❑The Appointment Status Form allows you to define various Status Categories for Service Appointments and to Color Code the description of each Appointment Status.
•When Service Appointments are displayed on the Technician Scheduling Form, this Appointment Status Color designation provides a visual indication of that Appointment's Status.
✓This Appointment Status color coding has nothing to do with theTechnicians who are listed on the Technician Status Form
✓It is instead an indicator of the Appointment's Status.
•Understand the Use of Appointment Status Colors:
✓By "coloring" each Appointment displayed on the Technician Scheduling Form, the User can easily "see" the status of each Appointment.
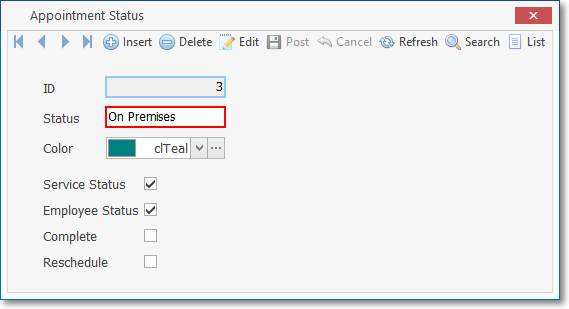
Appointment Status Form - On Premises Color is Teal
✓As an example: an Appointment Status of "On Premises" (as shown in the Appointment Status Form above) would "color" the Appointment information on the Technician Scheduling Form in Teal if that Appointment's Status was set to On Premises (as shown in the illustration below).
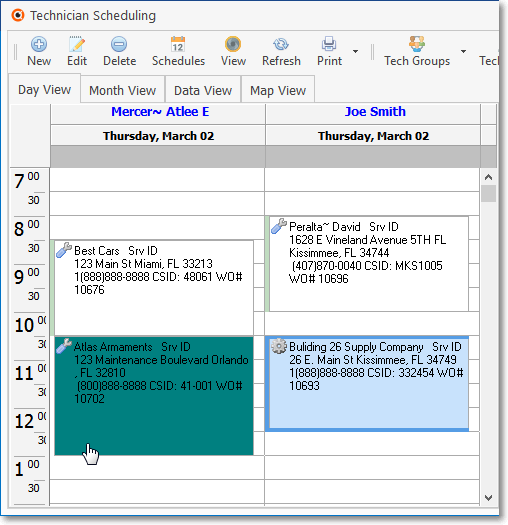
Appointment has Status set to: On Premises is displayed in the "color"of the Appointment Status
✓See the "Updating a Work Order's Appointment Status" section of the Technician Scheduling chapter for more information.
•To define Appointment Status settings (their Name and Color) and their effect on the Technician Scheduling and Technician Status Forms:
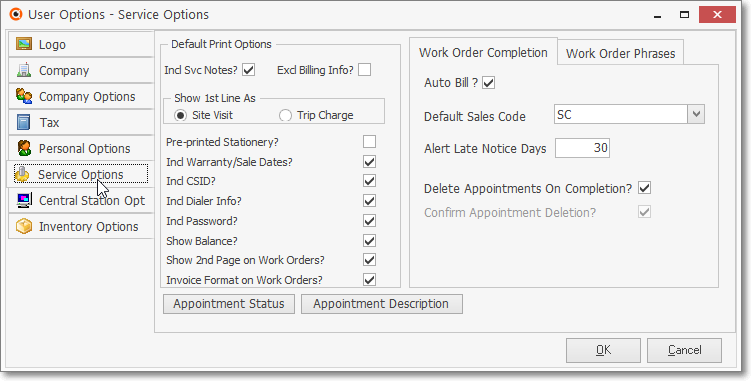
User Options - Service Options
✓Open the User Options Form and Select the Service Options tab (as shown above).
![]()
✓Click the Appointment Status button at the bottom of the Service Options tab to open the Appointment Status dialog illustrated below.
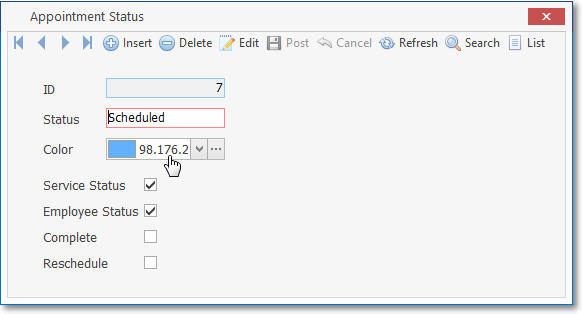
Appointment Status Form - RGB Color Code
✓This Appointment Status Form may be Re-sized by Dragging the Top and/or Bottom up or down, and/or the Right side in or out.
•Navigation Menu - The Navigation Menu is located at the top of the Appointment Status Form.
![]()
✓This Navigation Menu provides the normal Record Movement, Insert, Delete, Edit, Post, Cancel, and Refresh options; as well as Search and List functions.
•Record Editing section - The details of the currently selected record are displayed below the Navigation Menu at the center (Main Body) of the Appointment Status Form.

•List option - A tabular (spreadsheet style) Grid View of all of the Appointment Status records is accessible by Clicking the List option on the Navigation Menu on the Appointment Status Form.
✓Click the List Icon to display the associated Grid Data.
✓The columns of Grid Data may be rearranged, filtered, sorted, and exported as a PDF file and/or an Excel formatted file.

✓Find - Enter text to search for a specific record, then Click the Find option.
✓Clear - To remove the text to search for entry, Click the Clear option
✓Click the List Icon again to Close the List View and return to the Record Editing View.
✓To display a specific Appointment Status record in the Record Editing section, you may also use the Search Icon (see the "Using the Search Function" section later in this chapter).
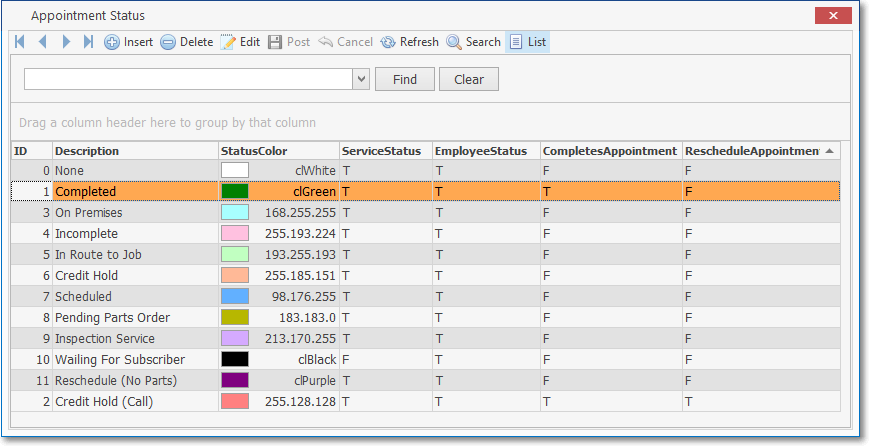
Appointment Status Form - with List View
✓Each column's Header Name describes the data contained in that column.
▪Clicking on a Header Name will set the order in which the Appointment Status will be listed.
▪Clicking on the same Header Name will set the order in the opposite direction (ascending vs. descending).
▪The Header Name that is determining the Order of the list will have an Icon indicating the Order displayed next to that Header Name.
❖See the Grid & Lists - Print Preview - Export Data chapter for complete information on using the List View, including its Export & Print options.
➢Note: Previous Versions of MKMS had a fixed set of predefined Appointment Status Descriptions and Colors.
a)Those records - converted from the older Version - may have RGB Color Numbers in addition to the color square itself, displayed in the Color field (as shown above).
b)You may modify these records and re-select a Color to eliminate these color codes, if desired.
c)However, the numbers will have no negative affect on the operation of this Appointment Status feature.
❑Using the Appointment Status Form:
•To define an Appointment Status:
✓Click the ![]() Icon to start the Appointment Status entry in the Record Editing section.
Icon to start the Appointment Status entry in the Record Editing section.
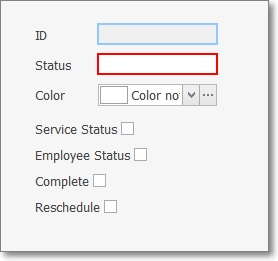
Appointment Status entry
✓ID - This is the system record number and is assigned automatically when the record is in initially saved.
✓Status - Enter a brief description of the Technician's Status.
▪This entry is mandatory and may be up to 30 characters in length.
▪Numbers, Upper and lower case letters, spaces and standard punctuation marks are permitted.
✓Color - Using the Drop-Down Color Selection List provided, Choose the Color to be assigned to this Status.
▪This will be the background color of any Appointment (displayed on the Technician Scheduling and/or the Employee Calendar) which has been assigned this Status.
▪Service Status - Check this box if this record is used to define the current Status of an Appointment for a Service Request entered in the Technician Scheduling Form.
▪Complete - Check this box if this Status, when assigned, indicates that the selected Appointment for a Service Request entered in the Technician Scheduling Form has been Completed.
✓Employee Calendar Scheduling:
▪Service Status - Check this box if this record is used to define the current Status Color of a Technician's Appointment displayed on the Technician Scheduling Form.
▪Employee Status - Check this box if this record is used to define the current Status Color of an Employee's Appointment displayed on the Employee Calendar.
▪Complete - Check this box if this Status, when assigned, indicates that the selected Appointment in the Employee Calendar has been Completed.
oWhen this Status is assigned to an Appointment being viewed on the Employee Calendar but was originally entered on the Technician Scheduling Form, only the color of that Appointment changes to the assigned color.
oWhen this Status is assigned to an Appointment or Task originally entered in the Employee Calendar, the Task tab's Details sub-tab dialog will be displayed.
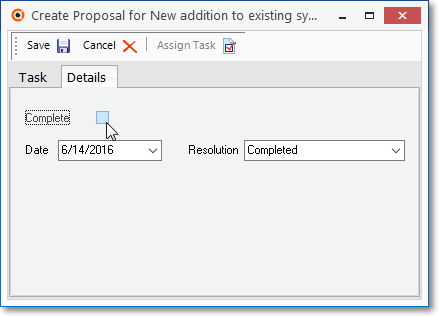
> Complete - Check the Complete box.
> Date - Using the Drop-Down Calendar/Date Entry field provided, Choose the appropriate Date which, by default, is Today.
> Resolution - Using the Drop-Down Selection List provided, Choose the appropriate Resolution of this Task.
a)Completed - a default - No more action is required by this User.
b)Rescheduled - a default - Another Reminder Item has been created for further follow up.
c)Note - a default - See the Note for why no more action is required by this User.
d)Sold - User Defined (if desired) - Prospect has been sold and requires no more follow up by the Salesman.
e)Collected - User Defined (if desired) - Accounts Receivable Department has received Payment.
f)Sent to Collection - User Defined (if desired) - Accounts Receivable Department has determined this Past Due Account is not collectable using in-house procedures.
g)Left Message - User Defined (if desired) - See the Subscriber's Comments for reason no more action is required by this User.
> Click the Save button < on the Task Editor to properly save this completed Task record.
▪Reschedule - Check this box if this Status, when assigned, indicates that the selected Appointment in the Employee Calendar must be Rescheduled.
oWhen this Status is assigned to an Appointment being viewed on the Employee Calendar but was originally entered on the Technician Scheduling Form, only the color of that Appointment changes to the assigned color.
oWhen this Status is assigned to an Appointment or Task originally entered in the Employee Calendar, the Reschedule Appointment dialog will be immediately displayed.
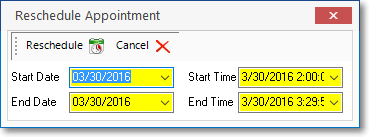
Reschedule Appointment dialog triggered by Reschedule Status
✓Save - Click the ![]() Icon to record this Appointment Status entry.
Icon to record this Appointment Status entry.
✓Any number of Appointment Status records may be created, as needed.
❑Using the Search Function on the Navigation Menu at the top of the Appointment Status Form:
•Search - Click the Search Icon to open the Search Appointment Types dialog.
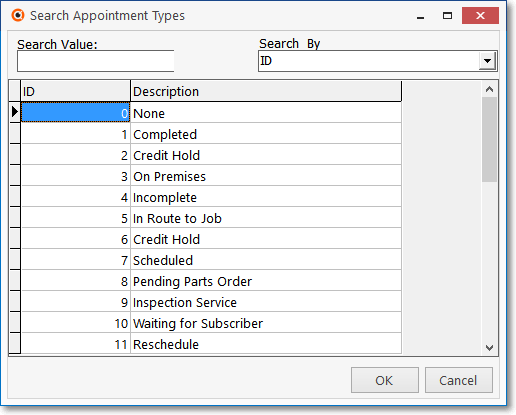
Search Appointment Types dialog
✓See the "Using the Generic Search dialog" section in the Advanced Search Dialog chapter for more information about this Search dialog.