❑Understanding the Receiver Setup dialog:
•Receiver Options - When required, Select the Receiver Options field and then Click the Ellipse button to open the Setup dialog.
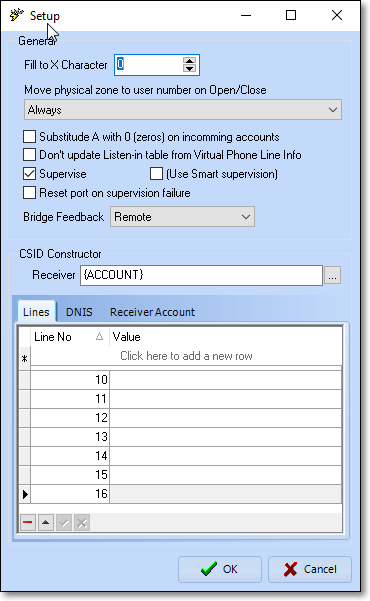
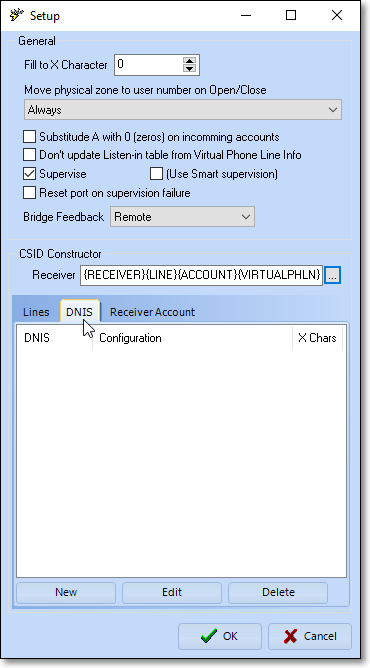
Receiver Setup dialog
•General - Define any special Receiver Options, as may be required:
✓Fill to X Characters - This option allows you to convert three digit (Control Panel transmitted) CSIDs to four (or more) digits in length, based on your needs, by preceding the transmitted CSIDs with zeros, thus converting them to the required length.
✓Move Physical Zone to User Number on Open/Close - This seemingly simple option has many variables to consider before making your choice (based on the manner in which your data has been entered):
▪Using the Drop-Down Selection List provided, Choose the appropriate option:

Move Physical Zone to User Number on Open/Close
oCarefully read the choices outlined below (based on the manner in which your data has been entered) before making your selection.
➢Note: The "Name" and "User # " referenced below represent the Name entered on the Contacts (eople To Call) Form, and the corresponding User # for that Name is assigned within the Central Station tab on that same People To Call Form.
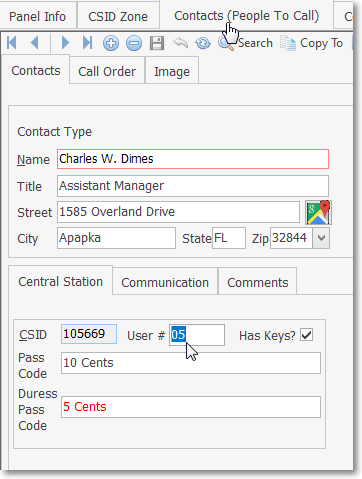
People To Call Form with Name and User # shown
oThe decision, as to which one of these options should be chosen, depends on where the Opening/Closing Signal ID(s) and/or Physical Zone(s) are defined - and so is based on one of these three data entry methods:
1.Opening and Closing Signal ID(s) are defined within the Panel Zones Form for the Communicator Format that is assigned to the Subscriber Panel(s) CSID:
a.Always - Select this option if you always want to see Name, which is assigned to the User # that matches the Physical Zone sent to this Receiver, displayed with that User # .
b.Except CSID Zone Perfect Match - Select this option if you want the Physical Zone, that was sent to this Receiver, displayed as the User #.
c.Never - Select this option if you want only the Physical Zone displayed.
2.Opening and Closing Signal ID(s) and Physical Zone(s) are both defined within the same CSID Zones record:
a.Always - Select this option if you always want to see Name which is assigned to the User # (in the Central Station tab in the People To Call Form) that matches theSignal ID and Physical Zone, defined together in the same CSID Zones record, displayed with that User # .
b.Except CSID Zone Perfect Match - Select this option if you want the Name shown, but do not want the Physical Zone moved to the User #.
c.Never - Select this option if you want only the Physical Zone displayed.
3.Opening and Closing Signal ID(s) are all defined as CSID Zone records, but the actual Physical Zones are entered as separate CSID Zone records:
a.Always - Select this option if you always want the Physical Zones displayed as User Numbers along with the associated Name.
b.Except CSID Zone Perfect Match - Select this option if you always want the Physical Zones displayed as User Numbers along with the associated Name.
c.Never - Select this option if you want only the Physical Zone displayed.
oSome Receiver Drivers may move the Physical Zone to the User Name depending on that Driver or Protocols in use (e.g., SIA, Contact ID, DMP, SK).
✓Substitute A with 0 (zero) on incoming accounts - Check this box if this Receiver that transmits the letter A but you need it seen by the Operator as a 0 (zero).
✓Don't update Listen-in table from Virtual Phone Line info. - Check this box if you do not want the Listen-in table updated with Virtual Phone Line information associated with this Receiver.
✓Supervise - This option allows you to specify whether or not this Receiver should be supervised.
▪(Use Smart Supervisor) - If Supervise is Checked, this Use Smart Supervisor Check box will be available.
✓Reset port on supervision failure - This option allows you to specify whether or not the Receiver Port for this Receiver should reset automatically if the supervised connection to this Receiver fails.
✓Bridge Feedback - Use the Drop-Down Selection List provided to Choose the appropriate one.
1)Remote
2)Local
•CSID Constructor - The CSID Constructor section allows you to precisely identify the type of data, and the order in which that data will be received - from the Accounts connected to this Receiver - these identified data types becoming part of the CSID entered in the Subscriber Panels section of the Central Station Data Form.
✓Receiver - Select this field and then Click the Ellipse button to open the Signal Configuration dialog:
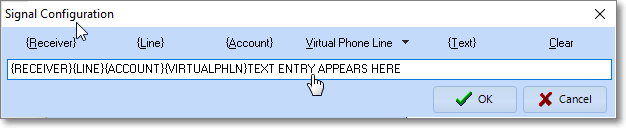
The Signal Configuration dialog opened with Ellipse button on Receiver field within the Setup Form
▪If you are updating existing information that is already entered here, Click the Clear button to remove that old data.
▪Select the Signal Items to be included, in the order they will be received - keeping in mind that the maximum length of a CSID is 10 characters:
oReceiver - Include the Receiver Number as part of the CSID.
oLine - Include the Line Number as part of the CSID.
oAccount - Include this as the actual CSID code being sent in.
oVirtual Phone Line - Use the Drop-Down Selection List provided to Choose what information (from the Virtual Phone List set up data) is to be included as part of the CSID.
1)Receiver - This entry will be the Receiver Number
2)Phone Line - This entry will include the Phone Line
3)Both - This entry will include both of these
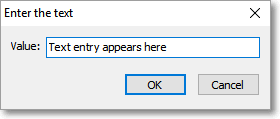
oText - Use this field to enter any text (such as a letter to precede each CSID) that should be placed before the actual CSID.
➢Note: If you add a letter, or some other prefix, when this Receiver's CSIDs are entered in the Subscriber Panels section of the Central Station Data Form, and this applies to All of the Subscribers reporting in to All of the telephone lines connected to this Receiver, use this option of the Signal Configuration dialog to define that information.
oClear - Select this option to delete the current entry
▪Click the OK button to save this Signal Configuration information.
•CSID Constructor tabs:
✓Lines tab - If the normal CSID Constructor rules for certain Receiver's Line Numbers are to be handled in a different manner, use this Lines tab to define those exceptions:
▪Select the appropriate Line Number.
▪Click that Line Number's Ellipse button to define those rules, as needed.
The Signal Configuration dialog opened with Ellipse button
▪Follow the CSID Constructor steps outlined above for any Line Number that needs a different set of CSID Constructor rules.
▪Be sure to Click the OK button to save this Signal Configuration information.
▪Repeat for each Line Card installed on this Receiver.
✓DNIS tab - For Receivers that have implemented DNIS (Dialed Number Identification Service) functionality - the storage of the Communicator Transmission Protocol - that these Accounts use to reduce the time required to acknowledge signals sent from the specified DNIS number:
SPA - Receiver Setup dialog - DNIS tab
▪Click the DNIS tab on the Setup dialog.
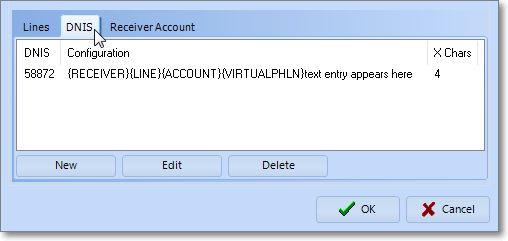
DNIS tab on the Setup dialog
▪Click the New button to open the DNIS Configuration dialog.
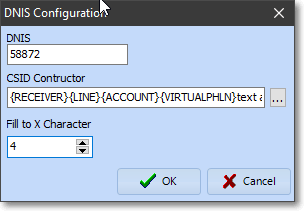
DNIS Configuration dialog
oDNIS - Enter the DNIS Number - which generally will be the last five (5) digits of the Telephone Number being dialed by the Control Panel's Communicator when transmitting a Signal to this Receiver.
oCSID Constructor - Click the Ellipse button on the CSID Constructor field to open a Signal Configuration dialog.
The Signal Configuration dialog opened with Ellipse button
oFollow the CSID Constructor steps outlined above for DNIS Number that needs a different set of CSID Constructor rules.
oBe sure to Click the OK button to save this Signal Configuration information.
oThen Click the OK button on the DNIS Configuration dialog to save this information.
▪Repeat this process for any Line Number that needs a new DNIS definition.
▪Click the Edit button to modify the DNIS Configuration information.
▪Click the Delete button to remove the DNIS Configuration information.
✓Receiver Account tab - Use this tab to change the actual Receiver Account to another name
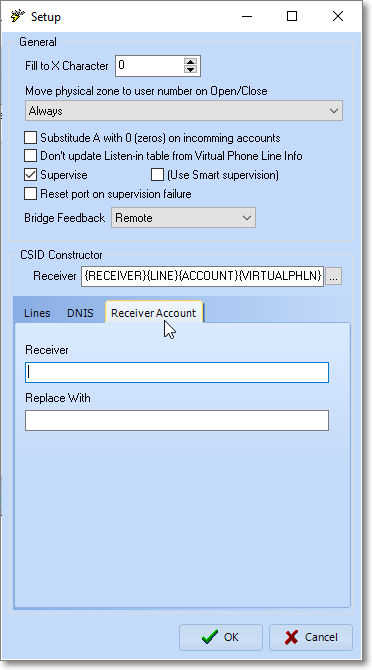
▪Receiver - Enter then existing Receiver
▪Replace With - Enter the substitute Receiver
▪Be sure to Click the OK button to save this entry