❑The Signals Options tab will be activated when the Operator:
1.Has finished all of the Operator Guided Response steps required - based on the actual results of those action steps.
2.Has been directed to the Signal Options tab by an Action Plan step.
3.Has switched to the Manual Mode from an Action Plan step.
➢Note: If an Action Plan was originally directing the Operator, once that Signal is retrieved following being Placed on Hold, the system will, by default, revert to the Operator Guided Response method.
1.This assumes that the RestartActionPlanFromOnHold option is set to False ("F") meaning that:
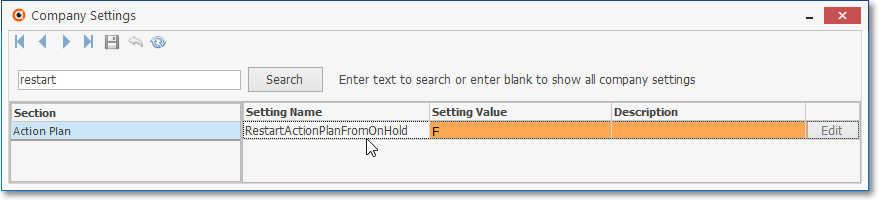
a.While an Operator is Processing an Alarm Signal being guided by an Action Plan, and
b.That Signal must by Placed On Hold, then
c.When that Signal is retrieved from the Alarm Stack for further processing, it will revert to the Operator Guided Response processing methodology.
2.However, if this RestartActionPlanFromOnHold option is set to True ("T"),
a.Processing will revert to the first step defined in that Action Plan, and
b.Processing continues as an Action Plan controlled Signal until Completion, or if it is again Placed On Hold.
❑There are several options available on the Signal Options tab:
1.The Operator may temporarily place the Signal on Hold
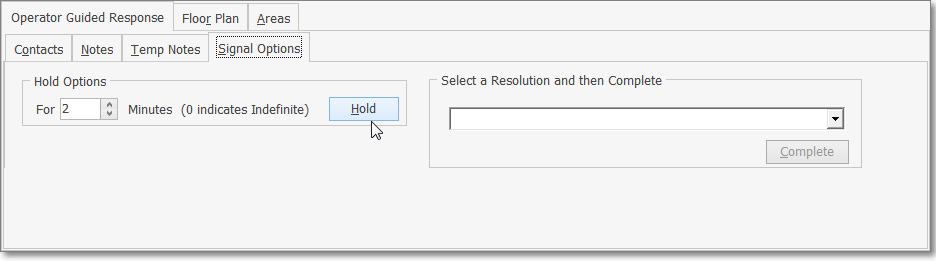
Signal Processing Form - Signal Options tab - Hold Options
✓Hold Options: Enter the number of Minutes this Signal should be placed On Hold, then Click the Hold button.
2.When a Contact List which was assigned the Must Contact Type is in effect, the List Members associated with that Contact List entry must be reached prior to Completion of the Signal Processing procedure
a.If a "Must Contact" List Type is assigned to a Contact List entry, the List Member(s) for this Contact List must be notified as described below:
1)The List Member(s) must be contacted prior to Completion of the Signal Processing procedure
2)To ensure this action is taken, the List Member(s) will be shown in a Must Call List sub-tab as part of an Action Plans instruction, or
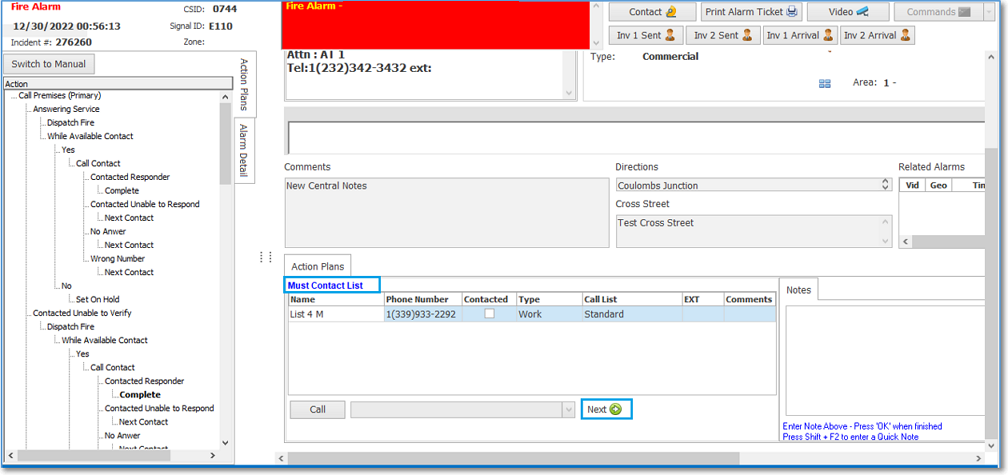
Must Contact List sub-tab as an Action Plan step
3)To ensure this action is taken, the List Member(s) of a Contact List with the Type of Must Contact will be shown in a Must Call List sub-tab within the Signal Options tab

Must Contact List sub-tab on the Signal Options tab
4)Those Contact(s) must be reached before a Resolution Code is selected
3.The Operator wants to indicate that all required and necessary processing steps have been Completed, by selecting the appropriate Resolution Code.
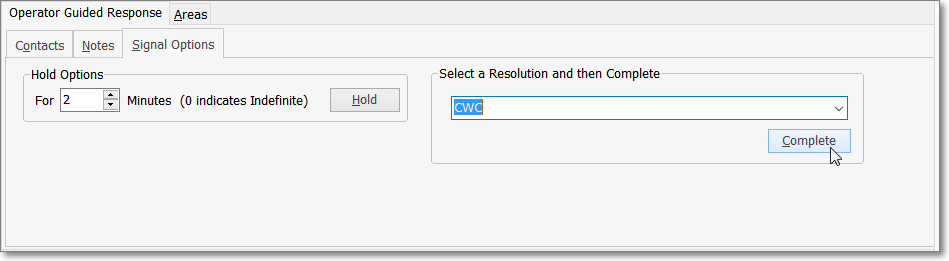
Signal Processing Form - Signal Options tab - Complete
✓Select the Resolution and the Complete: Using the Drop-Down Selection List provided, Choose the appropriate Resolution Code, then Click the Complete button.
4.The Operator wants to Reschedule an Event. When the Alarm Signal being processed is reporting an Event related issue, the Signal Options tab also offers the Reschedule Event option.
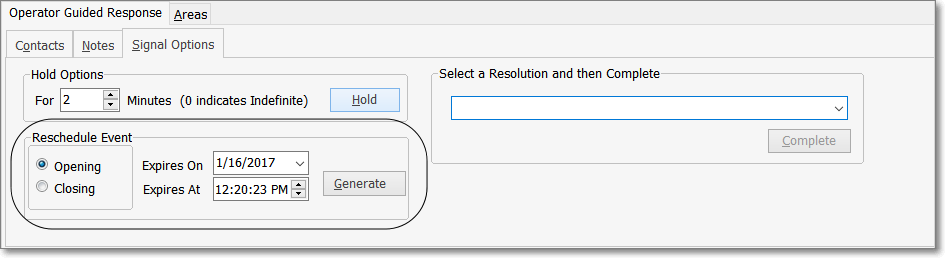
Signal Processing Form - Signal Options tab - Reschedule Event options
✓Reschedule Event: Choose whether this will be a rescheduled Opening or Closing, Set the new expiration Date and Time, and Click the Generate button.
✓See Completion - Finalizing an Alarm for more information.
❑A Review of the features on the Signal Options tab:
•Hold Options - To place an Alarm Signal on Hold to await further information, perform the steps below:
✓For - Enter the number of minutes that you want to place the Alarm Signal on Hold. Entering a zero (0) places the Alarm Signal on Hold indefinitely.
✓Hold - Click the Hold button to execute the Hold request.
➢Note: If an Action Plan was directing the Operator, once this Signal is retrieved following being Placed on Hold, the system will default to the Operator Guided Response method.
•Select Resolution and then Complete - To define the reason this event is resolved, (optionally) print an Alarm Ticket, and indicate that all required and necessary processing steps have been Completed.
✓Resolution Code - Use the Drop-Down Selection List to Choose the appropriate Resolution Code.
✓Print - To print an Alarm Ticket for this Alarm Signal, Click the Print button if shown, or select the Print Alarm Ticket on the Actions button Menu before Clicking Complete.
✓Complete - Click the Complete button to finalize the processing of the current Alarm Signal.
•See Rescheduling an Event below.
❑Rescheduling an Event - When the Alarm Signal being processed is reporting an Event related issue, the Signal Options tab automatically offers the Reschedule Event option
•Often, while verifying an FC* - Failed to Close or an FO* - Failed To Open - Event, the Operator is asked to set a new Opening or Closing time for the premises.
Signal Options tab with Reschedule Event options
•The Reschedule Event box:
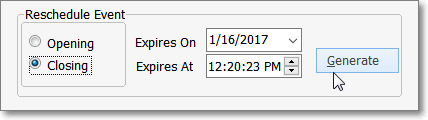
Reschedule Event box
✓Open or Close - Click either the Opening or Closing button that represents the type of Event which needs to be rescheduled.
✓Expires On - By default, it will be Today.
▪Use the Drop-Down Calendar/Date Entry field the Choose the Date when this Event should occur.
▪Keep in mind that if setting the time beyond midnight, you must Choose the Date of the following day.
✓Expires At - By default it will be one hour later than the current time.
▪Reset the Time when this Event should occur using the up & down arrow buttons.
▪As needed, Click the Hours, Minutes, Seconds or AM/PM column, then Click the appropriate arrow to change the contents.
✓Generate - Click the Generate button to create the new Event in this Subscriber's current list of Scheduled Events.
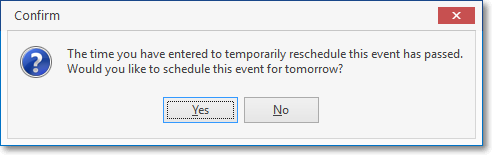
▪If you have entered a time that would require that it be inserted into the "next day" Scheduled Events list, you must Confirm this action.
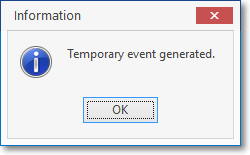
▪The system will indicate (whether or not the next day's date was required), that this Temporary Event has posted correctly.
✓Complete - Complete the processing as explained in Completion - Finalizing an Alarm Signal chapter.