❑The ePay Review dialog's data grid provides a fully functional data grid listing with All (or a selected set) of the previously created Payment Gateway Payment Transactions, as needed, which may then be Printed as a report, and/or Exported (or Emailed) as an Excel® style Spreadsheet (or as a comma delimited file, or even a text file).
•These include Credit Card and Check Payments (which are stored as Receipts records), the Payment Status of each, and other related information (see the "Understanding the Status and Response columns" discussion below for more information).
✓This ePay Review data may be Printed as a report, and/or Exported as an Excel® style Spreadsheet (or as a comma delimited file, or even a text file), and/or Emailed (as an attached PDF file)) , and in some cases Modified.
•There are two ways to access the ePay Review dialog:
a)From the Backstage Menu System Select Reports and Choose Receivable Reports, or
b)From the Quick Access Menu, Select Reports and Choose Receivable Reports.
✓Then, Select the ePay Review option.
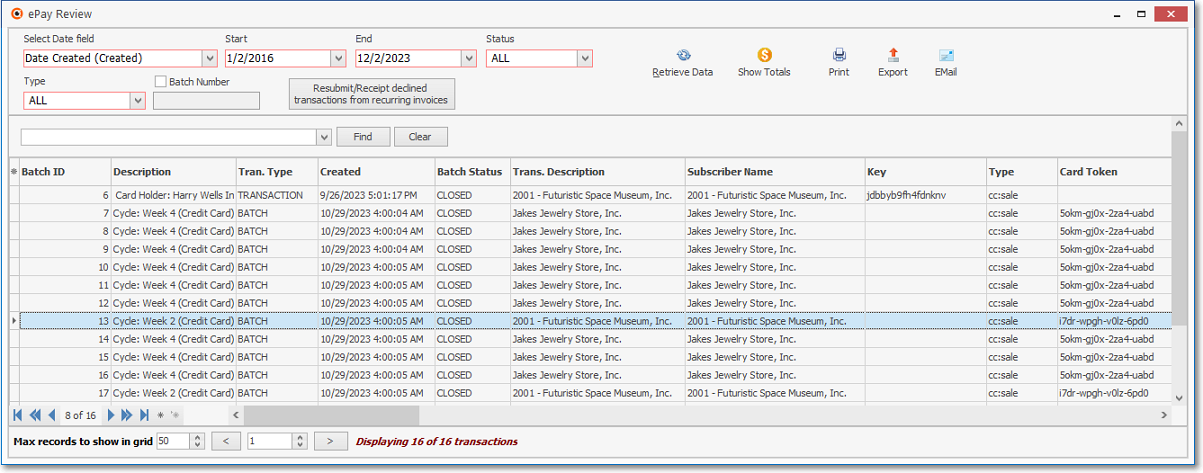
ePay Review dialog
❑Setting Up the ePay Review dialog's data grid Options: The Ribbon Menu provides these Options and Icons:

ePay Review - Ribbon Menu Options
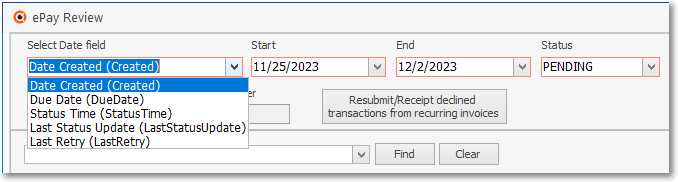
•Select Date field - Using the Drop-Down Selection List provided, Choose the Date Field that will compared to the specified Date Range (see below).
✓The Selected Date Field will be the new default for this field when this ePay Review report is selected in the future, but may be changed..
ePay Review - Select Date field and Start/End Date Range fields
•Set Date field:
✓Start - By default, this will be 7 days ago, but this Date may be changed as needed.
a)Click on the Start Date field and type the desired Date using a MM/DD/YYYY format; or
b)Use the Drop-Down Calendar/Date Entry field provided to Choose the desired Date
✓End - By default it will be Today, but this Date may be changed as needed.
a)Click on the End Date field and type the desired Date using a MM/DD/YYYY format; or
b)Use the Drop-Down Calendar/Date Entry field provided to Choose the desired Date
•Status - By default, the Status field is set to PENDING.
✓Using the Drop-Down Selection Box provided, Choose a different ePay Status to be reported
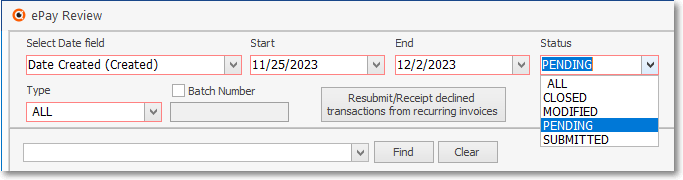
ePay Review dialog - Status options
•Search capability:
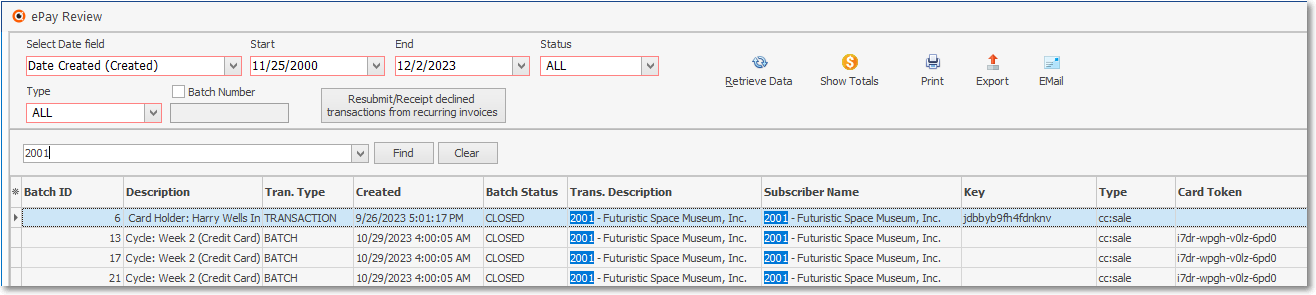
✓Find - Enter text to search for a specific Record or Records, then Click the Find option.
▪The results will be displayed in the Grid with the "Search Entry" highlighted in blue.
✓Clear - To remove the text to search for entry and the results displayed in the Grid, Click the Clear option
•Retrieve Data - Once the Date Range (and optionally the Column selections as explained Columns bullet below) has been set, Click the Retrieve Data Icon to populate the ePay Review dialog's data grid.
•Show Totals - Once the designated data is Retrieved, Click the Show Totals option to view a pop-up with a summary of the selected data .
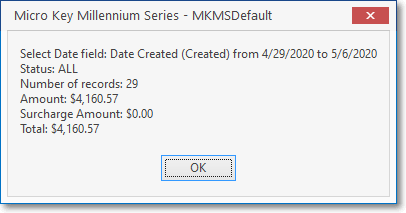
ePay Review - Show Totals results
•Print - Once the data has been formatted, filtered, sorted and configured as needed, a copy of this ePay Review data grid data may be printed (see Understanding the Print Preview Dialog chapter).
•Export - Once the data has been formatted, filtered, sorted and configured as needed, Click the Export Icon to make an Excel spreadsheet, Text or comma delimited copy of this ePay Review data grid data.
•EMail - Once the data has been formatted, filtered, sorted and configured as needed, Click the EMail Icon to send this data as a PDF attachment to an Email address of your choosing.
•Radial Menu Lookup options - Accessing the Receipt and/or the Subscriber Form for any listed ePay payment transaction line item.
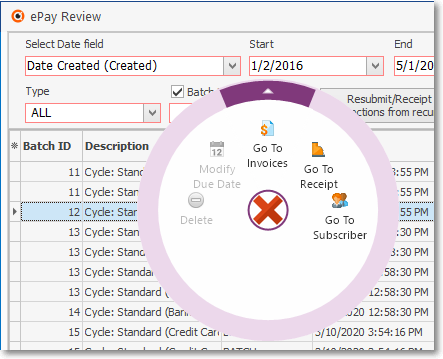
✓Right-Click on any ePay payment transaction record to display its Radial Right-Click Menu
▪Select the Go To Subscriber, Go To Invoice, or Go To Receipt option to open and view the associated Subscriber, Invoice or Receipt Form, and/or
▪Select the Modify Due Date option (if that Date has not passed) or the Delete option (if not yet funded).
▪Select the Delete option to remove an entry with a PENDING Status.
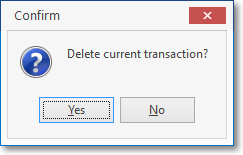
oConfirm your deletion request.
•Type - By default, this will be All which means that both Credit Card and Bank transactions are to be reported.
▪Use the Drop-Down Check List to Select whether Credit Card or Bank transactions are to be reported
•Batch Number - By default All Batch Numbers will be reported.
▪Check this box and enter a specific Batch Number to be reported.
•Resubmit/Receipt declined transactions from recurring invoices - Receipts from Credit Card and/or Bank Payment Transactions posted during an Fully Automatic Recurring Billing process are recorded in the ePay Review report Gird.
✓When any of those expected Credit Card or Bank Payment Transactions are declined during the Fully Automatic Recurring Billing process, they are recorded in this Resubmit/Receipt declined transactions from recurring invoices Gird.
✓To review and re-process any of this declined Payment Transactions, select this option on the ePay Review Form's Menu.

Resubmit/Receipt declined transaction from recurring revenue invoices
•Columns - Select which columns of data are to be displayed:

Available Columns
✓Click the asterisk (¬) at the left of the data grid's Header row (see the mouse pointer in the illustration above) to display a list of all of the column names - and associated data - which may be displayed.
✓By default, all Column Names will be Checked.
✓Remove the Check mark (Click on the Check to remove it) to hide that column of data from the data grid.
•Max records to show in grid - This option - which is located at the bottom of the ePay Review Grid is set to 50 by default.

✓Provided for those Companies with a large number of Subscribers
✓This setting allows a User to restrict the number of ePay records - that will be retrieved from the database at one time - to the Maximum number set here.
✓A pair of left and right arrow buttons provides movement from Grid page to Grid page.
✓The number of records (transactions) being displayed, and the total number of applicable records (transactions), is also shown.
•Sorting the List - Setting the Order in which the ePay Review dialog's data grid is Listed within the ePay Review Form:
✓The default sorted order of the ePay Review dialog's List is based on the BatchId (Payment's Batch ID Number) - which is ordered from lowest to highest (1 - 9, a-z, then A - Z).
✓Thereafter, the column that determines the sorted order of the List may be easily changed, whenever needed.
•Filtering the List - This ePay Review dialog's data grid may also be filtered, as needed to define/identify the data that is actually needed.
✓See the Grids & Lists and the Filter Builder Dialog chapters for more information about formatting and printing (and exporting) the ePay Review dialog's data grid
❑Understanding the Status and Response columns:
•Invoices may be paid manually using the E-Payments option on the Subscribers Form and/or the Invoice Form; automatically by implementing Fully Automated Recurring Billing and/or by using the Post Auto Draft process.
✓When using the E-Payments option on the Subscribers Form or the E-Pay option on the Invoice Form, and an Automatic Payment Gateway i.e., InnoEPay, Authorize.net, or Forte.net) is chosen in the Drop-Down Selection List in the Select Gateway field.
✓When using the Post Auto Draft process, and an Automatic Payment Gateway i.e., InnoEPay, Authorize.net, or Forte.net) is chosen in the Drop-Down Selection Lists in the Processor/Bank Credit Card payments and/or the Processor/Bank for Bank Accts payments fields.
•Once an Invoice is "Paid" using the an Automatic Payment Gateway, this will be the basic work-flow/process for a Check (or Credit Card) payment's submission, through the final result:
1.Pending – after a Check (or Credit Card) payment transaction record is submitted to the Payment Gateway it will reflect a Pending Status until the final submission to the check processor
2.Submitted – once the Check (or Credit Card) payment transaction record has been submitted to the Processor, the Status within the Payment Gateway (and therefore this ePay Review dialog) will be reflected as Submitted until the Transaction is funded (or the payment processor reports/provides information as to why the payment transaction record will not be funding such as NSF/Account Closed).
3.Final Results: (primarily, this will be reported as Settled or Returned)
a.Funded/Settled – the Check (or Credit Card) payment transaction record has been successfully completed
b.Returned – the Check (or Credit Card) payment transaction record was not Funded/Settled so your Company will be provided the reason why - such as Insufficient Funds or Account Closed (see the list of Returned Codes chart below)
•The Status code of each payment transaction record will change as that transaction goes through the process to ultimately be Funded (for Checks) and Settled (for Credit Cards), or Rejected for some reason.
|
|---|
Transaction Status Codes
✓If a Check transaction is not funded, your Company will be provided with a Response (Reason code) for why it was Returned [e.g., Insufficient Funds ("R01"), Account Closed ("R02")]
Response |
Reason |
|---|---|
Returned |
R01: Insufficient Funds |
Returned |
R02: Account Closed |
Returned |
R03: No Account/Unable to Locate Account |
Returned |
R04: Invalid Account Number |
Returned |
R06: Returned per Originating Depository Financial Institution's Request |
Returned |
R07: Authorization Revoked by Customer |
Returned |
R08: Payment Stopped |
Returned |
R10: Customer Advises not Authorized |
Returned |
R16: Account Frozen |
Returned Codes
❑Certain Pending Payment Gateway Payment transaction records may be modified and/or deleted:
•Modifying data in the Due Date column - The Due Dates on payment transaction records with a Pending ("P") Status may, from time to time, need to be modified. To do so:
a)Set a Filter for Status = P
b)If there are many payment transaction records in the ePay Review dialog's data grid, you may also Sort the data by Due Date column to make finding the necessary payment transaction easier.
c)Locate and Modify the Due Date, as required by using the Radial Right-Click Menu to open the desired record and modifying it there.
✓All Invoices associated with this Selected payment transaction record will have their Due Dates changed.
•Deleting a payment transaction record with a Pending ("P") Status may be deleted:
✓From time to time, a payment transaction record may have to be deleted. To do so:
a)Locate that payment transaction record
b)Ensure that it has a Pending ("P") Status
c)Press the Delete key.
✓The Invoice record(s) associated with this payment transaction record will be unallocated, and the associated Receipt record removed.