➢Note - Form Name Change implemented: This Smooth Operator Form that was previously titled Automatic Actions is now titled Smooth Operator
❑The Smooth Operator Form is used to define and configure those procedures which will provide an Automatic Action (e.g., a predefined, passive alarm signal processing functionality) that may be implemented while Processing Signals.
•Smooth Operator processing may:
✓Send SMS (Text) Notifications to Contacts (People To Call) with a Check in the SMS column
✓Send Voice Notifications to Contacts (People To Call) with a Number Type (not identified as any type of Pager)
✓Send Email Notifications to:
a)The Email address identified in the Contact Information section if the Edit View of the Subscriber Account
b)The Email address identified on the Main tab of a Dealer record
c)The Subscriber Contacts (People To Call) with an Email address in the Communication sub-tab
d)The Dealer Contacts (People To Call) identified in the Dealer Form's Other tab
➢Note: Smooth Operator Processes do not execute when the Account is On Test.
❖Please review these chapters for important information related to Smooth Operator:
a)Automated Signal Processing - Enhanced chapter for an overview of Enhanced Automated Processing capabilities
b)Smooth Operator Category because one of these must be assigned to each Smooth Operator procedure used by MKMSCS when processing certain signals within MKMSCS.
c)MKS Connect Service and Automatic Signal Processing information for a description of its capabilities and how predefined alarm signal processing functionality is setup.
d)IVR & SMS Overview and its subordinate chapters for implementing Low Level Processing using Twilio (www.twilio.com) to provide cloud based SMS and IVR (Text and Voice) communication services
•To add or update a Smooth Operator process, Access the Smooth Operator Form:
a)From the Backstage Menu System Select Maintenance and from the General sub-menu Choose General Maintenance locate the secondary Monitoring Menu, or
b)From the Quick Access Menu, Select Maintenance and Choose General Maintenance and locate the secondary Monitoring Menu.
✓Once in the Monitoring sub-menu, Click on the Smooth Operator option.
Smooth Operator Form
✓This Smooth Operator Form may be Re-sized by Dragging the Top and/or Bottom up or down, and/or the Right side in or out.
•Navigation Menu - The Navigation Menu is located at the top of the Smooth Operator Form.

✓This Navigation Menu provides the normal Record Movement, New, Delete, Save, Refresh, and List options.
❑Understanding the purpose and data entry requirements for each of the three tabs on this Smooth Operator Form:
1.Main - This is where the instructions for an Automatic Action a defined
2.Activate/Deactivate Action by Category - This is where a selected Smooth Operator Category may be activated, or deactivated, and optionally where the status of existing Pending Signals may be updated accordingly
3.LLP Service - In this tab the associated LLP Service set for the currently selected Smooth Operator procedure may be activated, or deactivated based on its selected LLP Priority level
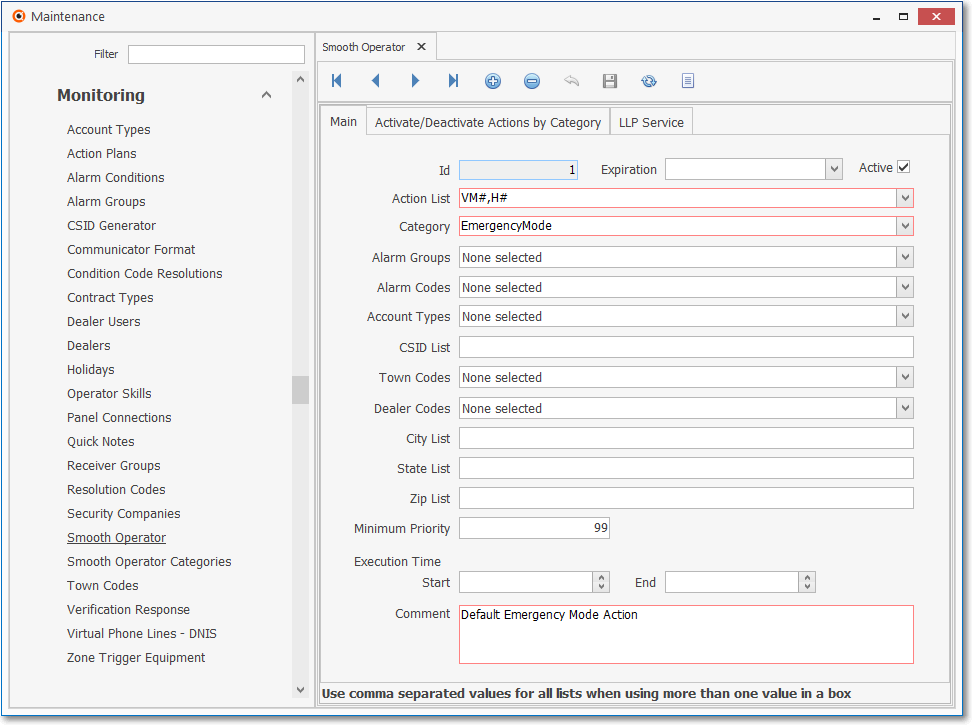
I.Main tab - The details of the currently selected record are displayed below the Navigation Menu at the center (Main Body) of the Smooth Operator Form.
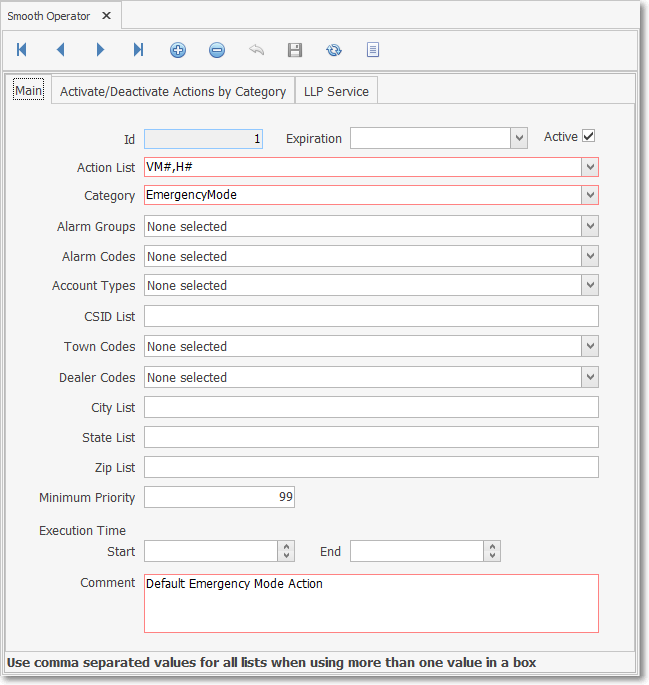
Smooth Operator - Main tab - Record Editing View
A.Defining an Smooth Operator process: First, Click the ![]() Icon to start entering a Smooth Operator procedure entry in the Record Editing section of the Main tab
Icon to start entering a Smooth Operator procedure entry in the Record Editing section of the Main tab
1.ID - A record number for this Smooth Operator procedure will be assigned when this entry is initially saved.
2.Expiration - If appropriate, use this Drop-Down Date/Calendar to choose an Expiration Date for this Smooth Operator procedure
a.If blank, the availability of this Smooth Operator procedure never expires
3.Active - By default, this box will be Checked
a.Remove this Check Mark to deactivate this Smooth Operator procedure
4.Action List - (Mandatory) - Use the Drop-Down Check Box List provided to Check the appropriate Action List item(s) that are to be executed (automatically) when this Smooth Operator procedure is required
❖See Understanding the Action List's Action Options for more information
Smooth Operator - Record Editing View - Action List items
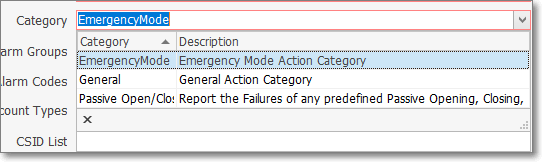
5.Category - (Mandatory) - Use the Drop-Down Selection List provided to Choose the appropriate Smooth Operator Category
6.Alarm Groups - (Optional) - Use the Drop-Down Check Box List provided to Choose the Alarm Group(s) that may trigger this Smooth Operator procedure
7.Alarm Codes - (Optional) - Use the Drop-Down Check Box List provided to Choose the Alarm Condition Code(s) that may trigger this Smooth Operator procedure
8.Account Types - (Optional) - Use the Drop-Down Check Box List provided to Choose the Account Type(s) that may trigger this Smooth Operator procedure
9.CSID List - (Optional) - Specific CSID(s) that may trigger this Smooth Operator procedure may be identified, each one must be separated by a comma
10.Town Codes - (Optional) - Use the Drop-Down Check Box List provided to Choose the Town Code(s) that may trigger this Smooth Operator procedure
11.Dealer Codes - (Optional) - Use the Drop-Down Check Box List provided to Choose the Dealers that may trigger this Smooth Operator procedure
12.City List - (Optional) - Specific Cities that may trigger this Smooth Operator procedure may be identified, each one must be separated by a comma
13.State List - (Optional) - Specific State Code(s) that may trigger this Smooth Operator procedure may be identified, each one must be separated by a comma
14.Zip List - (Optional) - Specific Zip Code(s) that may use this Smooth Operator procedure may be identified, each one must be separated by a comma
15.Minimum Priority - (Mandatory) - The value 99 will be inserted indicating that All Priorities may trigger this Smooth Operator procedure, otherwise enter the minimum Priority Level that should trigger this Automatic Action
16.Execution Time - (Optional) - Establish a Time Range within which this Smooth Operator procedure should be executed
a.Start - Enter the Starting time
b.End - Enter the Ending time
17.Comment - (Mandatory) - Enter a clear/precise description of the purpose for this Smooth Operator procedure
II.Activate/Deactivate Action by Category tab - Turn On or Turn Off this Smooth Operator procedure, as needed
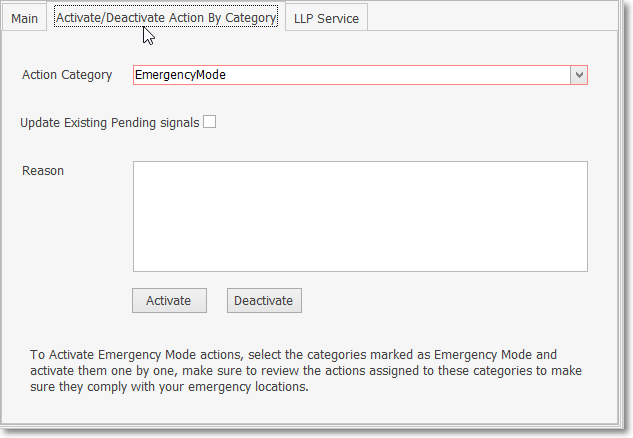
Smooth Operator - Activate/Deactivate by Category tab - Record Editing View
✓Action Category - This will be the Smooth Operator Category selected in the Main tab of this Smooth Operator procedure record
✓Apply to existing "Pending" signals on stack - Check this box to indicate that when this Smooth Operator procedure is executed, any Pending signals should be updated
✓Reason - Enter a clear, concise explanation for this action
✓Activate option - Click on this option to Activate (turn on) this Smooth Operator procedure
✓Deactivate option - Click on this option to Deactivate (turn off) this Smooth Operator procedure
✓Click the ![]() Icon on the Ribbon Menu to update this Smooth Operator procedure .
Icon on the Ribbon Menu to update this Smooth Operator procedure .
III.LLP Service tab - As may be required, Activate or Deactivate this Smooth Operator procedure based on the Priority Level (re-)set here
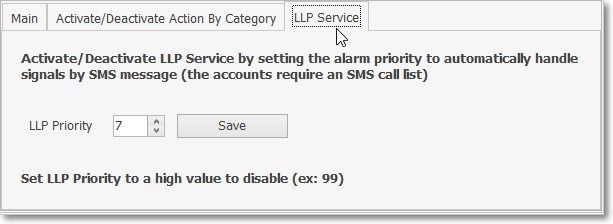
Smooth Operator - LLP Service tab - Record Editing View
✓LLP Priority - Update the Priority Level for an SMS response, as needed, to Activate or Deactivate this Smooth Operator procedure
oTo Deactivate the LLP Service for this Smooth Operator process, reset the Priority Level to a very high number (e.g., 99)
oTo Activate the LLP Service for this Smooth Operator process, reset the Priority Level to a normal level (e.g., 7)
✓Save - Click the Save option to reset to the selected Priority Level
❖Important Information: When the LLP Priority entry in the LLP Service tab is set to 99, the LLP Service is Deactivated.
Smoother Operator Form - LLP Service tab - LLP Priority setting
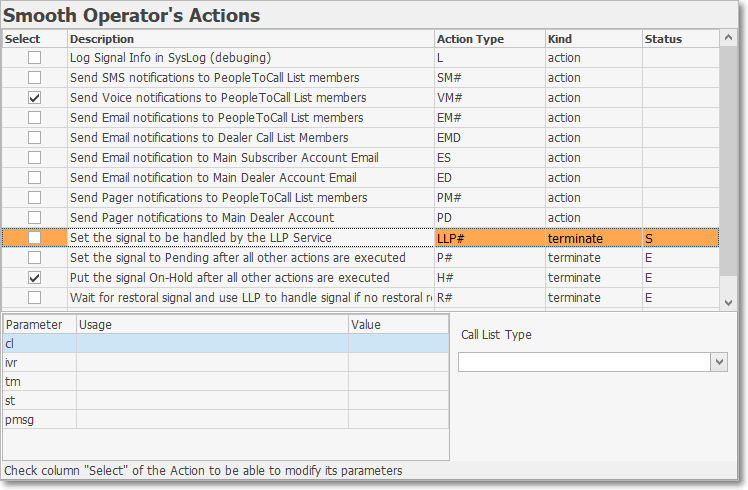
❑Understanding the Action List field's Action Options
•A Drop Down Check List of Actions will be presented
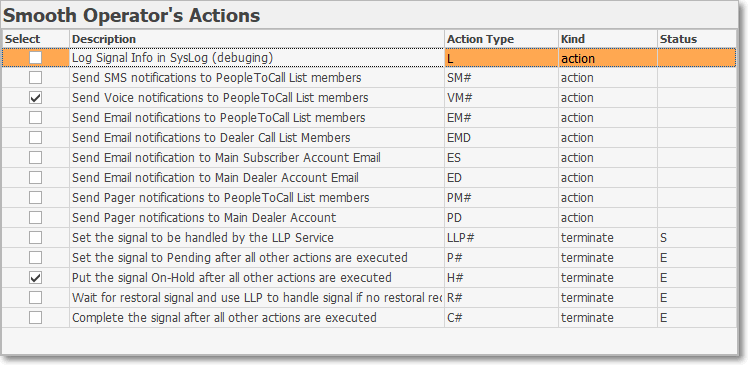
Smooth Operator - Actions listing
1.More than one Action List item may be Checked
2.Some Action List items require additional parameters or other data.
a.When this is the case, a drop-down list of parameters section at the bottom of the Actions List dialog will be displayed
b.Select the parameter and a Drop-Down Selection List or Data Entry field will be presented
c.Choose the appropriate item, or enter the requested data as needed
•Available Actions:
a)L - Log Signal Info in SysLog (debugging) - No parameters required
b)SM# - Send SMS notification to People To Call List members - Enter parameters as requested notification is sent to Contacts (People To Call) with a Check in the SMS column of at least one Call Number entry]
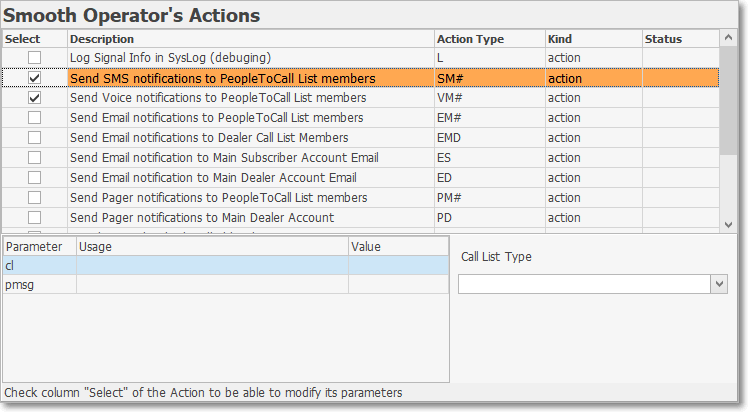
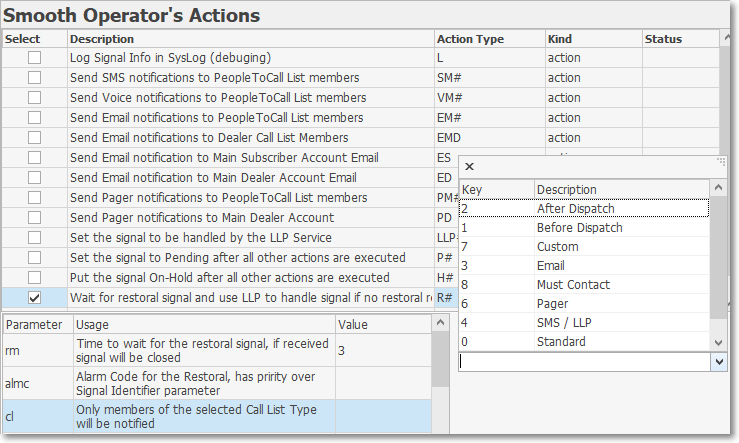
i.d - Call List Type - Use the Drop-Down Selection List provided to Choose the appropriate Call List Type
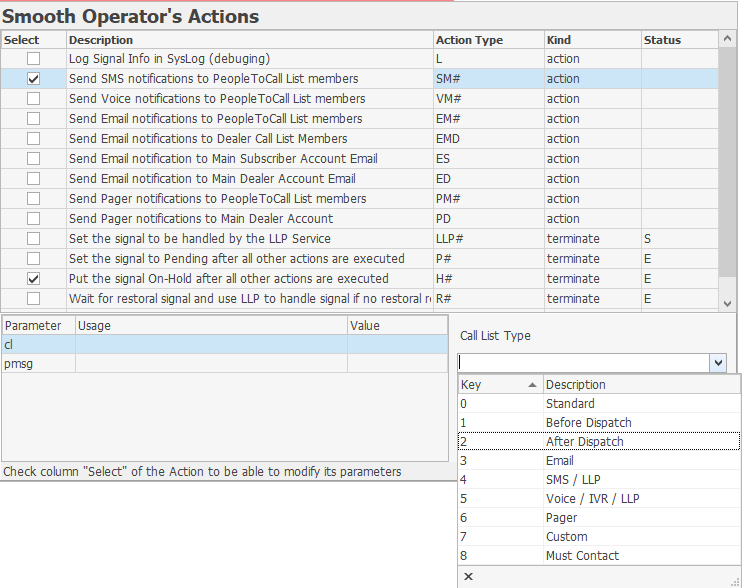
0 - Standard - This Contact List to be used for Notification based on the signal parameters of that Contact List entry.
1 - Before Dispatch: Used specifically when a special Contact List is required after Verification but before an alarm signal has been Dispatched.
2 - After Dispatch: Used specifically when a special Contact List is required after an alarm signal has been Dispatched. but before the Notification procedure has been started
3 - Email - May be used specifically when a Contact List is required for a specific Alarm Code and/or Signal Id and/or Zone combination has been received that matches this Smooth Operator procedure
4 - SMS / LLP - May be used specifically when a Contact List is required for a specific Alarm Code and/or Signal Id and/or Zonecombination has been received that matches this Smooth Operator procedure
5 - Voice / IVR / LLP - May be used specifically when a Contact List is required for when a specific Alarm Code and/or Signal Id and/or Zone combination has been received that matches this Smooth Operator procedure
6 - Pager - May be used specifically when a Contact List is required for a specific Alarm Code and/or Signal Id and/or Zone combination has been received that matches this Smooth Operator procedure
7 - Custom - May be used specifically when a Contact List is required for a specific Alarm Code and/or Signal Id and/or Zone combination has been received that matches this Smooth Operator procedure
8. - Must Contact - Contact must be completed
ii.pmsg - Use the Drop-Down Selection List provided to Choose the appropriate Predefined Message
c)VM# - Send Voice notification to People To Call List members - Enter parameters as requested
i.d - Call List Type - Use the Drop-Down Selection List provided to Choose the appropriate Call List Type [see b) i. above for more information]
ii.ivr - Use the Drop-Down Selection List provided to Choose the appropriate IVR setting
▪200 - Subscriber Signal Notification
▪300 - Message Acknowledging
iii.pmsg - Use the Drop-Down Selection List provided to Choose the appropriate Predefined Message
d)EM# - Send SMS notification to People To Call List members - Enter parameters as requested
i.d - Call List Type - Use the Drop-Down Selection List provided to Choose the appropriate Call List Type [see b) i. above for more information]
ii.pmsg - Use the Drop-Down Selection List provided to Choose the appropriate Predefined Message
e)EMD - Send SMS notification to Dealer Call List Member - No parameters required
f)ES - Send Email notification to Main Subscriber Email - No parameters required
g)ED - Send Email notification to Main Dealer Email - No parameters required
h)PM# - Send Pager Notification to People To Call List members - Enter parameters as requested
i.d - Call List Type - Use the Drop-Down Selection List provided to Choose the appropriate Call List Type [see b) i. above for more information]
ii.pmsg - Use the Drop-Down Selection List provided to Choose the appropriate Predefined Message
i)PD - Send Pager Notification to Main Dealer Account - No parameters required
j)AM# - Audible notification using the Audible notification MKSAudible Application Action
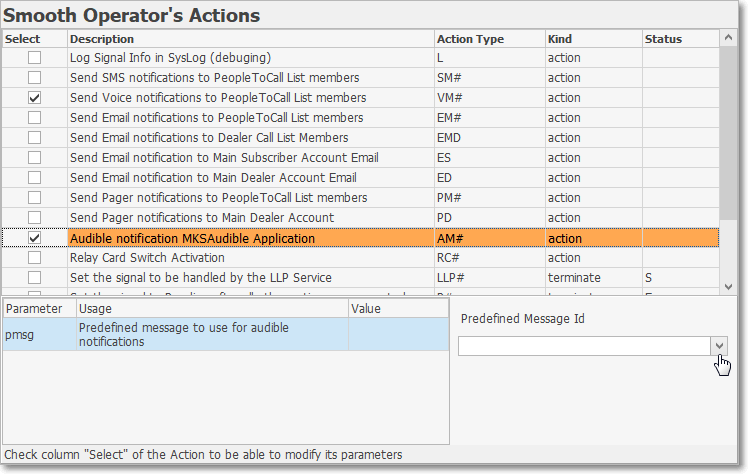
i.pmsg - Predefined message to use for audible notifications
ii.Predefined Message ID - Use the Drop-Down Selection Box to Choose the appropriate Predefined Message (-940)
❖ See the Audible Alarm Smooth Operator Notification Action chapter for detailed information
k)RC# - Relay Card Switch Activation
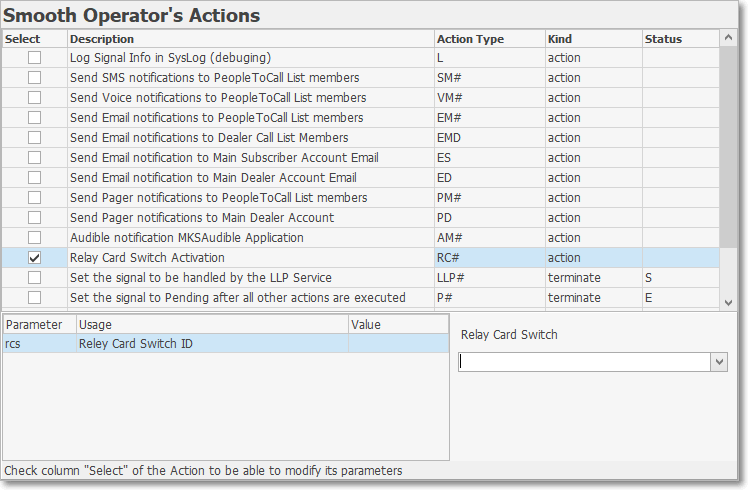
i.rcs - Relay Card Switch Activation
ii.Relay Card Switch - Use the Drop-Down Selection Box to Choose the appropriate Relay Card
•Available Terminations:
l)LLP# - Set the signal to be handled by the LLP Service - Enter parameters as requested
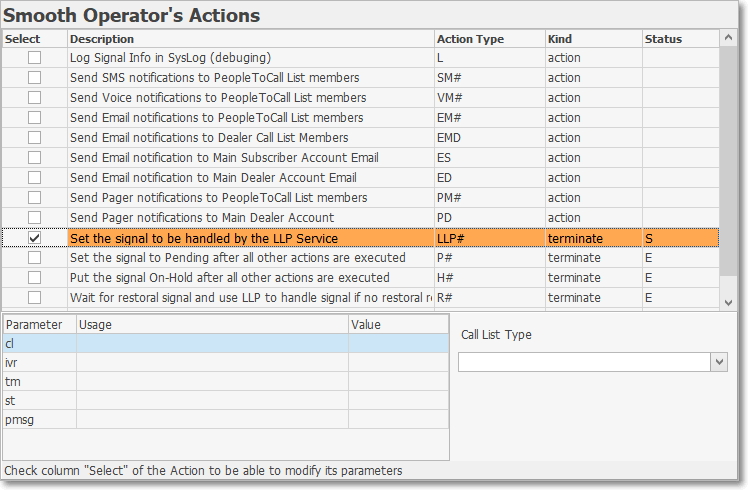
i.d - Call List Type - Use the Drop-Down Selection List provided to Choose the appropriate Call List Type [see b) i. above for more information]
ii.ivr - Use the Drop-Down Selection List provided to Choose the appropriate IVR setting
▪200 - Subscriber Signal Notification
▪300 - Message Acknowledging
i.tm - Enter the number of minutes to wait before executing this Action
ii.st - Use the Drop-Down Select List provided to Choose the Status (i.e., Complete, Hold, Pending) that should trigger this Action
iii.pmsg - Use the Drop-Down Selection List provided to Choose the appropriate Predefined Message
m)P# - Set the signal to be Pending after all other actions are executed
i.tm - Enter the number of minutes to wait before executing this Action
n)H# - Set the signal to On-Hold after all other actions are executed
ii.tm - Enter the number of minutes to wait before executing this Action
iii.st - Use the Drop-Down Select List provided to Choose the Status (i.e., Complete, Hold, Pending)
iv.sch - Use next available time on the LLP schedule for On-Hold time, or none if no Schedule is found
o)R# - Wait for restoral signal and use LLP to handle if no restoral received
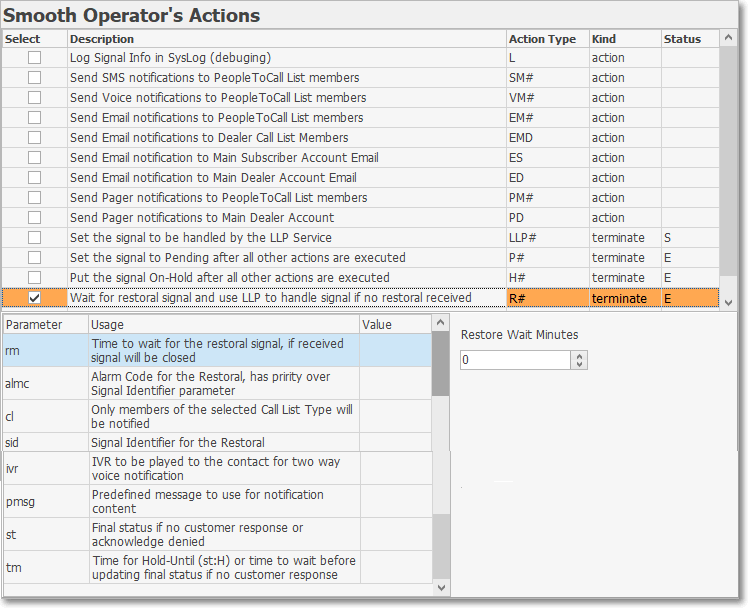
i.rm - Enter the number of Restoral Minutes to Wait before executing this Action
ii.almc - Alarm Code for the Restoral, has priority over Signal Identifier parameter - Enter a comma separated list of Alarm Conditions

iii.d - Only members of the Selected Call List Type will be notified -
▪Use the Drop-Down Selection List provided to Choose the appropriate Call List Type [see b) i. above for more information]
iv.sd - Signal Identifier for the Restoral - enter a comma separate list of signal identifiers, no spaces

v.ivr - IVR to be played to the contact for two way voice notification - Use the Drop-Down Selection List provided to Choose the appropriate IVR setting
▪200 - Subscriber Signal Notification
▪300 - Message Acknowledging
vi. pmsg - Predefined message to be used for notification content - Use the Drop-Down Selection List provided to Choose the appropriate Predefined Message
vii.st - Final status if no customer response or acknowledge denied - Use the Drop-Down Select List provided to Choose the Status (i.e., Complete, Hold, Pending)
viii.tm - Time for Hold-Until (st:H) or time to wait before updating final status if no customer response - Enter the number of minutes to wait before executing this Action
p)C# - Complete the signal after all other actions are executed -
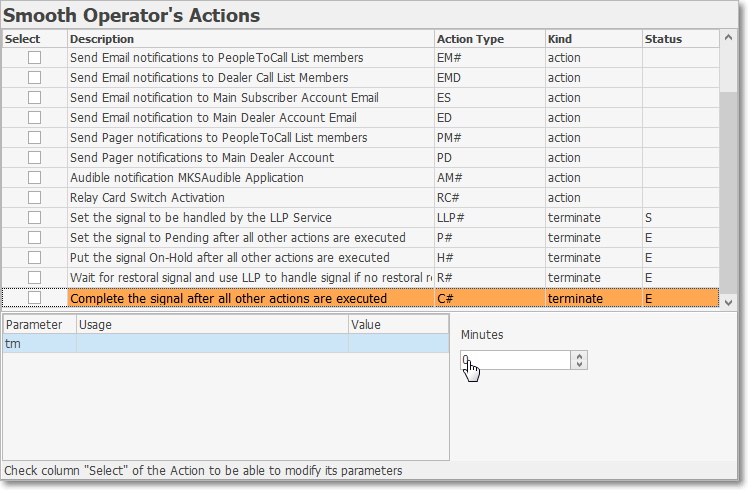
i.tm - Enter the number of minutes to wait before executing this Action
![]() List Icon - The Navigation Menu also has a List option which provides a tabular view of these Smooth Operator procedure records.
List Icon - The Navigation Menu also has a List option which provides a tabular view of these Smooth Operator procedure records.

Smooth Operator Form - List View
✓Some columns may contain expanded comments or other information which may make the List View's display somewhat difficult to use.
Ø - Click the Asterisk at the left of the row of Header Names to display a Drop-Down Check List of each column's Headed Name.
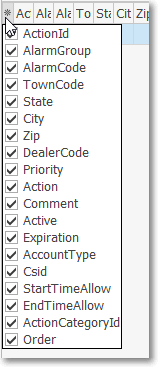
Smooth Operator Form
Available Column
▪Check any Header Name to be included in the List View (by default, All Header Names will be Checked)
▪Remove the Check for any Header Name (see illustration below) that is to be removed from the List View.
✓Click the List Icon to display the associated Grid Data.
✓The columns of Grid Data may be rearranged, filtered, sorted, and exported as a PDF file and/or an Excel formatted file.

✓Find - Enter text to search for a specific record, then Click the Find option.
✓Clear - To remove the text to search for entry, Click the Clear option

Navigation Menu shown with the List Options for Export & Print
✓Click the List Icon again to Close the List View and return to the Record Editing View.
❖See the Grid & Lists - Print Preview - Export Data chapter for complete information on using the List View, including its Export & Print options.