❑Why you should not Close a Purchase Order?
a)Backorders are outstanding and expected shortly;
b)Purchase Orders may only be closed by an Accounting Administrator;
c)Some other Company Policy.
❑Regardless, Closed Purchase Orders may be re-opened if necessary if the Order Date of the Purchase Order is still within an open Accounting Period!
•Purchase Order - Header: Make the appropriate corrections to one or more of these fields:
✓Closed - remove the Check from the Closed box.
✓Warehouse - Use the Drop-Down Selection List to Choose a different Warehouse.
✓Division - Use the Drop-Down Selection List to Choose a different (or new) Division Code, if appropriate.
✓Ship When - Use the Drop-Down Calendar/Date Entry field to Choose the probable Shipping Date, if available.
✓Ship Via - Identify the desired Shipping Method using the Drop-Down Selection List provided, if known.
✓FOB - Enter the location from where the order will be shipped.
•Purchase Order - Detail Line Items: Make the appropriate corrections to one or more of these fields:
✓Dept - Departments are used in the General Ledger to identify the Work Group or Profit-Center within your Company that is responsible for ordering and/or using this Detail Line Item.
▪If appropriate, enter the Department that is responsible for, and will use, the items requested on this Detail Line Item.
✓Lcl Tax - If this Detail Line Item is taxable locally, the system will insert the default Sales Tax Rule (i.e., Yes, No, Exempt) based on what is defined in the Vendor Tax Information section. for this Vendor.
▪This entry may be changed, as needed.
✓Ntl Tax - If this Detail Line Item is taxable nationally, the system will insert the default Sales Tax Rule (i.e., Yes, No, Exempt) based on what is defined in the Vendor Tax Information section. for this Vendor.
▪This entry may be changed, as needed.
✓Note - Click within the Note field and Press the <Space Bar> to display the Drop-Down Note Pad in which you may enter any additional information related to the Detail Line Item.
✓Bill It - By default, this box will be Checked.
▪Later, once Ordered items are received and Checked In, if you want to Bill some Detail Line Items but not others - because additional Ordered items are expected to be delivered later - remove the Check from this box for any Detail Line Items which have not yet been received, or for any other reason you do not what them Billed at that time.
✓Ordered - You may Modify the quantity that was ordered, as needed.
✓Check In - Nothing is entered now. Later, when the Vendor has shipped some., or all of the order, you will enter the number ot items that were actually shipped to your Company.
▪See the Checking In Inventory chapter for more information about making entries in this field.
✓Price - You may Modify this Price, if a different price is to be specified on the Purchase Order.
✓WH - Use the Drop-Down Selection List to Choose a different Warehouse, if needed.
✓More Info - Click the More Info field's Drop-Down Arrow:
▪Work Order field in More Info Drop-Down Data Entry Box
▪Shipper - Use the Drop-Down Selection List to Choose a Shipping Method for the current Detail Line Item, if and when appropriate.
▪Delivery Date - Use the Drop-Down Calendar/Date Entry field to Choose a Delivery Date for the current Detail Line Item, if and when available.
oThe Inventory Delivery Report uses this information to determine when ordered Inventory Items are expected to be delivered.
▪Tracking # - Enter a Tracking Number for the current Detail Line Item, if and when available.
![]() Click the Save Icon to mark the PO as completed.
Click the Save Icon to mark the PO as completed.
Proceed?
❑When is Closing a Purchase Order appropriate?
•Some, or all of the requested items on a Purchase Order have arrived, What do you do?
1.Locate the Purchase Order
2.Check in those Items that were delivered (see the Checking In Inventory chapter) by entering the Quantity that was received in the Check In column on the Purchase Order Form.
3.Create a Vendor Bill for these items (See the Bill It Icon chapter for complete information on using that feature).
•At this point, one of two cases exist:
1.If all of the items that were ordered were Checked In, then Billing those items will automatically Close this Purchase Order.
2.If all of the items that were ordered were not received, follow the "Dealing with Back Orders" instructions immediately below.
❑Dealing with Back Orders
•If any ordered items are temporarily back ordered (and/or will not be shipped by this supplier within a reasonable time period), there are three options:
1.Adjust - If none of an ordered item is going to be available in the near future from this Vendor:
a.Adjust the Quantity Ordered to match what if anything, has been Checked In (and therefore shown in the Received column )
b.![]() Click the Save Icon
Click the Save Icon
c.Then, use the Bill It Icon to record the Bill for what was received,
d.This action will automatically Close the Purchase Order,
e.Attempt to order the back ordered Quantity of those items from another Vendor.
2.Wait - Leave the Purchase Order open while waiting for the back ordered items:
a.Use the Bill It Icon to record the Bill for what was Received so far
b.Then, when those back ordered Items are eventually received, Check In those additional items at that time
c.![]() Click the Save Icon to move the Quantity that was just Check In to the Received column
Click the Save Icon to move the Quantity that was just Check In to the Received column
d.Use the Bill It Icon to record the Bill for what was finally received
e.If everything that was ordered is now Checked In (Received), this action will automatically Close the Purchase Order
3.Cancel - If none of an ordered item is going to be available in the near future from this Vendor, and no other items were ordered on this Purchase Order:
a.Delete the Purchase Order
b.Then, attempt to order the item(s) from another Vendor
❑When and How is a Purchase Order Closed?
•Order - Create a Purchase Order.
✓If your Company is using the Inventory Tracking System, all Inventory Items should be ordered using the Purchase Order Form.
✓Both the Inventory Item's " Pending " and " Available Pending " Count on the Sale-Purchase Item Form will be increased by the Quantity that is Ordered.
✓No General Ledger System transactions are executed (nor required) during the creation of a Purchase Order for Inventory Items.
•Check In - All Items that have been delivered must be Checked In.
✓Properly Checking In any Inventory Items that were ordered will properly update Inventory Quantities, and the Values the General Ledger System.
▪Both the Inventory Item's " Pending " and " Available Pending " Count on the Sale-Purchase Item Form will be reduced by the Quantity that was Checked In
▪Both the Inventory Item's " On Hand " and " Available On Hand " Count on the Sale-Purchase Item Form will be increased by the Quantity that was Checked In
✓For the Inventory Items that were received, in the General Ledger System:
▪The Inventory Asset Account will be Debited (increased) for the Value - Including the Sales Tax that will charged, if any - of what was Checked In (Quantity multiplied by the Price plus Sales Tax, if any),
▪The Inventory Purchases Liability Account will be Credited (increased) by the same Value.
✓If you are using the Inventory Tracking & Job Costing System, Do Not manually create a Bill for a Purchase Order that contains Inventory Items
▪Use the Bill It Icon to create the Vendor's Bill which will automatically post the Values of Inventory Items that have been Checked In (within the Inventory Tracking & Job Costing System).
▪Not using the Bill It button will not properly update those Values (unless you manually bill those same Purchase Categories and Quantities on its Detail Line Items as were originally entered on the corresponding Purchase Order's Detail Line Items - but why bother when it can be done automatically?).
•Bill It Icon - You've used the Bill It Icon on the Purchase Orders Form to record the appropriate Vendor Bill (which should match their Invoice).

Purchase Order Form - Actions Menu - Bill It Icon
✓For the Inventory Items that were Billed:
a)Within the Inventory Tracking & Job Costing System
oNo Inventory Quantity changes are required (the Inventory related Quantities were updated when that Inventory Items were Checked In).
b)Within the General Ledger System
oThe Accounts Payable Liability Account will be Credited (increased) for the Value - Including the Sales Tax that will charged, if any - of what was Billed (Quantity multiplied by the Price plus Sales Tax, if any, when using the Bill It Icon to create the Vendor Bill),
oThe Inventory Purchases Liability Account will be Debited (decreased) by the same Value of any Inventory Items that were Billed..
•Closed - If you manually Check the Closed box on the Purchase Order Form:
➢Note: If all ordered items have been Received and then Invoiced using the Bill It Icon - see above - the Purchase Order will be Closed automatically.
A.If the Quantity that was Checked In does not match the Quantity that was Ordered (i.e., the Quantity shown in the Received column does not match the Quantity shown the Ordered column), a message will be displayed noting that these Quantities do not match!
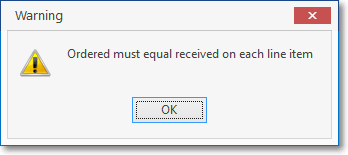
Warning - Ordered must equal received on each line item
▪There are a few choices that may be made to resolve this issue:
1.If any ordered items are permanently back ordered (or will not be shipped by this supplier within a reasonable time period):
a.Adjust the Quantity Ordered to match what has already been Checked In (and therefore shown in the Received column),
b.Use the Bill It Icon to enter the Vendor's Invoice for these items which "moves" the Checked In count(s) to the Received count(s) and updates the Inventory Counts in the Inventory Tracking & Job Costing System.
c.This will automatically Close the Purchase Order.
d.Because none of an ordered item is going to be available in the near future from this Vendor, after you zero that Quantity Ordered, Billed any other ordered items that were received, and Closed the Purchase Order: whenever those back ordered items become available, reorder them on a new Purchase Order.
2.If any ordered items are temporarily back ordered (and so will be shipped by this supplier in the near future):
a.Wait for the back ordered items,
b.Use the Bill It Icon to Bill the whole (what was previously received and what was received that was back ordered) Purchase Order when those back ordered items are received
c.This will automatically Close the Purchase Order.
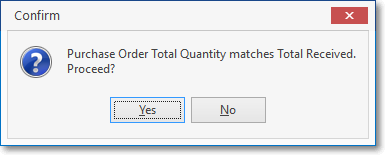
B.One the Quantity of the ordered items that were Checked In equals all of the Quantity of the Items that were Ordered, there are two possibilities:
1.Answer Yes to Close the Purchase Order, or
2.Answer No if you Checked the Closed box in error.
Mark PO Complete?
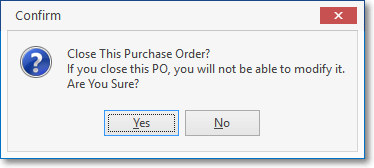
C.If the Quantity Ordered does not match the Quantity you Checked In, a message will warn you that once Closed, you will not be able to modify these values.
▪If all of the Ordered Items have not been Checked In (one or more of the Checked In fields are still set at zero (0) or at a value less that what was ordered), you will be warned.
▪Whether or not all of the Ordered Items have been Checked In, if they have not yet been Invoiced using the Bill It Icon, you will be warned.
▪Using the Bill It Icon to enter the Vendor's Invoice for these items "moves" the Checked In count(s) to the Received count(s) which then updates the Inventory Counts in the Inventory Tracking & Job Costing System.
![]() Always Click the Save Icon when you are finished with nay entry (or Click the Cancel Icon to abort the last entry).
Always Click the Save Icon when you are finished with nay entry (or Click the Cancel Icon to abort the last entry).