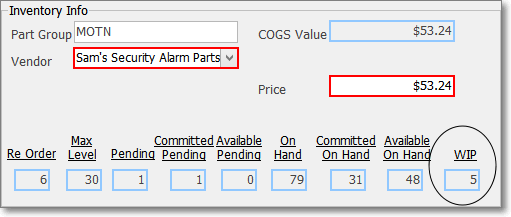
❑A new Work In Progress field (WIP) on the Sale-Purchase Items Form tracks that WIP Quantity of those Inventory Items as follows:
✓Basically, the WIP Quantity is increased when an Inventory Item is Used on a Job; and/or recorded in the Inventory/Materials tab on a Work Order Form.
✓Then the WIP Quantity is reduced when those Inventory Items recorded on the Inventory/Materials tab on a Work Order are actually Invoiced to the Subscriber after the Work Order is completed; or when a Work Order associated Job Task is Invoiced, and/or the Job itself is marked as Completed.
❖Tracking Work in Progress
1.When an Inventory Item is Used on the Job Costing Form which was previously Reserved on that Job Costing Form the Committed on Hand Count will be decreased, and the WIP (Work in Progress) will be increased by the Quantity that was recorded as Used.
2.When an Inventory Item is Used on the Job Costing Form which was not previously Reserved on that Job Costing Form the Available on Hand Count will be decreased, and the WIP (Work in Progress) will be increased by the Quantity that was recorded as Used.
3.The new Inventory WIP Report lists all Inventory Items' Counts that were transferred to Work In Progress via a Job and/or Work Order entry, executed within the Date Range specified, and subject to certain filtering and selection options.
•When Inventory Usage is recorded on a Work Order Form:
1.If the Service Request was created through the Job Costing Form, and those required Inventory Item(s) were previously identified on that Job Costing Form as Reserved
a.The On Hand Count will be decreased by the Quantity that was recorded as Inventory Items Used on the Inventory\Material tab of the Work Order Form.
b.The Available On Hand will be decreased by the Quantity that was recorded as Inventory Items Used on the Inventory\Material tab of the Work Order Form.
c.The WIP (Work in Progress) will be increased by the Quantity that was recorded as Inventory Items Used on the Inventory\Material tab of the Work Order Form.
2.If the Service Request record was created directly on the Inventory\Material tab (not created from a Job),
a.The On Hand Count will be decreased by the Quantity that was recorded as Inventory Items Used on the Inventory\Material tab of the Work Order Form.
b.The Available On Hand will be decreased by the Quantity that was recorded as Inventory Items Used on the Inventory\Material tab of the Service Request Form.
c.The WIP (Work in Progress) will be increased by the Quantity that was recorded as Inventory Items Used on the Inventory\Material tab of the Work Order Form.
3.When a Service Request - which had Inventory Usage recorded on the Inventory\Material tab of a Work Order Form (see "When Inventory Usage is recorded on a Work Order Form" above) - is then Invoiced
a.In the Inventory Tracking System: As part of the Completing the Service Request, when an Invoice is created for the services performed and there were Inventory and Materials recorded as required for the completion of that Work Order, The WIP (Work in Progress) Count will be decreased by the Quantity that was recorded on the Inventory\Material tab of the Work Order Form
4.When a Service Request - which had Inventory Usage recorded on the Inventory\Material tab of a Work Order Form - is Closed, but Not Invoiced (e.g., Warranty Repair, Free-bee, for Office use):
a.In the Inventory Tracking System: As part of the Completing the Service Request, when no Invoice is created for the services performed but there were Inventory and Materials recorded as required for the completion of that Work Order,
b.The WIP (Work in Progress) Count will be decreased by the Quantity that was recorded on the Inventory\Material tab of the Work Order Form
❑Inventory WIP Report - The new Inventory WIP Report lists all Inventory Items' Counts that were transferred to Work In Progress via a Job and/or Work Order entry, executed within the Date Range specified, and subject to certain filtering and selection options.
•To access the Inventory WIP Report:
a)From the Backstage Menu System Select Reports then Choose Inventory Reports and Select the Inventory WIP option, or
b)From the Quick Access Menu, Select Reports then Choose Inventory Reports and Select the Inventory WIP option
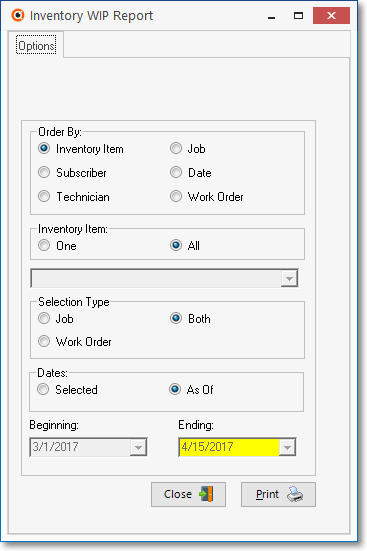
Inventory WIP Report - Options tab
•Options - Initially only the Options tab is shown (until you make your Options selections and Select Print).
✓Order By - Establish the sequence the Inventory Items will be listed.
▪Inventory Item - Sort the list of Inventory Items by Part Number.
▪Subscriber - Sort the list of Inventory Items Subscriber ID, then within each Subscriber, by the Inventory Item's Item ID.
▪Technician - Sort the Inventory Items by Technician, then within each Technician, by the Inventory Item's Item ID.
▪Job - Sort the list of Inventory Items by Job Number, then within each Job Number, by the Inventory Item's Item ID.
▪Date - Sort the Inventory Items by the Date that they were used, then within each Date, by the Inventory Item's Item ID.
▪Work Order - Sort the Inventory Items by the Work Order Number, by the Inventory Item's Item ID.
✓One or All - Based on the Order By option selected above, Choose whether All of the records for the select Order By method will be listed, or only a specific One.
▪Inventory Item - If the Inventory Item order option was selected above, you may include All Inventory Usage in the report, or the Inventory Usage of One specific Inventory Item.
oOne - Click this button to report usage for only one Inventory Item. Use the Drop-Down Selection List to Choose the appropriate Inventory Item's Item ID.
oAll - The default. All Inventory Usage of all Inventory Items will be listed.
▪Subscriber - If the Subscriber order option was selected above, you may include All your Subscriber's Inventory Usage in the report, or the Inventory Usage of One specific Subscriber.
oOne - Click this button to report usage for only one Subscriber. Use the Drop-Down Selection List to Choose the required Subscriber.
oAll - The default. All Inventory Usage for all Subscribers will be listed.
▪Technician - If the Technician order option was selected above, you may include All your Technician's Inventory Usage in the report, or the Inventory Usage of One specific Technician.
oOne - Click this button to report usage for only one Technician. Use the Drop-Down Selection List to Choose the required Technician.
oAll - The default. All Inventory Usage for all Technician will be listed.
▪Job - If the Job order option was selected above, you may include All your Jobs in the report, or the Inventory Usage of One specific Job.
oOne - Click this button to report usage on only one Job. Use the Drop-Down Selection List to Choose the required Job.
oAll - The default. All Inventory Usage for all Jobs will be listed.
▪Work Order - If the Work Order option was selected, you may include All your Work Orders in the report, or the Inventory WIP for One specific Work Order.
oOne - Click this button to report usage on only one Work Order. Use the Drop-Down Selection List to Choose the required Work Order.
oAll - The default. All Inventory WIP for all Work Orders will be listed.
✓Selection Type - You may Limit the report to the Inventory Items for Work Orders, Jobs, or include Both (the default).
▪Job - Includes only Work In Progress entries from Jobs.
▪Work Order - Includes only Work In Progress entries from Work Orders.
▪Both - Includes all Work In Progress entries.
✓Dates - Click the Selected button to report Inventory Usage that occurred within the specified Beginning and Ending Date Range.
▪The default dates will be for the month preceding the current month.
Dates option with default Dates inserted
✓Print - Click the Print button ![]() to Preview and optionally Print (to a File or a Printer) this Inventory WIP Report.
to Preview and optionally Print (to a File or a Printer) this Inventory WIP Report.
•Preview - The Preview tab presents the report which resulted from the Options you've selected.
✓Up Arrow/Down Arrow - hi - Moves the report one line up, or one line down, respectively.
✓Page Up/Page Down - Moves the report to the previous or next page, respectively.
✓Subscriber ID - Click this number to open the related Subscriber Form.
✓W/O# - Click this number to open the related Service Request Form.
✓Job # - Click this number to open the related Job Costing Form.

Inventory WIP Report - Preview tab
✓Home - ![]() - Using either the screen icon or your Keyboard's Home key, moves the report to the top of the first page.
- Using either the screen icon or your Keyboard's Home key, moves the report to the top of the first page.
✓End - ![]() - Using either the screen icon or your Keyboard's End key, moves the report to the bottom of the last page.
- Using either the screen icon or your Keyboard's End key, moves the report to the bottom of the last page.
✓Arrows - The arrows allow you to move back and forth, from page to page.
✓Number - Indicates the page number you are viewing.
▪You may also type in a specific page number, Press 8 Enter and that page will be displayed immediately.
▪If you enter an invalid page number, it will be ignored.
✓Fit To Page - Click the first button after the arrows to size a full page of the report to fit the screen.
✓Zoom To 100% - Click the second button after the arrows to display the page at 100% (of the printed view).
✓Fit To Page Width - Click the third button after the arrows to size the page of the report to fit the full width of the screen.
✓Zoom To Percentage - Click the fourth button after the arrows to re-size the page of the report by percentage.
![]()
▪When you Click the Zoom To Percentage button, the Percentage selector will be displayed.
▪You may then Click the Up or Down ‚ arrows to set the exact amount of Zoom you want.
✓Print - Click the Print button to Print (to a File or a Printer) ![]() the displayed Inventory Usage Report.
the displayed Inventory Usage Report.
✓Email - Click the Email button ![]() to send the Report to an Email Address of your choosing.
to send the Report to an Email Address of your choosing.
❑Understanding the new Calculate Average Item Cost Form
❖For those Companies using the STARK 35 version of the General Ledger System, the required Inventory Valuation method is Average Cost Inventory.
❖You must run the Start Inventory Tracking/Job Costing setup wizard before using this Calculate Inventory Item Average Cost Form!
•Inventory Listing - When the Calculate Average Item Cost Form is opened, only those Sale-Purchase Items which have been identified as an Inventory Item and have actually been Purchased (versus those which were defined, but for which no Inventory has yet been acquired) will be listed.
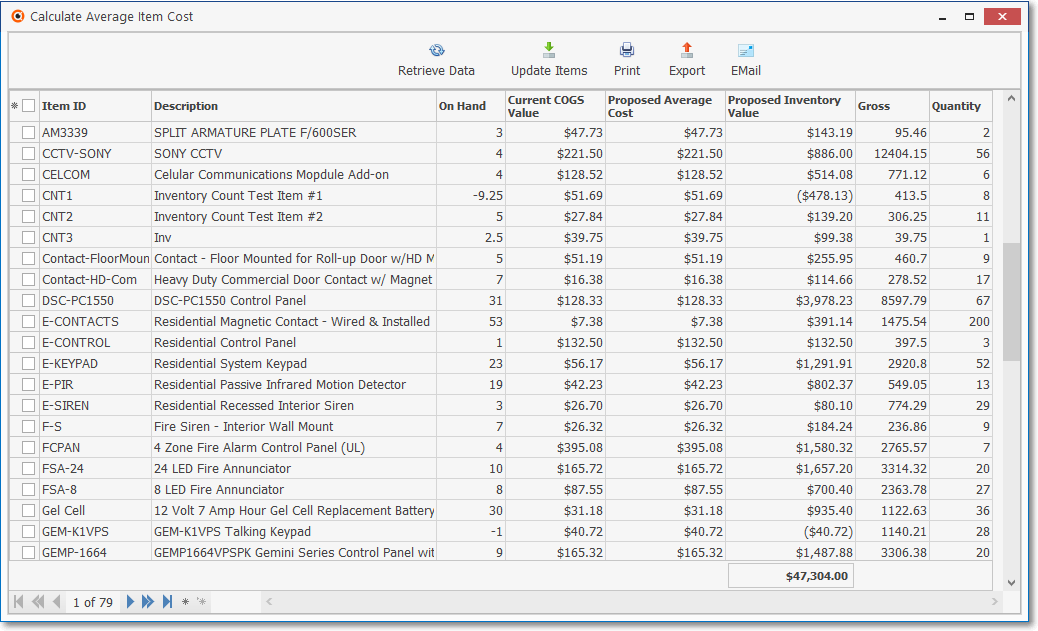
✓A tabular (spreadsheet style) Record Listing of the Inventory Item records is displayed.
➢Note: Those Inventory Items that have been marked as Inactive will not be included in this Inventory Listing.
✓There are many columns of data in this Inventory Items Record Listing:
1)Update box - This is a Check Box field used to "select" this Inventory Item.
2)Item ID - The Sale-Purchase Item ID (Purchase Category Code) assigned to the Inventory Item
3)Description - The Description of this Inventory Item
4)On Hand - Quantity of this Inventory Item that is currently on hand
5)Current COGS Value - This is the Price - including Sales Tax* - that was entered manually in the Sales-Purchase Items Form, or previously updated using this procedure
6)Proposed Average Cost - This is the most recently calculated Average Cost - including Sales Tax - for the Inventory Item
7)Proposed Inventory Value - This is the most recently calculated Average Cost multiplied by the Quantity on hand - including Sales Tax - for the Inventory Item
8)Gross - This is the most recently calculated Average Cost multiplied by the sum of all of the Quantity - including Sales Tax - for the Inventory Item
9)Quantity - This is the sum of all of the Quantities of the Inventory Item
* The only time Sales Tax is not calculated as part of an Inventory Item's cost is when the Canada Tax option is set to True ("T") in Company Settings because Sales Tax is initially posted an Asset (see the Canada Sales Tax chapter for more information).
✓See the Calculate Inventory Item Average Cost chapter for more detailed information.
❑The new Inventory Listing (Grid) Report provides a complete list of the Values and Quantities of Inventory Items - based on the the "As Of Date" selected and the customized columns, order, format, and filters you've set (explained below).
•Understanding the Cost and Value columns on the Inventory Listing Report:
✓The various Quantities listed on this report are those that are maintained by the Inventory Tracking System as Inventory Items and are tracked as follows:
▪Inventory Used in Job Costing (see the Inventory and related sub-chapters in the Job Costing section of the Help Files)
▪Ordered (see the Purchase Orders chapter)
▪Purchased (see the Vendor Bills chapter)
▪Sold (see the Invoices chapter)
✓The various Values represent the Average Inventory Cost Inventory Valuation Method when your Company will be using the STARK 35 General Ledger System) in the Sale-Purchase Items Form for each Inventory Item listed.
▪These reported Inventory Item Values are based on the currently selected Inventory Valuation Method (i.e., Average Inventory Cost).
•To access the Inventory Listing Listing (Grid) Report:
a)From the Backstage Menu System Select Reports then Choose Inventory Reports and Select the Inventory Listing (Grid) option, or
b)From the Quick Access Menu, Select Reports then Choose Inventory Reports and Select the Inventory Listing (Grid) option
.png)
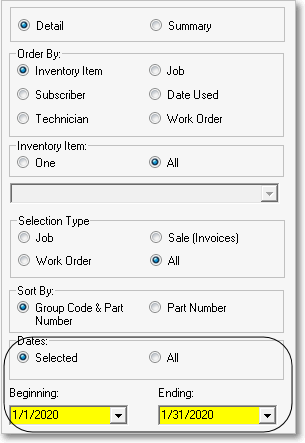
Inventory Listing As Of report Grid
•Options - The only Options are:
✓As Of Date - Initially this is set as Today but may be changed as needed.
▪Use the Drop-Down Calendar/Date provided to Choose a different As Of Date.
✓Retrieve Data - Click on this Icon to populate the Inventory Listing Grid based on the As Of Date entered above.
✓Print, Export and Email options work in the normal way.
•See the Inventory Listing (Grid) chapter for more information.