❑The Inventory Tab on the Job Costing Form provides a dialog to identify the Inventory that has been Used, or Reserved, for the selected Job.
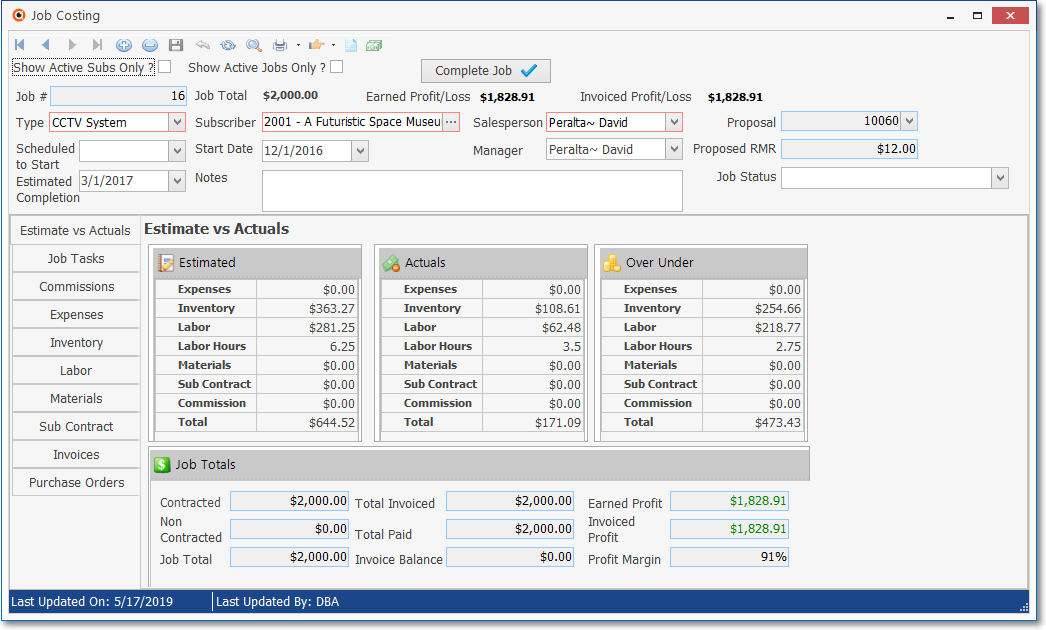
Job Costing Form - Estimate vs Actual tab
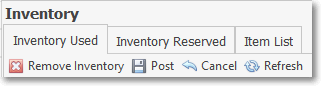
•The Inventory Tab has three sub-tabs:
Job Costing Form - Inventory Tab - 3 sub-tabs
1.Inventory Used - This sub-tab accepts the Use Inventory transactions from the Item List sub-tab, and includes those Inventory Items that have been identified on the Inventory\Materials tab on a Service Request Form that was created as part of the execution of a Job Task.
2.Inventory Reserved - This sub-tab allows you to commit existing, "in-stock" Inventory Items that are supposed be installed by a Technician at the Job, as part of the completion of a Job Task.
3.Item List - This sub-tab on the Inventory tab of the Job Costing Form allows you to manually enter, or automatically receive from a Converted Proposal, an Inventory List from which you may Order Inventory, Reserve Inventory and/or Use Inventory.
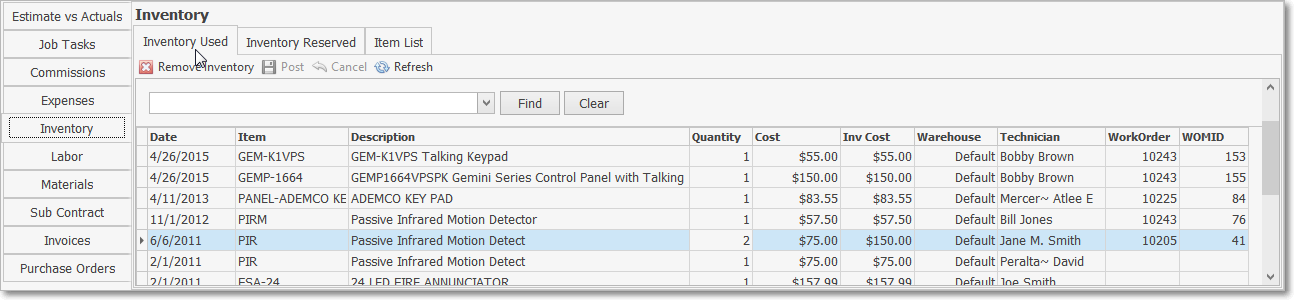
❑ Inventory Used sub-tab on the Job Costing Form - The Inventory that was Used on a Job may be identified in the revised Inventory Used sub-tab by using any combination of these two methods:
Job Costing Form - Inventory tab with Inventory Used sub-tab selected
1.Inventory Items that were used to fulfill a Job Task may be entered on a Work Order created using the Job Task Tab specifically for that purpose.
2.Inventory Items that were used and identified as such with the Use Inventory option on the Item List sub-tab will automatically be inserted in the Inventory Used sub-tab.
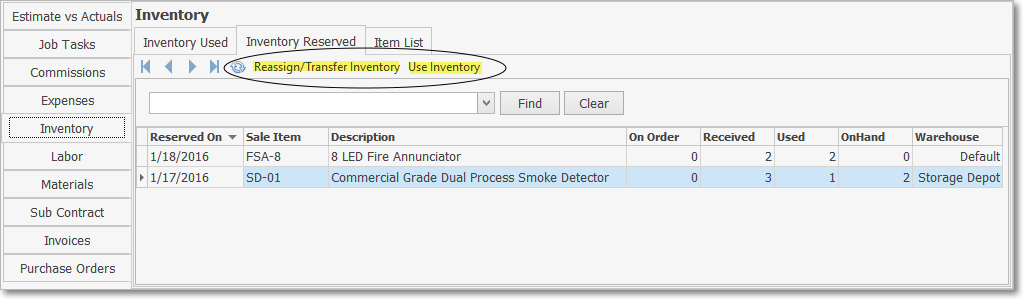
❑Inventory Reserved sub-tab on the Job Costing Form - When one or more Inventory Items that are potentially needed for a Job, and are currently identified as On Hand and Available On Hand, should be Reserved for this Job to ensure that those Inventory Items are available when needed:
•By doing so, you are notifying the system that those Inventory Items should not be Sold or Reserved by another User, because they are now committed to this Job.
✓To Reserve those Inventory item(s) for this Job, use the Reserve Inventory option on the Item List sub-tab on this Job Costing Form.
✓Those Reserved Inventory item(s) will automatically be inserted into this Inventory Reserved sub-tab.
•Overview of the Inventory Reserved sub-tab
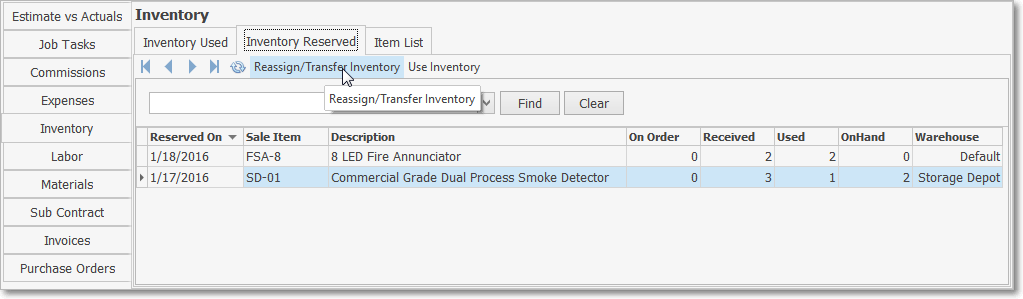
✓Select the Inventory Tab on the Job Costing Form, then Click the Inventory Reserved sub-tab.
Job Costing Form - Inventory Tab - Inventory Reserved - options
❑To Reassign/Transfer Inventory that had previously been Reserved for a Job using the Reserve Inventory option on the Item List sub-tab,
1.To change Inventory Items back to an uncommitted In-Stock status (as Available On Hand), or
2.To move Reserved Inventory Items to a Warehouse closer the the Technician who will need it (e.g., transfer them to his/her Truck)
3.Go to the Job Costing Form and locate the appropriate Job.
•Select the Inventory Tab.
✓Click the Inventory Reserved sub-tab.
Job Costing Form - Inventory Tab - Inventory Reserved sub-tab - Reassign Inventory option
✓Click the Reassign/Transfer Inventory button (see illustration above) to reassign or transfer Inventory Item(s) that had previously been Reserved, as needed:
a)Reassign the selected Inventory Item(s) back to an In-Stock status - moving that Quantity from the Committed On Hand count to the Available On Hand count of the selected Warehouse, or
b)Transfer the selected Inventory Item(s) to a more appropriate Warehouse
•The Reassign/Transfer Inventory Form will be displayed which will provide the required Job Inventory Reassignment or Transfer functionality.
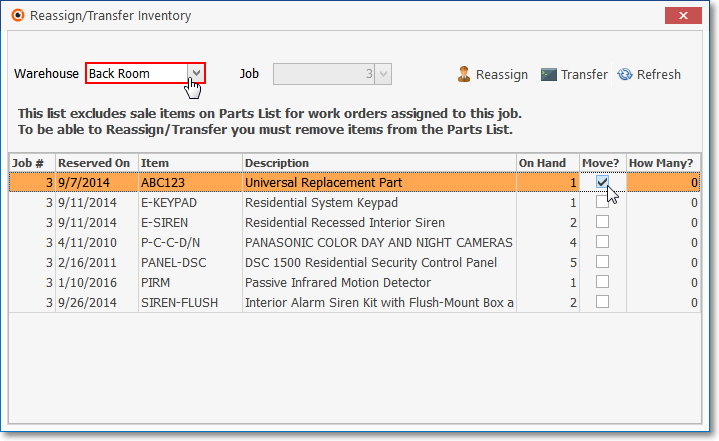
Job Costing Form - Inventory Tab - Reassign Inventory option
✓Warehouse - Use the Drop-Down Selection List to Choose the Warehouse to which the Inventory Item(s) are to be reassigned or transferred
✓Job - No Job Number needs to be entered because the system knows that this is for the currently selected Job.
✓Reassign/Transfer Inventory List - Header field names:
▪Job # - The Job Number is known by the system and may not be changed by the User.
▪Reserved On - The Reserved On Date is inserted by the system and may not be changed by the User.
▪Item - The Inventory Item codes are inserted by the system and may not be changed by the User.
▪Description - The Description of the Inventory Items is inserted by the system and may not be changed by the User.
▪On Hand - The Quantity of this Inventory Item that is On hand (and previously Reserved for this Job) is inserted by the system and may not be changed by the User.
▪Move? - Check each of the Inventory Item(s) to be Reassigned/Transferred.
▪How Many? - Enter the Quantity of the Checked Inventory Item(s) to be Reassigned/Transferred.
✓Click the Reassign option at the top of the Reassign/Transfer Inventory Form to initiate the Reassignment the selected Inventory Item(s) to the Available On Hand count of the selected Warehouse.
▪This will reduce the Received Quantity on the Inventory Reserved sub-tab by the How Many? number entered on the Reassign/Transfer Inventory Form
▪It will increase the Available On Hand count and reduce the Committed On Hand count in the selected Warehouse by that same number.
▪The associated Sale-Purchase Item record will also be updated, with the Available On Hand count increased, and WIP (Work in Progress) and Committed On Hand counts reduced by that How Many? number.
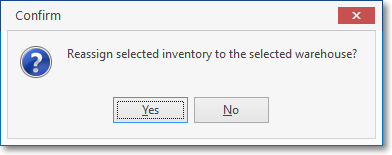
Confirm Inventory Reassignment request
▪Click the Close ![]() box to Close the Reassign/Transfer Inventory Form
box to Close the Reassign/Transfer Inventory Form
✓Click the Transfer option at the top of the Reassign/Transfer Inventory Form to move the selected Inventory Item(s) to the Committed On Hand count of the selected Warehouse.
▪This will not change the Received Quantity on the Inventory Reserved sub-tab.
▪It will increase the Committed On Hand and the Total On Hand counts in the selected Warehouse by the How Many number.
▪The Committed On Hand and the Total On Hand counts in the originating Warehouse will be reduced by the same How Many number.
▪There will be no changes to the associated Sale-Purchase Item record.
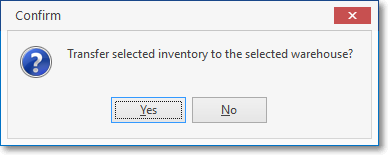
Confirm Inventory Transfer request
▪Click the Close ![]() box to Close the Reassign/Transfer Inventory Form
box to Close the Reassign/Transfer Inventory Form
❑Use Inventory - Once at least one Inventory Item has been reserved, the Use Inventory option on the Item List sub-tab and/or the Inventory Reserved sub-tab allows you to acknowledge that a Listed Inventory Item, and/or a Reserved Inventory Item has actually been Used.
•There is a new Job Invoice Multi Usage dialog which is used for this purpose.
✓When the Use Inventory option is selected on the Item List sub-tab and/or the Inventory Reserved sub-tab on the Inventory tab of the Job Costing Form, this new Job Invoice Multi Usage dialog will be displayed.
✓The User may identify (using this new Job Invoice Multi Usage dialog):
▪Each Inventory Item that has been used on a Job;
▪ALL items in the list as having been used;
▪The Warehouse from which each Item was taken;
▪How many (Quantity) were used;
▪Whether or not a Used Inventory Item should be inserted into the Subscriber's Installed Equipment Form.
•Use Inventory - The Use Inventory option allows you to identify those On Hand and Available On Hand Inventory Items (previously added to this Item List sub-tab) that were subsequently used for this Job
✓Those Inventory Item(s) which are identified as having been Used will be added to the Inventory Used sub -tab.
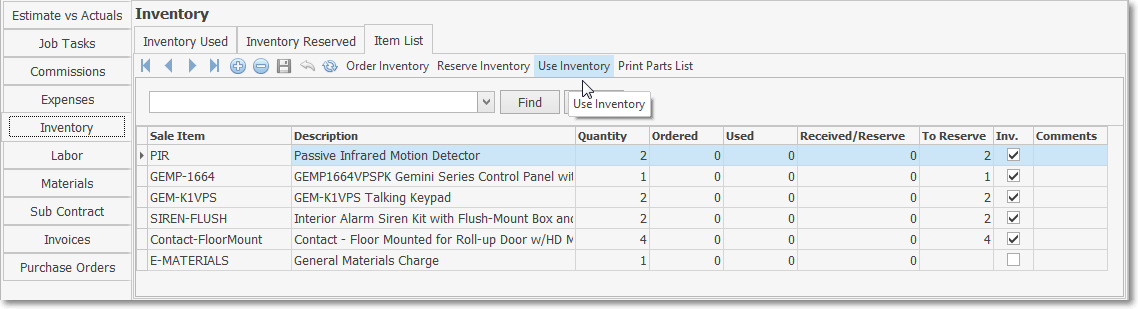
Job Costing Form - Inventory tab - Item List sub-tab - Use Inventory option
✓Job Invoice Multi Usage dialog - When the Use Inventory option is selected, the Job Invoice Multi Usage dialog will be displayed
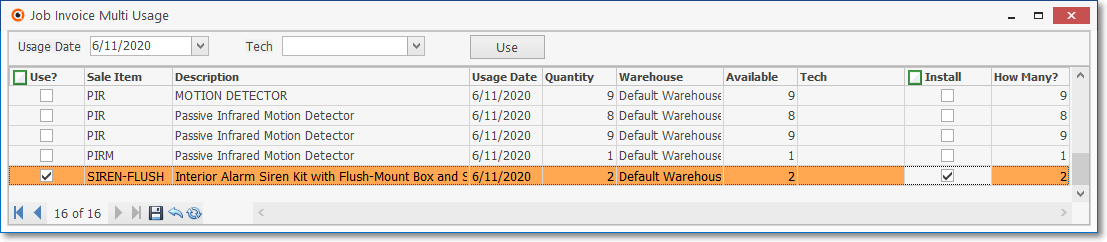
Job Costing Form - Inventory tab - Item List sub-tab - Use Inventory option selected - Job Invoice Multi Usage dialog
▪It contains a data gird with a list of those Inventory Item(s) which are both In-Stock and have been Reserved (see 2. Reserve Inventory above) for this Job.
✓Using the Job Invoice Multi Usage dialog - Select the Inventory Item(s) - that are both In-Stock (Available) and have been Reserved and may now be recorded as having been used:
▪Use? - Check the box in the Use column for each Inventory Item that was used (if all listed Inventory Items were used, Check the Green Use? box).
▪Sale Item - The Sale-Purchase Item code for the selected Inventory Item is inserted
▪Description - The default description of the selected Inventory Item is inserted
▪Usage Date - By default Today will be inserted
oUse the Drop-Down Calendar/Date Entry field to Change that Date, if required.
▪Quantity - Enter the number of the selected Inventory Item that was used (it cannot be greater than that number that is Available).
▪Warehouse - Use the Drop-Down Selection List to Choose the Warehouse location from which the Inventory Item(s) will be taken.
▪Available - The quantity Available On Hand of the selected Inventory Item that is currently in the selected Warehouse location is inserted
▪Technician - Use the Drop-Down Selection List to Choose the Technician that (will use) has used the Inventory Item(s).
▪Install - Check the box in the Install column for each Inventory Item that is to be recorded in this Subscriber's Installed Equipment Form (if all listed Inventory Items were installed, Check the Green Install box).
▪Use - Click the Use button at the top of the Job Invoice Multi Usage dialog to execute the usage updates.
▪If this Inventory Use entry creates a Negative On Hand Quantity for the selected Inventory Item, a Negative Inventory Warning message will be displayed.
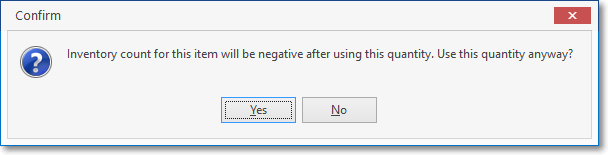
Warning - Negative Inventory
oClick the Yes or No button, as appropriate.
❖This Pop-Up Negative Inventory Warning will only be displayed when an attempt is made to add an Inventory item to the Inventory Used tab and the addition of that Inventory item results in a Negative On Hand Quantity value for that Inventory item, but only if the ConfirmNegativeInventory option in the Company Settings Form is set to True ("T").
✓Otherwise, the "Inventory Successfully Utilized" message is displayed
a)The Quantity that was used will be inserted in the Used column of this Inventory item on the Item List sub-tab.
b)The associated Sale-Purchase Item record will also be updated, with the Quantity of Committed On Hand will be increased, the Quantity of On Hand, Available On Hand, will be decreased, and the Quantity of WIP (i.e., Work in Progress) increased, as appropriate.
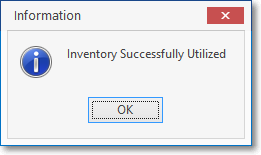
Inventory Successfully Utilized
▪Click OK.
•Installed Equipment Form - If the Install box was Checked for any Inventory Items that were Used, the Installed Equipment Form should be displayed.
✓Installed Equipment records should be updated, as appropriate, to identify additional information about the installation of the Inventory Item(s) (see the "Updating the Installed Equipment record" discussion immediately below)
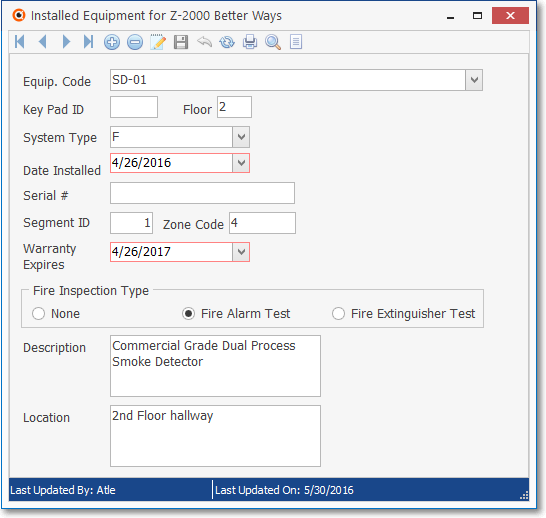
Installed Equipment Form for Subscriber
•Updating the Installed Equipment record
✓To properly identify this Installed Equipment item update the following fields, as appropriate:
✓Equip. Code - Entered automatically.
✓Key Pad ID - If this installed device reports an Alarm or Fault Code to the system's Keypad, enter that Key Pad ID Code here.
✓Floor - Enter the Floor number where this system component is installed.
➢Note: This is a two character field allowing for special entries such as B1 for first basement level, or Mz for the Mezzanine floor.
✓System Type - Use the Drop-Down Selection List to Choose the appropriate Alarm Condition Code that best represents the type of system function or alert that this component represents and/or reports to your Central Station.
✓Date Installed - By default, the Date Installed will be entered automatically..
▪This Date may be modified using the Drop-Down Calendar/Date Entry field, if this component has a different Sale Date than that of the master system.
✓Serial # - Where appropriate, enter the product's Serial Number.
▪This is particularly important for expensive components such as cameras, DVRs, control panels, etc.
▪Accepts up to 15 characters including upper & lower case letters, numbers and standard punctuation.
✓Segment ID - If this system consists of multiple segments, enter the appropriate Segment number for this system component.
✓Zone Code - If, upon alarm or fault, this device reports a Zone Code to the Central Station, enter that Zone Code here (the Zone Code is referred to as a Physical Zone in the CSID Zones and/or the Panel Zones Form).
✓Warranty Expires - By default, the Warranty Expires will be entered automatically.
▪This Date may be modified using the Drop-Down Calendar/Date Entry field, if this component has a different Warranty Ends Date than the master system.
✓Fire Inspection Type - If this component requires a Fire Alarm Test or a Fire Extinguisher Test, Click the appropriate button.

▪None - By default, None will be selected.
▪Fire Alarm Test - The Work Order Form - when it is created for a Fire Alarm Test - will list each of the Equipment Code items that have this button Clicked
oThis will help to make that Fire Inspection easier to perform and more accurately completed.
▪Fire Extinguisher Test - The Work Order Form - when it is created for a Fire Extinguisher Inspection - will list each of the Equipment Code items that have this button Selected
oThis will help to make that Fire Extinguisher Test easier to perform and more accurately completed.
✓Description - By default, the original Description entered for the selected Installed Equipment Code will be entered automatically.
▪The default Description of this system component may be revised (using up to 50 characters including upper & lowercase letters, numbers, spaces and standard punctuation), if required.
✓Location - Enter a brief comment (up to 100 characters including upper & lowercase letters, numbers, spaces and standard punctuation) specifying this system component's exact location.
✓Click the ![]() Icon to record this updated information.
Icon to record this updated information.
➢Important Note: If more than one Inventory Item was used, (two or more items were used) multiple records will be inserted into the Installed Equipment table and each record should be updated, as appropriate.
See the Installed Equipment chapter for complete information about using, and updating this Installed Equipment Form.
✓Close - Click the Close ![]() box on the Installed Equipment Form.
box on the Installed Equipment Form.
❑Item List sub-tab on the Inventory Tab of the Job Costing Form provides many capabilities (e.g., maintain a parts List which may be printed as needed, Order news parts, reserve parts for this Job, identify parts that were actually "Used").
•To access the Item List sub-tab,
a)From the Backstage Menu System Select Maintenance, then in the General sub-menu Choose Job Costing, or
b)From the Quick Access Menu, Select Maintenance and Choose Job Costing.
✓A Job Costing Form will be displayed.
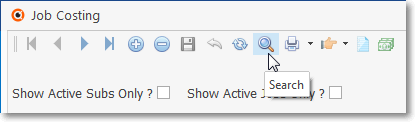
oLocate the Job that needs Inventory Items added by Clicking the Search Icon at the top of the Job Costing Form (see illustration above) which will open the Search Jobs dialog.
oSelect the Inventory Tab on the Job Costing Form.
oSelect the Item List sub-tab
❖ The Item List sub-tab on the Inventory Tab of the Job Costing Form has its own Ribbon Menu plus up to four special options which are located at the top of the Item List sub-tab:
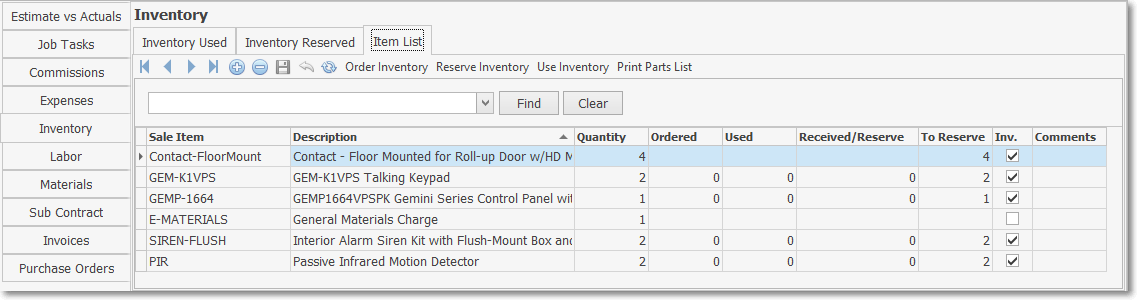
Job Costing Form - Inventory Tab - Item List sub-tab - Options

Item List sub- Ribbon Menu provides Record Movement, plus Add, Delete, Save, Cancel, Refresh & 4 special options
•Special Options on the Item List sub-tab:
1.Order Inventory - Create a Purchase Order for one or more Inventory Items specifically for this Job (whether or not any are currently in-stock).
2.Reserve Inventory - Often, the Inventory Item(s) required for a new Job is already in-stock, so it is wise to make a reservation for those existing in-stock Inventory Item(s) specifically for this Job (this information is automatically transferred to the Inventory Reserved sub-tab).
3.Use Inventory - This button allows the User to record the usage of a specified quantity of a selected Inventory Item (this information is automatically transferred to the Inventory Used sub-tab)
4.Print Parts List - Click the Print Parts List button to Preview and optionally Print (to a File or a Printer) this Parts List report.
❑Creating the Item List: The Item List sub-tab is where the master list of the Inventory Item(s) that may potentially be required for a Job can (and should) be identified.
•The first step in using the is to create a list of the Inventory Item(s) which may be needed for this Job.
•Then, there are two ways that the Item List may be populated:
A.Manually - Enter the Inventory Item(s) manually based on anticipated need:
▪Add - Click the ![]() Icon to insert a record in the Item List sub-tab
Icon to insert a record in the Item List sub-tab
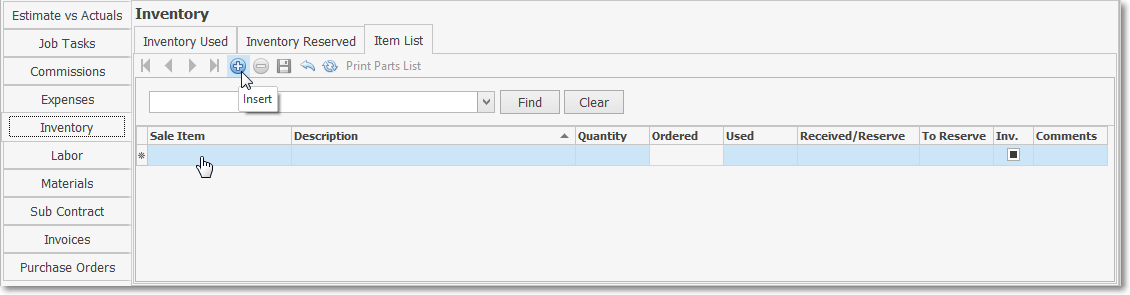
oSale Item - Use the Drop-Down Selection List provided to Choose the Inventory Item
oDescription - The Description of that Inventory Item will be inserted automatically
oQuantity - Enter the Quantity required
oOrdered - This column is populated by the Order Inventory (see below) option
oUsed - This column is populated by the Use Inventory (see below) option
▪Save - Click the ![]() Icon to record this Inventory Item requirement.
Icon to record this Inventory Item requirement.
➢Note: Any quantity of, and type of Inventory Item(s) and/or Materials may be added to this Item List sub-tab
B.Automatically - Use an existing Proposal containing (most or all of) the anticipated Inventory Item(s) that will be required for the Job:
1.First, if the Proposal was created for a Prospect, Convert the Prospect to a Subscriber following the instructions in that chapter.
2.Then, Convert the Proposal into a Job, rather than an Invoice, following the instructions in that chapter.
oThis conversion process creates a Job Costing record; then inserts all of the Inventory Items that were included in that converted Proposal into this Item List sub-tab.
oThe Inventory List that is created does not alter any of the Inventory Tracking System's Counts (e.g., On Hand, Committed On Hand, Available On Hand).
3.Later, the Inventory Item(s) listed on the Item List sub-tab may be identified as Ordered, Reserved, or Used by choosing one or more of the Special Options
❑Using the Special Options on the Item List sub-tab:
1.Order Inventory - If Inventory Item(s) are identified as required, but are not currently Available on Hand, select the Order Inventory option
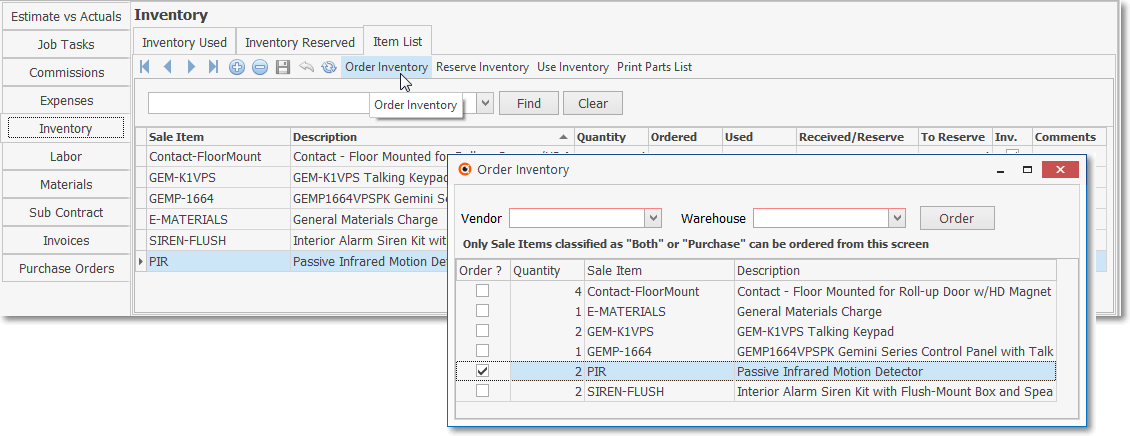
✓This Order Inventory option allows the User to Create a Purchase Order for any of the listed Inventory Item(s) following the directions outlined below:
▪Click the Order Inventory option to display the Order Inventory dialog
▪The Order Inventory dialog will list all of the Inventory Item(s and the Quantity of each that is required which have been defined on the Item List sub-tab.
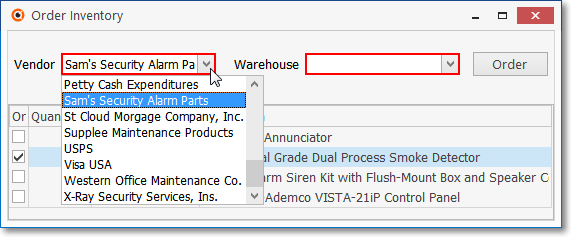
Order Vendor dialog - Vendor field's Drop-Down Selection List
▪Vendor - Using the Drop-Down Selection List provided (see above), Choose the Vendor from whom these Inventory Item(s) are to be ordered.
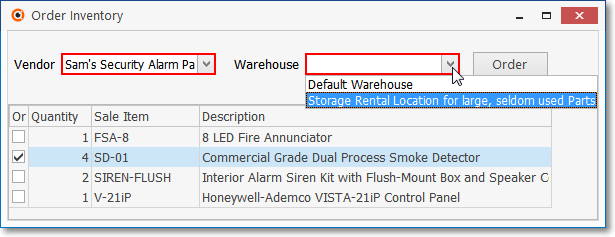
Order Vendor dialog - Warehouse field's Drop-Down Selection List
▪Warehouse - Using the Drop-Down Selection List provided (see above), Choose the Warehouse to which these Inventory Item(s) are to be delivered.
✓Once the Vendor and Warehouse have been selected, identify specifically which Inventory Item(s) are to be ordered:
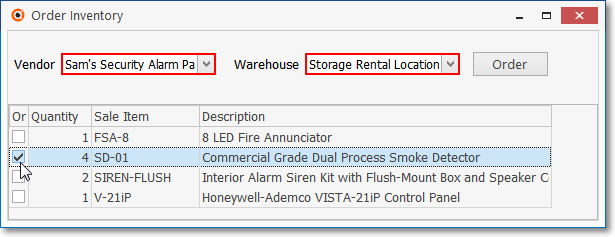
Order Vendor dialog - Item List
▪Order? - Check each Inventory Item that is to be ordered
▪Quantity - Set the Quantity that is to be ordered (you may only need to order less than the total of what is required because there may be some of the Inventory Items in-stock and so those may just need to be reserved (see Reserve Inventory below).
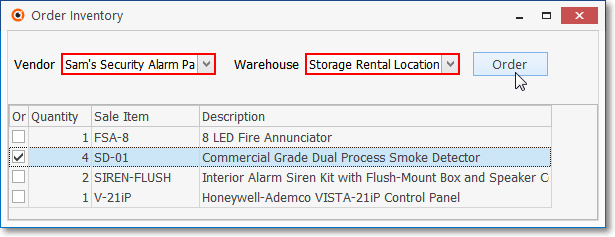
Order Vendor dialog - Order option
✓Order - Click the Order option and a Purchase Order confirmation message will be displayed,

✓To view the Purchase Order Form that was created
▪Select the Purchase Orders tab on the Job Costing Form
▪Click on the Purchase Order Number that was just created
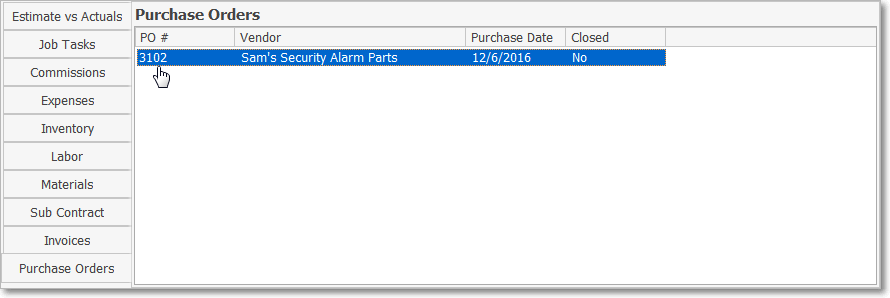
Job Costing Form - Purchase Order Tab - Select the desired Purchase Order number
▪The Purchase Order Form for the selected Purchase Order Number will be displayed.

Purchase Order created using the Order Inventory Option on the Item List sub-tab of the Job Costing Form
✓Refresh - Click the Refresh Icon on the Inventory Reserved sub-tab
▪The Inventory Item(s) that were ordered on this Purchase Order will also be inserted into the Inventory Reserved sub-tab.
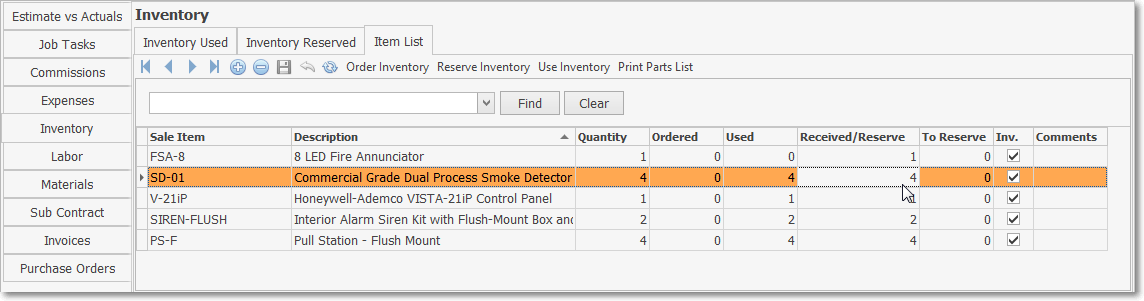
▪Once those Inventory Item(s) that were ordered on this Purchase Order have been Received (Checked In), the Received and On Hand Columns will be updated automatically.
oReserved Inventory, once identified as such, is counted as Work in Progress (i.e., the Quantity Checked In is added to the existing Quantity in the WIP field) in the associated Sale-Purchase Item Form records.
▪Record updates will be posted as follows:
a)The Received and On Hand Quantity values on the Inventory Reserved sub-tab will automatically be updated to reflect these changes.
b)The associated Sale-Purchase Item records will also be updated, with the On Hand, Available On Hand, and WIP (i.e., Work in Progress) Quantities revised, as appropriate.
2.Reserve Inventory - When the Inventory Item(s) needed for a Job are already in-stock (i.e., On Hand and Available on Hand), it is recommended that you make a reservation for those existing in-stock Inventory Item(s) specifically for this Job (this information is automatically added to the Inventory Reserved sub-tab),
✓Select the Inventory Item on the Item List sub-tab for which on or more are to be reserved
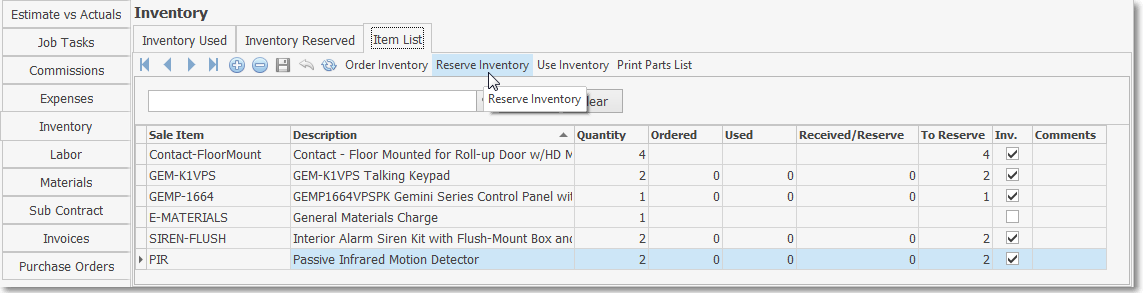
✓Click the Reserve Inventory option
▪If the Quantity of the Available On Hand field on the Sale-Purchase Items Form is 0, the No Available On Hand message will be displayed.
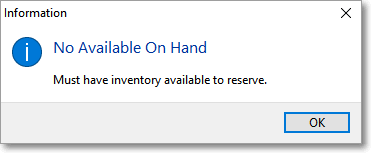
▪OK - Click the OK button toi acknowledge this message.
▪The Reserve Inventory procedure will be canceled.
✓The Job Inventory Reservation dialog will be displayed when the Quantity of the Available On Hand field on the Sale-Purchase Items Form is greater than 0.

Job Inventory Reservation Form
▪Select A Warehouse - Using the Drop-Down Selection List provided, Choose the Warehouse from which one or more of this Inventory Item will be reserved.
▪Select Inventory Item - The selected Inventory Item to be reserved will be inserted automatically.
▪Description - The default Description for the Selected Inventory Item will be inserted.
▪Available - When the Warehouse and the Inventory Item are chosen, the number of these Inventory Items that are actually Available at the selected location will be displayed automatically.
▪Reserve - Enter the Quantity of these Inventory Item(s) that are to be reserved.
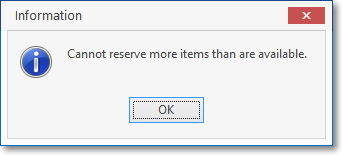
➢Note: You cannot Reserve more Inventory Items than are indicated as Available On Hand!
If attempted, a Warning message will be displayed.
✓Reserve - Click the Reserve button to execute this reservation request.
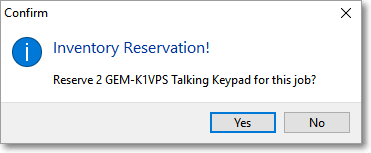
Inventory reservation confirmation
▪Click Yes to move the Quantity reserved from the Available on Hand field to the Committed on Hand field on the Sale-Purchase Item Form
▪This Reserved Inventory entry is also added to the Inventory Reserved sub-tab with that the Quantity inserted into that tab's Received column
✓Confirm this reservation request.
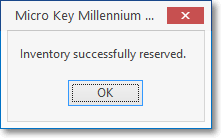
▪Click OK
✓Click the Close ![]() box on the top of the Inventory Reservation Form to close this Form.
box on the top of the Inventory Reservation Form to close this Form.
3.Use Inventory - The Use Inventory option (discussed in detail at the beginning of this New Job Costing Features chapter) allows you to identify those On Hand and Available On Hand Inventory Items (previously added to this Item List sub-tab) that were subsequently used for this Job
✓Those Inventory Item(s) which are identified as having been Used will be added to the Inventory Used sub -tab.
Job Costing Form - Inventory tab - Item List sub-tab - Use Inventory option
4.Print Parts List: Click the Print Parts List button to Preview and optionally Print (to a File or a Printer) this Parts List report.
Do you wish to preview the report first?
✓Click the Yes button to view a preview of the Parts List.

Parts List - Print Preview