Entering a New Prospect
❑This Prospects Form's Edit View Icon opens the Edit View dialog in which a new Prospect record may be entered, or an existing one, edited.
•Entering a New Prospect record
✓Open the Prospects Form by Pressing Ctrl+F3 (or Clicking the Prospects Icon on the Receivables Tab's Ribbon Menu),
✓Then, Click the Edit View Icon.
![]()
•The Edit View on the Prospects Form is where a Prospect's information is entered, modified (if needed) and deleted, if appropriate.
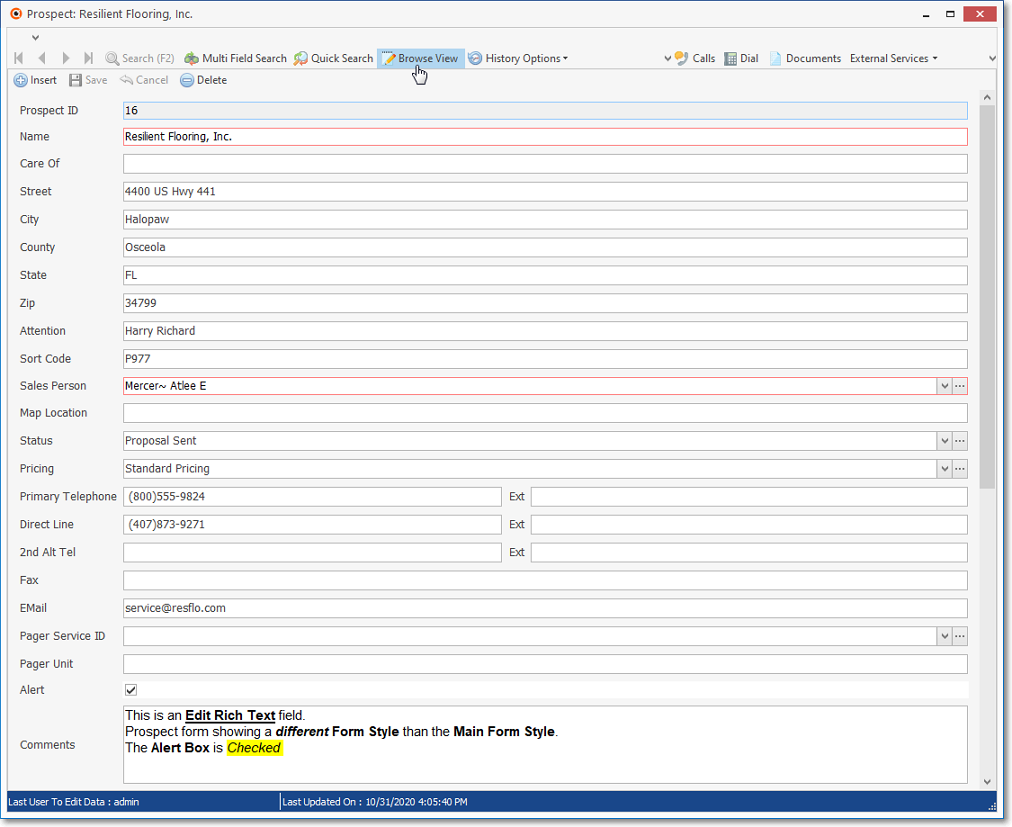
Prospects Form - Edit View
❑Prospect - Creating a new Prospect record:
•Click Insert ![]() to start an new Prospect record.
to start an new Prospect record.
•Prospect ID - This is the Prospect record number which is inserted automatically after the record is initially saved.
•Name. - Enter the Prospect's Name (up to 70 characters) as explained below:
✓Entering a Business Name
▪Enter the Name as it would normally be listed in the Telephone Directory
▪If a prefix is part of the Name but that Name is not normally alphabetized by that prefix (such as the word "the"), enter the name followed by a tilde ("~") and the prefix.
▪Example: "ABC Company~The"
✓Entering an individual Person's Name
▪The Last Name is entered first
▪Type a Tilde ("~") which tells the system that everything after it is the Prospect's first name and middle initial.
▪Enter the First Name and Middle Initial
▪For Prefixes (Mr., Mrs., Ms., etc.), enter them after the Tilde and before the first name
▪For Suffixes (MD., Jr., III, etc.), enter them after the Last Name and before the tilde.
▪Example: "Smith, MD~Dr. James T."
•Care Of - This field provides a place to expand the Subscriber's address information, and will appear below the Attention line described below (up to 30 characters in length), if entered.
•Street - Enter the Street address number and name.
•City, County State, Zip - Enter the City (up to 25 characters in length), optionally the County (up to 20 characters in length) which is entered for informational purposes only and does not print on a Proposal, State code (or Province), and Zip (or Postal) code.
•Attention - The Attention line will be printed below the Prospect's Name on their Proposal's Mailing Address. So this may be used for a building name, a person, suite number, additional address information or skipped entirely - depending on what you need.
•Sort Code - Up to 20 characters and may be entered to help you classify this Prospect record.
✓The Prospect Listing report allows you to Filter the list of Prospects based on - among many other fields - the Sort Code.
•Sales Person - Using the Drop-Down Selection List provided, Choose the appropriate Sales Person who is (or will be) assigned to this Prospect.
✓When assigning a Salesperson to Prospect, only those Employees whose Employee Type is identified as either Sales or All will be available (in the Drop-Down Selection List) for populating the Sales Person field.
▪Double-Click on the appropriate Employee
✓Click the Ellipse Icon to open the Employee Maintenance Form where a new or revised entry may be made (if the appropriate User Access Rights have been granted for the Employee Form)
•Map Location - Enter a Map book Location (or other Location information which can be used to record the page number and map coordinates), or the GPS coordinates of this location, or any other consistent methodology your Company adopts to easily locate a Subscriber's premises.
•Status - Initially the Prospect Status should be set to the Default Status as defined in the Prospect Status Form.
✓Use the Drop-Down Selection List provided to Choose this, or a different Prospect Status,
▪Double-Click on the appropriate Prospect Status
✓The Status may be changed at anytime based on subsequent contacts with this Prospect.
✓Click the Ellipse Icon to open the Prospect Status Maintenance Form. where a Prospect Status description may be created new or revised (if the appropriate User Access Rights have been granted for the Prospect Status Form)
•Pricing - To have the Retail Prices for the Sale-Purchase Items entered on Proposals adjusted using the Markup/Markdown Percentage defined in a Pricing Mark Up Group,
✓Use the Drop-Down Selection List provided to Choose the (optional) Pricing Mark Up Group.
▪Double-Click on the appropriate Pricing Mark Up Group
▪Click the Ellipse Icon to open the Pricing Mark Up Group Maintenance Form. where a Pricing Mark Up Group may be created new or revised (if the appropriate User Access Rights have been granted for the Pricing Mark Up Group Form)
•Primary Telephone - Enter the primary telephone number following the rules below.
✓If no Area Code is required, enter the seven (7) digit telephone number (it cannot start with a 1)
✓If 10 digit dialing is in effect - no "1"prefix is needed, but you do need to dial an Area Code as part of the telephone number:
▪Press the <Space Bar> first.
▪Then enter the three digit Area Code.
▪Finally, enter the seven digit Telephone Number.
▪Correct formatting will be applied automatically.
✓Long distance Telephone Numbers (with a "1" prefix) are entered as such, and the appropriate formatting parentheses and dash is applied automatically.
•Ext - Enter any Extension required (up to 8 characters).
•Alternate 1.. Alternate 2 - Continue with the Alternate Numbers and Extensions as needed following the telephone number entry rules above.
❖Renaming the Telephone Number field names:
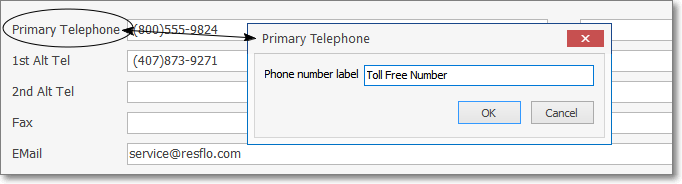
Primary Telephone - Phone number re-label entry
✓Right-Click on the Telephone Number field name you want to rename (Primary Telephone, 1st Alt Tel and 2nd Alt Tel field names may be renamed, as needed for each individual Prospect).
✓Enter the desired Telephone Number field name.
✓Click the OK button.

All of the Phone Number field names have been renamed
✓To cancel any renamed Telephone Number field name,
▪Right-Click on the Telephone Number field name you want to revert to the original field name.
▪Leave the Phone number label field blank.
▪Click the OK button.
▪That Telephone Number field name will revert to the original "default" field name.
•Fax- Enter a Fax number and/or an E-mail address.
•EMail - Enter the appropriate Email Address to be used for contacting this Prospect.
•These fields are only available if you have registered the Communications Module:
✓Pager Service ID - If needed.
▪Double-Click on the appropriate Page Service ID using the Drop-Down Selection List, if applicable for this Prospect.
▪Click the Ellipse Icon to open the Page Service Maintenance Form where a new or revised entry may be made (if the appropriate User Access Rights have been granted for the Page Service Form)
✓Pager Unit - If needed.
•Alert - Check this box to identify the record as being in Alert Status which will be displayed on the Information Bar on the Subscribers Form when (if) this Prospect is Converted to a Subscriber.
•Comments - You may simply type in any appropriate Comments, as needed.
✓However, there is a built in Rich Text Editor available - accessed by Double-Clicking within the Comments field.
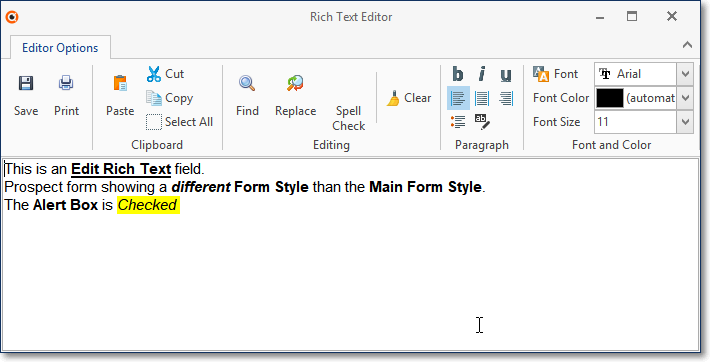
✓This Rich Text Editor provides word processing level features - most of which - you will find familiar like bold, underline, italics, highlighting plus font and font color selections.
▪If you have opened the Rich Text Editor dialog, Choose Save on the Editor Options Ribbon Menu to record the text.
▪Click the Save Icon on the Edit View Menu to record any changes to the Comments without using the Rich Text Editor,
✓Click the Rich Text Editor Find Icon to locate a particular word or phrase anywhere within the Comments.
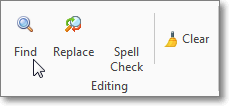
✓Enter the word or phrase you are searching for in the Find What field.
✓Check the Match whole word only box if you want the search result limited to the exact word or phrase you entered (versus a portion of it).
✓Check the Match case box if you want your search results to exactly match the upper and lower case of your Find what entry
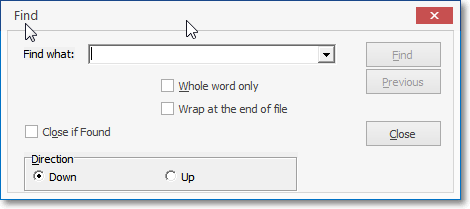
Find dialog
✓Once you've located the required text, Click the Close button to close the Find dialog.
✓View or change what you've located, as needed.
❑Tax Information section for Prospects
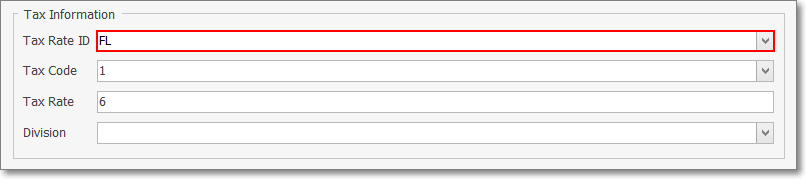
•Tax Rate ID - Using the Drop-Down Selection List provided, Double-Click the appropriate Sales Tax ID for this Prospect.
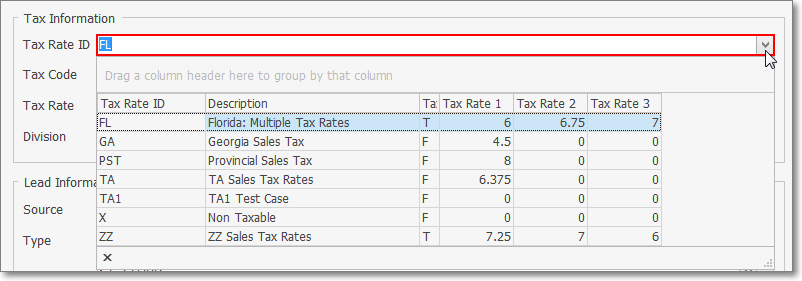
✓The Sales Taxing Authority - Tax Rates Maintenance Form is where Sales Tax Rates may be created or revised (if the appropriate User Access Rights have been granted for the Sales Tax Rates Form)
▪When Sales Taxing Authorities have implemented Sales Tax Percentage Rates with up to three (3) Decimal Places, two Company Settings must be re-set to support Charging and Collecting this type of Sales Tax.
1)Show Tax And Total Per Line Item Report - By default, the ShowTaxAndTotalPerLineItemReport option is set to False ("F"). However, when Sales Taxing Authorities have implemented Sales Tax Percentage Rates to three (3) Decimal Places (e.g., nn.nnn%), this is one of the two Company Settings that must be re-set ( see "Show Tax And Total Per Line Item Screen" immediately below) to support Charging and Collecting this type of Sales Tax. Setting this ShowTaxAndTotalPerLineItemReport option to True ("T" will activate this Three Decimal Places Sales Tax feature and include this information on reports.
2)Show Tax And Total Per Line Item Screen - By default, the ShowTaxAndTotalPerLineItemScreen option is set to False ("F"). However, when Sales Taxing Authorities have implemented Sales Tax Percentage Rates to three (3) Decimal Places (e.g., nn.nnn%), this is one of the two Company Settings that must be re-set ( see "Show Tax And Total Per Line Item Report" immediately above) to support Charging and Collecting this type of Sales Tax. Setting this ShowTaxAndTotalPerLineItemScreen option to True ("T" will activate this Three Decimal Places Sales Tax feature on the appropriate data entry screens.
•Tax Code - Using the Drop-Down Selection List provided, Select the appropriate Tax Code (from those defined for the assigned Tax Rate ID):
✓Y - Yes they are Taxable and the assigned Tax Rate ID was defined as not having Multiple Tax Rates
✓1 - Yes they are Taxable and the assigned Tax Rate ID was defined as a Multiple Tax Rates class and this Tax Code number represents the Tax Rate to be assessed.
✓2 - Same as 1 above.
✓3 - Same as 1 above.
✓N - No the Subscriber is Not Taxable.
✓E - This Subscriber is always Sales Tax Exempt.
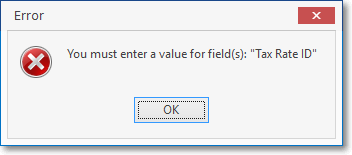
➢Note: If no Tax Information is entered and the User attempts to save this Prospect record, an error message will be displayed.
•Tax Rate - This field will be populated automatically based on the Percentage Rate defined for the Tax Code previously entered in the Tax Rates Form.
•Division - If your Company has implemented the Division Codes functionality, using the Drop-Down Selection List provided, Double-Click the appropriate Division code.
✓The Divisions Maintenance Form is where Divisions may be created or revised (if the appropriate User Access Rights have been granted for the Divisions Form)
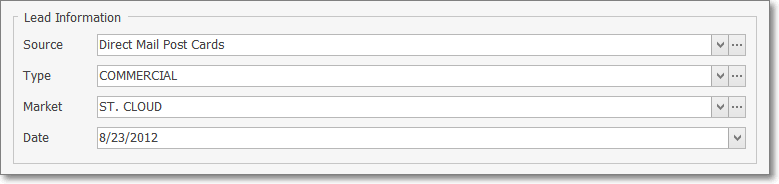
•Finish the Prospect entry by completing the Lead Information section which has four (4) fields:
1.Source - Enter the Lead Source for this Lead using the Drop-Down Selection List provided.
▪Double-Click on the appropriate Lead Source within the Drop-Down Selection List provided.
▪Click the Ellipse Icon to open the Lead Source Maintenance Form. where a Source may be created new or revised (if the appropriate User Access Rights have been granted for the Lead Source Form)
2.Type - Enter the Lead Type using the Drop-Down Selection List provided.
▪Double-Click on the appropriate Lead Type within the Drop-Down Selection List provided.
▪Click the Ellipse Icon to open the Lead Type Maintenance Form. where a Lead Type may be created new or revised (if the appropriate User Access Rights have been granted for the Lead Type Form)
3.Market - Enter the Marketing Area for this Lead using the Drop-Down Selection List provided.
▪Double-Click on the appropriate Marketing Area within the Drop-Down Selection List provided.
▪Click the Ellipse Icon to open the Marketing Area Maintenance Form. where a Marketing Area may be created new or revised (if the appropriate User Access Rights have been granted for the Marketing Area Form)
4.Date - Enter the Date when this Lead was received using the Drop-Down Calendar/Date Entry field provided.
a)Click on the Date field and type the desired Date using a MM/DD/YYYY format; or
b)Use the Drop-Down Calendar/Date Entry field provided to Choose the desired Date
❑Custom Fields - Custom Fields and Tabs may be created for the Prospects Form's Edit View.
•If Custom Tabs and Fields have been defined, these will appear at the bottom of the Edit View on the Prospects Form.

❖See the Custom Fields and Tabs chapter for complete information on how they are created.
•Click the Save Icon to record the Prospect entry.
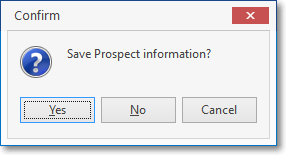
Post changes to record?
✓If the User attempts to leave the Prospects Form's Edit Tab before saving the current entry (or modification), a Save Prospect Information? message will be displayed.
▪Yes - Click the Yes button to record the entry (or modification) and Close the Form.
▪No - Click the No button to abandon the entry (or modification) and Close the Form.
▪Cancel - Click the Cancel button to return to the Edit View and continue the entry.
•Duplicate Account Warning - If the Telephone Number of this new Prospect record being saved already exists in another Prospect record, a Duplicate Account dialog will be displayed.
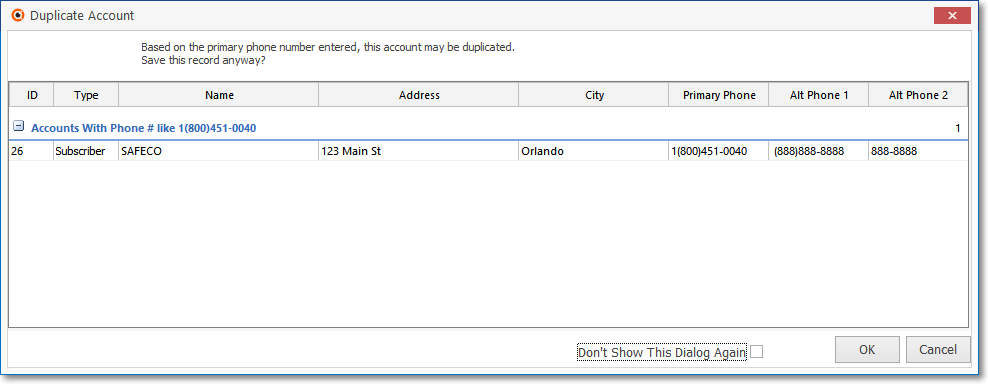
Duplicate Account dialog
✓If you know that this Telephone Number is being used by another Prospect record that already exists, and that is acceptable (perhaps it is a sub-location of a main Account or for some other reason, more than one Prospect will have the same main number):
▪Click the OK button to save the record as requested.
✓If this is not the case, and one or more Prospect records are listed, determine whether duplicates are acceptable, whether you need to correct this, or another record's primary telephone number.
▪Click the Cancel button and change the current record.
▪Click the OK button to accept the current record.
▪Go to the other record(s) and make the primary telephone number changes there, if appropriate.
✓Don't Show This Again - Check this box if you want to turn off the Duplicate Account checking process.
➢Warning: Once the Duplicate Account checking process is turned off, Technical Support must be contacted to re-activate this feature!
❑Updating Prospect information:
•Once you have completed a Prospect entry, you may return to the Prospects Form's Edit View at any time to Update the record, as needed.
✓Particularly, you may want to update the Prospect Status previously assigned to this record.
•Press F2 or Click the Search Icon at the top of the Prospects Form to look up a specific Prospect's record that needs to be Updated.
❖See the F2 Prospect Search chapter for additional information about this function.
✓To make entries, Click on the field(s) needing revision and add or change the data, as needed.
•Click the Save Icon to save these Prospect record updates.

•To return to the regular Prospects Tab (the Browse View), Click the Browse View Icon.