❑Ideally, all of your Prospects will eventually become Subscribers.
•As stated in the How to Setup a Module, any data entered, that would be needed in another module later, will automatically be there and shared with that module when that new module is started.
✓The Prospect Tracking System is actually a sub-ordinate module to the Accounts Receivable System
✓Prospects are easily, and virtually automatically, exported to the Subscribers Form.
•To Convert a Prospect to a Subscriber:
✓On the Prospect Form, Locate (F2 Prospect Search) the appropriate Prospect that has become a Subscriber.
✓On the Prospect Form's Prospect Options Menu, Click the Convert To Subscriber Icon (see menu option in illustration below).
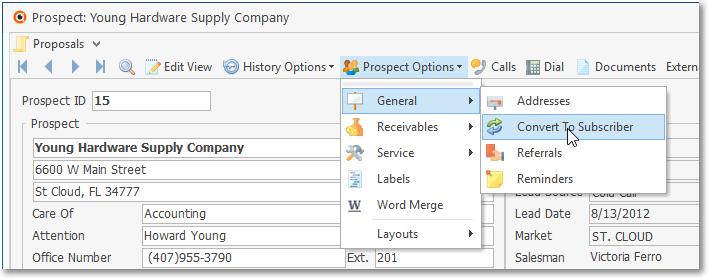
Prospect Form - Prospect Options Menu - General sub-menu - Convert to Subscriber option
✓Confirm that you do want to make this conversion.
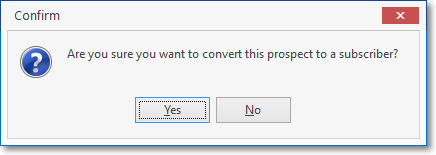
Confirm Prospect to Subscriber Conversion
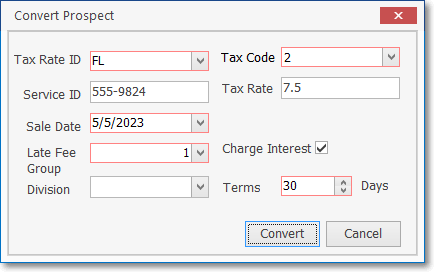
✓The Convert Prospect dialog is displayed.
✓You must enter certain Sales Tax, Service ID, and Recurring Billing related data to allow its acceptance as a Subscribers record within the Accounts Receivable System.
❑Convert Prospect dialog - Entering the required Prospect Conversion information.
Convert Prospect Form - Completed conversion data
•Tax Rate ID - Use the Drop-Down Selection List to Choose the appropriate Sales Tax Rate.
•Tax Code - Use the Drop-Down Selection List to Choose the appropriate Tax Code (Y,N,1,2,3) which establishes their Sales Tax Rate.
•Service ID - Accepts all alphanumeric characters (a-z, A-Z, 0-9) and regular punctuation marks - up to a total of 15 characters in length.
✓Many users assign the Subscriber's telephone number as the Service Account Number such as "407-870-0040"
✓The original sale date plus their primary CSID (or visa versa) is another choice such as "2007-09-24/3277".
✓Just be consistent and have your entry actually mean something to your Service Technicians.
•Sale Date - Use the Drop-Down Calendar/Date Entry field to enter the Sale Date (or completion date - if you prefer) from which their Warranty Ends date will be calculated (a one year Warranty is assumed).
a)Click on the Date field and type the desired Date using a MM/DD/YYYY format; or
b)Use the Drop-Down Calendar/Date Entry field provided to Choose the desired Date
•Charge Interest? - If your Company charges interest (Late Fees) on past due Invoices, and this Prospect - who is now becoming a Subscriber - will be assessed interest charges on those past due Invoices, Check this box.
✓Late Fee Group - If you Checked the Charge Interest? box, use the Drop-Down Selection List to Choose the appropriate Late Fee Group.
oRight-Click this field to Choose the Search By method, if desired.
•Division - If you have defined Divisions and this Prospect should be assigned to a specific one, use the Drop-Down Selection List to Choose the appropriate Division code.
✓Right-Click this field to Choose the Search By method, if desired.
•Terms - If the "UseSubscriberTerms" option in Company Settings is set to True ("T"), it requires that this Conversion Process gets the payment Terms your Company will offer to that newly created Subscriber.
a)By default, it will insert the Company Terms set in the Company Options - General sub-tab within the Company Options tab of the User Options Form but may be re-set to what Terms are appropriate for this (new) Subscriber.
b)When the UseSubscriberTerms option in Company Settings is set to False ("F"), this field will not be presented because the Company Terms set in the Company Options - General sub-tab within the Company Options tab of the User Options Form will prevail.
•Convert - Click the Convert button to execute the move.
•Cancel - Click Cancel to abort the conversion process.
❑Cleanup Procedures:
•Based on the previously entered Prospect information, the Comments, Leads, Service Info Section and Accounting Receivable Sections within the Edit View of the Subscribers Form are filled in during the conversion.
✓Take a moment and review the information that was transferred.
✓Update any information items (perhaps an additional Comment on the conversion, and update of the Service Info Section with Directions, Contract Type, etc.), as needed.
•Proposal Alternate Address - An alternate address, if defined, will be also converted.
▪It will be inserted into the Subscriber's Addresses Form and also into the Configuration Form as the Default Proposal Address.
•Proposals - Because this Prospect was converted to a Subscriber, it's assumed that you will want to Convert the Proposal in some manner:
✓When the Prospect to Subscriber conversion is executed, it also reassigns the Proposal(s) to that Subscriber.
✓Any converted Proposals may then be converted to an Invoice, a Job, or an Installation Order, as may be required (see the Converting Proposals chapter for more information).