What are Custom Fields?
❑Eventually, almost everyone has some data (dates, numbers, comments, or another type of information) that they wish was acquired, and accessible later, in MKMS - but is not.
a)Up to three (3) Custom Tabs may be defined.
b)A total of forty (40) Custom Fields are available - shared between the three Tabs, and are assigned to the appropriate Tab, as needed.
c)Once defined, these tabs will appear in the Edit View on the Subscribers and Prospects Forms
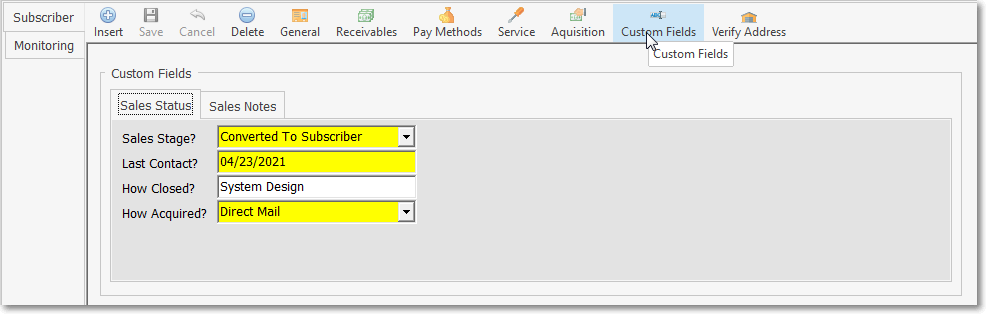
Subscriber Form - Custom Fields option within Edit View
d)They will also be available within MKSales using the Custom Fields option on the Prospect Detail and Add Prospect pages
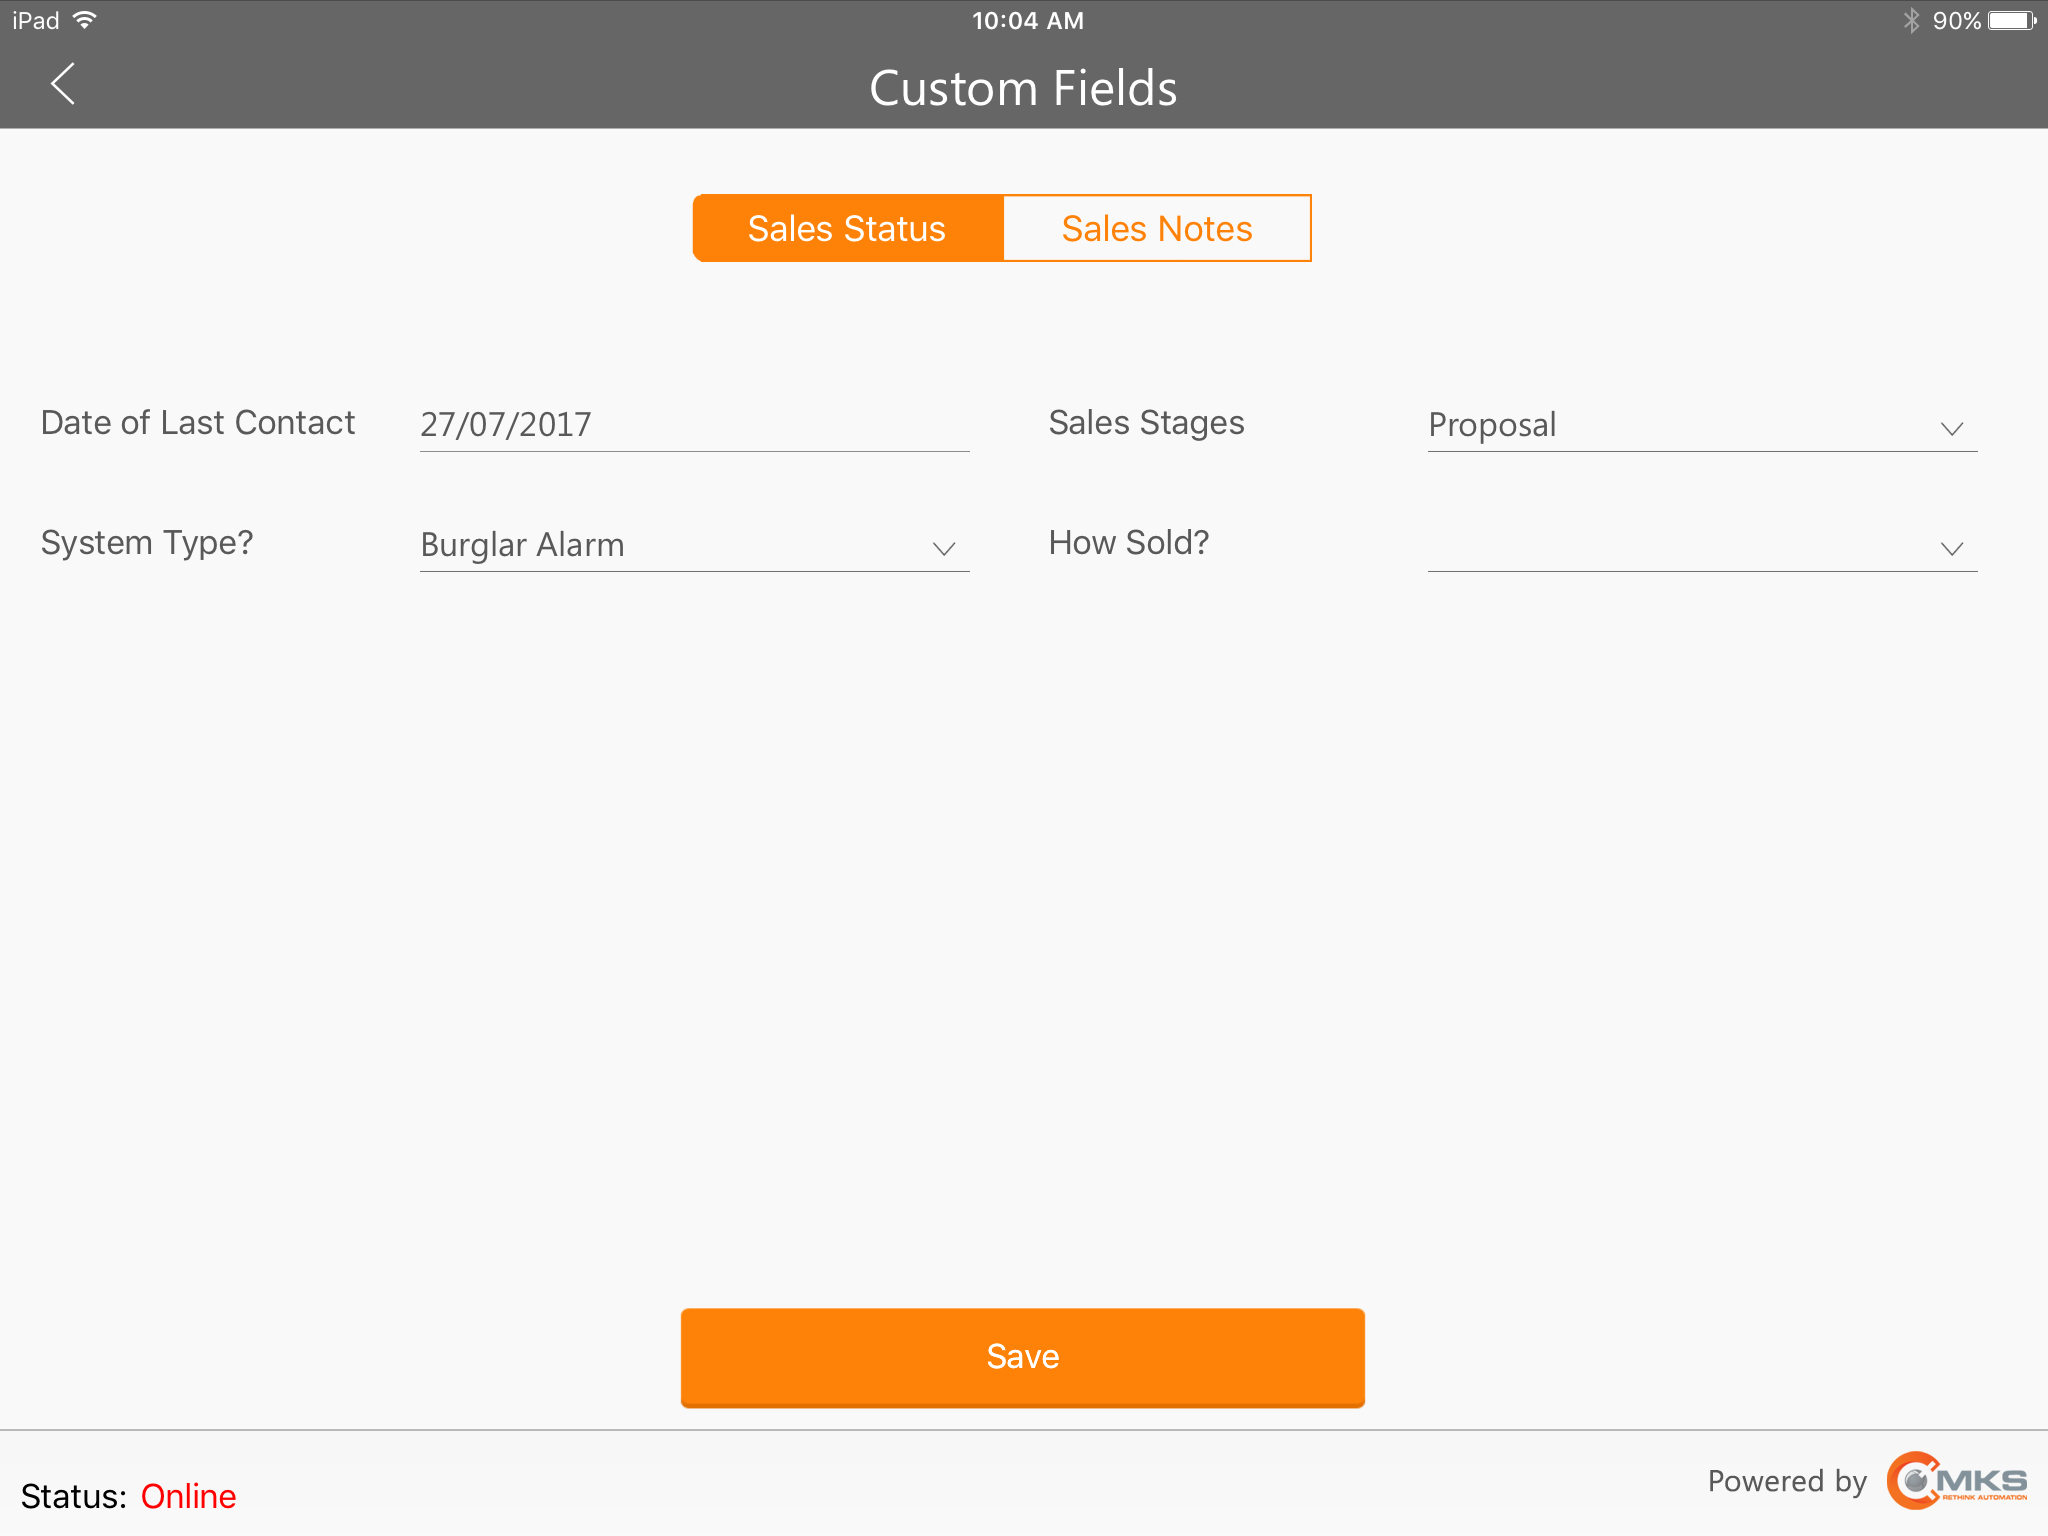
MKSales application - Prospect Details - Custom Fields example
•Custom Fields may also be displayed in ant of the three Tabs (i.e., Accounting, Monitoring, Service) within the Browse View of the Subscribers and/or Prospects Forms
•When a Prospect is converted to a Subscriber: any information entered in these Custom Fields will follow it.
•So, with this ability to define Custom Tabs within the Subscribers Form, and being able to define Custom Fields within those Tabs, you will not have that type of limitation.
Defining Custom Fields
❑To access the Custom Fields option:
a)From the Backstage Menu System Select the Maintenance Menu then Click Custom Fields, or
b)From the Quick Access Menu, Select the Maintenance Menu then Click Custom Fields.
•The process is as follows:
✓Tabs section: The top of the Custom Fields Form has a Tabs section:
▪Three available Tab names are displayed and labeled as: First Tab, Second Tab and Third Tab
▪By default, they are named generically as Custom1, Custom2 and Custom3.
▪Each Custom Field will be assigned to one of these Tabs (see 6. Tab below).

▪In this Tabs section of the Custom Fields Form, Click the Edit Captions option and then edit each Tab's name as appropriate.
▪Click the Save button next to the Edit Captions option button to record that Tab's name.
✓Fields section: In the Fields section, one row at a time (as needed), select and complete each of the columns as needed.
▪There are nine (9) columns - starting with the system assigned record's ID - in the Fields section.
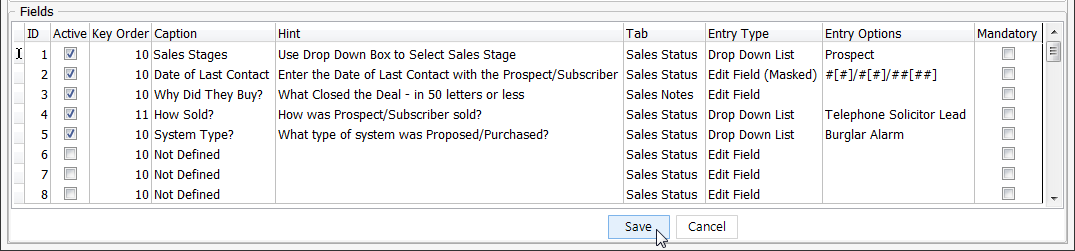
▪Up to 40 Custom Fields may be defined.
oFor each Field that you want to appear on selected Tab, you must enter information in each of these fields.
oThe information you enter will allow you to strictly control what and how this information will be accepted and formatted.
oClick the Save button at the bottom of the Form to record the Fields information that is entered.
❖See the detailed instructions in the "Identifying the required Custom Fields" discussion immediately below.
❑Identifying the required Custom Fields:
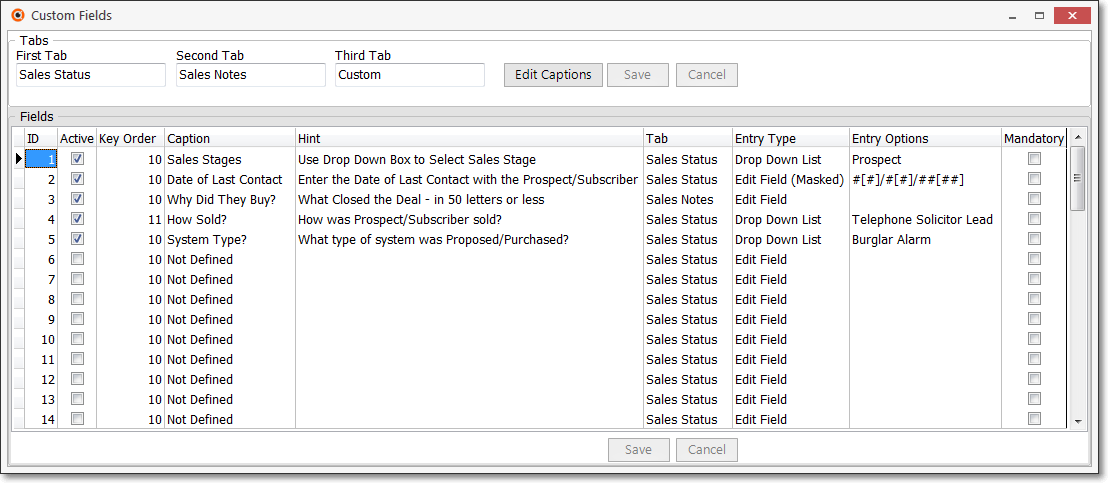
Custom Fields Form
Tabs section where up to three (3) Custom Tabs may be defined
Fields section for specifying the characteristics of each Custom Field
•To complete the activation of a Custom Tab, you must Click on each column of the selected row and enter the appropriate information as described below:
1.ID - This is the system assigned record number of this Custom Field
2.Active - Check the Active box to turn on the selected Tab in the Subscribers and Prospects Forms
3.Key Order - Set the Order number in which this field's Caption will appear.
✓By default, that number is ten (10).
✓If you entered 10 for every item on this Tab, they would appear in the order these Custom Fields were defined.
✓If you want to change that order, assign an Order number either more than or less than the number 10.
✓The end result is that the Custom Fields will be displayed in numerical order - from lowest to highest, skipping Key Order numbers in between is OK - on that Tab (see 6. Tab below).
4.Caption - Enter a Caption representing what you want to name this Custom Field.
✓The Caption may be up to 20 characters long.
✓This is the name of the field that will appear on this Tab (see 6. Tab below).
✓Each Caption that will be displayed within the same Tab must be assigned a different Caption name.
5.Hint - Enter a "Hint" that briefly defines what type of information is needed.
✓This hint will be displayed like a Tool Tip.
✓If you hold your mouse over the field, the Hint will be displayed.

✓Although normally the entry would be brief, you may enter a considerable number of lines of text to make the explanation as detailed as necessary.
▪Because of screen size limitations, each information line should be brief.
▪It should not fill the distance across the screen.
▪So each line should be less than 80 characters.
▪To start the next line, Press 8 Enter.
▪Repeat as needed.
6.Tab - Click the Tab box.
✓ A Drop-Down Selection List will show all of the Custom Tab names that have been defined [or the generic name(s) if they have not].
✓Select the appropriate Tab name.
▪More than one Custom Field may be assigned the same Tab.
▪This allows you to define multiple Custom Fields on this same Tab.
▪The Caption (see 4. Caption above) will be the name of the data item shown on the Custom Tab
▪The other columns in the row will allow you to define its format and content.
✓In this manner, by selecting the appropriate Tab name and then entering its Caption (and the other information in this row), you will be able to "build" the data entry fields that will be shown on the selected Tab.
7.Entry Type - There are five (5) types of entries that may be specified.
✓Using the Drop-Down Selection List, Select the appropriate Entry Type for this field.
1)Edit Field - Specifies a field that will accept up to 50 characters of any type.
2)Edit Field (Masked) - Sets a field that will accept information with a predefined format (like a telephone number, date, Social Security Number, Yes/No choice, or other special formatting (see Understanding Data Entry Masks below).
3)Drop-Down - Allows for the creation of selections for a Drop-Down Selection List which offers suggestions, but the actual entry may be different than any of the suggested entries.
4)Drop Down List - Allows for the definitions of the selections that are offered in a Drop-Down Selection List (which will be the only ones accepted in this field).
5)Number - Displays a field with an up and down arrow. You may Click either one to (re-)set that field's value or simply enter a number of your choosing.
✓Define Data Entry Masks or Drop-Down selections, as needed.
8.Entry Options - Double-Click (Memo) to further define your field using the Entry Options for the following Entry Types:
✓Masked Entries - In the Entry Type column, Select Edit Field (Masked)
▪Click the Entry Options column
▪Define this Data Entry Mask
▪See Understanding Data Entry Masks below.
✓Drop Down - In the Entry Type column, Select Drop-Down
▪Double-Click the Entry Options column.
▪Define this Drop-Down selections by entering each selection on its own line.
▪To start the next available selection, Press 8 Enter.
▪Repeat this process until you have defined all the necessary Drop-Down Selection List choices.
▪Remember that the selections defined in this list are merely suggestions and the user may type in their own entry.
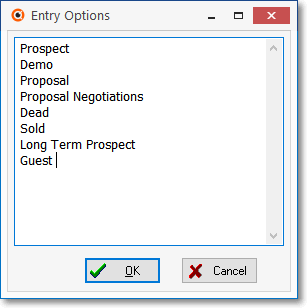
Drop-Down Selections List contents defined in Entry Options
▪Click OK ü to save the list.
▪When this field is appears on the Subscriber/Prospect Form, the Field Name and associated Drop-Down Selection List is displayed in the normal manner.
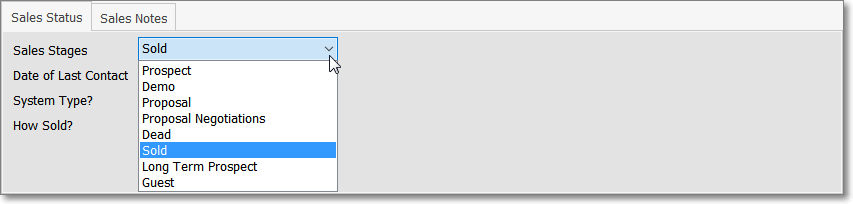
Subscriber Form - Custom Field - Field Name with its associated Drop Down Selection Box
✓Drop Down List - In the Entry Type column, Select Drop Down List
▪Double-Click the Entry Options column
▪Define this Drop Down List selections by entering each selection on its own line.
▪To start the next available selection, Press 8 Enter.
▪Repeat this process until you have defined all the necessary Drop-Down Selection List choices.
▪Remember that the selections defined in this list are the only choices the user will be able to enter.
9.Mandatory - Check this box if the information required for this Custom Field must be entered in order to save the information on the Subscribers and Prospects Forms
Understanding Data Entry Masks
❑Data Entry Masks are simply the rules you can define that establish the proper formatting of the data that may be entered in a Custom Field.
•By establishing these Data Entry Masks, you are assured that the information will be entered in a consistent manner, regardless of the user.
•As an example, these dates all mean the same thing:
a.March 21st, 2009
b.3/21/09
c.03-21-2009
d.21 Mar 09
e.2009.03.21
•Even though we can probably decipher all of these dates, we could easily foresee errors developing because of their inconsistent format.
•In less clearly interpreted information, or information that has a mandatory format (like Social Security and Telephone Numbers), proper and consistent formatting is even more critical.
❑Data Mask Types
•A "mask" is one or more characters, placed within a line, that represent one or a group of character types that are allowed to be entered in that position and that need to be formatted in a very specific way.
•There are ten specific "mask" defining characters:
1."#" - pound sign - allows for the entry of a digit between 0-9.
2."?" - question mark - allows for the entry of a letter (upper or lower case permitted).
3."&" - ampersand - allows for the entry of any letter (automatically converted to UPPER case).
4."~" - tilde - allows for the entry of a letter (automatically converted to lower case).
5."@" - at sign - allows for the entry of any keyboard character (see # 7. for the exception).
6."!" - exclamation point - allows for the entry of any keyboard character with letters automatically converted to upper case (see # 7. for the exception).
7.";" - semi-colon - If you need one of the dedicated Mask characters to be included in the data entry itself, precede that character with a semi-colon.
➢Note: If you wanted the resulting entry to be "#ABCD-7665", because of the use of the pound sign, the mask would be ;#&&&&-####
8."*" - asterisk - allows you to repeat the character following this asterisk any number of times.
9."[ ]" - left and right square brackets - allows for an optional sequence of characters [the mask for them will be defined within these square brackets]
➢Note: If you wanted the resulting entry to be "3/1/09" but would accept "03/01/2009" or "3/1/2009", etc., the mask would be #[#]/#[#]/##[##].
10."{ }" - left and right curly brackets - this groups a character(s) set, allowing you to create simple either/or choices.
➢Note: Define the required user responses with the appropriate Masks:
oYes or No - {Yes,No}
oSmall Medium or Large - {Small,Medium,Large}
oRed Green or Blue - {Red,Green,Blue}
•Any other character defined within a mask represents that character itself.
✓Parenthesis, dashes, other punctuation marks, letters and numbers in a mask means that those characters will be inserted in the text at their location, automatically.
✓As an example: In a 10 digit telephone number the (111) 555-1212 would be masked as (###) ###-#### indicating that there will always be parenthesis surrounding an area code and that there will be a dash between the exchange numbers and the last four digits.
•Additional mask examples with their explanations:
✓US Zip Code with optional Zip+4 formatting - #####[-####]
✓First letter will be capitalized, the remainder of the entry may be upper and/or lower case letters - &*?
✓First letter will be capitalized, the remainder of the entry will be lower case letters - &*~
✓Standard Canadian Postal Code - #&#&#&