❑The Subscriber Information page has three (3) tabs one of which is the Panels tab
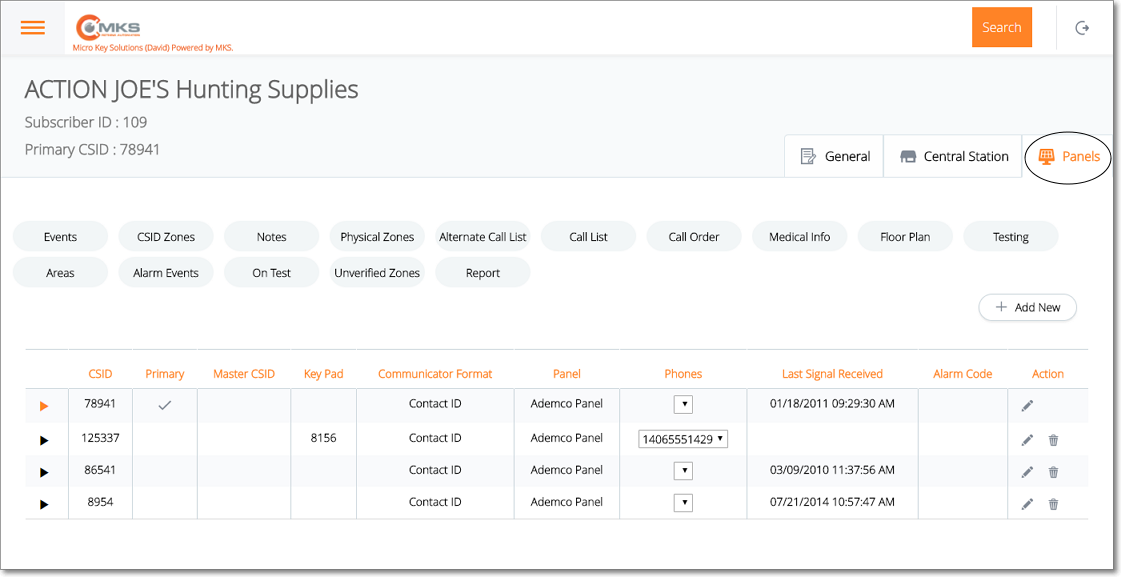
Web Dealer Access - Subscriber Information - Panels tab
•The Panels tab contains the list of CSIDs which are being monitored for this Subscriber; and (among other options) has a CSID Zones option.
✓Select the CSID from the list on the Panels tab that has the CSID Zones which are to be viewed, added to, modified and/or deleted.
✓Tap or Click on the CSID Zones option to display the CSID Zones page for that CSID.
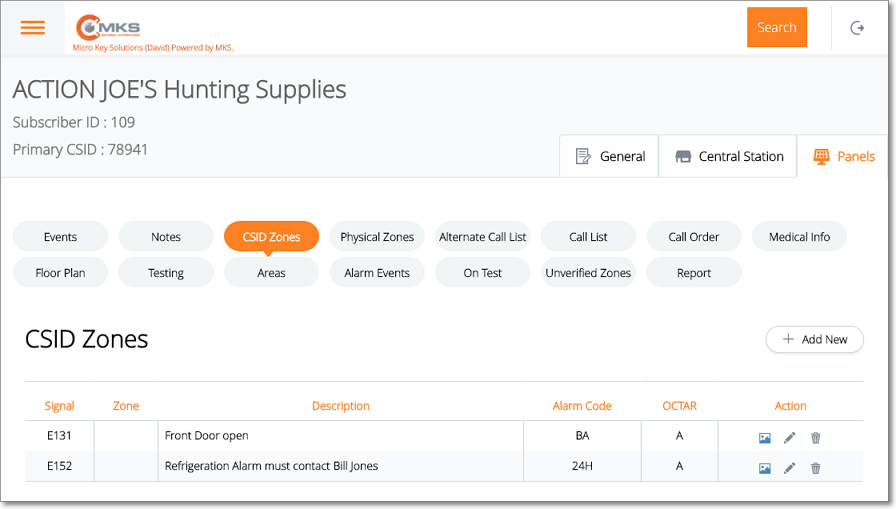
Web Dealer Access - Subscriber Information - Panels tab - CSID Zones page
✓Once you have finished using the CSID Zones page, Tap or Click on the Panels tab to return to it.
❑Understanding and Using the CSID Zones page:
•This CSID Zones page provides three features:
A.List - A List of all previously defined CSID Zones
B.Actions - Ability to Edit, Save and/or Delete a previously defined CSID Zones
C.Add New - Ability to Add a new CSID Zones
A.List of CSID Zones has several columns
1.Signal - The Signal ID sent by the control panel
2.Zone - The (optional) physical zone being reported by the control panel
3.Description - The description of what is being reported by this CSID Zone
4.Alarm Code - The Alarm Condition Code representing what is being reported by this CSID Zone
5.OCTAR - The code identifying what this CSID Zone is reporting (i.e., Open, Close, Test, Alarm, Restoral)
6.Action - Special purpose Icons (see B. below).
B.Action - Offers an Image (select to add or to view a picture or graphic of the CSID Zone), an Edit (select to update existing CSID Zones information), and a Delete (select to remove this CSID Zone) option
1.Image - Tap or Click ![]() to add an Image to the selected CSID Zone page (see the "Updating a CSID Zone" discussion below).
to add an Image to the selected CSID Zone page (see the "Updating a CSID Zone" discussion below).
2.Edit - Tap or Click ![]() to open the CSID Zone page (see the "Updating a CSID Zone" discussion at the end of this chapter)
to open the CSID Zone page (see the "Updating a CSID Zone" discussion at the end of this chapter)
3.Trash - Tap or Click ![]() to remove this CSID Zone entry.
to remove this CSID Zone entry.
C.+ Add New - Tap or Click this button to open the CSID Zone entry page.
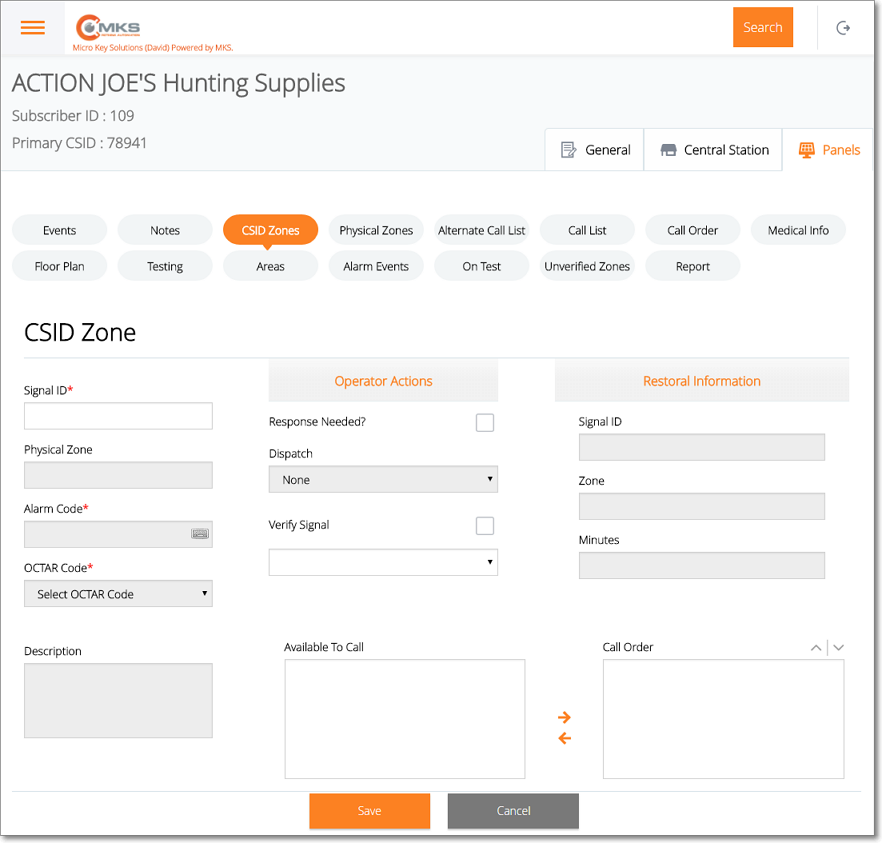
Web Dealer Access - Subscriber Information - Panels tab - new CSID Zones entry
❑Defining a CSID Zone
•Signal ID - Enter the specific Signal Identifier for this signal, keeping in mind the Communicator Format that was assigned to the Subscriber's CSID in Subscriber Panel(s).
✓Once a Signal ID has been entered, the additional fields listed below will become available for data entry.
❖Also, see Using the Wild Card Feature for more information about this feature.
•Physical Zone - Enter the Zone Code, if one is transmitted along with the Signal Identifier.
✓For the SIA Format Only - When the additional modifiers: PT (point), ID (user id), or RT (rf point) are received, the number that follows these modifiers will be placed in the Physical Zone field appended to actual Physical Zone number.
✓If a Wild Card was used in the Signal ID, a Physical Zone must be entered.
•Alarm Code - Use the Drop-Down Selection List provided to Choose the appropriate Alarm Condition.
•OCTAR Code - Use the Drop-Down Selection List provided to Choose (the list is shown below) the type of signal or event you are defining.
✓O = Open
✓C = Close
✓T = Test
✓A = Alarm
✓R = Restoral
•Description - Provide a clear, concise description of this Signal ID and/or Physical Zone.
➢Note: As noted above, for Accounts using a Security Company for their Burglar Alarm Response, this Description field should also clearly reflect this response requirement.
•Operator Action - If this is a Active Signal (one that needs some type of Operator Response), indicate the Alarm Processing step(s) the Operator is to take when this Alarm Signal is received.
✓Response Needed? - Check this box when some type of Operator Response is required.
▪Whether or not the Response Needed? box is Checked, the Call List section with the Available To Call and Call Order columns will be accessible.
▪If Response Needed? is not Checked, it will be considered a Passive Signal (one that does not need any specific Operator Response) and no other Operator Action or Notification options will be available.
▪Note: For MKS Connect Service Users - When using the Off Test Warning feature (which notifies a Technician via Email that an Account which she/he placed On Test is about to come Off Test), to have an Operator also get this Off Test Warning Signal, Check the Response Needed? box.
✓Dispatch - If this is an Active Signal, use the Drop-Down Selection List to Choose (the list is shown below) the type of response that is needed.
▪Fire = Notify the appropriate Fire Department of the reported Fire Alarm Condition.
▪Medical = Notify the appropriate Medical Emergency Response Service of the reported Medical Alarm Condition.
▪Police = Notify the appropriate Police or Sheriff's Department of the reported Burglary, Silent or Hold-Up Alarm Condition.
▪Other = Notify the appropriate Responsible Person responsible for responding to the reported Emergency Condition (also see Other Call below).
▪None = No specific "Dispatch" related Response is needed (see ØNote immediately below).
➢Note: For Accounts using a Security Company for their Burglar Alarm Response,
a)The Comments entered on the Central Station Data Form should clearly reflect that a Guard Response is required for any Burglar Alarm signals.
b)The CSID Zone records defining these events should be Checked Response Needed? and have <Other> selected for the Dispatch type.
c)The Security Company's emergency contact number should be entered in the Subscriber's People To Call list.
d)Select the record representing that Security Company when defining who is contacted for the <Other> response (see "Other Call" below).
e)Be sure that the CSID Zone's Description field also clearly reflects this response requirement (see "Other Call" below).
✓Verify Signal? - Check if this Signal is to be Verified by telephoning the premises in advance of any Dispatch, or other Notification process..
✓Other Call - If the type of Dispatch Response that was selected above is <Other>, use the Drop-Down Selection List (immediately below the Verify Signal? box) to Choose the appropriate Name, from the Subscriber's People To Call table, of who is to be notified.
•Restoral Information
✓Signal ID - Enter the corresponding Signal ID representing the Restoral of the CSID Zone's Signal ID entered above.
✓Zone - Optionally, enter the Physical Zone representing the Restoral of the CSID Zone's Physical Zone entered above.
✓Minutes - If this Alarm Condition is not to be reported to the Operator until after a specified number of minutes has passed (allowing the Subscriber's system to restore to its normal mode in a reasonable period of time), enter that number of minutes here.
▪If the Restoral signal has not been received within this time frame, a Failed to Restore (FR*) Alarm Event will be generated for the Operator indicating that the original Event or Alarm Signal was not restored within the appropriate time frame.
•Save - Tap or Click the Save option to record this CSID Zone information.
❑Updating a CSID Zone - As may be required, add or update the existing information following the instructions in the "Defining a CSID Zone" above.
• Referring to the "Defining a CSID Zone" discussion above, all of those same fields may be modified, as needed.
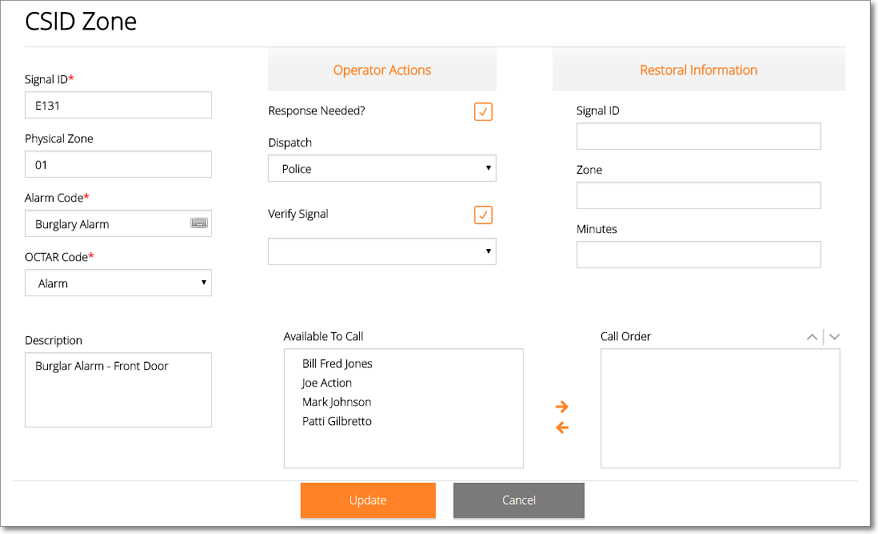
Web Dealer Access - Subscriber Information - Panels tab - CSID Zone page
•In addition, once saved, the Available To Call and Call Order list boxes will be populated.
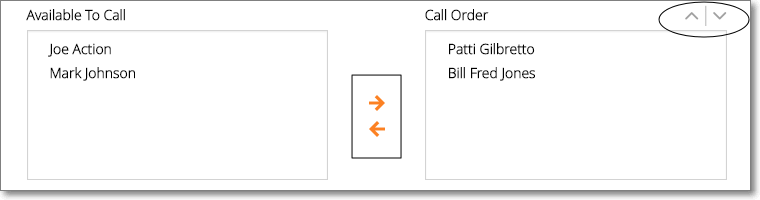
CSID Zone page - Available To Call & Call Order lists
✓This Available To Call list of Contacts contains the People To Call associated with for the CSID for which this CSID Zone is created, plus any others Contacts available from the Global Call List members (see above), and represents the default order in which Operator Notifications should proceed until someone is successfully notified (see the "Available To Call" discussion in the CSID Zones chapter).
▪You may add additional name to this list by using the Call List and/or the Alternative Call List options on the Panels Tab.
✓Call Order - Once initially saved, this column displays the re-set order - for this specific CSID Zone - in which Operator Notifications should proceed until someone is successfully notified.
▪Select a Name from the Available To Call column (see above) and Click the right arrow (illustrated with a surrounding box) to move that Name to the Call Order column.
▪Select a Name from the Call Order column and Click the left arrow (illustrated with a surrounding box) to move that Name to the Available To Call column.
▪The, using the Up and Down arrows (circled), select a Name and relocate it, as needed.
•Update - Tap or Click the Update option to record any changes or updates to this information.
✓A confirmation message will be displayed when the changes have successfully been posted to the database.
✓Tap or Click the OK button to continue.