❑The Dealer Access Module allows certain Technicians and other persons designated as Dealer Users, to access the Dealer Access Module Client Connection and view certain specified Subscriber's data, and to add, modify and/or delete Central Station related information, as well as viewing Selected Central Station Reports, from a remote PC via a direct internet connection, or with wireless Web access.
1.Those Technicians who are to be permitted access to the Dealer Access Module Client Connection, must be identified using the Dealer Users Form.
2.Unlike Technicians who use the Virtual Operator application - who must be identified as Employees and provided specific Log in access information on that Employee's Security tab - those Technicians using the Dealer Access Module Client Connection only need to be identified here in this Dealer Users Form.
3.Within this Dealer Users Form you will be able to establish all of the Access and Reporting Rights that are required by each Technician.
❑Entering a record in the Dealer Users (Maintenance) Form:
•There are two ways to Access the Dealer Users Form:
a)From the Backstage Menu System Select Maintenance and Choose the General option, then select the General Maintenance option which displays the secondary Maintenance Menu, or
b)From the Quick Access Menu, Select Maintenance and Choose General Maintenance to display the secondary Maintenance Menu.
✓Once the Maintenance Menu is displayed, Choose the Monitoring sub-menu, then Click on the Dealer Users option.
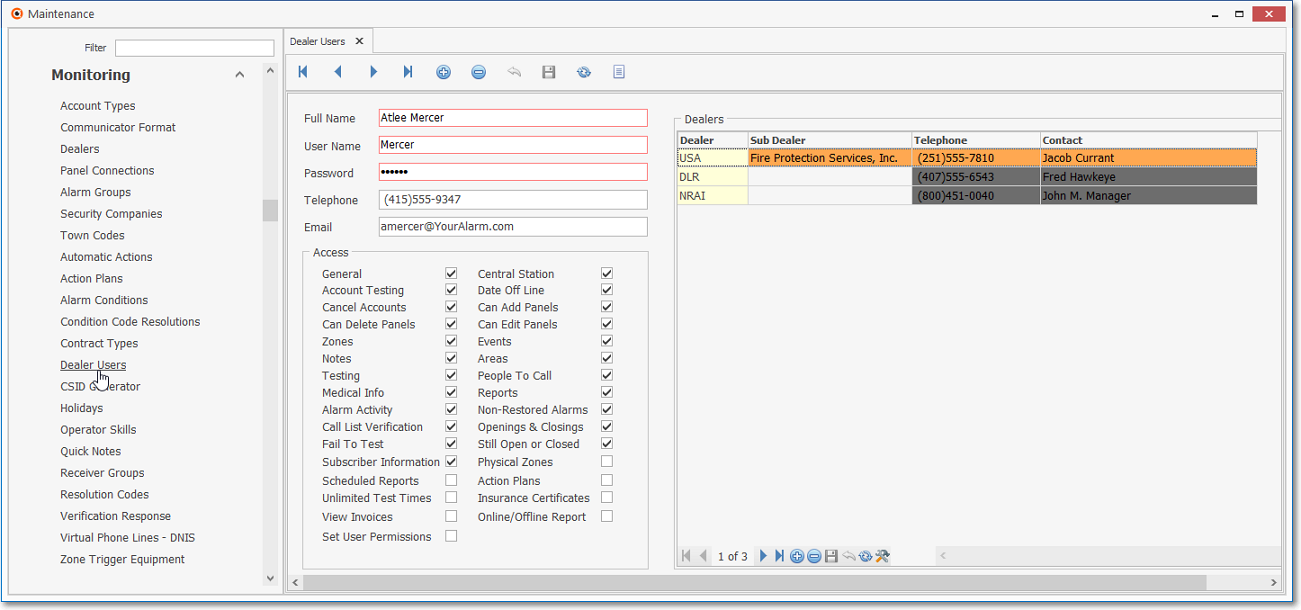
Dealer Users Form
✓This Dealer Users Form may be Re-sized by Dragging the Top and/or Bottom up or down, and/or the Right side in or out.
•Navigation Menu - The Navigation Menu is located at the top of the Dealer Users Form.

✓This Navigation Menu provides the normal Record Movement, New, Edit, Delete, Cancel, Save, and Refresh options; as well as special Print and Search functions.
•Record Editing section - The details of the currently selected record are displayed below the Navigation Menu at the center (Main Body) of the Dealer Users Form.
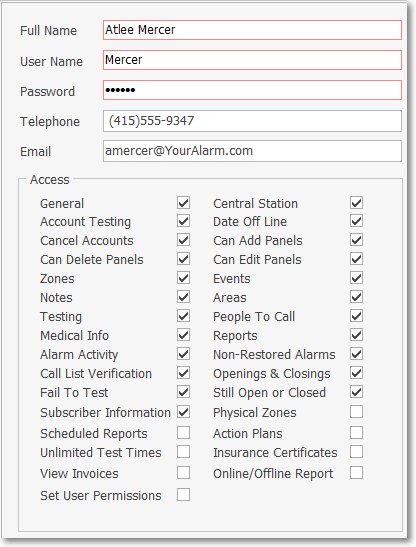
Dealer Users Form - Record Editing View
•To define a Dealer User, Click the ![]() Icon to start the Dealer User entry in the Record Editing section.
Icon to start the Dealer User entry in the Record Editing section.
✓Full Name - Enter the full name of the Dealer User.
✓User Name - Enter the User Name with which they will log in to the system.
✓Password - Enter the Password they will use to log in to the system
✓Phone - Enter the telephone number that can be used to contact this Dealer User.
▪If no Area Code is required, enter the telephone number (it cannot start with a 1 and the dash between the third and fourth number will be inserted automatically).
▪If 10 digit dialing is in effect - no "1"prefix is needed, but you do need to dial an Area Code as part of the telephone number:
oPress the <Space Bar> first.
oThen enter the three digit Area Code.
oFinally, enter the seven digit Telephone Number.
oCorrect formatting will be inserted automatically.
▪Long distance Telephone Numbers (with a "1" prefix) are entered as such with the formatting parentheses and dash applied automatically.
✓E-Mail - Enter the E-mail address that can be used to contact this Dealer User.
✓Access - Define the access rights that will be applied to this Dealer User.
▪General - If this box is Checked, general system wide access is permitted.
▪Central Station - If this box is Checked, central station related access is permitted.
▪Account Testing - If this box is Checked, account testing access is permitted.
▪Date Off Line - If this box is Checked, the off line date access is permitted.
▪Cancel Accounts - If this box is Checked, the Technician can cancel monitoring for an Account.
➢Important: By allowing this Dealer User to Cancel the record, they are disallowing further access to this Subscriber via the Dealer Access Module.
✓Data Management Rights - Indicate which information this Dealer User is granted access to modify.
▪Can Add Panels - If this box is Checked, Subscriber Panels may be added.
▪Can Edit Panels - If this box is Checked, Subscriber Panels information may be edited.
▪Can Delete Panels - If this box is Checked, Subscriber Panels records may be deleted.
oZones - If this box is Checked, CSID Zones may be edited.
oEvents - If this box is Checked, Scheduled Events may be edited.
oNotes - If this box is Checked, Temp Notes may be edited.
oAreas - If this box is Checked, the system's Areas may be edited.
oTesting - If this box is Checked, Account Testing information may be edited.
oPeople To Call - If this box is Checked, People To Call information may be edited.
oMedical Info - If this box is Checked, Medical Information may be edited.
✓Reporting Rights - Indicate what reports this Dealer User is permitted to access.
▪Reports - If this box is Checked, the Dealer User has access to view the Reports Menu.
oAlarm Activity - If this box is Checked, the Dealer User may print/view the Alarm Activity Report.
oCall List Verification - If this box is Checked, the Dealer User may print/view the Call List Verification Report.
oFailed To Test - If this box is Checked, the Dealer User may print/view the Failed To Test Report.
oNon-Restored Alarms - If this box is Checked, the Dealer User may print/view the Non-Restored Alarms Report.
oOpenings & Closings - If this box is Checked, the Dealer User may print/view the Openings & Closings Report.
oStill Open or Closed - If this box is Checked, the Dealer User may print/view the Still Open or Closed Report.
oSubscriber Information - If this box is Checked, the Dealer User may print/view the Subscriber Information Report.
oPhysical Zones - If this box is Checked, the Dealer User may edit this information.
oScheduled Reports - If this box is Checked, the Dealer User may edit this information.
oAction Plans - If this box is Checked, the Dealer User may edit this information.
oUnlimited Test Times - If this box is Checked, the Dealer User may create Account Testing entries with no time limit.
oInsurance Certificates - If this box is Checked, the Dealer User may print/view Insurance Certificates.
oView Invoices - If this box is Checked, the Dealer User may view Invoice information.
•Click the ![]() Icon to record this Dealer User entry.
Icon to record this Dealer User entry.
✓This entry will be immediately be available in the Dealers Form as an additional selection on the Dealer Module Users tab (see the "Assigning a Dealer User to specific Dealer" discussion immediately below).
❑Assigning the Dealer Users to specific Dealers:
•You will identify the Dealer assignment(s) for the currently selected Dealer User, using the Dealers section of this Dealer User Form.
a)Dealer Users do not have to be, but may also be an Employee. (i.e., if an Employee of your Company also provides emergency services for an Alarm Dealer and therefore needs access to the Dealer Module)
b)Dealer Users identified in the Dealer User Maintenance Form may be assigned on that Form to one or more of your Alarm Dealers, or at any time in the future, as appropriate (i.e., if the Alarm Dealer has granted that Dealer User access to their data and systems through the Dealer Access Module).
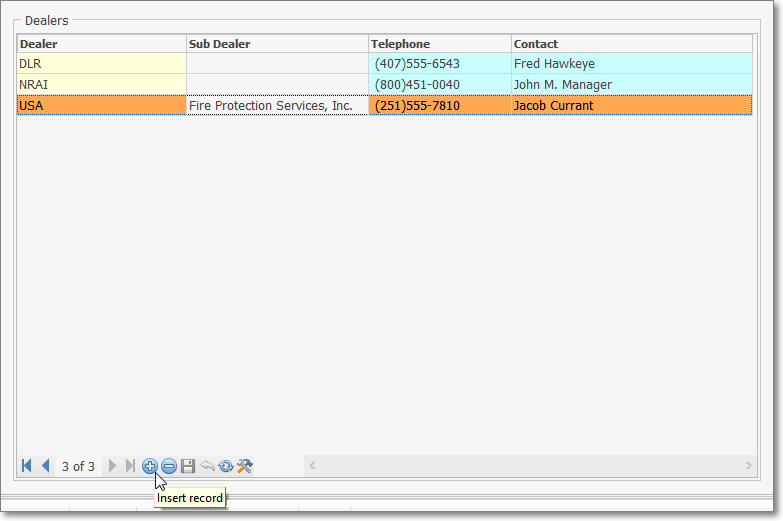
✓Click the ![]() Icon on the Ribbon Menu at the bottom of the Dealers section on the Form.
Icon on the Ribbon Menu at the bottom of the Dealers section on the Form.
✓Dealer - Using the Drop-Down Selection List provided, Choose the Dealer to whom this Dealer Users is to be assigned.
✓Click the ![]() Icon to record this entry.
Icon to record this entry.
▪The Telephone and Contact information will be inserted automatically.
✓Repeat as needed.
▪The same Dealer User may be assigned to multiple Dealers.
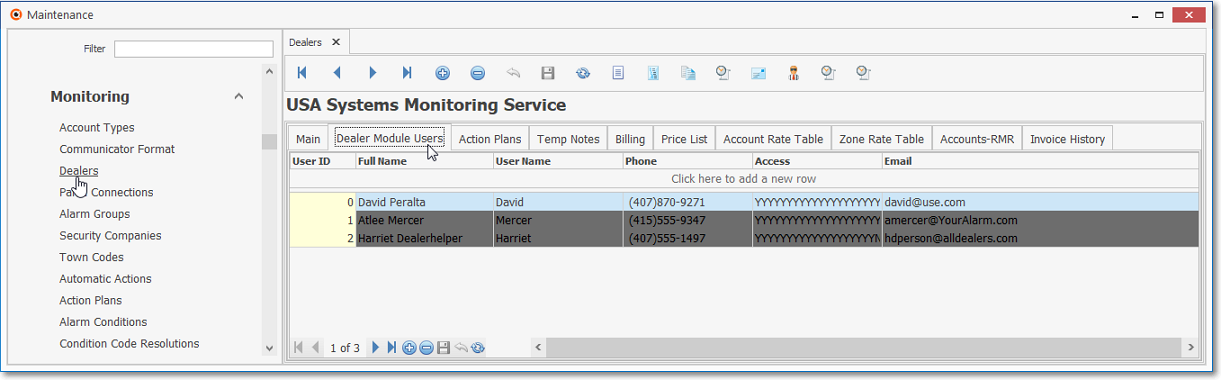
•Then, with the Dealer Module Users tab selected on the Dealers Form, those Dealer Access Module Dealer Users will appear on the Dealer Module Users tab of those Dealer(s)
Dealer Module Users section on the Dealer Form
•You may also identify a Dealer assignmen for a Dealer User using the Dealer Module Users tab on the Dealers Form.
✓Click the ![]() Icon
Icon
✓User ID - Use the Drop-Down Selection List to Choose a previously identified Dealer Access Module Dealer Users from those entered in this Dealer User Maintenance Form
✓Full Name, User Name, Phone, etc. - This data will be inserted automatically based on the Selected User ID and the information entered for that User ID.
✓Click the ![]() Icon to record this entry.
Icon to record this entry.
➢Note: Dealer Module Users must first be identified in the Dealer User Maintenance Form to be added to the Dealers Form.
❑Tech Details - The Tech Details Icon is located at the bottom of the Dealers section of the Dealer User Form and opens the Dealer Technician Form for viewing and entering the Names and related information of the Dealer Technicians who are employed by the currently selected Dealer.
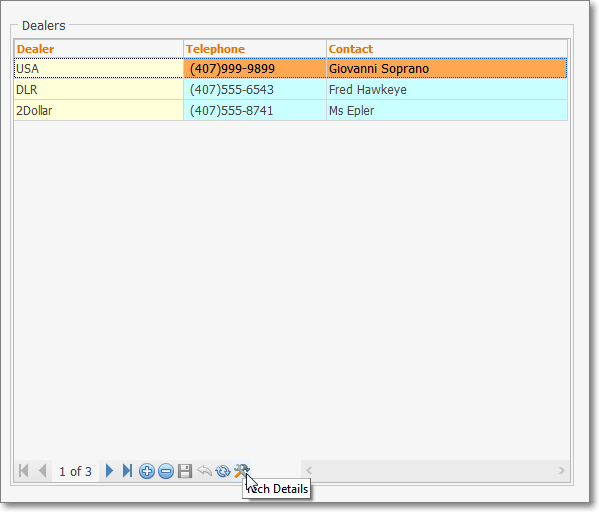
•Click the ![]() Icon and complete as shown below.
Icon and complete as shown below.
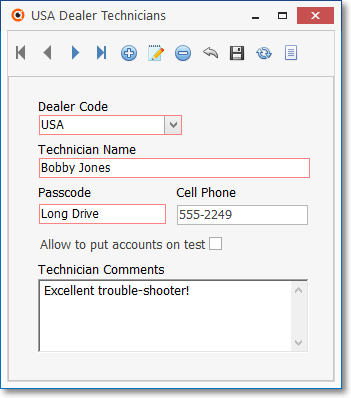
Dealer's Tech Details Form
✓Dealer Code -Use the Drop-Down Selection List provided to Choose the Dealer Code of the Alarm Dealer for whom this Dealer Technician is working.
✓Technician Name - Enter the Technician's Name
▪If this is an actual Employee, we suggest entering the Technician's Name exactly as it is entered in the Employees Form.
✓Password - This is the pass code the Technician will use when they need to be Validated by the Operator when this Dealer Technician calls in for access to the Subscriber's Monitoring information.
✓Cell Phone - Enter the Cell Phone number which can be used to contact this Technician.
✓Allowed to put accounts on test - Check this box if this Technician has this permission.
✓Technician Comments - Enter any pertinent information about this Technician who will be working on this Dealer's Accounts.
•Click the ![]() Icon to record this Dealer Technician entry.
Icon to record this Dealer Technician entry.