❑Subscribers come, and Subscribers go.
•But Why?
•You really should know why!
•Use this Attrition Report to research the information needed to better understand a Company's Acquisition and Attrition results.
❑Why did they come to you?
•What was the reason?
•Was it from a regular Sale, a purchased Account, a take-over of another Company's service, results of referral, or a new home pre-wire that moved in and ordered monitoring?
❑Why did they leave you?
•What was the reason?
•Was it a poor service experience, unacceptable monitoring response time, they simply moved away or were foreclosed on, there was a take-over by another Company, or a pre-wire that went with some other Company?
❑To actually know Why, enter the appropriate Attrition Type code, as Accounts come on-line (Acquired) and go off-line (Lost), in each (Subscribers) Account's Auto Bill Form.
•If your interest is also specifically tracking Sales, you may also use the Prospect Tracking System and enter Lead Types, Lead Sources and Market Areas information.
•Keep in mind that Sales are not what makes an Alarm Company successful over the long term.
✓It is a consistent and ever increasing volume of Recurring Revenue!
•This Attrition Report provides that all important Recurring Revenue related information.
✓It is a better way to address your on-going business's success.
❑If you do enter Acquisition and Attrition information in a timely and consistent manner, this RMR Differential (Attrition Reports) will provide you with clear, valuable and up to the minute information about your Recurring Revenue and account base stability.
•There are two ways to access the Attrition Report dialog:
a)From the Backstage Menu System Select Reports and Choose Receivable Reports, or
b)From the Quick Access Menu, Select Reports and Choose Receivable Reports.
✓Then, Select the RMR Differential (Attrition Reports) option.
❑RMR Differential tabs - There are three tabs on the Attrition Report dialog.
•Options - Initially only the Options tab is shown (until you make your Options selections and Select Print).
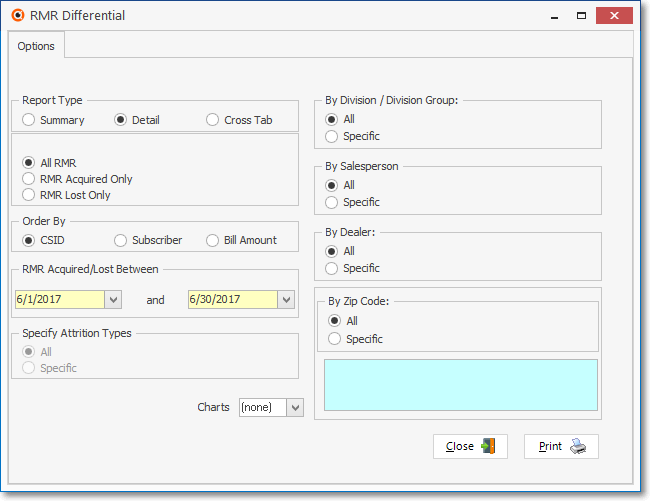
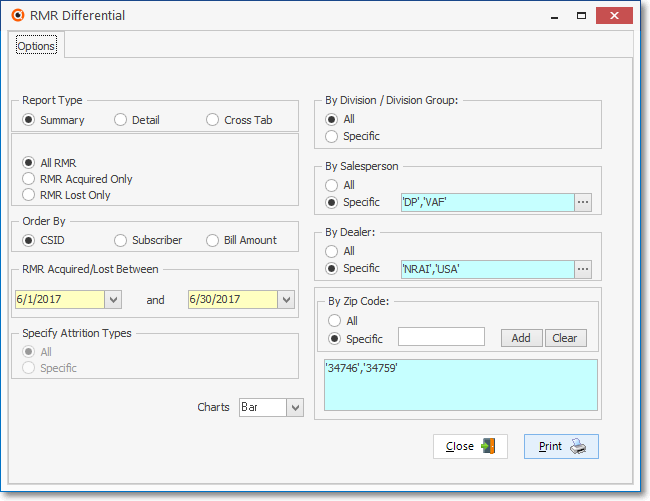
RMR Differential - Options tab
•Report Type - Choose how much detail should be included in this report.

RMR Differential Report - Report Type options
✓Summary - Summarize the requested RMR Selection for Attrition and/or Acquisitions, the number that occurred and total dollar value gained and/or lost.
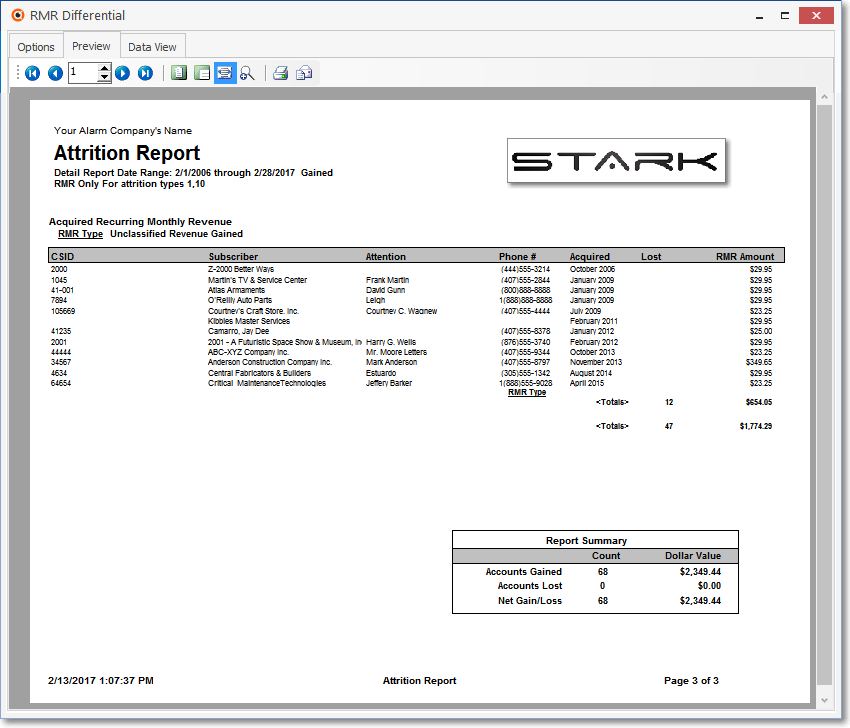
✓Detail - Lists each requested RMR Selection for Attrition and/or Acquisitions, the Subscribers, CSID, Contact, Telephone, Date Acquired/Lost and the dollar Value gained and/or lost on each.
✓Cross Tab - Provides a tabular, spreadsheet style report for one year based on a defined Starting Date.
•RMR Selections - Note: RMR ("Recurring Monitoring Revenue") actually refers to those Recurring Revenue Rules defined in the Subscribers Form's Recurring Revenue Form
RMR Differential Report - RMR Acquired Only option
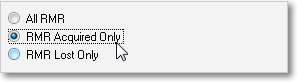
✓All RMR - Report on all Recurring Revenue status changes (Acquisitions and Attrition).
✓RMR Acquired Only - Report on all Acquired Recurring Revenue.
▪These first two RMR Selections use the Acquired Date entered on the Recurring Revenue Form when determining the RMR Acquired/Lost Between (see below) revenues.
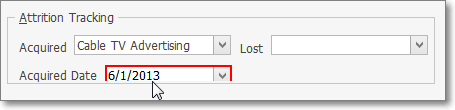
Recurring Revenue Form - Acquired Date field
✓RMR Lost Only - Report on all Lost Recurring Revenue
•Order By - Choose the sequencing of this report.
✓CSID - List the Subscribers in CSID order.
✓Subscriber - List alphabetically by the Subscribers names.
✓Bill Amount - List based on the Amount of the Recurring Revenues.
•RMR Acquired/Lost Between - Specify the Date Range of the data to be included in this report.
✓Enter the Starting and Ending Dates of the period to be reported.
✓Based on certain selected Options, the Date Range is automatically inserted, or the End Date is calculated based on the Starting Date that was selected.
▪These fields use the Acquired Date entered on the Recurring Revenue Form to determine the RMR Acquired/Lost Between revenues.
Recurring Revenue Form - Acquired Date field
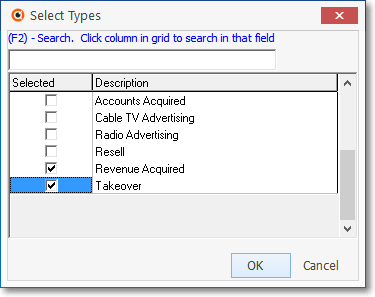
•Specify Attrition Types - If the RMR Acquired, or RMR Lost option was selected (re: the "RMR Selections" discussion immediately above), you may also Choose whether to include all Attrition Types, or to limit the report to a specific Attrition Type:
✓By default, All Attrition Types are reported.
Select Types - Check needed Acquisition/Attrition Type(s)
✓Specific - To Select one or more Attrition Type, Click Specific.
▪Use the Select Types look-up box (Click the Ellipse "..." button) to identify each desired Attrition Type.
▪Check the desired Attrition Type(s).
▪Click the OK button to insert the selection(s) in the Specific field.
•By Division/Division Group: - Include all, or limit the reporting to Accounts within a specific Division or a Division Group:
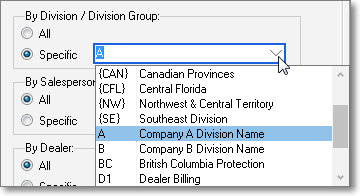
All or a Specific Division or Division Group
✓All - All Subscribers will be included, regardless of what or if they have a Division code assigned.
✓Specific - To include only those Subscribers who are a member of the specified Division or Division Group, Click Specific.
▪If a Division is selected using the Drop-Down Selection List provided, the report will be limited to Subscribers assigned that Division code.
oThis Division is identified on the Accounting Receivable Section within the Edit View of the Subscribers Form.
▪A Division Group could also be selected to incorporate All Subscribers associated with that Division Group.
▪If a Division Group is selected using the Drop-Down Selection List provided, the report will be limited to Subscribers assigned to a Division within the selected Division Group.
•By Salesperson: - Include all, or limit the reporting to Accounts assigned to a specific set of one or more Salespersons (Employees):
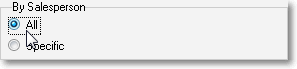
All or a Specific Salesperson
✓All - All Subscribers will be included, regardless of who they have assigned as a Salesperson.
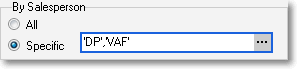
✓Specific - To include only those Subscribers who are assigned to a specific set of one or more Salespersons, Click Specific and then Click the Ellipse "..." button
▪The Select Salesperson dialog will be displayed
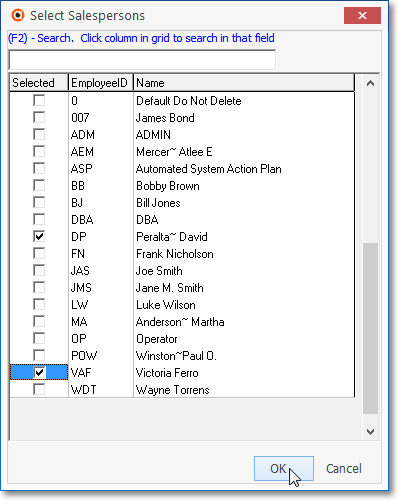
Select Salespersons dialog
▪Check the desired Salesperson(s).
▪Click the OK button to insert the selection(s) in the Specific field.
▪When one or more Salespersons are selected using the Select Salesperson dialog, the report will be limited to those Subscribers that have been assigned to the selected Salespersons (Employees).
•By Dealer: - Include all, or limit the reporting to Accounts being monitored for a specific set of one or more Dealers.
✓All - All Subscribers will be included, regardless of whether they are being monitored for a Dealer.
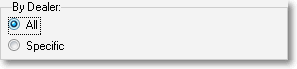
✓Specific - To include only those Subscribers who are assigned to a specific set of one or more Dealers, , Click Specific and then Click the Ellipse "..." button
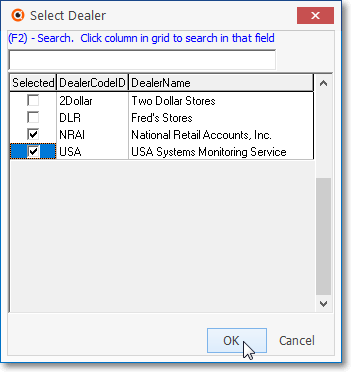
Select Dealers dialog
▪Check the desired Dealers(s).
▪Click the OK button to insert the selection(s) in the Specific field.

All or a Specific Dealer
▪When one or more Dealers are selected using the Select Dealers dialog, the report will be limited to those Subscribers that have been assigned to the selected Dealer(s).
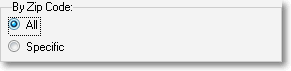
•By Zip Code: - Include all, or limit the reporting to Accounts located within a specific Zip Code.
All or Specified Zip Code(s)
✓All - All Zip Codes will be included, regardless the Subscriber's Zip Code location.
✓Specific - To include only those Zip Codes specifically identified to be included in this report, Click Specific.
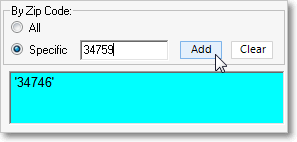
Specific field, Add button, Selected Zip Codes field
▪Enter a Zip Code in the Specific field.
▪Click the Add button to insert a Zip Code into the Selected Zip Codes box.
▪Repeat this two-step action, as needed, to identify all of the required Zip Codes.
▪If one or more Zip Codes are Added, the report will be limited to Subscribers that are located within any of those Zip Codes.
RMR Differential Reports - Options tab - various options selected
•Charts - Using the Drop-Down Selection List provided, you may request that a Pie or Bar Chart be included as part of this report's output.
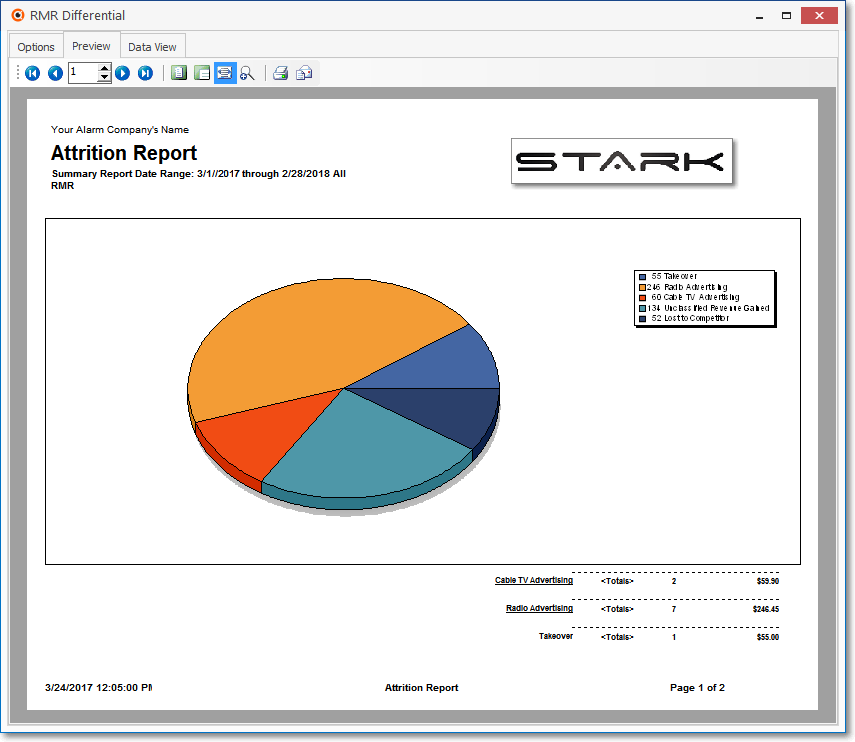
RMR Differential Report - Preview tab - with Pie Chart
•Print - Click the Print button ![]() to Preview and optionally Print (to a File or a Printer) this RMR Differential Report.
to Preview and optionally Print (to a File or a Printer) this RMR Differential Report.
❑Preview - The Preview tab presents the report which resulted from the Options you've selected.
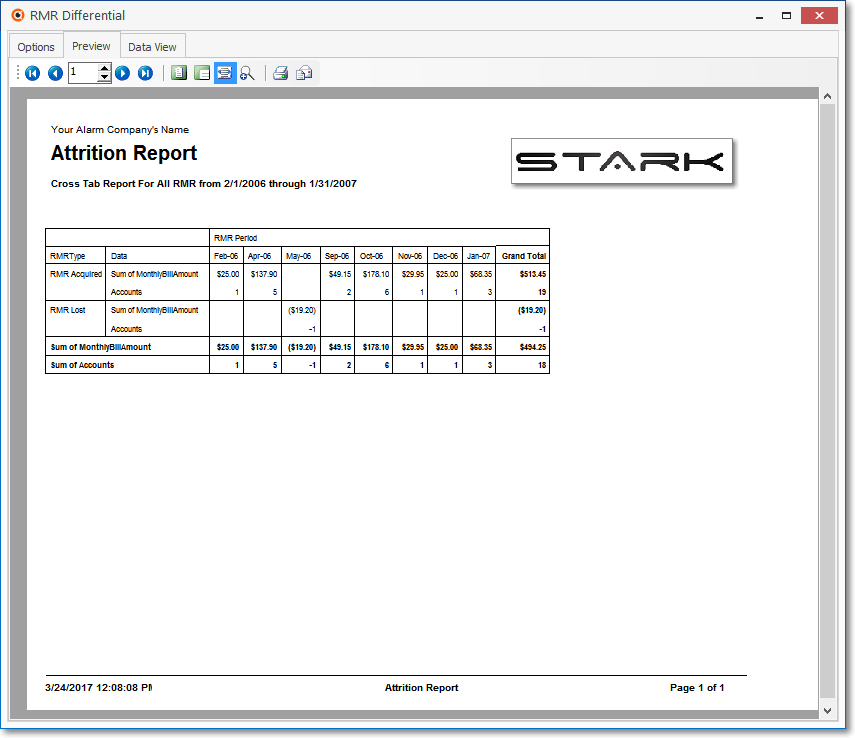
RMR Differential Report - Cross Tab format
RMR Differential Report - Preview tab - RMR Rate Changes
•Up Arrow/Down Arrow - hi - Moves the report one line up, or one line down, respectively.
•Page Up/Page Down - Moves the report to the previous or next page, respectively.
•Home - ![]() - Using either the screen Icon or your Keyboard's Home key, moves the report to the top of the first page.
- Using either the screen Icon or your Keyboard's Home key, moves the report to the top of the first page.
•End - ![]() - Using either the screen Icon or your Keyboard's End key, moves the report to the bottom of the last page.Arrows - The arrows allow you to move back and forth, from page to page.
- Using either the screen Icon or your Keyboard's End key, moves the report to the bottom of the last page.Arrows - The arrows allow you to move back and forth, from page to page.
•Number - Indicates the page number you are viewing.
✓You may also type in a specific page number, Press 8 Enter and that page will be displayed immediately.
✓If you enter an invalid page number, it will be ignored.
•Fit To Page - Click the first button after the arrows to size a full page of the report to fit the screen.
•Zoom To 100% - Click the second button after the arrows to display the page at 100% (of the printed view).
•Fit To Page Width - Click the third button after the arrows to size the page of the report to fit the full width of the screen.
•Zoom To Percentage - Click the fourth button after the arrows to re-size the page of the report by percentage.
![]()
✓When you Click the Zoom To Percentage button, the Percentage selector will be displayed.
✓You may then Click the Up or Down ‚ arrows to set the exact amount of Zoom you want.
•Print - Click the Print button to Print (to a File or a Printer) ![]() the displayed RMR Differential Report.
the displayed RMR Differential Report.
•Email - Click the Email button ![]() to send the Report to an Email Address of your choosing.
to send the Report to an Email Address of your choosing.
•To Exit the Preview tab and Close this Report dialog Form, Click the Close box ![]() on the right at the top of the Preview tab.
on the right at the top of the Preview tab.
❑Data View - This view provides a tabular (spreadsheet style) presentation of the selected data.
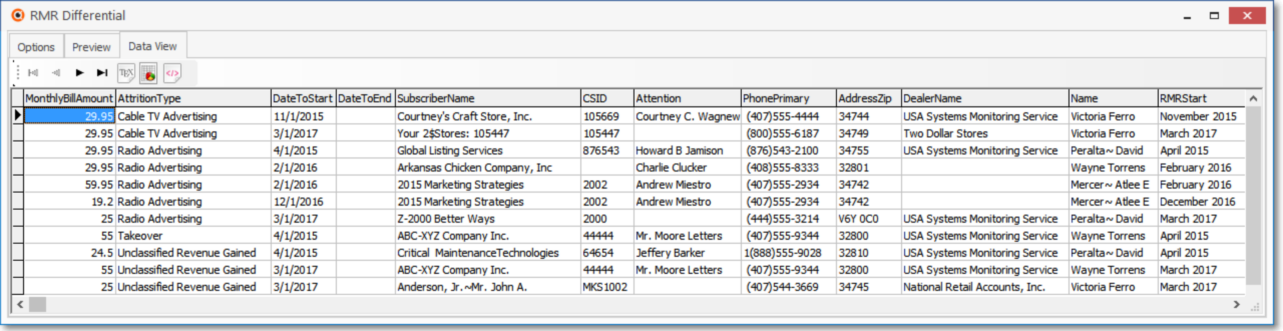
RMR Differential Report - Data View tab
•Arrows - Click the arrows to move through the record.
•Export - Exporting the data from this Data View tab (note the "fly-over" help available on these buttons):
✓Export to CSV - Click the first button after the arrows to export the data to a Comma Separated Values (CSV) file format.
✓Export To Excel - Click the second button after the arrows to export the data to an Excel (.xls) file format.
✓Export To Html - Click the third button after the arrows to export the data to an HTML formatted file.
✓To Exit the Data View tab and Close this Report dialog Form, Click the Close box ![]() on the right at the top of the Data View tab.
on the right at the top of the Data View tab.