❑Those who ignore History are vulnerable to repeating the mistakes of the past, again in the future.
•This old adage matches up well with not having accurate, up-to-the-minute Alarm Signal History that's easily available.
✓While processing alarms, Operators and other Users frequently need to review the previous Alarm Signals and other related signals to recognize a runaway alarm,
✓Several other situations may also create a need to quickly view a Subscriber's Alarm Signal History.
✓There are many ways to display a Subscriber's Signal History, this Alarm History Form is just one of them.
•Operators may view the Signal History Form as follows:
✓Open a Subscriber Info Form (Press F2).
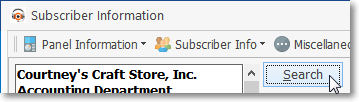
✓Using the Search option, locate the appropriate Subscriber CSID.
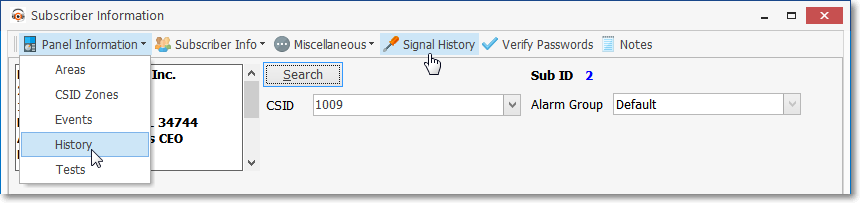
a)Click the Signal History Icon on the Subscriber Info Form's Menu (see the "hand" Icon in the illustration above)
b)Click the History option from the Panel Information Drop-Down Selections Menu (see the mouse pointer in the illustration above)
•In either case, the Alarm History Form for the currently selected Subscriber will be displayed.
❑Understanding the Signal History display's user interface:
•Each Line Item in the Alarm Signals Grid represents an Alarm Signal, Event Signal, Supervisory Report (e.g., Failed to Close, Invalid Opening), or any other internally generated signal which has been recorded in the selected Subscriber's Alarm History table.
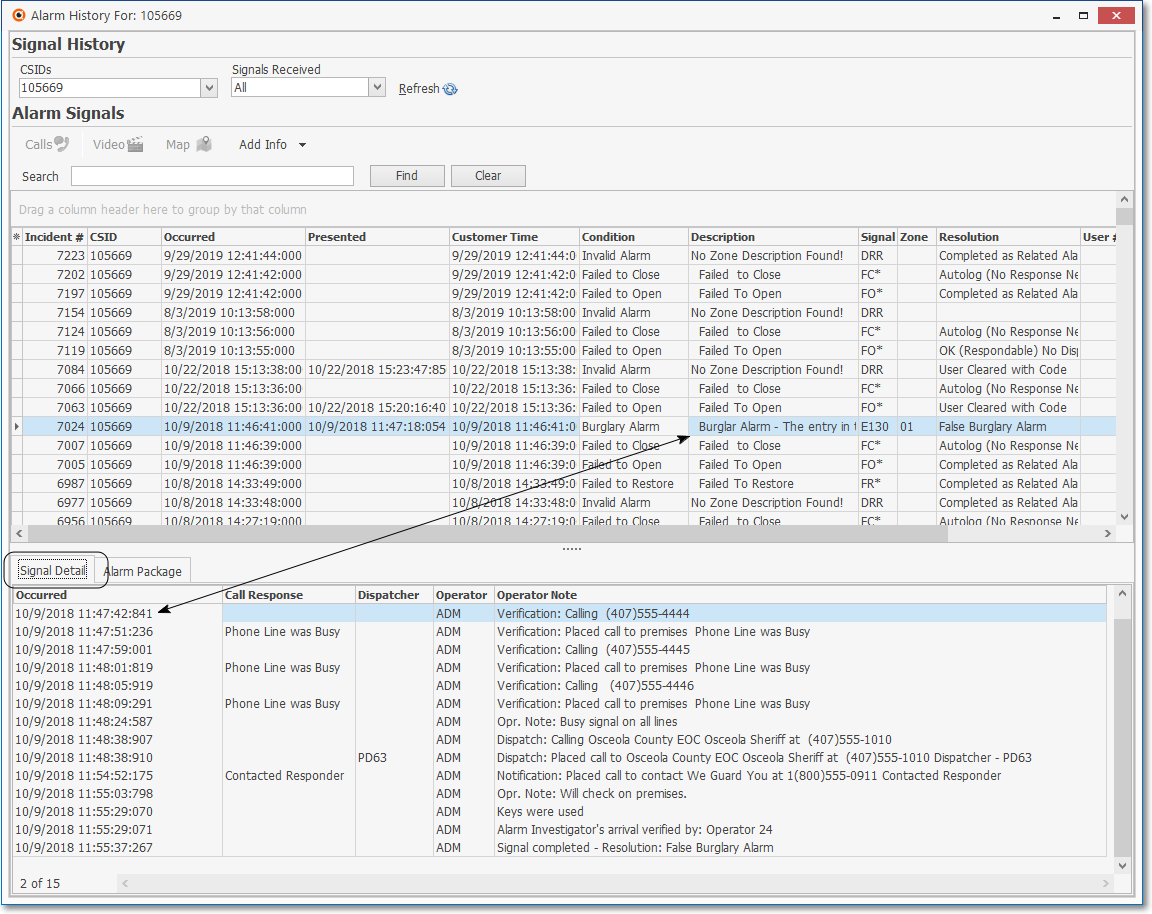
•CSIDs - By default, the Primary CSID will be selected.
✓If appropriate, use the Drop-Down Selection List provided to Choose a different CSID (or select the [All] option to view all Signal History sent from this premises regardless of what CSID was transmitted with those Signals).
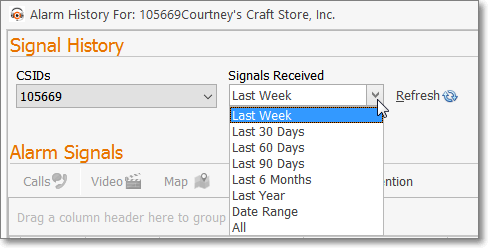
•Signals Received - Set the Date Range to be viewed using the Drop-Down Selection List provided and then Refresh the data.
✓Refresh - When you (re-)set the Signals Received Date Range, Click the Refresh button.
•Special Buttons on the Signal History Form:
![]()
✓Calls - The Calls button will only be enabled if the Selected Incident# has an associated recorded call.
▪Clicking the Calls button opens the Recorded Calls dialog - associated with the MKS SecurVoice Utility - for the currently selected Alarm Signal from this monitored Subscriber
▪This allows an Operator to listen to any recorded Calls associated with the currently selected Alarm Signal.
✓Video - If the Video Verification module has been registered, a Video button will be available to access any images related to the currently selected Alarm History information.
✓Map - Click the Map button to display a Google® Map with the location of the Alarm Signal (Subscriber).
▪This feature requires that the Subscriber's Panel sent the appropriate Geo Tag (Longitude and Latitude) information and the Receiver was able to interpret that information correctly so it could be written to the History file.
✓Add Info - This option is only available if the selected Signal was Completed by an Operator (see "Updating Signal History with new information using the Add Info function" below).
✓Loss Prevention - Click the Loss Prevention button to display the Loss Prevention Form.
▪See the complete discussion of Lost Prevention in the Loss Prevention chapters and its subordinate sub-chapters.
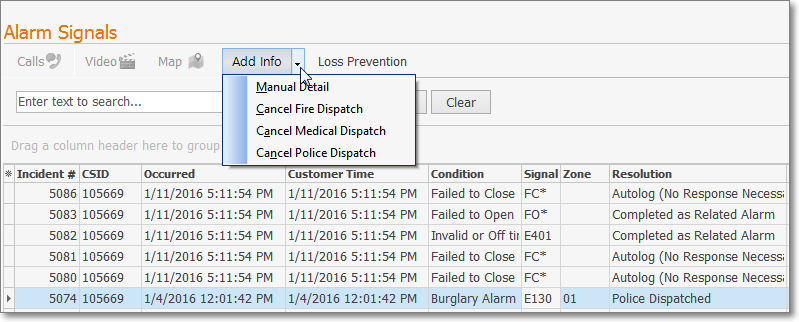
•The Alarm Signals - Header - A Header row with individual Header Names describes the data contained in each column of the rows displayed below the Header.
✓The Alarm Signals that will be listed are determined by the specified Date Range (see Date Range below).
✓Each of the Alarm Signals Header Names may be relocated using the standard Windows® Drag & Drop method.
✓When Columns are relocated, the Signal History dialog must be Closed and then Re-Opened to save the new Column positions.
✓Once relocated and saved, the current Header Name position will become the default location for the current User.
•Signal Details - Shows the individual steps taken for an Alarm Signal based on the Incident Number you've chosen in the Alarm Signals - Header.
✓The details for that Incident Number are displayed in the Signals Detail section of the Form.
❑Understanding the Alarm Signals Grid:
•Header - Each column has a Header Name
✓The User may Choose which columns of data are included in the Grid
✓To do so,
▪Click the Asterisk at the left of the Header to open the Header Names Check List.
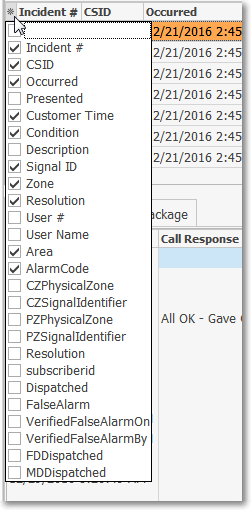
▪Check (or remove the Check from) the desired Column Header Name(s) which are to be included in (or excluded from) the Grid.
•Alarm Signals - Each Line Item in the Alarm Signals Grid represents an Alarm Signal, Event Signal, Supervisory Report (e.g., Failed to Close, Invalid Opening), or any internally generated signal which has been recorded in the selected Subscriber's Alarm History table.
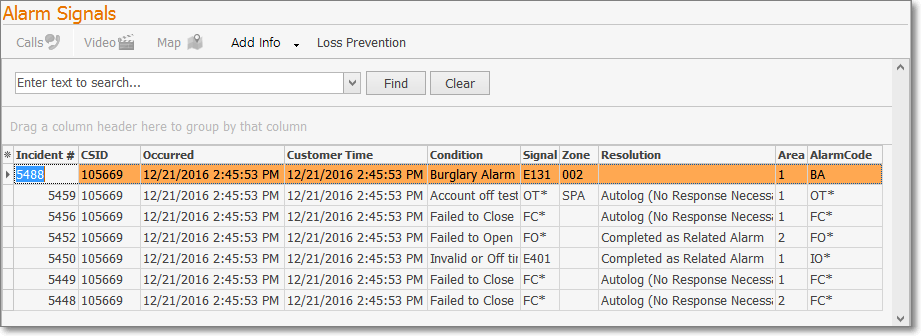
•The columns of the Alarm Signals Data Grid may be rearranged, filtered, sorted, and exported as a PDF file and/or an Excel formatted file by following the instructions in the Grids & Lists chapter.
✓An incremental search for any data item within the Alarm Signals Data Grid may be executed as needed:

▪Find - Enter text to search for a specific record, then Click the Find option.
▪Click on the desire record to view and/or make the changes as needed.
▪Clear - To remove the text to search for entry and redisplay the entire list, Click the Clear option
❑Understanding the Signal Detail Grid:
•Each Detail Line Item in the Signal Detail Grid represents one of the steps taken by the Operator, the system, and/or SPA to process the selected Alarm History Line Item

•The Header Names (and the associated data) of the columns on the Signal Detail Grid may be rearranged, if needed.
❑Understanding the Alarm Package tab:

•The Alarm Package tab displays three fields:
1.Receiver - This will be the Receiver ID of the device that received the selected Signal
2.Line - This will be the Line Number within the device that received the selected Signal
3.Port - This will be the Port ID to which the Receiver is connected
❑Updating Signal History with new information using the Add Info function:
•Sometimes an Operator is able to immediately Complete an Alarm Signal which they have just started Processing because the Subscriber has Called In a Cancellation request.
✓Occasionally, the Operator may temporarily forget to record this information, or additional information becomes available to them that they want to record in the Signal History.
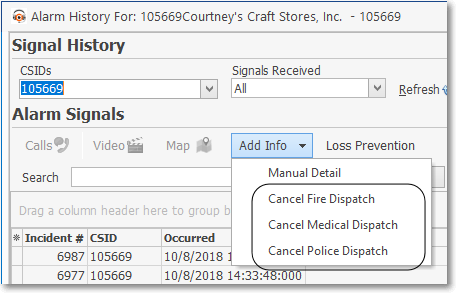
✓Locate the Add Info button at the top of this Signal History Form next to the Special Buttons which provides the means to insert additional information in the list of Signal Detail records for this specific Alarm Signal. To do so:
▪Select the Alarm History record to which you want to add information.
oIncident # 5381 has been selected in the Signal History Form shown above.
oThat record is highlighted in Orange
oThis will be the active record to which Alarm History information may be added.
✓Add Info - Click on the Add Info button.
▪Use the Drop-Down Selection List to Choose the type of information you want to add to the selected Incident number's Signal Details information.
Add Info button options
✓Manual Detail - Use the Drop-Down Selection List to identify the additional response, additional information about the person called or follow-up attempted, and a Note about the contact or lack of it.
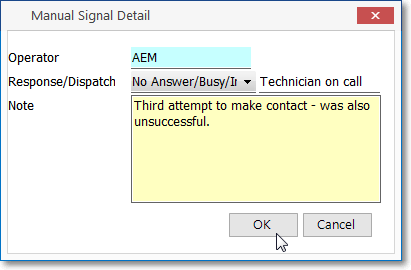
Manual Signal Detail Form
❑Making a selection that will open a Cancel Dispatch (for Fire, Medical, or Police) Form which allows the Operator to record Dispatch Cancellation data.
•Overview of how an Operator records a Dispatch Cancellation:
1.Open to the Sub Info (F2) Form
2.Locate that Subscriber
3.Select the History option on the Panel Information Drop-Down Menu to open the Signal History Form.
4.Select the appropriate Signal.
5.Click the Down Arrow ‚ on the Add Info button
6.Select the appropriate Cancellation Option
7.Complete the required information
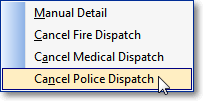
•Canceling a Dispatch - To Cancel a Dispatch:
✓Using the Down Arrow q on the Add Info button at the top of this Signal History Form to open the options menu, Select the appropriate Cancel Option.
Add Info Cancellation options
▪Cancel Fire Dispatch - Used to record the cancellation of a Fire Dispatch.
▪Cancel Medical Dispatch - Used to record the cancellation of a Medical Dispatch.
▪Cancel Police Dispatch - Used to record the cancellation of a Police Dispatch (as shown above).
✓The Cancel Alarm Dispatch dialog will be displayed.

Signal History - Add Info - Cancel Alarm Dispatch dialog
▪Cancel Dispatch - Click the Cancel Dispatch button (see the mouse pointer in the illustration above).

oThe appropriate responding authority, based on the Cancellation selection made above and the Subscriber's Town Code information, will be dialed.
oThe Cancel Dispatch button converts to a Cancel Call button to enable you to "hang up" that call when your are done speaking to the Dispatcher.
▪Note - Enter a brief comment about the conversation with the Dispatcher to whom you spoke.
▪Dispatcher - Enter that Dispatcher's ID or Name, as appropriate.
![]()
▪OK - Click the OK button to record this Cancel Alarm Dispatch entry and close this Form.
▪Indicate whether this Alarm Signal Cancellation attempt was successful.
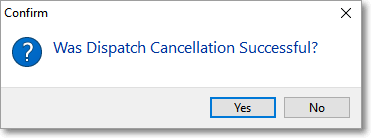
oYes - If the cancellation was successful, this Alarm Signal will be removed from the False Alarm table.
oNo - If the cancellation was not successful, this Alarm Signal will be added to the False Alarm table.
▪The appropriate additional Signal Detail records will be inserted.
❑Accessing the Loss Prevention Form from within the Signal History Form:
•Within MKMSCS in the Sub Info (F2) Form (if the Loss Prevention application has been registered):
✓Click the History option on the Panel Information sub-menu and Select Loss Prevention.
✓The Loss Prevention dialog will be displayed
✓See the Loss Prevention chapters for more information.