Zone Triggers - An Overview
❑SPA can be configured to send commands to peripheral equipment (e.g., Trigger Zone Hardware) when a specific Alarm Signal (i.e., CSID Zone, Signal ID and Physical Zone) is received.
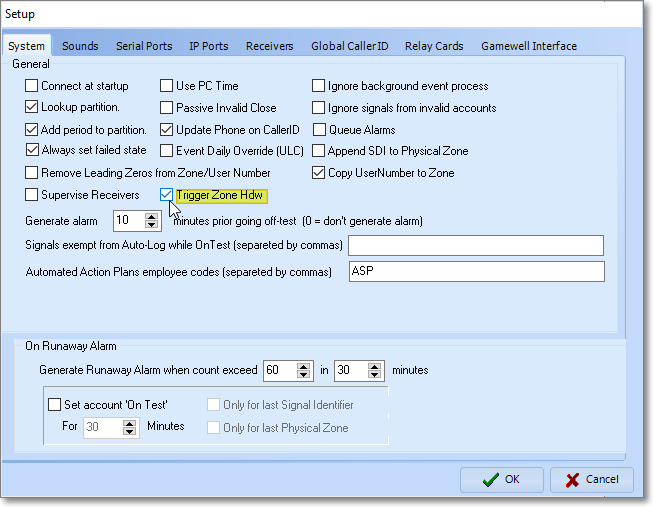
SPA Setup Form - Trigger Zone Hdw Checked
•Certain peripheral equipment may include (but are not limited to) PTZ (i.e., Pan, Tilt, Zone) cameras, video switching gear, door locks, and other types of security related devices.
✓Currently, only Serial Communication Ports are supported, but other connectivity may be implemented in the future.
•This process is called Zone Triggering.
✓Configuration of the Zone Triggers feature is accomplished within MKMS.
❑Zone Trigger(s) options in Company Settings - By default, the ZoneTriggers and ZoneTrigger options in the Company Settings Form are set to False ("F").
•To activate the CSID Zone Triggers functionality, in Company Settings, set the ZoneTriggers option and the SPA ZoneTrigger option to True ("T") and restart MKMS.
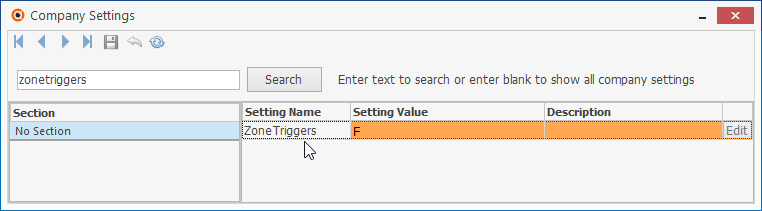
Company Settings - Zone Triggers option - Edit to True
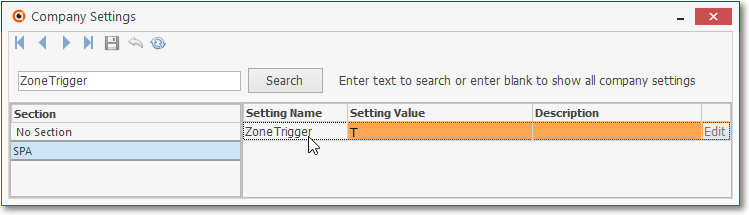
Company Settings - Zone Trigger option - Edit to True
•When the Zone Triggers ("ZoneTriggers") option and the Zone Trigger (" ZoneTrigger") option are set to True ("T"), these Forms will become accessible:
a)Zone Triggers Equipment - Use the Zone Triggers Equipment Form to identify the various Zone Trigger compatible equipment and related data your Company will be using.
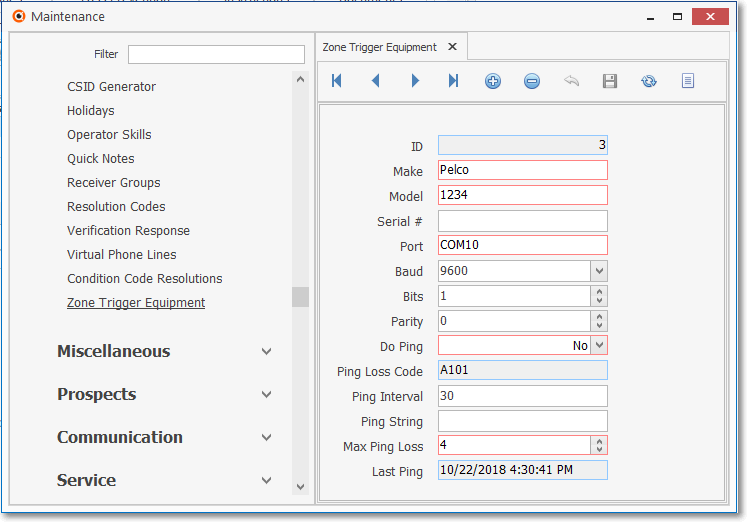
Zone Trigger Equipment Form - With data
b)Zone Trigger Assignment - Use the Zone Trigger Assignment Form to identify a Subscriber, Subscriber Panel, the CSID Zones and the type of Equipment which will provide that Subscriber with the CSID Zone Trigger functionality within MKMSCS.
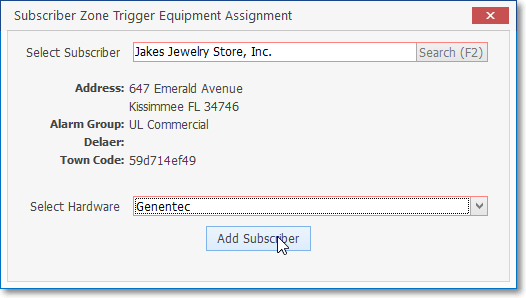
Subscriber Zone Trigger Equipment Assignment Form
c)Zone Trigger Subscribers Grid - Use the Zone Trigger Subscribers Grid to view/add/delete/modify the list of Subscribers and associated Equipment that will provide their CSID Zone Trigger functionality within MKMSCS.
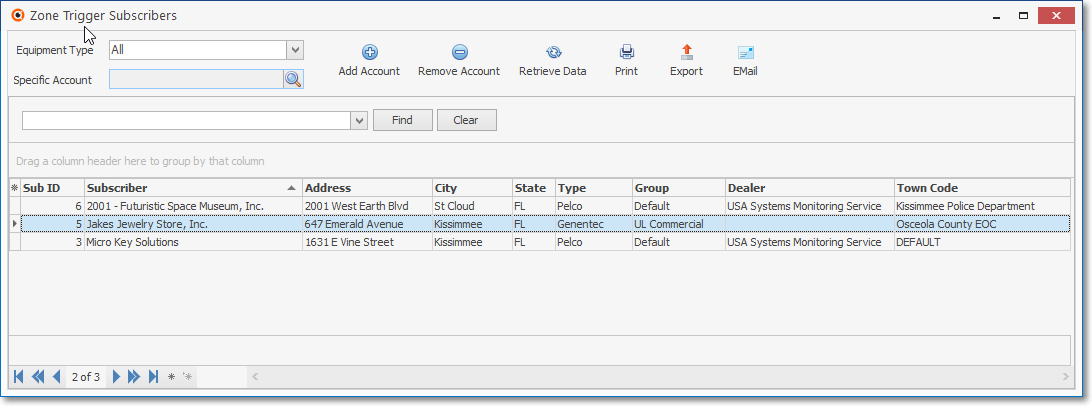
Zone Trigger Subscribers Grid
d)Zone Triggers sub-tab - When a Subscriber's Subscriber Panel and Zone Triggers Equipment Type have been identified as Zone Trigger Subscriber, the Zone Triggers sub-tab on the CSID Zones tab will be populated with all of its previously entered CSID Zones .
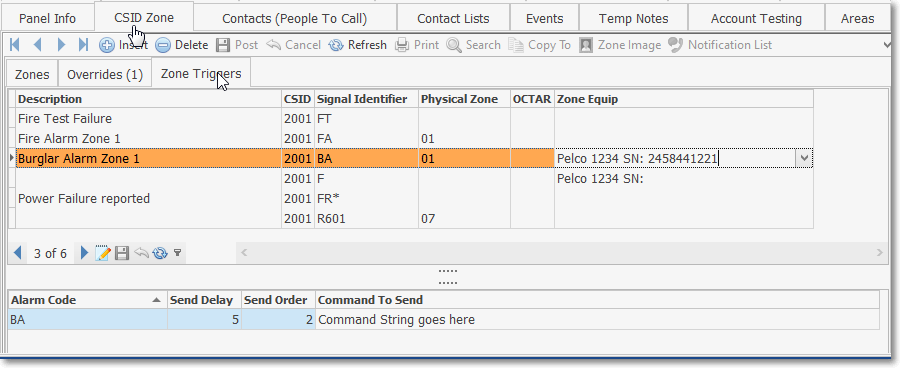
CSID Zones tab - Zone Triggers sub-tab - Zone Equipment and interface data entered
i.Then, in that Zone Triggers sub-tab,
1)each CSID Zone that has Zone Triggers Equipment in use must have that Zone Equip - Equipment Type identified using the Drop-Down Selection List provided.
2)The previously defined Alarm Condition Code and Signal Identifier and/or Physical Zone combination are listed
3)The command strings to be transmitted to the Control Panel which can control various peripheral devices (e.g., cameras, recorders, doors, etc.) is defined in the Zone Triggers Equipment Form
❑Exploring the Zone Trigger Equipment Form
•The Make, Model and SN columns should be self-explanatory.
Zone Trigger Equipment Form - With data
✓Every Equipment item that will be controlled with SPA must be identified
✓The fields are simply used to differentiate between similar types of equipment.
✓Enter anything that helps you keep track of these Zone Trigger devices.
•Zone Triggers Hardware fields:
a)Make - Manufacturer's Name
b)Model - Manufacturer's Model Number
c)Serial Number - Enter when available
d)Port identifies the physical connection that SPA will use to communicate with this specific equipment item. Currently only Serial Ports are implemented, so enter the COMM port number you are going to use.
e)Ping Interval sets the number of seconds between SPA sending supervision queries to the equipment item.
f)Ping String is the ASCII command string sent to the equipment item.
1)This command string should cause the device to return a known reply.
2)You should not put any commands into this field that cause the device to change modes, move cameras, etc.
g)Ping Response String is the expected response from the equipment item when it "hears" our Ping String. The response string is case-sensitive.
h)Max Ping Loss is the maximum number of missed-ping-responses before SPA raises an equipment malfunction alarm.
i)Baud is the data rate to use to communicate with the device. It must match the current setting of the device.
j)Bits is the number of data bits to use to communicate with the device. It must match the current setting of the device.
k)Parity is the type of data communications error checking to use. It must match the current setting of the device.
l)Stop Bits is the number of zero-bits to send after each Serial COMM character to indicate it has been fully sent. It must match the current setting of the device.
m)Ping Loss Code is the Signal Identifier code that SPA will push on to the Alarm Stack in the event of ping supervision failure.
n)Do Ping? is a Check box which activates/deactivates Zone Trigger device supervision.
o)Last Ping shows the time and date of the last ping for the device.
Zone Trigger Equipment Form
❑The Zone Trigger Equipment Form is used to define (identify) the Hardware Equipment that will provide the CSID Zone Triggers functionality within MKMSCS.
•Once those Hardware Devices are identified here, the Hardware Providers (identified in the Make field below) being used by each specific Subscriber may be identified in the Zone Trigger Subscribers dialog.
•Thereafter, a List of all Zone Trigger Subscribers may be accessed and managed whenever needed.
•Finally, the Zone Triggers sub-tab on the CSID Zones tab is where the specific Equipment and Command Strings are identified for any Zone that will control the associated Zone Trigger Equipment.
❑Defining the Zone Trigger Equipment that will be used:
•To Access the Zone Trigger Equipment Form:
a)From the Backstage Menu System Select Maintenance and from the General sub-menu Choose General Maintenance locate the secondary Monitoring Menu, or
b)From the Quick Access Menu, Select Maintenance and Choose General Maintenance and locate the secondary Monitoring Menu.
✓Once in the Monitoring sub-menu, then Click on the Zone Trigger Equipment option.
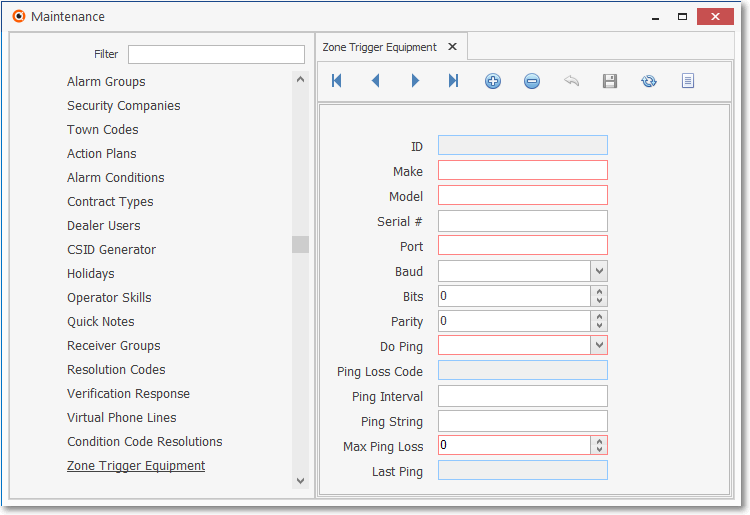
Zone Trigger Equipment Form - Blank
Zone Trigger Equipment Form - With data
✓This Zone Trigger Equipment Form may be Re-sized by Dragging the Top and/or Bottom up or down, and/or the Right side in or out.
•Navigation Menu - The Navigation Menu is located at the top of the one Trigger Equipment Form.

✓This Navigation Menu provides the normal Record Movement, New, Delete, Save, Refresh, and List options.
•Record Editing section - The details of the currently selected record are displayed below the Navigation Menu at the center (Main Body) of the Zone Trigger Equipment Form.
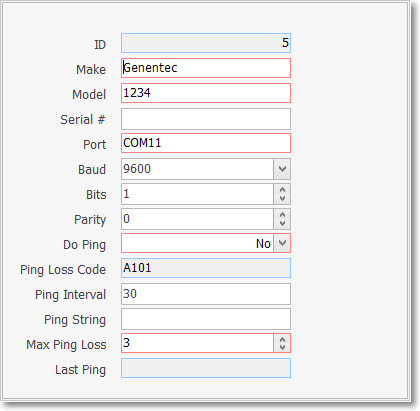
Zone Trigger Equipment - Record Editing View
•Defining Zone Trigger Equipment: First, Click the Click here to add a new row bar (or Click the ![]() Icon) to start a Zone Trigger Equipment entry within the Record Editing section.
Icon) to start a Zone Trigger Equipment entry within the Record Editing section.
✓Make - Enter the Make of the Zone Trigger Equipment being defined.
✓Model - Enter the Model of the Zone Trigger Equipment being defined.
✓Serial # - Optionally, enter the Serial Number of the Zone Trigger Equipment being defined.
✓Communication Parameters - Zone Trigger Equipment communicates with MKMSCS (through SPA) using the serial communication parameters which are defined below:.
▪Port - Enter the Communication Port to which this device will be attached
▪Baud - Use the Drop-Down Selection List provided to Choose the required Baud Rate.
▪Bits - Enter the number of Stop Bits required (0 = None).
▪Parity - Enter the proper Parity setting.(0 = None).
✓Do Ping - Is a Ping command sent to this device? Use the Drop-Down Selection List provided to Choose either Yes or No.
✓Ping Loss Code - System defined as A101.
✓Ping Interval - Enter the manufacture's recommended Interval between Pings.
✓Ping String - Enter the manufacture's recommended command string characters to identify the purpose of this signal.
✓Max Ping Loss - Enter the manufacture's recommended maximum for Ping Signal Loss (typically 3% or less)
✓Last Ping - System maintained value.
✓Click the ![]() Icon to record this Zone Trigger Equipment entry.
Icon to record this Zone Trigger Equipment entry.
✓Repeat this process, as needed, to define additional Zone Trigger Equipment, as needed.
![]() List Icon - The Navigation Menu also has a List option which provides a tabular view of these Zone Trigger Equipment records.
List Icon - The Navigation Menu also has a List option which provides a tabular view of these Zone Trigger Equipment records.

Zone Trigger Equipment Form - List View
✓Click the List Icon to display the associated Grid Data.
✓The columns of Grid Data may be rearranged, filtered, sorted, and exported as a PDF file and/or an Excel formatted file.

✓Find - Enter text to search for a specific record, then Click the Find option.
✓Clear - To remove the text to search for entry, Click the Clear option

Navigation Menu shown with the List Options for Export & Print
✓Click the List Icon again to Close the List View and return to the Record Editing View.
❖See the Grid & Lists - Print Preview - Export Data chapter for complete information on using the List View, including its Export & Print options.