❑Virtual Phone Lines - DNIS are designed to accommodate Listen In procedures (see the Two Way Voice chapter) which may be required of your Company's Central Station Operators while Processing Alarm Signals.
•Actual physical phone lines can be combined with other Physical Lines into a Virtual Line (to facilitate the use of "Roll-Over" lines which are often used for Two Way Voice (Listen In).
❑The Virtual Phone Lines - DNIS Form allows your Company to define where incoming signals - from designated Listen In Accounts - are actually being received.
•The Physical/DNIS Number - for Receivers that have implemented DNIS (Dialed Number Identification Service) functionality - the storage of the Communicator Transmission Protocol - that these Accounts use to reduce the time required to acknowledge signals sent from the specified DNIS number
✓Will generally be the last five (5) digits of the Telephone Number being dialed by the Control Panel's Communicator when transmitting a Signal to this Receiver
✓Provides the ability to share all the lines so you can use the CSID Constructor.(see below)
•The CSID Constructor section within SPA's - Receiver Setup instructions allows you to:
✓precisely identify the type of data, and the order in which that data will be received from the Accounts connected to that Receiver
✓these identified data types will become part of the CSID entered in the Subscriber Panels section of the Central Station Data Form.
✓This is also where you can have the software assign a prefix or a suffix to the CSID (Subscriber Panel Number) so that you do not have duplicated Accounts
▪You can even assign Text to the Prefix or Suffix.
▪This can be done by Receiver, or by a Receiver Line, or by a DNIS.
•The Two Way Voice Grid that contains the current Two Way Voice information is one of the Docking Option :
✓Once the Two Way Voice signal has been completed, the Operator must delete it from that Two Way Voice Grid
❑When & How you may choose to use Virtual Phone Lines for the Listen In/Two Way Voice feature:
1.Never - You are not required to use this capability.
2.To have the Two Way Voice tab include a Special Description:
▪Physical Zone Code - Define the Physical Zone Code that will be sent from the Receiver
▪Notes - Enter the appropriate Special Description in the provided Notes field.
3.To have the Pop Up message, shown to the Operator, that displays a Special Description:
▪Physical Zone Code - Enter a Physical Zone Code that will be sent from the Receiver
▪Notes - Enter the appropriate Special Description in the Notes field.
•To Access the Virtual Phone Lines - DNIS Form:
a)From the Backstage Menu System Select Maintenance and Choose the General option, then select the General Maintenance option which displays the secondary Maintenance Menu, or
b)From the Quick Access Menu, Select Maintenance and Choose General Maintenance to display the secondary Maintenance Menu.
✓Once the Maintenance Menu is displayed, Choose the Monitoring sub-menu, then Click on the Virtual Phone Lines option.
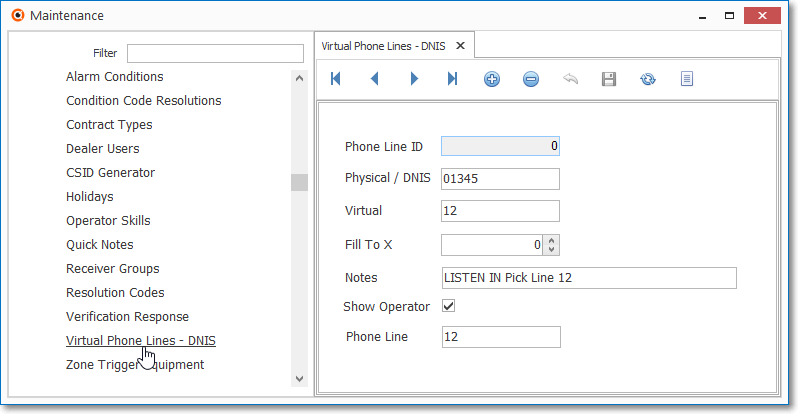
Virtual Phone Lines - DNIS Form
✓This Virtual Phone Lines Form may be Re-sized by Dragging the Top and/or Bottom up or down, and/or the Right side in or out.
•Navigation Menu - The Navigation Menu is located at the top of the Virtual Phone Lines Form.

✓This Navigation Menu provides the normal Record Movement, New, Delete, Save, Refresh, and List options.
•Record Editing section - The details of the currently selected record are displayed below the Navigation Menu at the center (Main Body) of the Virtual Phone Lines Form.
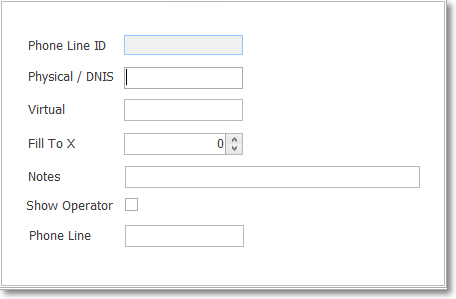
Virtual Phone Lines Form - Record Editing section
•To define the various Virtual Phone Lines:
✓Click the ![]() Icon to start the Virtual Phone Line entry in the Record Editing section.
Icon to start the Virtual Phone Line entry in the Record Editing section.
✓Phone Line ID - This is the internal record number supplied by the system when the record is initially saved.
✓Physical / DNIS - Enter the last five (5) digits of the Telephone Number, dialed by the Control Panel's Communicator, to transmit Two Way Voice Signals to the Receiver.
✓Virtual - Enter the internal phone system line number into which the Two Way Voice Signals should be translated.
▪This is a ten (10) character field which would normally be used to enter numbers, but may contain upper and lower case letters, and normal punctuation marks.
▪If this is not needed, enter the Line Card number in the Receiver to which these Two Way Voice Signals are to be sent.
▪Optionally, this field may be used for whatever else may be needed at your Central Station.
✓Fix To X - If required, enter the length that this Virtual Phone Line should be expanded
✓Notes - Enter a brief description indicating the purpose for this Listen In transmission, and/or any special instructions the Operator may need.
▪This is a forty (40) character field and accepts numbers, upper and lower case letters, and normal punctuation marks.
✓Show Operator? - Check this box if a specific Phone Line (extension number) will be needed to access this designated Physical Line Card - when used exclusively for Listen In.
✓Phone Line - If Show Operator was Checked, enter the Phone Line (extension number) required to access this Signal's Listen In connection.
▪This is a three (3) character field which would normally be used to enter numbers (i.e., 1 to 999), but may contain upper and lower case letters, and normal punctuation marks.
✓Click the ![]() Icon to record this Virtual Phone Line entry.
Icon to record this Virtual Phone Line entry.
✓Repeat this process, as needed, to define each Virtual Phone Line in use.
![]() List Icon - The Navigation Menu also has a List option which provides a tabular view of these Virtual Phone Line records.
List Icon - The Navigation Menu also has a List option which provides a tabular view of these Virtual Phone Line records.
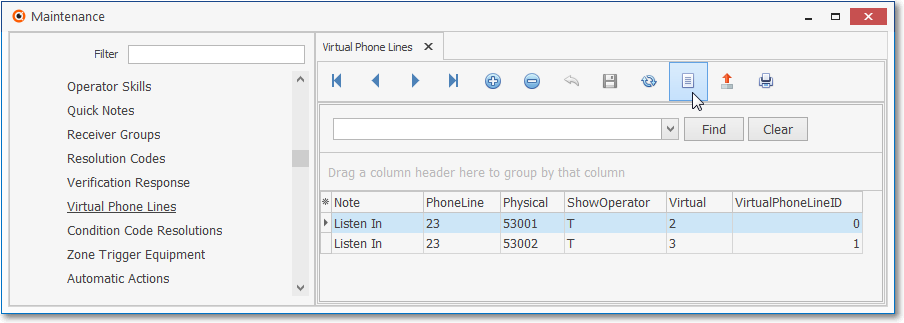
Virtual Phone Line Form - List View
✓Some columns may contain expanded comments or other information which may make the List View's display somewhat difficult to use.
Ø - Click the Asterisk at the left of the row of Header Names to display a Drop-Down Check List of each column's Headed Name.
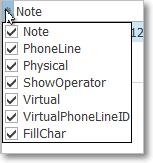
Available Column
▪Check any Header Name to be included in the List View (by default, All Header Names will be Checked)
▪Remove the Check for any Header Name (see illustration below) that is to be removed from the List View.
✓Click the List Icon to display the associated Grid Data.
✓The columns of Grid Data may be rearranged, filtered, sorted, and exported as a PDF file and/or an Excel formatted file.

✓Find - Enter text to search for a specific record, then Click the Find option.
✓Clear - To remove the text to search for entry, Click the Clear option

Navigation Menu shown with the List Options for Export & Print
✓Click the List Icon again to Close the List View and return to the Record Editing View.
❖See the Grid & Lists - Print Preview - Export Data chapter for complete information on using the List View, including its Export & Print options.
07/18/2022