❑The Telephone Search dialog allows an Operator within MKMSCS (or any User within MKMS) to locate a specific telephone number which was entered anywhere within the Central Station or Subscriber related data in MKMS.
•There are several ways available to activate the Telephone Number Search function:
1.From within MKMS:
a)From the Backstage Menu System Select Maintenance and Choose Telephone No Search.
b)From the Quick Access Menu, Select Maintenance and Choose Telephone No Search.
c)Press the Shift+F2 function key combination from within MKMS.

MKMS - Telephone Search dialog
2.From within MKMSCS:
a)On the Actions tab, Select the Telephone Number Search option on its Actions Icon's Menu.
b)Press the Alt+F2 function key combination.
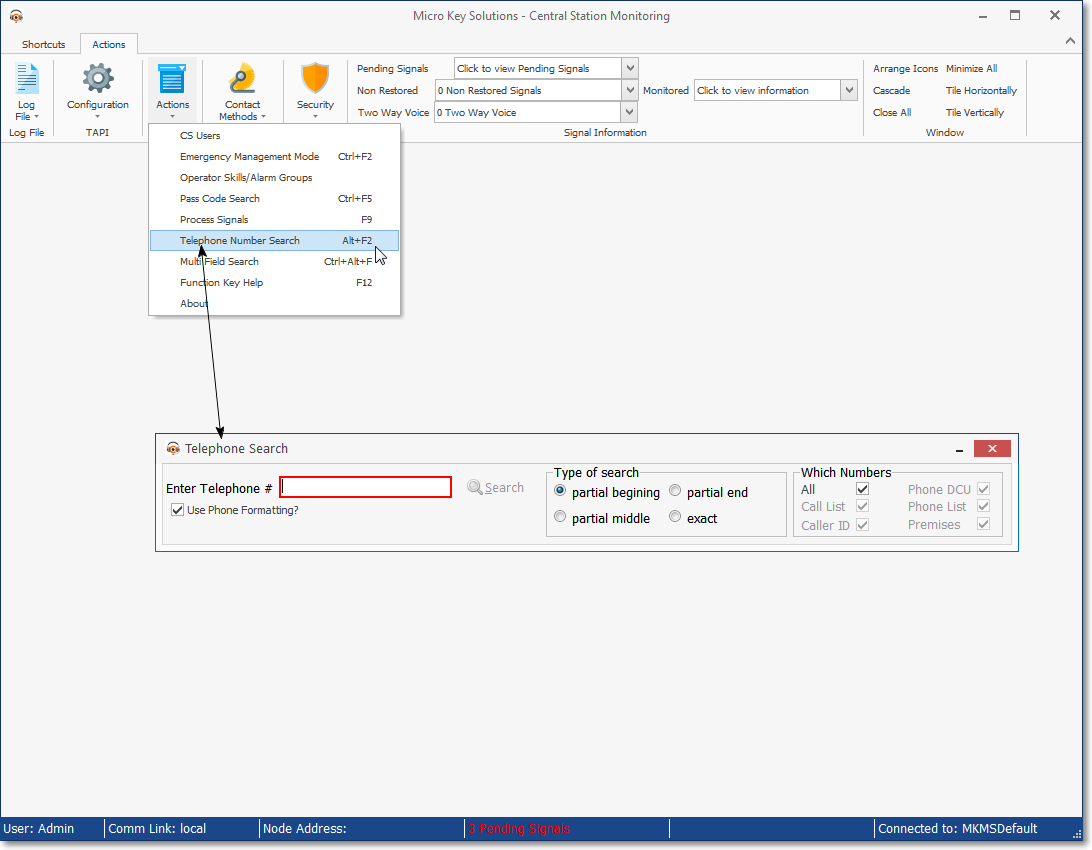
MKMSCS - Telephone Search dialog
❑Telephone Search - Regardless of the method used, the Telephone Search dialog will be displayed.
•Use Phone Formatting? - Check (or remove the Check) as appropriate for the required Search.
•Type of Search - Select the Type of Search you will want performed, Choose which Telephone Number fields you want searched, then make your entry and Click the Search button.
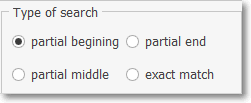
Type of Search
✓Type of Search - Choose the place within the selected field(s) that you want to match.
▪partial beginning - Compare the Filter expression entered in the Number field to the data in the Selected Field starting at the beginning of that field.
oNumber = " (407)" Selected Field = " (407)870-0040" (Note that each begins initially with a <space>.)
oA Match occurs because the " (407)" matches the beginning of the telephone number in the Selected Field.
▪partial end - Compare the Filter expression entered in the Number field to the data in the Selected Field starting at the end of that field.
oNumber = "0040" Selected Field = " (407)870-0040"
oA Match occurs because the "0040" matches the end of the telephone number in the Selected Field.
▪partial middle - The recommended default unless changed: Compare the Filter expression entered in the Number field to the telephone number in the Selected Field anywhere in that field.
oNumber = 407 Selected Field = " (407)870-0040"
oA Match occurs because the 407 matches the telephone number somewhere within the Selected Field.
oBe careful with this method because short values may match with records you did not intend to select.
oUse this match method with longer Number entries.
▪exact match - Compare the Filter expression entered in the Number field to the telephone number in the Selected Field - exactly.
oNumber = " (407)" Selected Field = " (407)870-0040"
oNumber = "0040" Selected Field = " (407)870-0040"
oNumber = 407 Selected Field = " (407)870-0040"
oA Match does not occur because none of these Numbers are an exact match to the whole telephone number within the Selected Field.
✓Which Numbers - Check each of the telephone number types within the database, that are to be searched.
▪Multiple Selections are permitted.
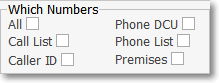
Which Numbers
1.All - Initially, All telephone number types are searched.
oRemove the Check from the All box to select a different set of telephone number types to be searched.
oOnce the User has specifically Checked a specific set of telephone number types, those become the default Choice until a different set (or All) is chosen.
2.Contacts - Check this box to include in the search, the telephone numbers entered in the Contacts (People To Call) Form for any Subscriber.
3.Caller ID - Check this box to include in the search, the telephone numbers inserted into Phone List field's sub-table in the Subscriber Panel(s) section on the Central Station Data Form for any Subscriber.
oThe Call ID numbers will be available if SPA has been Setup to automatically insert Caller ID Telephone Number(s) from which Alarm Signals were transmitted for an Account, into the Phone List field's sub-table within that Subscriber Panel(s) section on the Central Station Data Form.
4.Dealer - Check this box to include in the search, the telephone numbers entered in the Main tab of the Dealers Form
5.Phone DCU - Check this box to include in the search, the telephone numbers entered in the Phone DCU field in the Subscriber Panel(s) section on the Central Station Data Form for any Subscriber.
6.Phone List - Check this box to include in the search, the manually entered telephone numbers entered in the Phone List field's sub-table in the Subscriber Panel(s) section on the Central Station Data Form for any Subscriber.
7.Premises - Check this box to include in the search, the telephone numbers entered as Primary and/or Alternate Telephone Numbers in Contact Information section of any Subscriber Form.
•Enter Telephone # - Based on whether you Check (or remove the Check) the Use Phone Formatting? box:
a)If you chose to use Automatic Phone Formatting, the Enter Telephone # Filter expression should be filled in by entering as much of the Number as available following the rules below:
▪If no Area Code is required, enter the seven (7) digit telephone number (it cannot start with a 1)
▪If 10 digit dialing is in effect - no "1"prefix is needed, but you do need to dial an Area Code as part of the telephone number:
oPress the <Space Bar> first.
oThen enter the three digit Area Code.
oFinally, enter the seven digit Telephone Number.
oCorrect formatting will be applied automatically.
▪Long distance Telephone Numbers (with a "1" prefix) are entered as such, and the appropriate formatting parentheses and dash is applied automatically.
b)If you chose Not to use Automatic Phone Formatting - whether you have or have not Checked Remove Phone Formatting in User Options Form's Company Options tab,
▪The Enter Telephone # Filter expression must be manually formatted following the Manual Telephone Number Formatting Rules.
▪No Telephone Number Formatting will be applied to your entry.
•Search - Click the Search button to execute the search function.
❑Using the Search Results Grid Data to locate the desired Subscriber(s):
•Initial Search Results - The result of your initial search will be displayed below the Telephone Search dialog.
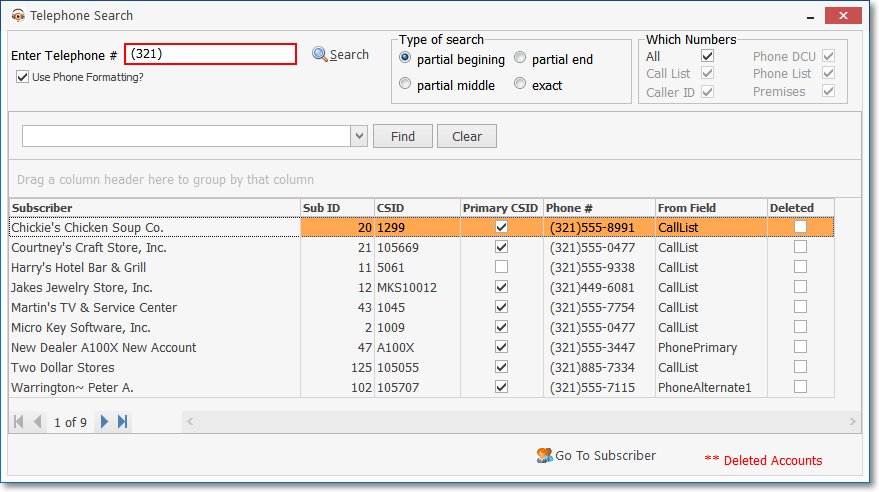
Telephone Search - Results Grid
•Secondary Search - To refine your list (make a Secondary Search):
✓The columns of Grid Data may be rearranged, filtered, sorted, and exported as a PDF file and/or an Excel formatted file.

✓Find - Enter text to search for a specific record, then Click the Find option.
▪An incremental search - based on that Enter text to search... entry - will be executed.
✓Clear - To remove the text to search for entry, Click the Clear option
❖See the Grid & Lists - Print Preview - Export Data chapter for complete information on using this option.
❑Viewing the Subscriber Information once the desired record is located:
•There are two ways to view the Subscriber information matching the record you located:
✓Within MKMSCS:
![]()
1.Select the record and Click the Go To Account button at the bottom of the Telephone Search dialog to open the Sub Info (F2) Form.
2.Double-Click on any record to open the associated Sub Info (F2) Form.
✓Within MKMS:
![]()
1.Select the record and Click the Go To Account Icon at the bottom of the Telephone Search dialog to open the Subscriber Form.
2.Double-Click the record to open the Subscriber Form.
•In either case, the Telephone Search dialog will automatically be closed.