❑Recurring Revenue is a vital, and stabilizing part of any alarm business.
•The biggest mistake many businesses make is not periodically indexing this revenue stream for inflation, by upwardly adjusting their Recurring Revenue Service rates.
✓By not doing so, on a regular (preferably annual) basis, a slow but steady erosion of the true value of their business occurs.
✓The costs associated with these services generally rises with inflation and the general value of the business is predominately based on its gross Recurring Revenue billings.
✓If the fees for these services do not rise (at least) with the cost of living, the effect is that of giving a slow, but steady discount for the services provided.
•The fix is to implement small, incremental increases. In so doing, the true Value of this Recurring Revenue remains steady (on a real cost per Subscriber basis).
✓Small, inflation adjustment related, changes rarely upset Subscribers.
✓However, if these adjustments do not occur, once you've realized that you are way behind, the large (although rare) increases required to "catch-up" do make them angry.
❑Pay Groups define the pre-set rates for all of your Recurring Revenues,
•More than one rate group may be defined for the same type of service.
✓If you want different rate sets for the same general type of service, establish multiple Pay Group codes (like OC1 at $15, OC2 at $20, etc., for your Opening & Closing service) .
✓Then assign the appropriate Pay Group code for that service when setting up each Subscriber's Recurring Revenue Rules.
•It is also a good practice to define one Pay Group for allowing you to manually reset rates for special customers.
✓For making periodic Adjustments to these Pay Rates, use the Pay Group Change procedure to globally re-set rates, on a group by group basis, as needed.
•Entering Pay Groups
a)From the Backstage Menu System Select Maintenance and Choose General and Click the General Maintenance option which displays the Maintenance Menu, or
b)From the Quick Access Menu, Select Maintenance and Choose General Maintenance to display the Maintenance Menu.
✓Once the Maintenance Menu is displayed, Select Receivables and Choose Pay Groups.
•The Pay Groups Form will be displayed (as shown below).
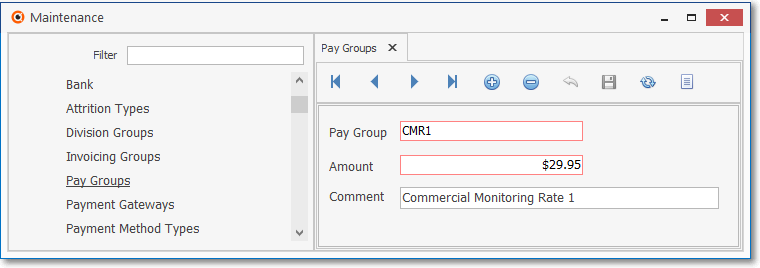
Pay Groups Form
✓This Pay Groups Form may be Re-sized by Dragging any side (Top, Bottom, Left or Right) in or out.
•Navigation Menu - The Navigation Menu is located at the top of the Pay Groups Form.

✓This Navigation Menu provides the normal Record Movement, plus Add, Delete, Cancel, Save, Refresh, and List options.
•Record Editing View - The details of the currently selected record are displayed below the Navigation Menu at the center (Main Body) of the Pay Groups Form.
Pay Groups Form - Record Editing View
•To define a Pay Group which will be used to define the pre-set rate for a type of Recurring Revenue:
✓Click the ![]() Icon to start the Pay Group entry in the Record Editing View.
Icon to start the Pay Group entry in the Record Editing View.
▪Pay Group - Enter a "Code" - an abbreviation of up to seven characters - for this Pay Group.
oA Pay Group Code is assigned to each Auto Bill record thereby setting the Amount (see below) for that Service.
oPeriodically that Amount may re-set by using the Pay Group Change process.
▪Amount - Enter the Monthly Rate for this Pay Group Code.
➢Note - In each Subscriber's Auto Bill Form there is also an option to set a Custom Pay Amount.
a)Normally, when you define Recurring Revenue types in the Sale-Purchase Items Form, in addition to its Description you must also specify the unit Price to be paid for that service.
b)That Sale-Purchase Item's Price will be inserted automatically when manually creating an Invoice for that service, although it can be modified on an Invoice by Invoice basis.
c)However, when automatically Billing Recurring Revenue, the Amount set for the Pay Group code assigned to the Auto Bill record will determine the Amount charged for the service when the Recurring Revenue Invoice is created.
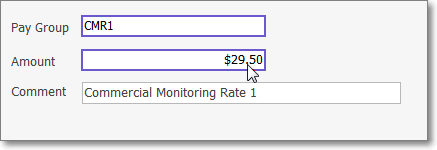
d)A Rate Change may also be easily implemented by simply changing the Amount entered here.

i.Once changed, a confirmation message will be displayed to remind the User of the impact of that Rate Change
ii.Select Yes to implement the Rate Change, or No to cancel the change.
e)You may override this normal Pay Group related pricing behavior by entering a Custom Pay Amount in the Auto Bill record, because there are times when you will want to make an exception and fix the price for a service:
i.That Custom Pay Amount becomes the permanent price and will not be re-set by the Pay Group Change process.
ii.If the record was previously assigned a Pay Group Code, once a Custom Pay Amount has been set, the previous Pay Group assignment is canceled automatically.
❖See the Recurring Revenue - Defining Open Term Billing chapter for more information about setting a Custom Pay Amount.
❖See the Custom Pay Increase chapter for more information about changing a Custom Pay Amount.
❖See the RMR Rate Change chapter for information on how to track all Rate Changes.
▪Comment - Enter a brief description for this Pay Group Code.
oThe Comment may up to 30 characters in length and include upper and/or lower case letters, numbers, spaces and normally used punctuation marks.
✓Click the ![]() Icon to record this Pay Group.
Icon to record this Pay Group.
•Any number of additional Pay Groups may be created.
![]() List Icon - The Navigation Menu also has a List option which provides a tabular view of these Pay Group records.
List Icon - The Navigation Menu also has a List option which provides a tabular view of these Pay Group records.
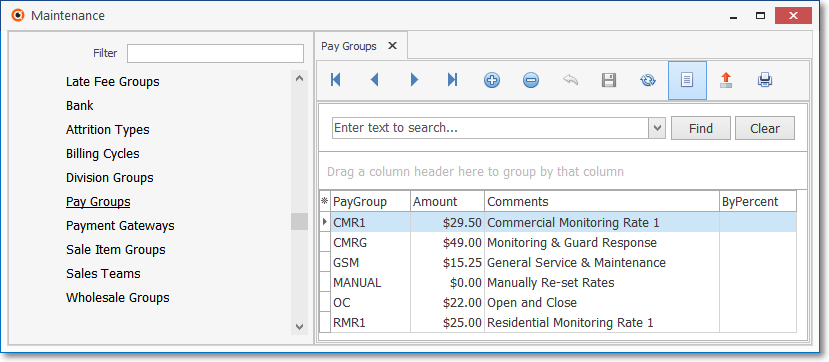
Pay Groups Form - List View
✓The columns of listed Grid Data may be rearranged, filtered, sorted, and exported as a PDF file and/or an Excel formatted file.

✓Find - Enter text to search for a specific record, then Click the Find option.
✓Clear - To remove the text to search for entry, Click the Clear option

Navigation Menu shown with the Icons for List, Export and Print
![]() List Icon - Click the List Icon again to Close the List View and return to the Record Editing View.
List Icon - Click the List Icon again to Close the List View and return to the Record Editing View.
![]() Export Icon - Click the Export Icon to create (one of there types of) a spreadsheet compatible file containing the Grid Data as it is currently organized and filtered.
Export Icon - Click the Export Icon to create (one of there types of) a spreadsheet compatible file containing the Grid Data as it is currently organized and filtered.
![]() Print - Click the Print Icon to display the Print Preview Form from which a custom report may be designed and "printed" as an Adobe® PDF File.
Print - Click the Print Icon to display the Print Preview Form from which a custom report may be designed and "printed" as an Adobe® PDF File.
❖See the Grids - Print Preview - Export Data chapter for complete information on using the List View, including its Export & Print options.