❖This chapter is being reviewed/revised
❑The ItsPayd Payment Import dialog presents the Upload list, (bottom section of the file transfer form), which includes those items that that have been previously uploaded by ItsPayd Users.
•The optional Its Payd Module requires a purchase and will not be available unless it's Registered
•To access this ItsPayd Payment Import dialog:
✓From the Quick Access Menu (i.e., Right-Click is any open space within the MKMS Desktop) Select Maintenance and Choose Receivables.
▪From the Receivables sub-menu Choose Pay Import and then Choose ItsPayd.
▪Click the Import Payment File option
❑To upload a new file, click the “Upload” button and a File Open dialog is presented to allow the user to select an import file generated from the from the export screen.
•After retrieving a payment file from the ItsPayd server for import, select the “Import Payment File” option
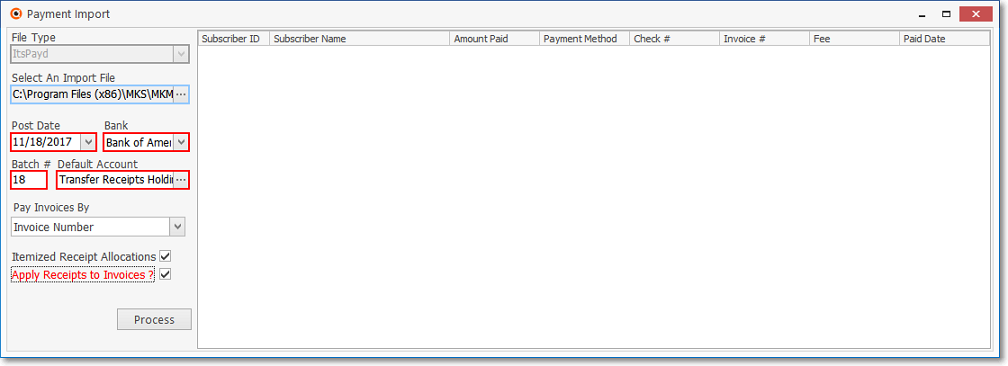
a)File Type - By default, “ItsPayd” is inserted.
b)Select An Import File -
i.Click the Ellipse button.
ii.It will display the standard Windows® "Open" dialog
iii.Choose the required file.
c)Post Date - By default this will be Today.
i.Use the Drop-Down Calendar/Date field provided to Choose a different Date, if needed.
a)Click on the Date field and type the desired Date using a MM/DD/YYYY format; or
b)Use the Drop-Down Calendar/Date Entry field provided to Choose the desired Date
d)Bank - Select the Bank into which ItsPayd deposited the funds
e)Batch # - Enter the appropriate number which, by default, will be today's date number but may be changed as needed.
oThe same Batch Number should never be assigned within the same Month to Receipts that will be deposited into different Banks!
➢Note: See the "Batch Number Assignment" discussion in the Receipts chapter for more information about Batch Numbering.
f)Default Account - Use the Drop-Down Selection List to Choose the Subscriber record that has been established as the default Account to which any Unassigned Receipts will be posted.
i.You can go to this Default Account later and review any Receipt saved there.
ii.Once it's determined who those collect funds actually belong to, those funds can be Transferred to the correct Account.
iii.This scenario will rarely occur with ItsPayd, because the Invoice number is always supplied in their import and export files.
iv.Therefore, the location of the account should not be problematic.
v.See the "Why create a Holding Account?" discussion below.
g)Pay Invoice By: Select either 1) Invoice or 2) Oldest Outstanding Invoice.
h)Itemize Receipt Allocation - Check this box only when (if) Itemized Receipt Allocation is required.
i)Apply Receipt to Invoices? - The posting process will locate the Invoice specified in the file and apply collect funds to that invoice.
i.If by chance there are additional funds left on the value of the collected funds after applying them to the invoice, the posting process will attempt to apply the remainder of the collect funds to any other open Invoice(s) on the Account.
ii.If there are no open Invoices the remainder will be posted as a Customer Deposit and will be available to be applied against future Invoices.
•To verify the payments posting, run the Cash Receipts Report and select the Date when those Receipts were posted and the Batch Number utilized for the import..
❑Why create a Holding Account?
•For a number of reasons - almost all of which relate to bad data - some Receipts may not be properly linked to a Subscriber during any Import Payments procedure (e.g., Import Payments, IsPayd Import).
✓These orphaned Receipts will be posted to a User designated Holding Account - a Subscriber record specifically entered for that purpose.
•From this Holding Account, you will be able to Transfer (see the Transferring a Receipt to a different Subscriber discussion in the Receipts chapter) these Unassigned Receipts to the appropriate Subscriber(s) using the Assign Receipts capability in the Receipt Transfer Form.
✓This Receipt Transfer dialog is used to identify and relocate (i.e., Transfer) the Receipts that were assigned to the Holding Account (which was created and designated for that purpose).