❑Lead Information Section - This Leads Section includes the Source, Lead Type, Marketing Area and original Date the Lead was received which ultimately led to the Acquisition of this Account.
•This Lead Information Section is generally used to add and/or update the Source, Lead Type, Marketing Area and original Lead Date initially entered in the Edit View on the Prospect Form within the Prospect Tracking System.
✓These Source, Lead Type, and Marketing Area Codes are identified as part of the Prospect Tracking System's Maintenance Information entry process.
✓Preferably, this Lead Information was identified when the Subscriber was initially entered as a Prospect.
✓It is then automatically imported into the Subscriber record when the Prospect is Converted to a Subscriber.
❑Accessing the Lead Information Section,
•Select the Receivables Tab on the MKMS Desktop and Click the Subscribers (F3) Icon.
•On the Subscribers Form, Locate the appropriate Subscriber record using the Subscriber Search function.
•Click the Edit View Icon and Choose the Subscriber Tab
•Maximize the Form to view the Lead Information section.
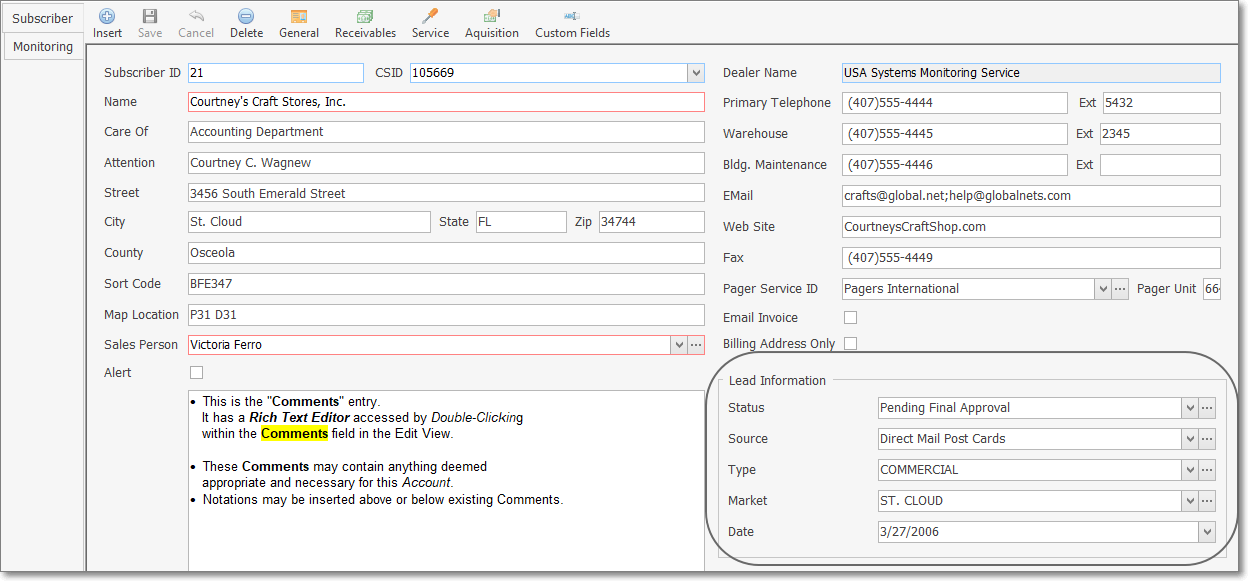
Subscribers Form - Edit View - Subscribers tab - Lead Information Section
•Using the Drop-Down Selection Lists or Date Selection Box provided:
1.Status - Enter the Prospect Status for this Lead using the Drop-Down Selection List provided.
▪Double-Click on the appropriate Prospect Status within the Drop-Down Selection List provided.
▪Click the Ellipse Icon to open the Prospect Status Maintenance Form. where a Status may be created new or revised (if the appropriate User Access Rights have been granted for the Prospect Status Form)
2.Source - Enter the Lead Source for this Lead using the Drop-Down Selection List provided.
▪Double-Click on the appropriate Lead Source within the Drop-Down Selection List provided.
▪Click the Ellipse Icon to open the Lead Source Maintenance Form. where a Source may be created new or revised (if the appropriate User Access Rights have been granted for the Lead Source Form)
3.Type - Enter the Lead Type using the Drop-Down Selection List provided.
▪Double-Click on the appropriate Lead Type within the Drop-Down Selection List provided.
▪Click the Ellipse Icon to open the Lead Type Maintenance Form. where a Lead Type may be created new or revised (if the appropriate User Access Rights have been granted for the Lead Type Form)
4.Market - Enter the Marketing Area for this Lead using the Drop-Down Selection List provided.
▪Double-Click on the appropriate Marketing Area within the Drop-Down Selection List provided.
▪Click the Ellipse Icon to open the Marketing Area Maintenance Form. where a Marketing Area may be created new or revised (if the appropriate User Access Rights have been granted for the Marketing Area Form)
5.Date - Enter the Date when this Lead was received using the Drop-Down Calendar/Date Entry field provided.
a)Click on the Date field and type the desired Date using a MM/DD/YYYY format; or
b)Use the Drop-Down Calendar/Date Entry field provided to Choose the desired Date

•Click the Save Icon on the Edit View Menu to record the entries.