❑To define an automated response to be executed using the MKS Connect Service (and the Communications Module), a Schedule record must be created in the Schedule Form
•This Schedule Form allows your Company to define, script, schedule and customize various Types of these automated responses.
•To view the Schedule Form:
a)From the Backstage Menu System Select Maintenance and Choose the General option, then select the General Maintenance option which displays the secondary Maintenance Menu, or
b)From the Quick Access Menu, Select Maintenance and Choose General Maintenance to display the secondary Maintenance Menu.
✓Once this Maintenance Menu is displayed
1)Choose the Customer Connect sub-menu,
2)Then Click on the Schedule option.
✓The Schedule Form will be displayed
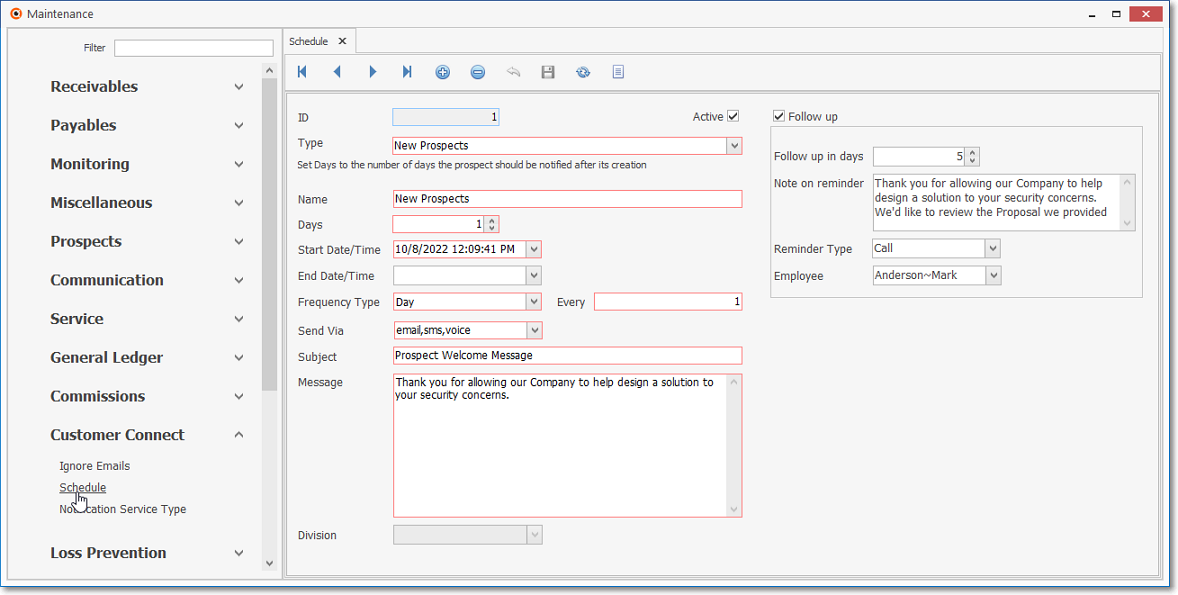
Customer Connect - Schedule Form
✓This Schedule Form may be Re-sized by Dragging the Top and/or Bottom up or down, and/or the Right side in or out.
•Navigation Menu - The Navigation Menu is located at the top of the Schedule Form.

✓This Navigation Menu provides the normal Record Movement, New, Delete, Cancel, Save, and List options.
•Record Editing section - The details of the currently selected record are displayed below the Navigation Menu at the center (Main Body) of the Schedule Form.
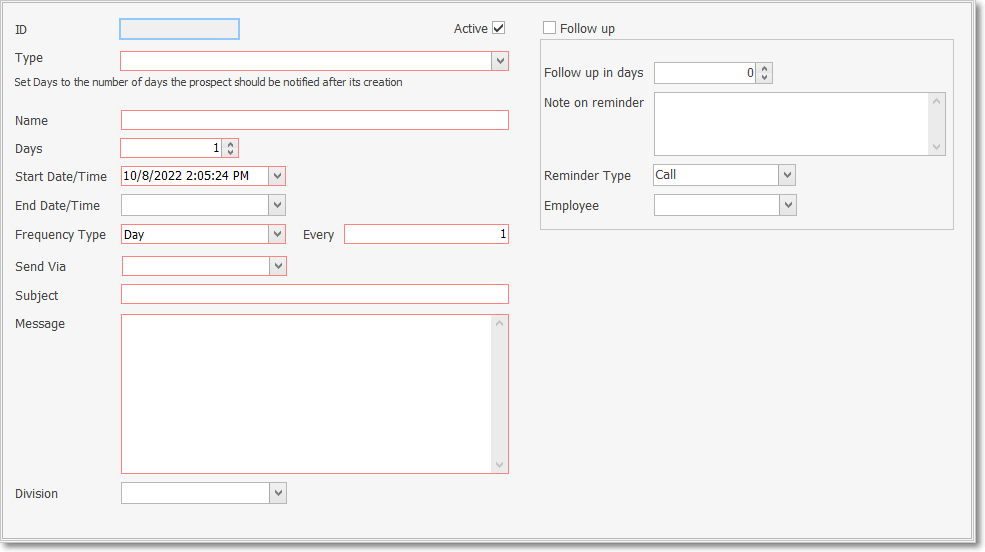
Customer Connect - Schedule Form - Record Editing section
❑Creating a Schedule record:
•To define the Schedule which will be used to identify an automated response
✓Click the ![]() Icon to start the Schedule entry in the Record Editing section.
Icon to start the Schedule entry in the Record Editing section.
✓ID - This is the system assigned record number which is inserted automatically when the record is initially saved.
✓Active - By default, this box will be Checked indicating that this Schedule is Active (remove Check Mark to deactivate this Schedule)
✓Follow up - Check this box if this Schedule entry requires additional Follow Up
▪This will allow the appropriate Follow Up Information to be defined (see Follow Up Information below)
✓Type - Use the Drop-Down Select List provide to Choose the appropriate Notification Service Type for the automated response being defined
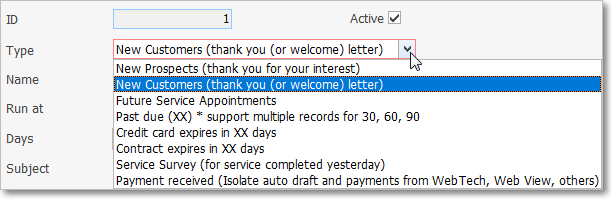
Customer Connect - Schedule Form - Record Editing section - Type selections
▪List of the predefined Notification Service Types
a)New Prospects (thank you for your interest) - See New Prospect Schedule below
b)New Customers (thank you (or welcome) letter) - See New Customer Schedule below
c)Future Service Appointments - See Future Service Appointments below
d)Past due (XX) * support multiple records for 30, 60, 90 - See Past Due Notice Reminder below
e)Credit card expires in XX days - See Credit Card Expiration Notice below
f)Contract expires in XX days - See Contract Expiration Notice below
g)Service Survey (for service completed yesterday) - See Completed Service Survey below
h)Payment received (Isolate auto draft and payments from Web Tech, Web View, others) - See Payment received below
✓Name - A brief description of the purpose of this automated response will be inserted based on the Notification Service Type selected above but may be modified when needed
✓Days - Number of Days before (or after) the associated event/purpose when this automated response should be processed.
✓Start Date/Time - By default, the current Date and Time will be inserted which indicates that when this condition (Notification Service Type) exists, the message/communication should be implemented immediately.
✓End Date/Tine - Normally left blank unless a special circumstance requires otherwise.
✓Frequency Type - By default, Day but should be changed when appropriate
✓Every - By default, this will be "1" but should be changed when appropriate
✓Send Via - Use the Drop-Down Check Box List provided to View the Notification Method(s) that should be used
▪By default, these will be those assigned to the Notification Service Type selected above
▪Check or remove the Check mark to change what Notification Type(s) should be used
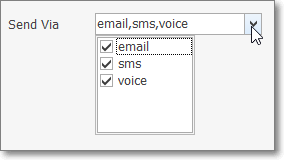
Schedule Form - Send Via options
✓Subject - This will be the Subject line of the Email that is generated and should be constructed accordingly.
✓Message - Enter the appropriate Email Message for the notification being performed
▪Double-Click this filed to access the Rich Text Editor features.
✓Division - If recipients should only be those Subscribers assigned to a specific Division,
▪Use the Drop-Down Select List provided to Choose that Division
▪Otherwise, All Subscribers who apply to the selected Type will be included (this field is not available if New Prospects was selected)
✓Follow up - If this automated response should include adding a Reminder for a specific Employee, Check this box.

Customer Connect - Schedule Form - Follow Up section
▪Follow up in days - The automated response Date set above will be the current day plus the number of Days entered in this field
▪Note on reminder - The Description to be entered on the Reminder entry.
▪Reminder Type - Use the Drop-Down Select List provided to Choose the appropriate response (Call, Meeting, Note, or To Do)
▪Employee - Use the Drop-Down Select List provided to Choose the Employee who will get, and need to respond to this Reminder
✓Click the ![]() Icon to record this Schedule entry.
Icon to record this Schedule entry.
✓The system will assign an ID.
❑Understanding ways the Schedule for each Notification Service Type may be defined on this Schedule Form:
•New Prospect Schedule - Scheduling a New Prospect automated response
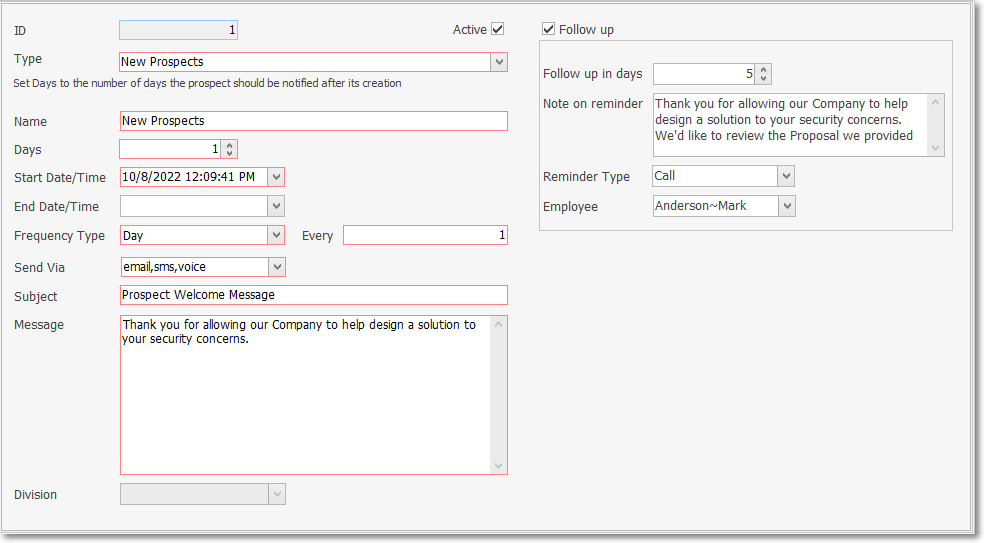
Customer Connect - Schedule - Type = New Prospect
✓Name - A brief description of the purpose of this automated response will be inserted based on the Notification Service Type selected above but may be modified when needed
▪This should should describe the type of message being sent to the New Prospect
▪This is an internal description defining the automated response, such as:\
o"Thank You for allowing us to design protection your Home,"
o"Thanks for the opportunity to design protection your Business"
✓Days - By default will be the day following (+1) the Date this new Prospect entry was created
▪May be changed based on your Company's adopted business model
✓Start Date/Time - By default, the current Date and Time will be inserted
▪This represents the time of Day/Night (it's a 24 hour field) when this automated response should be generated.
✓End Date/Tine - Normally left blank unless a special circumstance requires otherwise.
✓Frequency Type - By default, Day but should be changed when appropriate
✓Every - By default, this will be "1" but should be changed when appropriate
✓Send Via - Use the Drop-Down Check Box List provided to View the Notification Method(s) that should be used
▪By default, these will be those assigned to the Notification Service Type selected above
▪Check or remove the Check mark to change what Notification Type(s) should be used
Schedule Form - Send Via options
✓Subject - This will be the Subject line of the Email that is generated and should be constructed accordingly.
✓Message - Enter the appropriate Email Message for the notification being performed
✓Division - Not permitted - Prospects are not assigned to a Division until they actually Purchase/Lease a system
✓Follow up requirements are set based on the Notification Service Type of automated response being defined
▪Check this box to add a Task to a selected Employee's Reminders
▪Add what's required, or
▪Remove a Check to skip this functionality
•New Customer Schedule - Scheduling a New Customer automated response
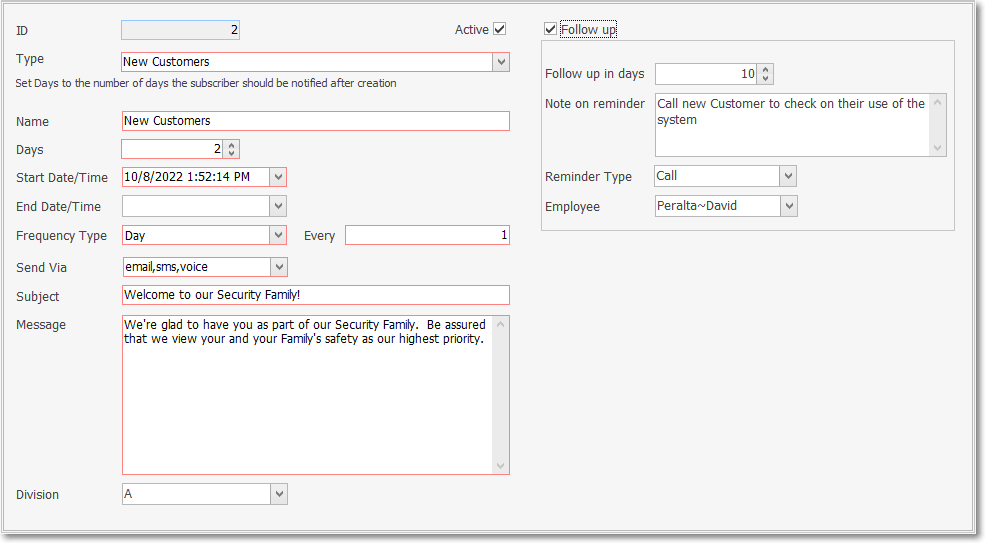
Customer Connect - Schedule - Notification Service Type = New Customer
✓Name - A brief description of the purpose of this automated response will be inserted based on the Notification Service Type selected above but may be modified when needed
▪This should should describe the type of message being sent to the New Customer
▪This is an internal description defining the automated response, such as:
o"Thank You for your Business"
o"Welcome to our Company"
o"Glad you allowed us to protect your Home/Business"
✓Days - by default will be the day following (+1) the Date this New Customer (Subscriber) entry was created
▪May be changed based on your Company's adopted business model
✓Start Date/Time - By default, the current Date and Time will be inserted
▪This represents the time of Day/Night (it's a 24 hour field) when this automated response should be generated.
✓End Date/Tine - Normally left blank unless a special circumstance requires otherwise.
✓Frequency Type - By default, Day but should be changed when appropriate
✓Every - By default, this will be "1" but should be changed when appropriate
✓Send Via - Use the Drop-Down Check Box List provided to View the Notification Method(s) that should be used
▪By default, these will be those assigned to the Notification Service Type selected above
▪Check or remove the Check mark to change what Notification Type(s) should be used
Schedule Form - Send Via options
✓Subject - This will be the Subject line of the Email that is generated and should be constructed accordingly.
✓Message - Enter the appropriate Email Message for the notification being performed
✓Division - when assigned - allows a Messages to be created based on the Division being served
✓Follow up requirements are set based on the Notification Service Type of automated response being defined
▪Check this box to add a Task to a selected Employee's Reminders
▪Add what's required, or
▪Remove a Check to skip this functionality
•Future Service Appointments - Scheduling a Future Service Appointment automated response
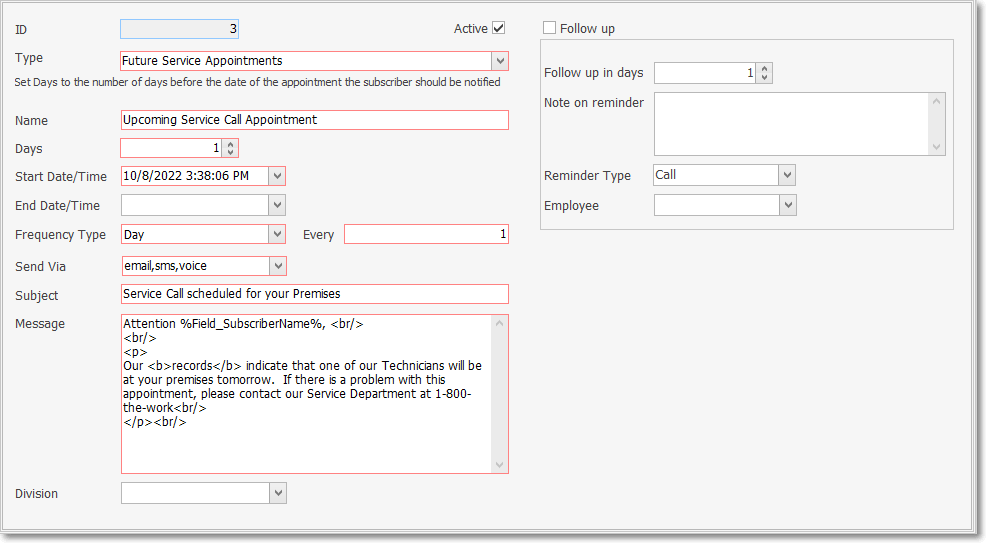
Customer Connect - Schedule - Notification Service Type = Future Service Appointment
✓Name - should describe the type of message being sent for a Future Service Appointment
▪Examples: a "Reminder for an upcoming service call", a "Pending Service Request", etc. message
▪This is an internal description of the use for this automated response
✓Days - represents the number of Days Prior to the scheduled Service Call is when this automated response should be generated
▪May be changed based on your Company's adopted business model
✓Start Date/Time - By default, the current Date and Time will be inserted
▪This represents the time of Day/Night (it's a 24 hour field) when this automated response should be generated.
✓End Date/Tine - Normally left blank unless a special circumstance requires otherwise.
✓Frequency Type - By default, Day but should be changed when appropriate
✓Every - By default, this will be "1" but should be changed when appropriate
✓Send Via - Use the Drop-Down Check Box List provided to View the Notification Method(s) that should be used
▪By default, these will be those assigned to the Notification Service Type selected above
▪Check or remove the Check mark to change what Notification Type(s) should be used
Schedule Form - Send Via options
✓Subject - This will be the Subject line of the Email that is generated and should be constructed accordingly.
✓Message is constructed to match the purpose identified in the Name entered above
✓Division - when assigned - allows a Messages to be created based on the Division being served
✓Follow up - not normally required
•Past Due Notice - Scheduling a Past Due Notice automated response
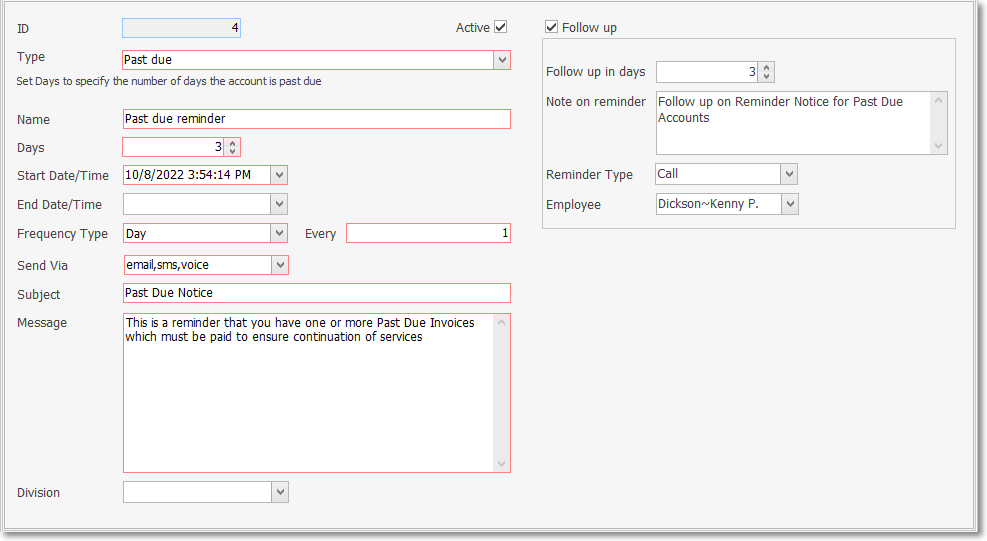
Customer Connect - Schedule - Notification Service Type = Past Due
✓Name - should describe the type of message being sent for a Past Due Notice
▪Examples: a "Reminder to Pay an Overdue Invoice", a "Past Due Warning Message", etc. message
▪This is an internal description of the use for this automated response
✓Days - represents the number of Days since the Invoice was Due when this automated response should be generated
▪May be changed based on your Company's adopted business model
▪Consider creating 30, 60, and 90 as options
✓Start Date/Time - By default, the current Date and Time will be inserted
▪This represents the time of Day/Night (it's a 24 hour field) when this automated response should be generated.
✓End Date/Tine - Normally left blank unless a special circumstance requires otherwise.
✓Frequency Type - By default, Day but should be changed when appropriate
✓Every - By default, this will be "1" but should be changed when appropriate
✓Send Via - Use the Drop-Down Check Box List provided to View the Notification Method(s) that should be used
▪By default, these will be those assigned to the Notification Service Type selected above
▪Check or remove the Check mark to change what Notification Type(s) should be used
Schedule Form - Send Via options
✓Subject - This will be the Subject line of the Email that is generated and should be constructed accordingly.
✓Message is constructed to match the purpose identified in the Name entered above
✓Division - when assigned - allows a Messages to be created based on the Division being served
✓Follow Up - requirements are set based on the Notification Service Type of automated response being defined
▪Check this box to add a Task to a selected Employee's Reminders
▪Add what's required, or
▪Remove a Check to skip this functionality
•Credit Card Expiration Notice - Scheduling a Credit Card Expiration Notice automated response
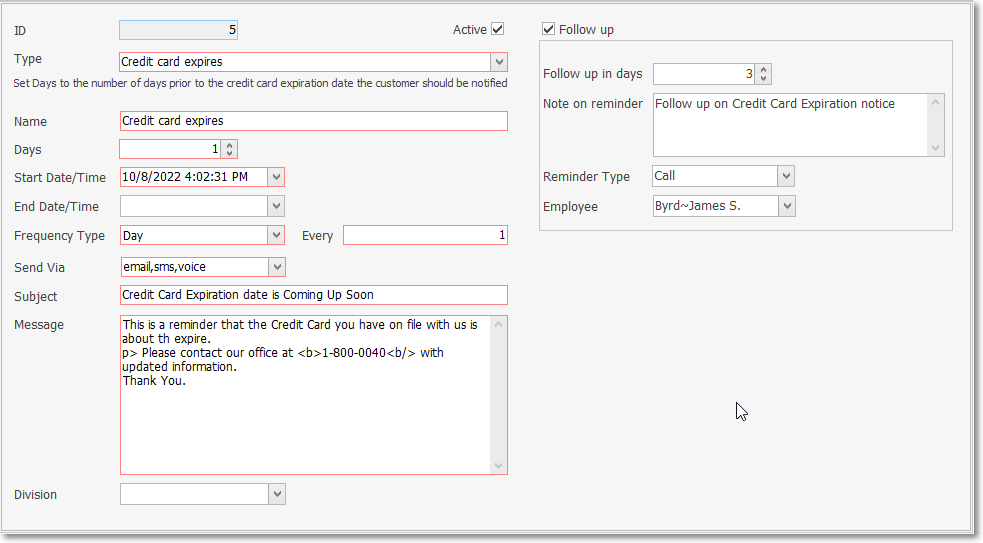
Customer Connect - Schedule - Notification Service Type = Credit Card Expires
✓Name - should describe the type of message being sent for a Credit Card Expiration Notice
▪Examples: a "Reminder to Update Credit Card Information", a "Credit Card Expiring Message", etc. message
▪This is an internal description of the use for this automated response
✓Days - represents the number of Days until the Credit Card Expires for when this automated response should be generated
▪May be changed based on your Company's adopted business model
✓Start Date/Time - By default, the current Date and Time will be inserted
▪This represents the time of Day/Night (it's a 24 hour field) when this automated response should be generated.
✓End Date/Tine - Normally left blank unless a special circumstance requires otherwise.
✓Frequency Type - By default, Day but should be changed when appropriate
✓Every - By default, this will be "1" but should be changed when appropriate
✓Send Via - Use the Drop-Down Check Box List provided to View the Notification Method(s) that should be used
▪By default, these will be those assigned to the Notification Service Type selected above
▪Check or remove the Check mark to change what Notification Type(s) should be used
Schedule Form - Send Via options
✓Subject - This will be the Subject line of the Email that is generated and should be constructed accordingly.
✓Message is constructed to match the purpose identified in the Name entered above
✓Division - when assigned - allows a Messages to be created based on the Division being served
✓Follow Up - requirements are set based on the Notification Service Type of automated response being defined
▪Check this box to add a Task to a selected Employee's Reminders
▪Add what's required, or
▪Remove a Check to skip this functionality
•Contract Expiration Notice - Scheduling a Contract Expiration Notice automated response

Customer Connect - Schedule - Notification Service Type = Contract Expires
✓Name - should describe the type of message being sent for a Contract Expiration Notice
▪Examples: a "Reminder to Renew expiring Contract", a "Monitoring/Service Contract Expiring Message", etc. message
▪This is an internal description of the use for this automated response
✓Days - represents the number of Days until the Contract Expires for when this automated response should be generated
▪May be changed based on your Company's adopted business model
✓Start Date/Time - By default, the current Date and Time will be inserted
▪This represents the time of Day/Night (it's a 24 hour field) when this automated response should be generated.
✓End Date/Tine - Normally left blank unless a special circumstance requires otherwise.
✓Frequency Type - By default, Day but should be changed when appropriate
✓Every - By default, this will be "1" but should be changed when appropriate
✓Send Via - Use the Drop-Down Check Box List provided to View the Notification Method(s) that should be used
▪By default, these will be those assigned to the Notification Service Type selected above
▪Check or remove the Check mark to change what Notification Type(s) should be used
Schedule Form - Send Via options
✓Subject - This will be the Subject line of the Email that is generated and should be constructed accordingly.
✓Message is constructed to match the purpose identified in the Name entered above
✓Division - when assigned - allows a Messages to be created based on the Division being served
✓Follow Up - requirements are set based on the Notification Service Type of automated response being defined
▪Check this box to add a Task to a selected Employee's Reminders
▪Add what's required, or
▪Remove a Check to skip this functionality
•Completed Service Survey - Scheduling a Completed Service Survey automated response

Customer Connect - Schedule - Notification Service Type = Service Survey
✓Name - should describe the type of message being sent for a Completed Service Survey
▪Examples: a "How Did We Do?", a "Did the service provided meet your expectations?", etc. message
▪This is an internal description of the use for this automated response
✓Days -represents the number of Days after the Service was provided when this automated response should be generated
▪May be changed based on your Company's adopted business model
✓Start Date/Time - By default, the current Date and Time will be inserted
▪This represents the time of Day/Night (it's a 24 hour field) when this automated response should be generated.
✓End Date/Tine - Normally left blank unless a special circumstance requires otherwise.
✓Frequency Type - By default, Day but should be changed when appropriate
✓Every - By default, this will be "1" but should be changed when appropriate
✓Send Via - Use the Drop-Down Check Box List provided to View the Notification Method(s) that should be used
▪By default, these will be those assigned to the Notification Service Type selected above
▪Check or remove the Check mark to change what Notification Type(s) should be used
Schedule Form - Send Via options
✓Subject - This will be the Subject line of the Email that is generated and should be constructed accordingly.
✓Message is constructed to match the purpose identified in the Name entered above
✓Division - when assigned - allows a Messages to be created based on the Division being served
✓Follow Up - requirements are set based on the Notification Service Type of automated response being defined
▪Check this box to add a Task to a selected Employee's Reminders
▪Add what's required, or
▪Remove a Check to skip this functionality
•Payment Received - Scheduling a Payment Received automated response
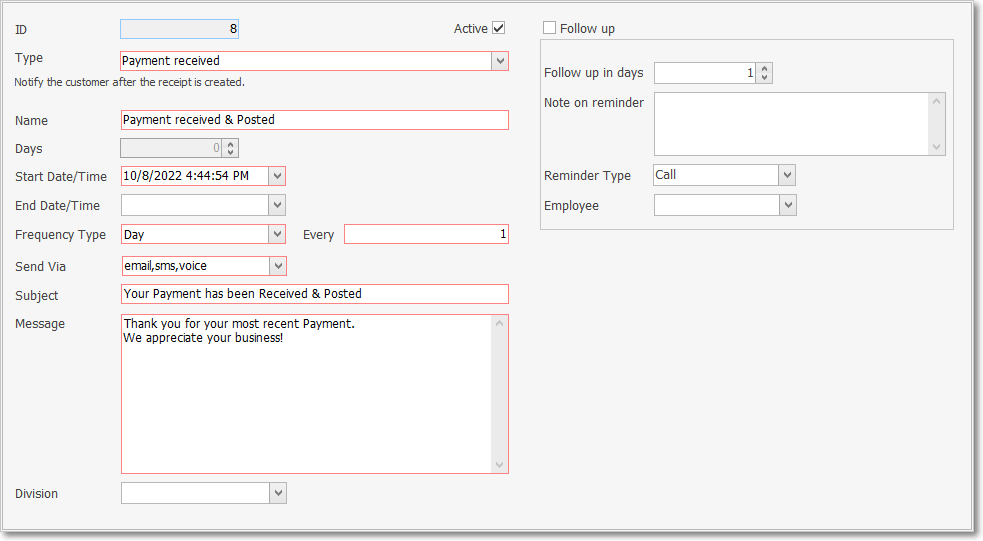
Customer Connect - Schedule - Notification Service Type = Payment Received
✓Name - should describe a message being sent for a Payment Received
✓Days - is Not applicable. Message generated when Receipt is posted
✓Start Date/Time - By default, the current Date and Time will be inserted
▪This represents the time of Day/Night (it's a 24 hour field) when this automated response should be generated.
✓End Date/Tine - Normally left blank unless a special circumstance requires otherwise.
✓Frequency Type - By default, Day but should be changed when appropriate
✓Every - By default, this will be "1" but should be changed when appropriate
✓Send Via - Use the Drop-Down Check Box List provided to View the Notification Method(s) that should be used
▪By default, these will be those assigned to the Notification Service Type selected above
▪Check or remove the Check mark to change what Notification Type(s) should be used
Schedule Form - Send Via options
✓Subject - This will be the Subject line of the Email that is generated and should be constructed accordingly.
✓Message is constructed to match the purpose identified in the Name entered above
✓Division - when assigned - allows a Messages to be created based on the Division being served
✓Follow Up - requirements are set based on the Notification Service Type of automated response being defined
▪Check this box to add a Task to a selected Employee's Reminders
▪Add what's required, or
▪Remove a Check to skip this functionality
![]() List Icon - The Navigation Menu also has a Grid option which provides a tabular view of the records.
List Icon - The Navigation Menu also has a Grid option which provides a tabular view of the records.
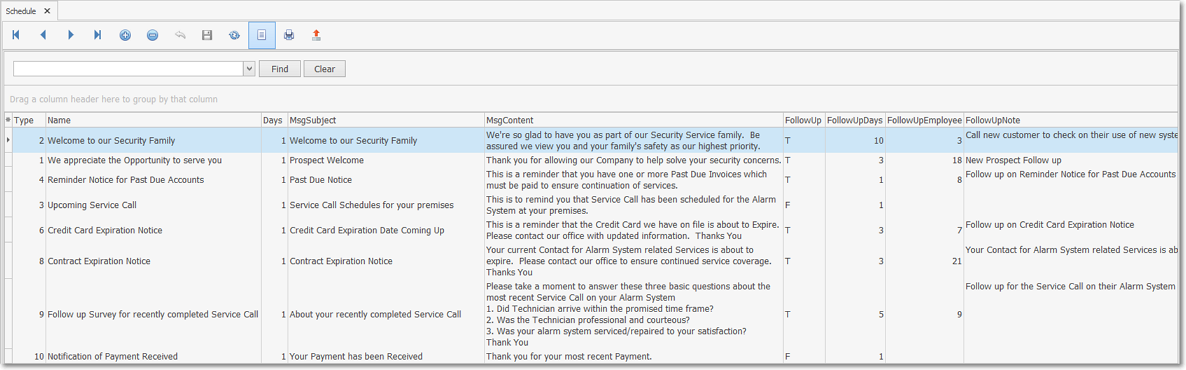
Schedule Form - List View
•Columns - You may also Select which columns of data are to be displayed:
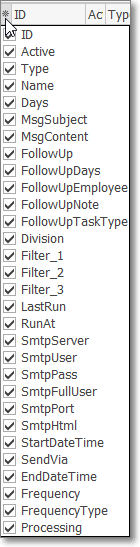
Available Columns
✓Click the asterisk (¬) at the left of the data grid's Header row (see the mouse pointer in the illustration above) to display a list of all of the column names - and associated data - which may be displayed.
✓By default, all Column Names will be Checked.
✓Remove the Check mark (Click on the Check to remove it) to hide that column of data from the data grid.
❖See the Grid & Lists - Print Preview - Export Data chapter for complete information on using the List View, including its Export & Print options.
✓The columns of listed Grid Data may be rearranged, filtered, sorted, and exported as a PDF file and/or an Excel formatted file.

✓Find - Enter text to search for a specific record, then Click the Find option.
✓Clear - To remove the text to search for entry, Click the Clear option

Navigation Menu shown with the Icons for List, Export and Print
![]() List Icon - Click the List Icon again to Close the List View and return to the Record Editing View.
List Icon - Click the List Icon again to Close the List View and return to the Record Editing View.
![]() Export Icon - Click the Export Icon to create (one of there types of) a spreadsheet compatible file containing the Grid Data as it is currently organized and filtered.
Export Icon - Click the Export Icon to create (one of there types of) a spreadsheet compatible file containing the Grid Data as it is currently organized and filtered.
![]() Print - Click the Print Icon to display the Print Preview Form from which a custom report may be designed and "printed" as an Adobe® PDF File.
Print - Click the Print Icon to display the Print Preview Form from which a custom report may be designed and "printed" as an Adobe® PDF File.