❑Implementing Dealer Billing - Each Dealer - for whom your Company's Central Station is providing Contract Monitoring Services - may be automatically Invoiced for those services by implementing Dealer Billing.
•Dealer Billing features:
a)Identifies a specific Billing Address record for where the Invoices are to be sent to the Dealer to pay for the Contract Monitoring Services your Company is providing
b)Implements a virtually automatic Invoice creation process for the billing Contract Monitoring Services provided to those Dealers
c)Billing Structure supports Fixed, Tiered and Zone related Monitoring Rates for each individual Dealer
d)Administrative Fees and Credit Card processing fees may also be Invoiced

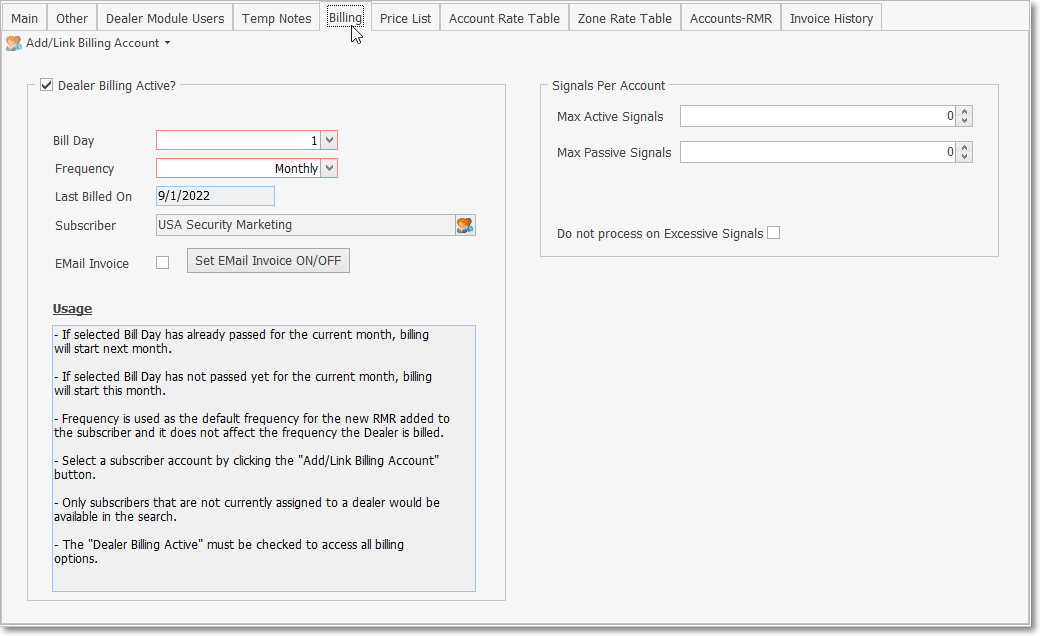
Dealer Form - Billing tab
❖See Preparing to use the Dealer Billing discussion immediately below for complete information
❑Preparing to use the Dealer Billing feature:
•As with all modules within the MKMS series, there are a few steps to be completed before this Fully Automatic Billing capability can be implemented (some of these steps will already have been completed if your Company is currently monitoring that Dealer's Accounts):
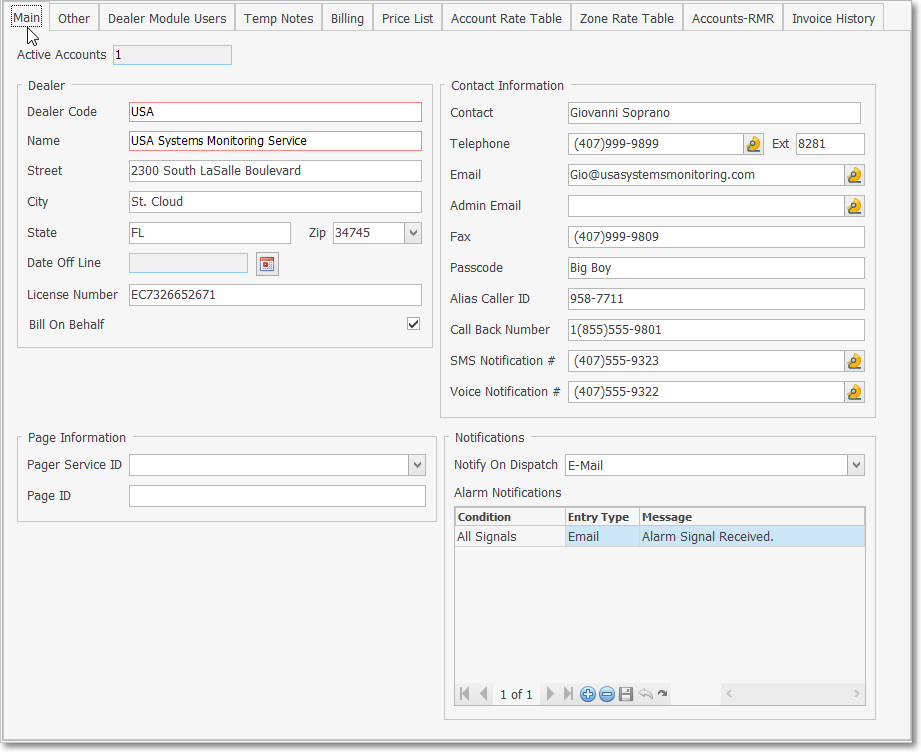
1.Enter the basic information for each Alarm Dealer on the Main Tab of the Dealer Form.

Dealer Form - Main tab
2.If your Company is using the MKMS General Ledger System, define the appropriate General Ledger Accounts - more than one in each category may be defined if necessary - to which the Dealer Billing associated Financial Transactions will be posted when the Dealer Billing process is executed.

General Ledger Accounts Form - Dealer Billing Sales Account
3.Define specific Recurring Revenue Sale Categories (more than one in each category may be necessary) that will be used when Billing Dealers for:
a.Define Contract Monitoring Services that will be billed to the Dealer

Sale-Purchase Items tab - Dealer Billing Sales Category Code
b.Define Credit Card Surcharges that may be billed to the Dealer

Sale-Purchase Items tab - Credit Card Sales Category Code
4.Dealer Billing - Enter/Update the Dealer Billing related information:
a.Select the Billing tab (see mouse pointer below) on the Dealers Form to display the Dealer Billing dialog.

Dealer Form - Billing tab - Dealer Billing dialog
b.Add/Link Billing Account - Each Dealer who to be Invoiced for the Contract Monitoring Services that your Company is providing must have a Billing Address defined as a Subscriber record.
1)Special Alarm Dealer Entries
a)A Subscriber record must be created for each Alarm Dealer for whom your Company is providing Dealer Monitoring Services.
i.This special Dealer Entry may be the same Subscriber record entered for the purpose of actually monitoring that Dealer's premises, or an additional Subscriber record, if more appropriate.
b)When defining an Alarm Dealer as a Subscriber, keep in mind that you may also define Events, Contacts (People to Call) and CSID Zones for that Dealer's Subscriber.
c)These Events, Contacts (People to Call) and CSID Zones for this special Dealer Entry may be used later to populate Accounts established using the Create Mass Accounts function.
d)The Contacts (People to Call) associated with a Subscriber Panel CSID for this Dealer, may be assigned to any Subscriber Panel CSID being monitored for that Dealer,
e)This capability is provided to identify the Dealer Call List as part of the Global Call List for that Dealer's Subscriber, and/or that set of Contacts (People to Call) may be used for the Dealer's actual monitored Account.
f)A second (internal) Subscriber Panel CSID may also be defined with it's own set of Contacts (People to Call) specifically for use as the Dealer Call List for the Global Call List.
g)Therefore, it may be helpful to enter more than one Subscriber Panel CSID for each Alarm Dealer to define multiple sets of predefined Events, Contacts (People to Call), and CSID Zones.
2)Identify the Subscriber record - Using the Drop-Down Selection List accessed by Clicking on the small down arrow € on the right of the Add/Link Billing Account option, Choose the appropriate Linking method
a)Add New Account - See b., 1), a) - g) above and the Special Subscriber Entries chapter for instructions
▪The current Dealer information entered in the Main tab will be inserted automatically. but may be updated as may be required.
![]()
Create Billing Record pop-up form for quick data entry
i.Subscriber - Enter the Dealer's Company Name
ii.Street - Enter their Street Address.
iii.City - Enter the City.
iv.State - Enter their 2 character State (or Province) code.
v.Zip - Enter their Zip Code.
vi.Phone, Ext - Enter their Primary Phone Number and an Extension, when needed.
vii.Fax - Enter their Fax Number if available.
viii.Email - Enter the Email address to which Monitoring Related information should be sent.
ix.Sales Person - Using the Drop-Down Selection List provided Choose the Employee who will be the Sales Person assigned to this Account.
x.Local Tax Class - Using the Drop-Down Selection List provided Choose the Tax Classification Code for this Account
1.If either Canada Tax or Multinational Rates is set to True ("T") in Company Settings, there will be additional tax related fields to populate.
2.See the Canada Tax chapter for that information.
xi.Tax Code - Using the Drop-Down Selection List provided Choose the Tax Rate Code for this Account
xii.Terms - If Use Subscriber Terms is set to True ("T") in Company Settings, each Subscriber must be assigned a specific Payment Term (set as the number of Days after the Invoice's Sale Date), enter that Number (otherwise this field will not be presented).
xiii.Save - Click the Save button to record this information
b)Link to Existing Account - If the appropriate Subscriber record has been created for this Dealer, this option opens the Subscriber Search dialog to locate that Subscriber record

Dealer Form - Billing tab - Link to Existing Account
i.Following the instructions in the Subscriber Search dialog chapter, Locate the Subscriber record to be associated with this Dealer

Dealer Form - Billing tab - Link to Existing Account - Subscriber Search dialog
ii.When the correct Subscriber record is selected, Click the OK button
c.Dealer Billing Active - Once this Dealer record is Added, or is Linked to the appropriate Subscriber record, the Dealer Billing Active box will be Checked by the system

Dealer Form - Billing tab - Dealer Billing Active checked
d.Enter the information required to establish the basic Dealer Billing parameters for this Dealer:
1)Bill Day - Using the Drop-Down Selection List provided, Choose the appropriate Billing Date for the Invoices
2)Frequency - Using the Drop-Down Selection List provided, Choose how often this Dealer Billing should occur

3)Last Billed On - By default, this will be set by the system and cannot be changed.
4)Subscriber - By default, this will be the Subscriber Name of the Billing Address of the Dealer.
![]()
▪Click the "Person" Icon to view the associated Subscriber Form.
5)Email Invoice - Click on the Set Email Invoice ON/OFF button to Check (or remove the Check) from this Check box
6)Usage - This section provides basic instructions for how to use this Dealer Billing dialog:

Dealer Billing instruction outline
e.Signals Per Account - Specific the Allowable Signals Ranges

Dealer Form - Billing tab - Dealer Billing Active checked - Signals Per Account settings
1)Maximum Active Signals Allowed - The number of Active Signals per Account that will be allowed each month
2)Maximum Passive Signals Allowed -The number of Passive Signals per Account that will be allowed each month
3)Do not process on Excessive Signals - Check this box if your Company's Central Station should not continue to Process this Dealer's Alarms once an Account's Maximums have been exceeded during any one month
f.Click ![]() Icon at the top of the Dealers Form to record this Billing setup information
Icon at the top of the Dealers Form to record this Billing setup information
6.You must ensure that all of the Dealer Billing options are set properly in Company Settings

a.DealerBillingRunTime = "5" or = "17" which establishes whether the Fully Automatic Recurring Revenue Billing process starts at 5:00am or 5:00pm (17 hundred on a 24 hour clock)
b.DealerBillingWorkerEnabled when set to "T" it activates the Automatic Dealer Billing Process [However, if the Dealer Billing Module option to set to False (DealerBillingWorkerEnabled = "F"), the Dealer Billing will have to be manually executed.

c.DealerBillingNotificationEmail = The Email address of the individual who should received the Billing File after the billing process is completed
d.DealerBillingFilePath = The location on the Server where the .CSV files will be created to be attached to the Email noted above

e.Dealer_Back_Billing when set to "T" which is the default: see Dealer Back Billing immediately below - which will allow the system to automatically back bill.
❖Dealer Back Billing - Usually Contract Central Stations - those Central stations that provided monitoring services to other Alarm Dealers - have to back bill their Accounts
✓This occurs when a Dealer puts an Account ("CSID) On-Line and your Central Station starts monitoring that Account, but the Dealer has not yet provided your Central Station with all of the necessary billing information for that Account
✓This requires your Central Station to set up the Recurring Billing for that Dealer's Account to start being invoiced on some future Billing Cycle/Date.
✓Once your Central Station has all of that necessary information, a back bill (a pro-rated Invoice) can be created to cover the period from the On-Line Date to when the automatic billing process starts for that Account
✓By doing so: The Dealer sees how much was billed from the On-Line Date to when the automatic billing process started; and the system also prorates the Wholesale amount due as well so the Dealer knows how much the Central Station will keep for providing those monitoring services.
✓Thereafter, this automatic billing process works in a similar manner to how the Fully Automatic Recurring Revenue Billing process operates.

Run Tiered Dealer Billing dialog
✓See the Run Dealer Billing chapter for that information.
❑What's Next?
A.Create the Pricing and/or Pricing Methods for Billing each of these Dealers'' Accounts:
1.Go to the Billing - Price List chapter for instructions on setting how, and how much this Dealer is to be Invoiced for each Account being provided monitoring services by your Company:
2.Go to the Billing - Account Rate Table for instructions on how to set the Per Monitored Account Invoicing Rates based on the number of Accounts being monitored for this Dealer
3.Go to the Billing - Zone Rate Table chapter for instructions on how to set the Per Monitored Account Invoicing Rates based on the number of Zones being monitored at each Account's premises.
4.Go to the Billing - Invoice History chapter to view a Grid containing a list of all the Invoices previously generated for this Dealer with a Drill-Down capability to view exactly what charges were billed on each Invoice
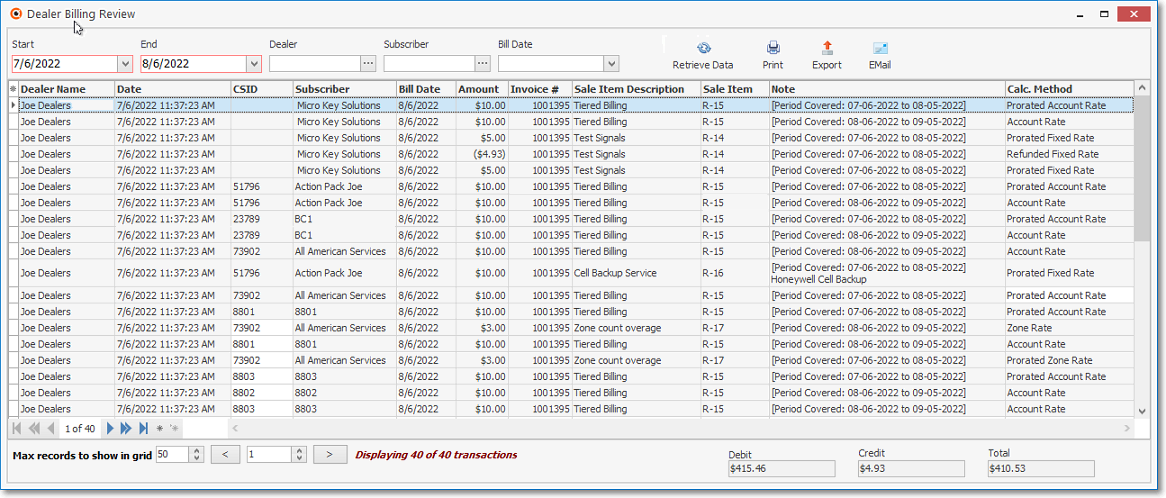
B.Review the Dealer Billing Review report information

Dealer Billing Review - List of the selected Pending Dealer Billing charges
C.View any of the Dealer Billing Invoices which contain a Detail Line Item for each Account being monitored for the associated Dealer

Dealer Billing Invoice (sample)