❑If your Company is required to collect Sales Taxes, once these sales taxes are billed and/or collected, the Amount of those Sales Taxes must then be remitted to the proper Taxing Authority.
•As part of your Periodic & Month Ending Procedures, you will need to Calculate & Remit Sales Taxes.
•There are two ways to do that:
1.Remit these Sales Taxes on an "As Collected" basis, or
2.Remit them on an "As Billed" basis.
•Each Taxing Authority will have its rules specifying how their Sales Taxes are to be reported (and paid).
✓Both of these Sales Tax Remittance methods are supported within MKMS.
❑The Sales Taxes Collected Report:
•This Sales Taxes Collected report lists Sales Tax on an "As Collected" basis.
✓All Receipts must be Allocated to the appropriate Invoices - at least those that have Sales Tax assessed - to ensure the accuracy of this Sales Taxes Collected Report.
•To access the Sales Taxes Collected dialog:
a)From the Backstage Menu System Select Reports and Choose Receivable Reports, or
b)From the Quick Access Menu, Select Reports and Choose Receivable Reports
✓On the Receivable Reports Menu, Choose the Sales Taxes Collected option to display the Sales Taxes Collected dialog shown below.
❑Sales Taxes Collected Report tabs - There are two tabs on the Sales Taxes Collected Report dialog.
•Options - Initially only the Options tab is shown (until you make your Options selections and Select Print).
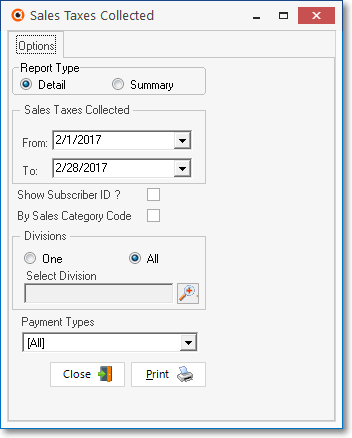
Sales Taxes Collected - Options tab
✓Report Type - Choose the required report format:
▪Detail - By default, the Detail format is selected which includes Sales Tax Amounts the were Paid along with the associated Invoice Numbers and Subscribers' Names for each Tax Rate and Tax Code assigned to Detail Line Items on Invoices created within the specified Date Range that match the other Parameters selected below.
▪Summary - If the Summary format is selected, the report only includes each Tax Rate and Tax Code Sales Tax Amounts that were Paid on Detail Line Items from Invoices created within the specified Date Range that match the other Parameters selected below.
✓Sales Taxes Collected - Identify the Date Range to be reported:
a)Click on the Date field and type the desired Date using a MM/DD/YYYY format; or
b)Use the Drop-Down Calendar/Date Entry field provided to Choose the desired Date
▪From: By default, the From Date will be day one of the most recently completed month.
oUse the Drop-Down Calendar/Date Entry field provided to Choose a different starting Date, if needed.
▪To: By default, the To Date will be the last day of the most recently completed month.
oUse the Drop-Down Calendar/Date Entry field provided to Choose a different ending Date, if needed.
✓Show Subscriber ID? - By default, the Subscriber ID is not printed.
▪Check this box to have the Subscriber's record number included on the report.
▪When the report is displayed on screen, Click the record number (listed in blue and underlined) of any Subscriber to open the Subscribers Form for that Subscriber.
✓By Sales Category Code - By default, the order is by Taxing Authority.
▪Check this box to have the report listed by Sales Category Code.
✓Divisions - By default, All Divisions will be included.
▪Click One and Choose a specific Division using the Drop-Down Selection List provided, if needed (see example below).
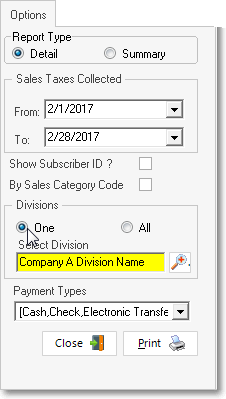
Sales Taxes Collected - Options Tab
One Division, selected Payment Types
✓Payment Types - By default, All Payment Types (Methods of Payment) will be included.
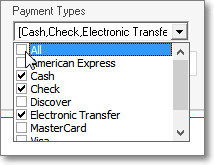
▪To specify a set of (one or more) Payment Types, Un-Check the All option.
▪Then, use the Drop-Down Selection List provided to Choose the Payment Type(s) which are to be reported by Checking all of those required.
▪The selection made will become the new default choice for this Sales Taxes Collected Report dialog.
✓Print - Click the Print button ![]() to Preview and optionally Print (to a File or a Printer) this Sales Taxes Collected Report (see sample below).
to Preview and optionally Print (to a File or a Printer) this Sales Taxes Collected Report (see sample below).
✓To Exit this Report dialog, Click the Close button ![]() toward the bottom of the Options tab.
toward the bottom of the Options tab.
•Preview - The Preview tab presents the report which resulted from the Options you've selected.
➢Note: If the ShowTaxAndTotalPerLineItemsReport option is set to True ("T") in Company Settings, the Sales Tax Rate field display up to three (3) Decimal Places.
✓Up Arrow/Down Arrow - hi - Moves the report one line up, or one line down, respectively.
✓Page Up/Page Down - Moves the report to the previous or next page, respectively.
✓Subscriber ID - If the Show Subscriber ID? box was Checked, Click the record number (listed in blue and underlined) of any Subscriber to open their Subscribers Form.

Sales Taxes Collected Report - Detail Preview
✓Home - ![]() - Using either the screen icon or your Keyboard's Home key, moves the report to the top of the first page.
- Using either the screen icon or your Keyboard's Home key, moves the report to the top of the first page.
✓End - ![]() - Using either the screen Icon or your Keyboard's End key, moves the report to the bottom of the last page.
- Using either the screen Icon or your Keyboard's End key, moves the report to the bottom of the last page.
✓Arrows - The arrows allow you to move back and forth, from page to page.
✓Number - Indicates the page number you are viewing.
▪You may also type in a specific page number, Press 8 Enter and that page will be displayed immediately.
▪If you enter an invalid page number, it will be ignored.
✓Fit To Page - Click the first button after the arrows to size a full page of the report to fit the screen.
✓Zoom To 100% - Click the second button after the arrows to display the page at 100% (of the printed view).
✓Fit To Page Width - Click the third button after the arrows to size the page of the report to fit the full width of the screen.
✓Zoom To Percentage - Click the fourth button after the arrows to re-size the page of the report by percentage.
![]()
▪When you Click the Zoom To Percentage button, the Percentage selector will be displayed.
▪You may then Click the Up or Down ‚ arrow to set the exact amount of Zoom you want.
✓Print - Click the Print button to Print (to a File or a Printer) ![]() the displayed Sales Taxes Collected Report.
the displayed Sales Taxes Collected Report.
✓Email - Click the Email button ![]() to send the Report to an Email Address of your choosing.
to send the Report to an Email Address of your choosing.
✓To Exit the Preview tab and Close this Report dialog Form, Click the Close box ![]() on the right at the top of the Preview tab.
on the right at the top of the Preview tab.

Sales Taxes Collected Report - Preview - Summary version