❑Understanding & Using the Local Central-Station options
I.When no Local Central Station information has been added to the currently selected Subscriber
A.If the Subscriber is to be linked to a Local Central Station, Choose the Local Central-Station option to display the page shown below which has the CREATE LOCAL CS option
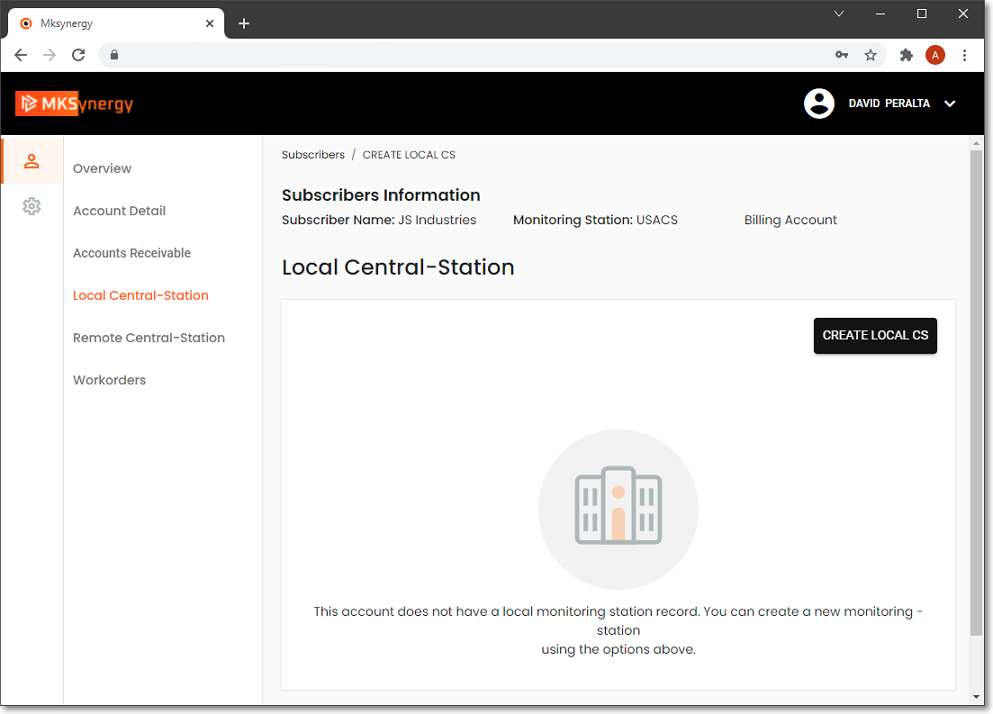
MKSynergy - Subscriber Information -Local Central Station page - Create Local CS option
II.Based on the Central Station to which this Subscriber was previously linked: the appropriate Site Information page's data, and associated sub-menu options will be displayed:
A.Local Central-Station Sub-Menu's options:
1.Site Information page - displays the previously entered Site Information for the selected Subscriber
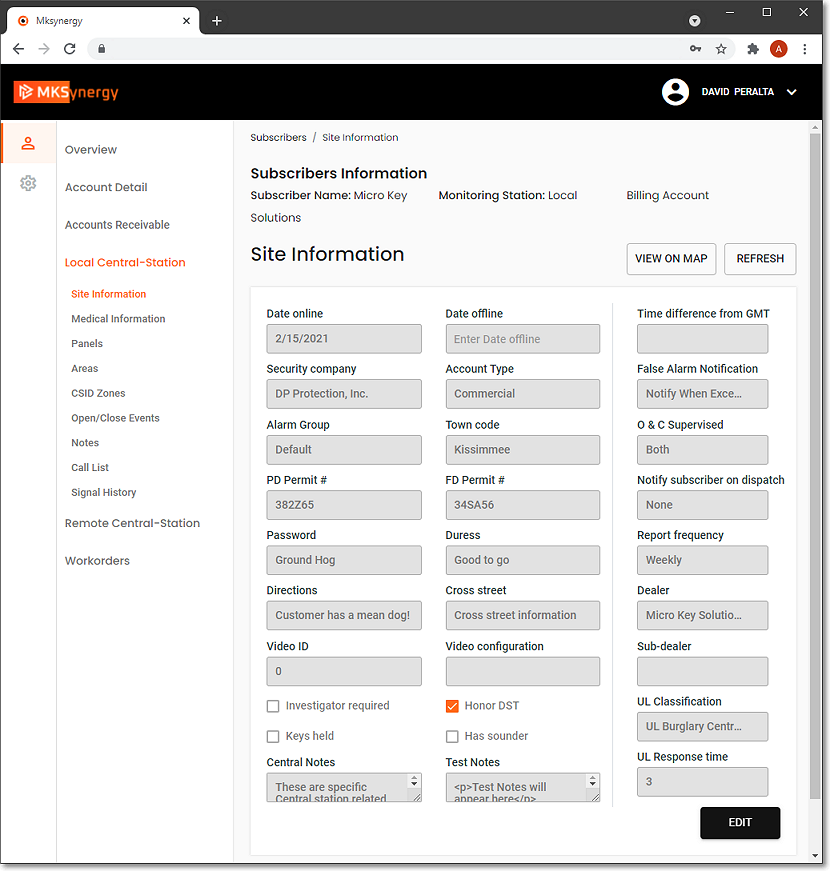
MKSynergy - Subscriber Information -Local Central Station Menu - Site Information page
2.Medical Information page - displays a list of the previously entered Medical Information records, an Actions options for each Medical record, and provides an ADD option
a.View - this Action option will display the selected Medical Information record in a read-only mode
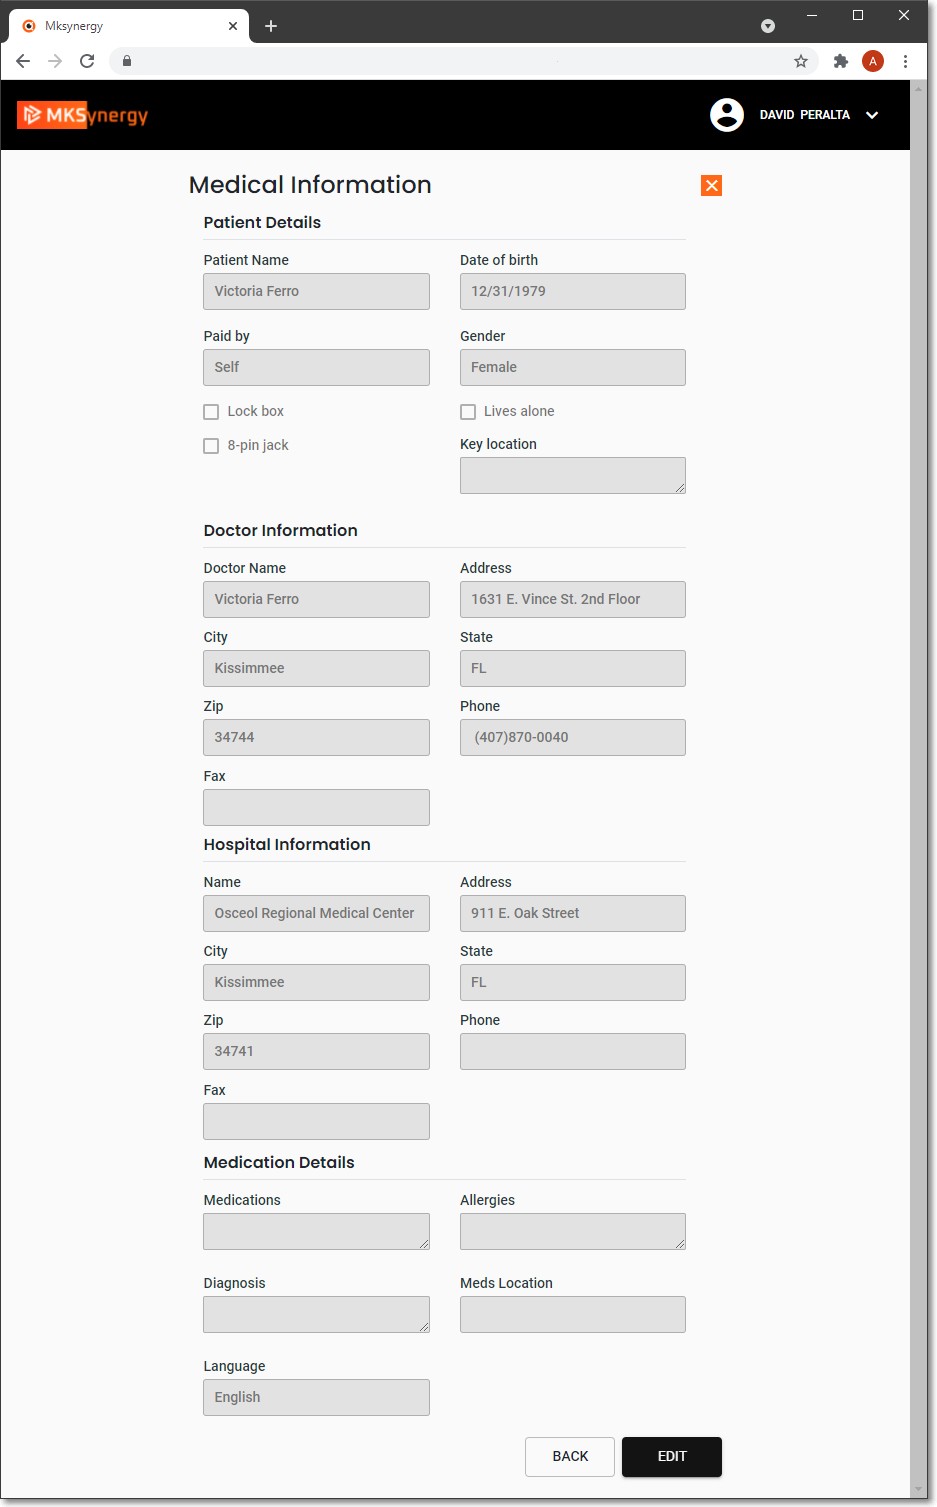
MKSynergy - Subscriber Information -Local Central Station Menu - View Medical Information page
b.Edit - this Action option will display the selected Medical Information record and allow changes
c.Delete - this Action option will allow the selected Medical Information record to be removed
d. ADD - display the Add Medical Information page
1)Patient Details
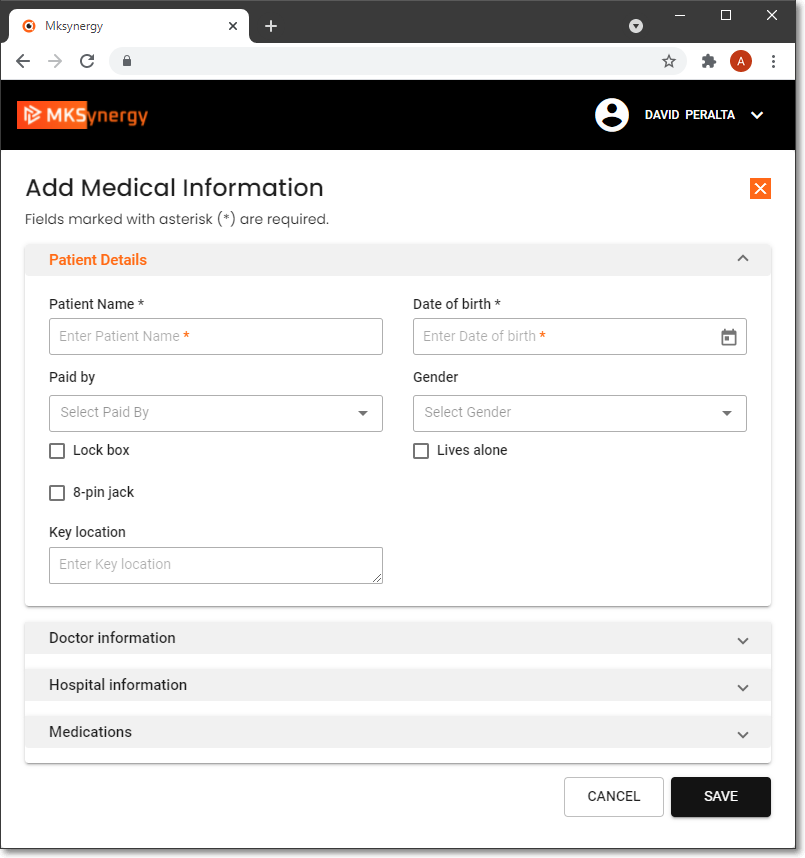
MKSynergy - Subscriber Information -Local Central Station Menu - Add Medical Information - Patient Details page
a)Patient Name - Enter the name of the Patient for whom this emergency medical response service information is being entered
b)Date of birth - Use the Drop-Down Calendar/Date Entry field to enter their Date of Birth.
c)Paid By - Using the Drop-Down Selection List provided, Choose the responsible Person or Agency (Agency indicates an Insurance Company, Medicare or Medicaid)
i.Self - The Patient identified here.
ii.Friend - A friend of the Patient identified here.
iii.Relative - A Relative of the Patient identified here
iv.Agency - An Agency who is responsible for the Patient identified here.
v.Other - Some other person or entity who is responsible for the Patient identified here.
d)Gender - Using the Drop-Down Selection List provided, Choose Male or Female
e)Lock Box? - Check this box if there is an external Lock Box installed containing the keys to the premises
f)Lives Alone? - Check this box if the Patient lives by themselves.
g)8 - Pin Jack? - Check this box if there is an 8 - Pin Jack for an EKG connection available on the premises
h)Key Location - Enter where the Patient normally keeps the Keys to their Premises (or the location of the Lock Box, if installed)
2)Doctor Information
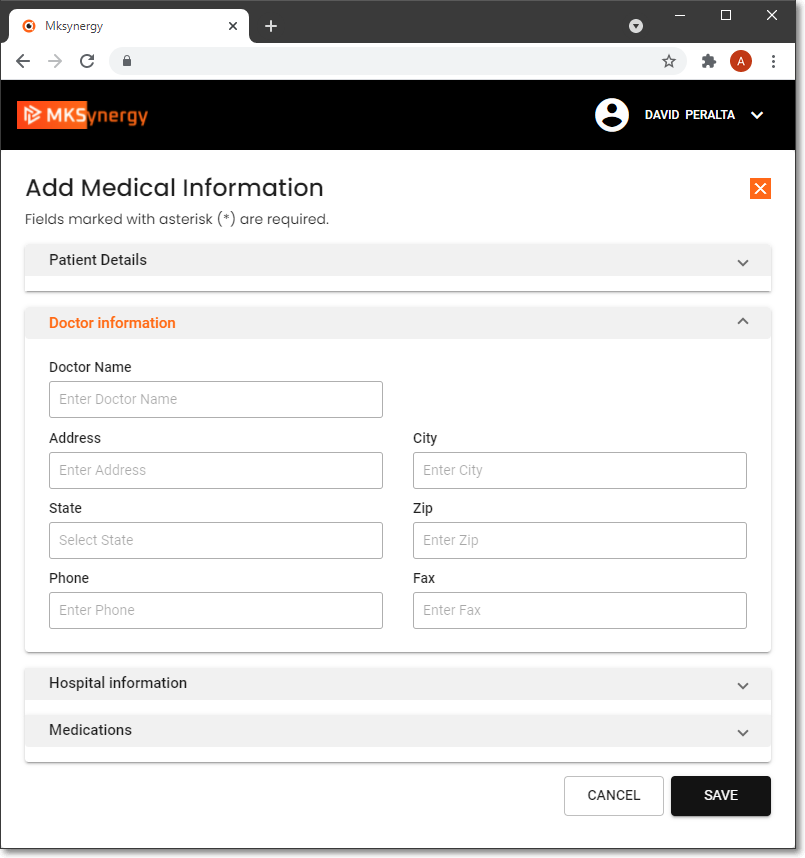
MKSynergy - Subscriber Information -Local Central Station Menu - Add Medical Information - Doctor Information page
a)Doctor Name - Enter the full name of the Physician
b)Address - Enter the office address of the Physician
c)City - Enter the city in which the office address of the Physician is located
d)State - Enter the State Code in which the office address of the Physician is located
e)Zip - Enter the Zip Code of the office address of the Physician is located
f)Phone - Enter the appropriate Telephone Number that is best used to contact this Physician.
g)Fax - Enter the appropriate Telephone Number that is best used to send a Fax to this Physician.
3)Hospital Information
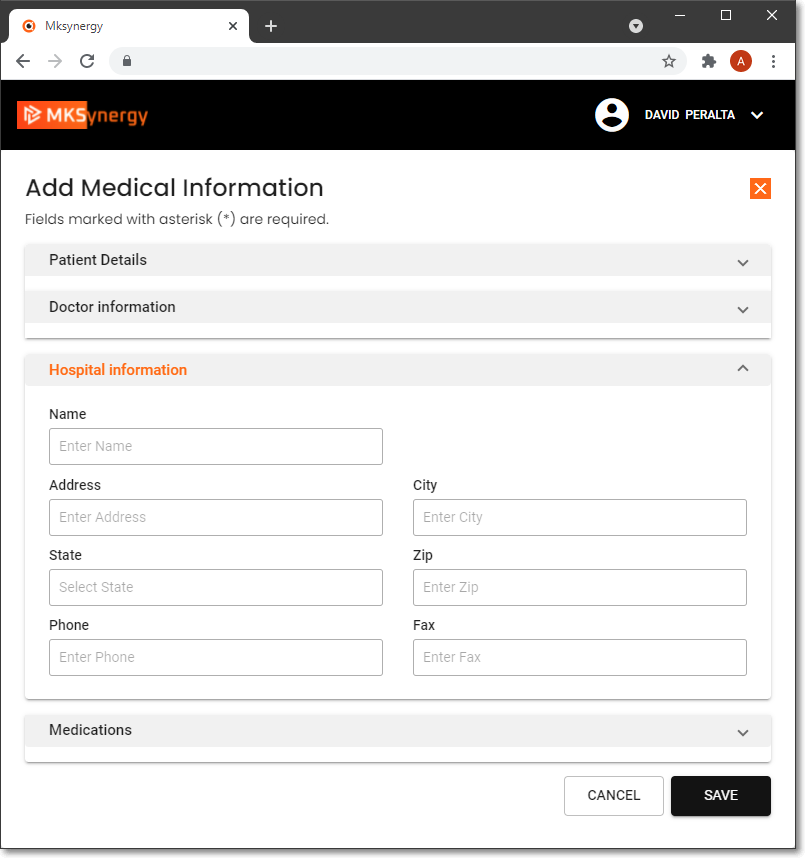
MKSynergy - Subscriber Information -Local Central Station Menu - Add Medical Information - Hospital Information page
a)Name - Enter the full name of the Hospital
b)Address - Enter the office address of the Hospital
c)City - Enter the city in which the office address of the Hospital is located
d)State - Enter the State Code in which the office address of the Hospital is located
e)Zip - Enter the Zip Code of the office address of the Hospital is located
f)Phone - Enter the appropriate Telephone Number that is best used to contact this Hospital
g)Fax - Enter the appropriate Telephone Number that is best used to send a Fax to this Hospital
4)Medications
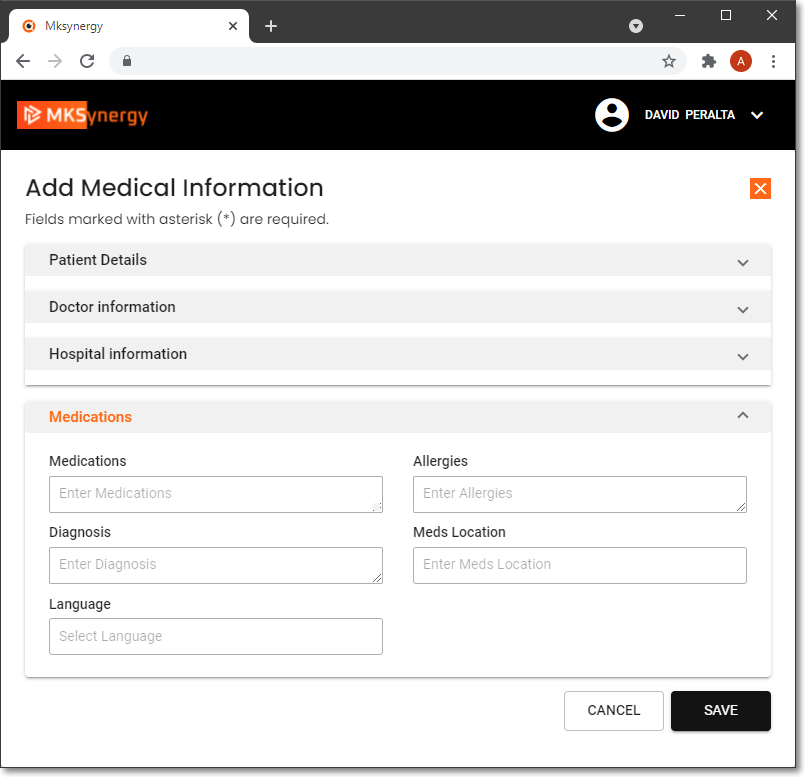
MKSynergy - Subscriber Information -Local Central Station Menu - Add Medical Information - Medications page
a)Medications - List as many medications, vitamins, over-the-counter drugs and herbal supplements that this Patient takes on a regular basis.
b)Allergies - Enter all known allergies for this Patient, or indicate that there are none known
c)Diagnosis - If this Patient has one or more specific medical conditions that should be known to an Emergency Responder, enter them here
d)Meds Location - Enter where the Client normally keeps their medications (up to 50 characters)
e)Language - Enter the preferred Language for the Patient, and a secondary language, if available.
3.Panels page - Each Local Central Station Subscriber may have any number of Panels (CSIDs) installed at the Billing address and/or Service Only locations
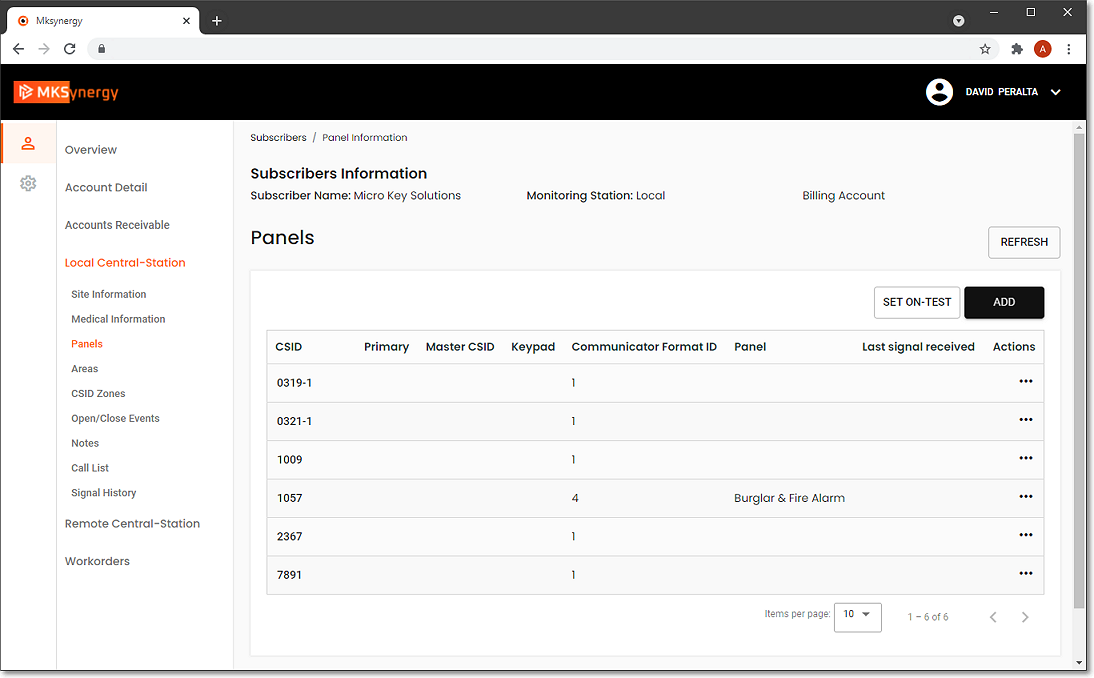
MKSynergy - Subscriber Information - Local Central Station Menu - Panels page
a.Panels - All of the Panels previously identified for this Subscriber are listed and the page will also provide these options:
1)View - this Action option will display the Panel Information page in a read-only mode for the currently selected CSID
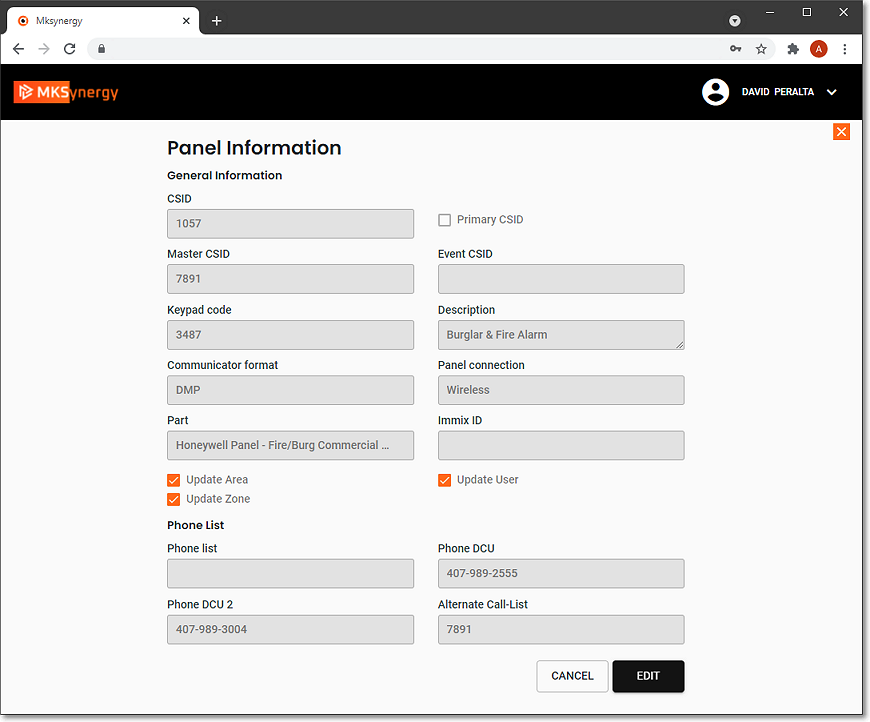
MKSynergy - Subscriber Information -Local Central Station Menu - Panels - (View) Panel Information page
2)Edit - this Action option will allow the modifications to the Panel Information for the currently selected CSID
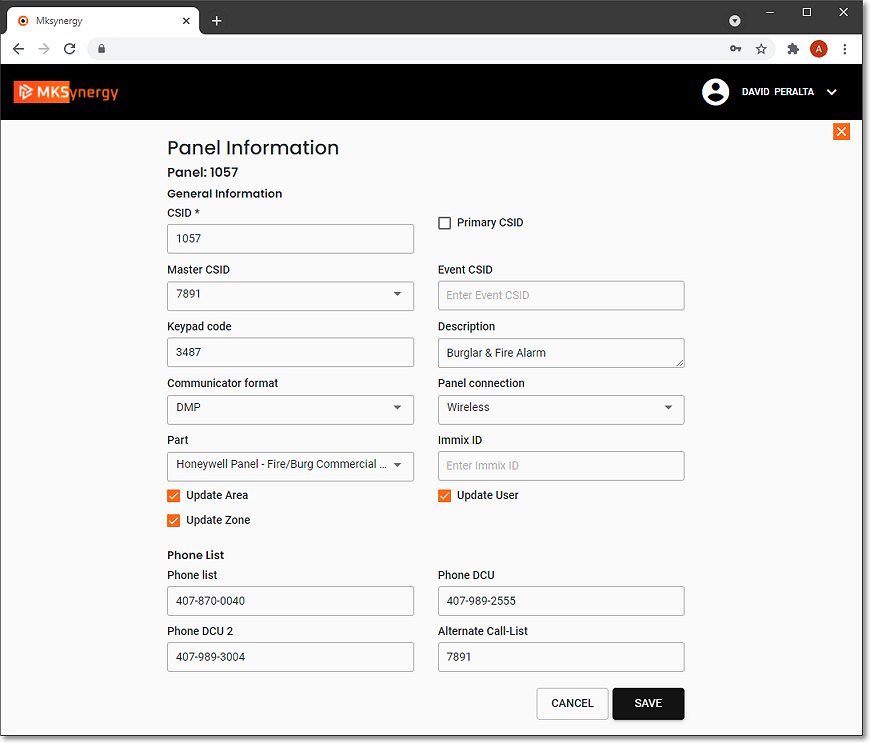
MKSynergy - Subscriber Information -Local Central Station Menu - Panels - (View) Panel Information - Edit page
❖See the 5) ADD - Create panel explanation below for complete information about the fields on this page
3)Set Panel On Test - this Action option will display the Set panel on-test pop-up on which the User may specify how long (in hours) this specific CSID (Panel) is to be placed on test
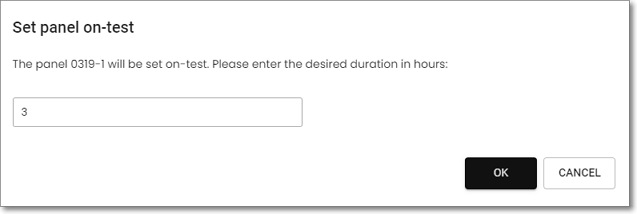
MKSynergy - Subscriber Information -Local Central Station Menu - Panels - Actions - Set panel on-test pop-up
4) SET ON-TEST - this option will display the Set all panels on-test pop-up on which the User may specify how long (in hours) all of the CSIDs (Panel) entered for this Subscriber are to be placed on test

MKSynergy - Subscriber Information -Local Central Station Menu - Panels - Actions - Set all panels on-test pop-up
5) ADD - This option will display the Create panel page

MKSynergy - Subscriber Information -Local Central Station Menu - Panels - (View) Panel Information - Create panel page
General Information
a)CSID - Enter the Subscriber's CSID which may be up to 40 characters in length
b)Primary CSID - Check this box if this CSID is the Primary CSID for this Subscriber - the one that is to be shown initially on the Account Information page.
i.One, and only one, of the Subscriber Panel(s)' CSIDs must be designated as the Primary CSID.
ii.If there is more than one CSID defined, and one has already been Checked as the Primary CSID, then a different one is Checked, the original Check Mark will be removed automatically.
c)Master CSID - If the CSID currently being entered is a secondary CSID (by definition, any CSID that is not identified as the Primary CSID for this Subscriber is considered a secondary CSID), a Master CSID may be identified for this Subscriber Panel record.
i.The purpose of assigning a Master CSID to a Subscriber Panel's CSID is to avoid having to enter more than one set of CSID Zones, People To Call and Events
ii.The Master CSID chosen must contain the CSID Zones, Call List for any Alarm Signals received from this secondary CSID
c)Event CSID - Optionally, an Event CSID for any Event Signals received from this secondary CSID may be identified
e)Key Pad Code - Enter the master Key Pad Code for this Control Panel.
f)Description - Enter a brief description of the functional significance of this CSID.
i.Enter up to twenty (20) characters - Upper and lower case letters, spaces, numbers and basic punctuation marks are accepted.
ii.Examples: "Fire Alarm System", "Burglar Alarm System", "Front Office", "Warehouse", or a similar descriptive phrase that "tells" the Operator - when Processing an Alarm received from the CSID - what type of location or system she/he is dealing with.
g)Communicator Format - Use the Drop-Down Selection List provided to Choose the Communicator Format being transmitted by the system's Control Panel.
h)Panel Connection ID - Use the Drop-Down Selection List provided to Choose the Panel Connection Type currently used to send transmissions from the Subscriber's premises to the Receiver.
i)Part - Use the Drop-Down Selection List provided to Choose the Installed Equipment Code representing the Control Panel programmed with this CSID.
j)Immix ID - When appropriate, enter the Immix ID (see IMMIX Server Configuration)
k) Update Area? - Check this box to have SPA update the Area information based on information in specific packet information received with a Signal.
l)Update Zone? - Check this box to have SPA update the CSID Zone information based on information in specific packet information received with a Signal.
m)Update User? - Check this box to have SPA update the User ID information based on information in specific packet information received with a Signal.
➢Note: Currently, this information is only required when a DMP Receiver is being used to receive the Signals transmitted from this Subscriber.
Phone List
n)Phone List - Enter the telephone number(s) that will/may transmit their Caller ID when an Alarm Signal is sent to your Central Station.
o)Phone DCU - Enter the primary telephone number used by the panel's (digital, cellular, cable, etc.) communicator.
p)Phone DCU2 - Enter the secondary telephone number used by the panel's (digital, cellular, cable, etc.) communicator.
q)Alternate Call List - Enter a CSID to assign an Alternate (additional) Call List of People To Call for this CSID:
i.This entry may be a "real" Account, or a fictitious Account established specifically to hold a set of People To Call that may be used by a group of Accounts (Restaurant Chain, affiliated Big Box Stores, Convenience Stores, etc.) all of whom are being monitored by your Central Station.
▪ SAVE - Tap (Click) the Save button to record this entry.
4.Areas page - Each Local Central Station Subscriber may have any number of Areas configured at the Billing address and/or Service Only locations
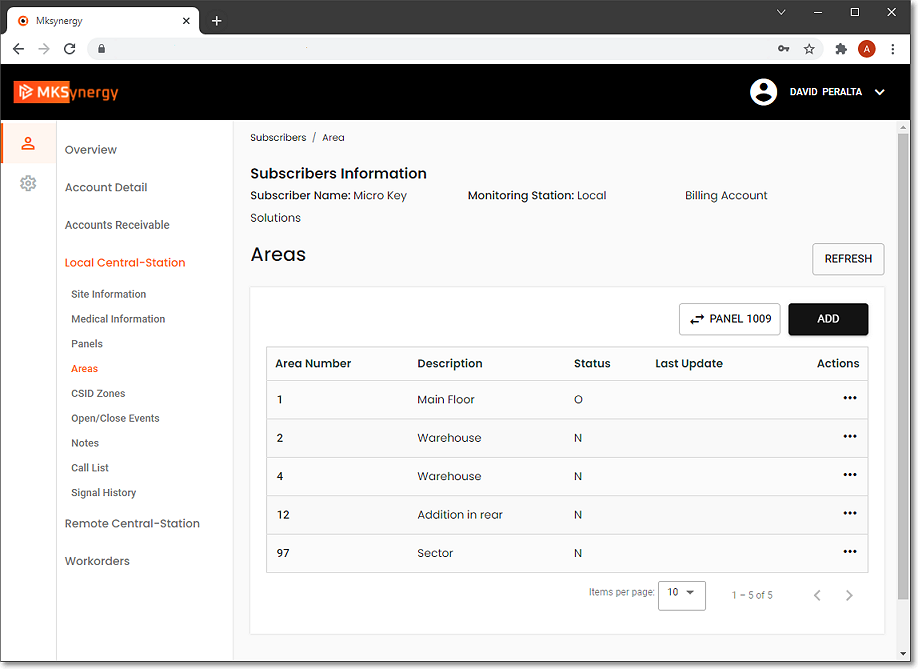
MKSynergy - Subscriber Information -Local Central Station Menu - Areas page
a.Areas - All of the Areas previously identified for this Subscriber are listed and the page will also provide these Actions (...) options:
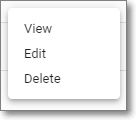
1)View - this Action option will display the Area Details page in a read-only mode for the currently selected CSID
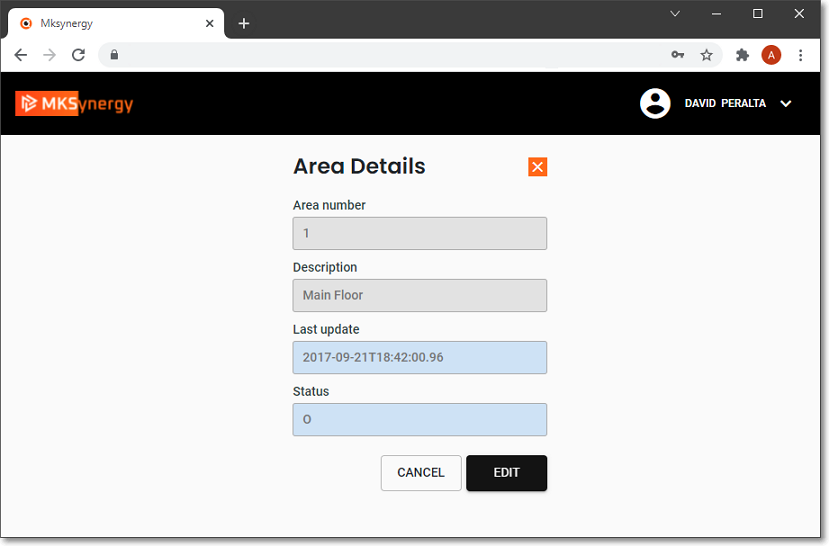
MKSynergy - Subscriber Information -Local Central Station Menu - Areas - (View) Area Detail page
2)Edit - Tap (Click) the EDIT button to update/modify this Area information
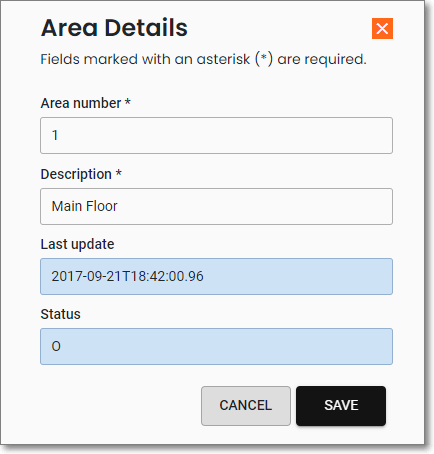
MKSynergy - Local Central Station Menu - Areas - (Edit) Area Detail page
a)Area number - Modify this number if necessary
b)Description - Modify the description of this Area as needed
c)Last Update - System maintain field updated after each Save
d)Status - System maintain field indicating whether this Area is Open, Closed. or None
• SAVE - Tap (Click) the Save button to record this entry.
3)Delete - Tap (Click) the Delete option and Tap (Click) DELETE to remove this Area information
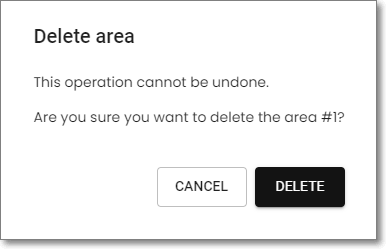
MKSynergy - Local Central Station Menu - Areas - Delete area page
a.Panels button - Tap (Click) the ![]() button to display the Select panel dialog
button to display the Select panel dialog
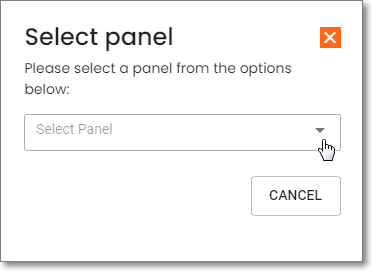
MKSynergy - Local Central Station Menu - Areas - Select panel dialog
1)Select Panel - Use the Drop-Down Selection List to Choose the Panel (CSID) whose Areas are to be listed.
b.Add - Tap (Click) the ADD button to display the Create area page
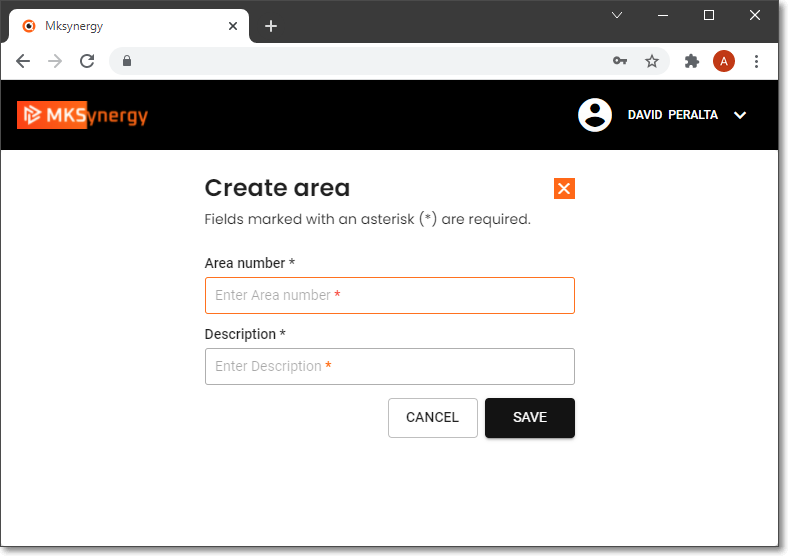
MKSynergy - Subscriber Information -Local Central Station Menu - Areas - Create area page
a)Area number - Modify this number if necessary
b)Description - Modify the description of this Area as needed
• SAVE - Tap (Click) the Save button to record this entry.
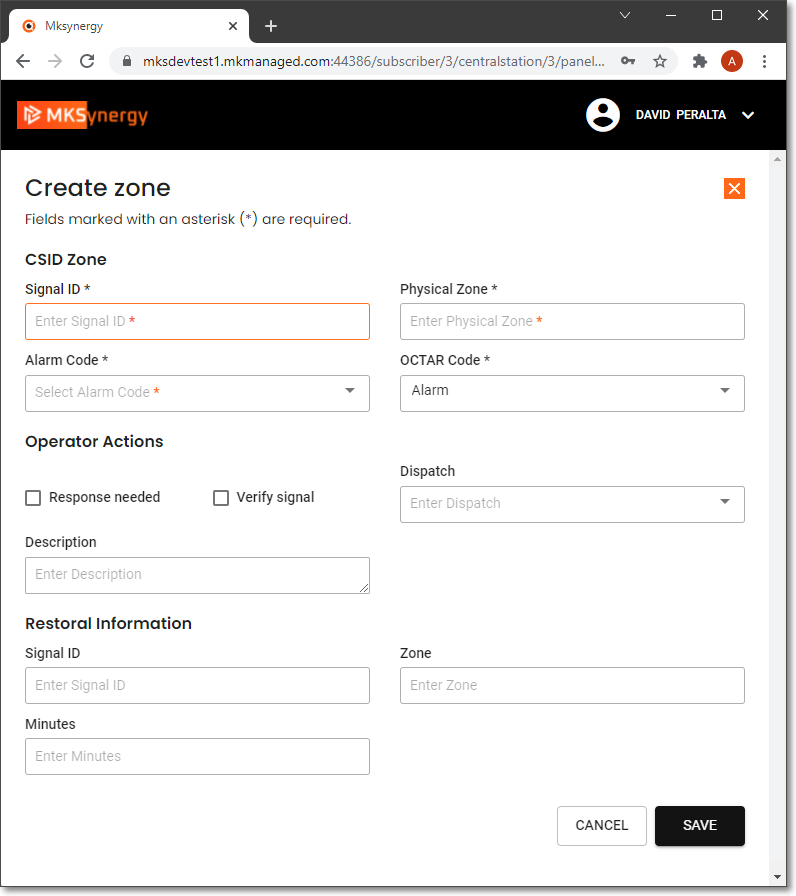
5.CSID Zones page - Each Local Central Station Subscriber may have any number of CSID Zones configured for the Billing address and/or Service Only locations

MKSynergy - Subscriber Information -Local Central Station Menu - Zone List page
a.Zone List - All of the Zones previously identified for this Subscriber are listed and the page will also provide these Actions (...) options:
1)View - This Action option will display the Panel: NNNN page in a read-only mode for the currently selected CSID Zone
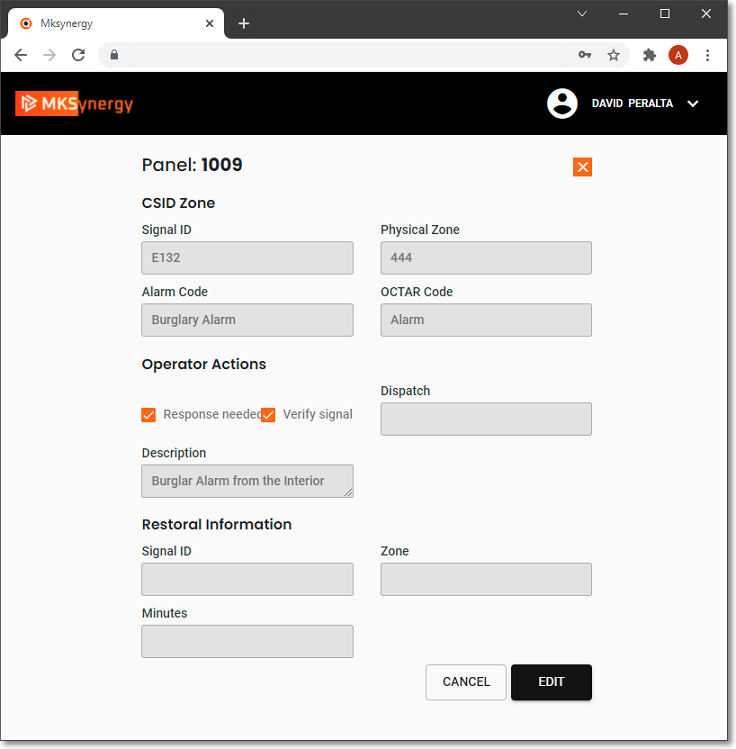
MKSynergy - Subscriber Information -Local Central Station Menu - Zone List - CSID Zone page
2)Edit - Tap (Click) the EDIT button to update/modify this Area information
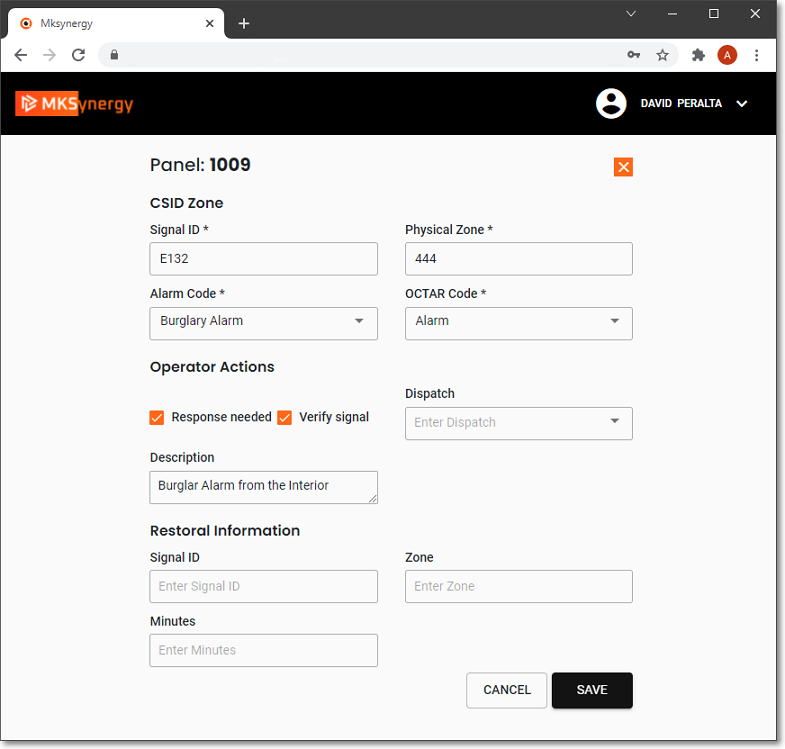
MKSynergy - Local Central Station Menu - Zone List - (Edit) CSID Zone page
▪CSID Zone
a)Signal ID - Enter the specific Signal Identifier for this signal, keeping in mind the Communicator Format that was assigned to the Subscriber's CSID in Subscriber Panel(s).
b)Physical Zone - Enter the Zone Code, if one is transmitted along with the Signal Identifier.
c)Alarm Code - Use the Drop-Down Selection List provided to Choose the appropriate Alarm Condition.
d)OCT AR Code - Use the Drop-Down Selection List provided to Choose (the list is shown below) the type of signal or event you are defining.
▪Operator Actions
e)Response Needed? - Check this box when some type of Operator Response is required.
f)Verify Signal? - Check if this Signal is to be Verified by telephoning the premises in advance of any Dispatch, or other Notification process..
g)Dispatch - If this is an Active Signal, use the Drop-Down Selection List to Choose (the list is shown below) the type of response that is needed.
i.Fire = Notify the appropriate Fire Department of the reported Fire Alarm Condition.
ii.Medical = Notify the appropriate Medical Emergency Response Service of the reported Medical Alarm Condition.
iii.Police = Notify the appropriate Police or Sheriff's Department of the reported Burglary, Silent or Hold-Up Alarm Condition.
iv.Other = Notify the appropriate Responsible Person responsible for responding to the reported Emergency Condition (also see Other Call below).
v.None = No specific "Dispatch" related Response is needed
h)Verify Signal? - Check if this Signal is to be Verified by telephoning the premises in advance of any Dispatch, or other Notification process..
▪Restoral Information - Do not Check the Response Needed? box for this CSID Zone (which is the one reporting the problem).
i)Signal ID - Enter the corresponding Signal ID representing the Restoral of the CSID Zone's Signal ID entered above.
j)Zone - Optionally, enter the Physical Zone representing the Restoral of the CSID Zone's Physical Zone entered above.
k)Minutes - If this Alarm Condition is not to be reported to the Operator until after a specified number of minutes has passed (allowing the Subscriber's system to restore to its normal mode in a reasonable period of time), enter that number of minutes here.
• SAVE - Tap (Click) the Save button to record this entry.
3)Delete - Tap (Click) the Delete option and Tap (Click) DELETE to remove this Area information
MKSynergy - Local Central Station Menu - Areas - Delete area page
c.UNVERIFIED - Tap (Check) the UNVERIFIED box
▪The Unverified Check box on the Zone List page will cause this Zone List page to display only the CSID Zones that are currently Waiting to be Tested.
d.Panels button - Tap (Click) the ![]() button to display the Select panel dialog
button to display the Select panel dialog
Local Central Station Menu - Zone List option - Select panel dialog
2)Select Panel - Use the Drop-Down Selection List to Choose the Panel (CSID) whose Panel Zones are to be listed.
e.Add - Tap (Click) the ADD button to display the Create zone page
1)See #4) Edit above
MKSynergy - Subscriber Information -Local Central Station Menu - Zone List - Create zone page
6.Open/Close Events page - Tap (Click) this option to display the Open/Close Events page
a.Select Panel - Use the Drop-Down Select List to Choose the appropriate Panel (CSID)
Open/Close Events option - Select panel dialog
b.The Open/Close Events page for the selected Panel will be displayed
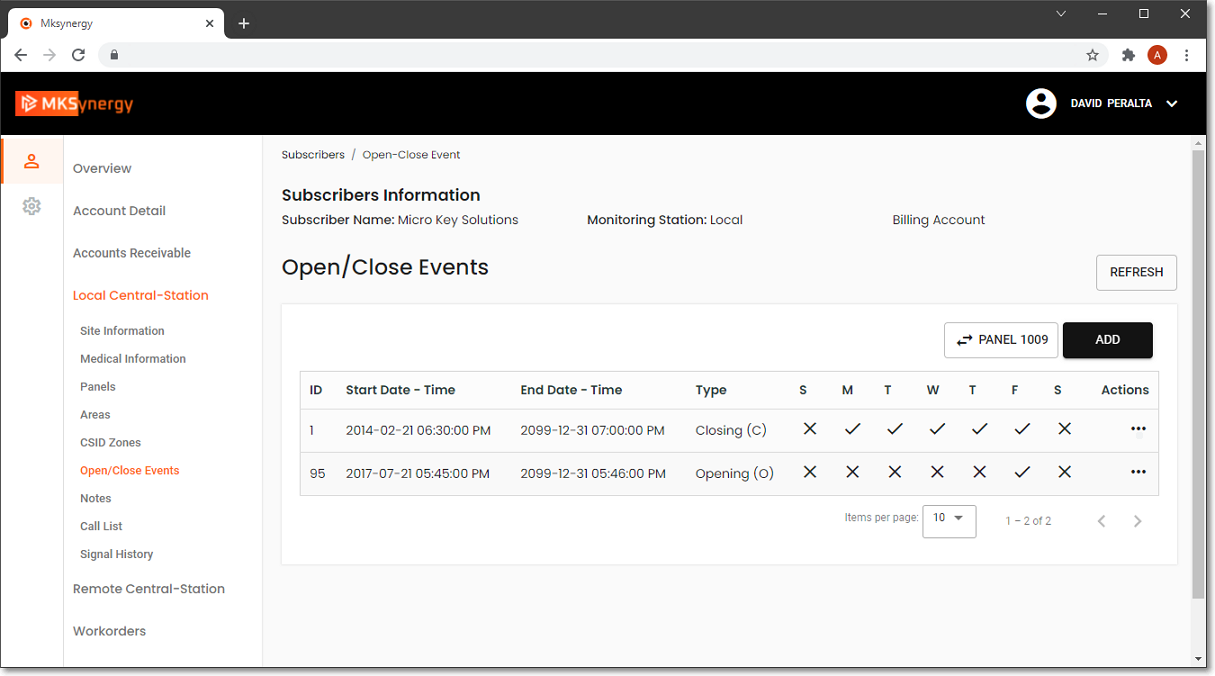
MKSynergy - Subscriber Information -Local Central Station Menu - Open/Close Events List -page
a.Open/Close Events - All of the Events previously identified for this Subscriber are listed and the page will also provide these Actions (...) options:
1)View - This Action option will display the Create open/close event page in a read-only mode for the currently selected Event
MKSynergy - Subscriber Information - Local Central Station Menu - View the Create open/close event page
2)Edit - Tap (Click) the EDIT button to update/modify this Area information
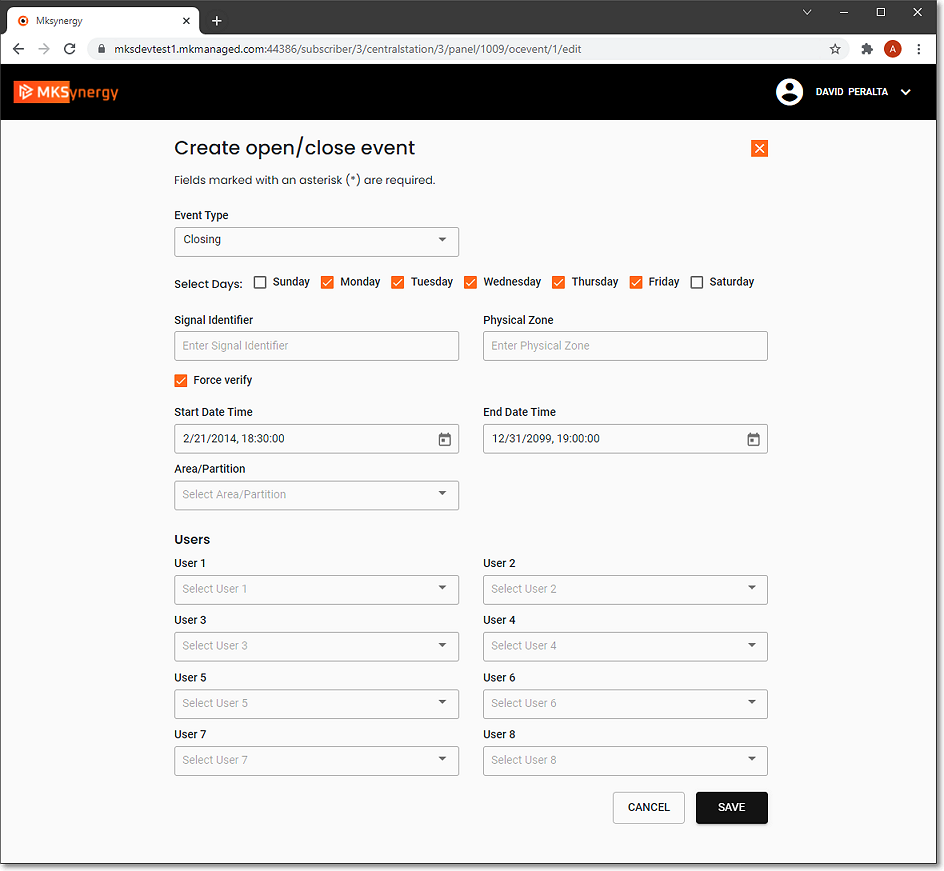
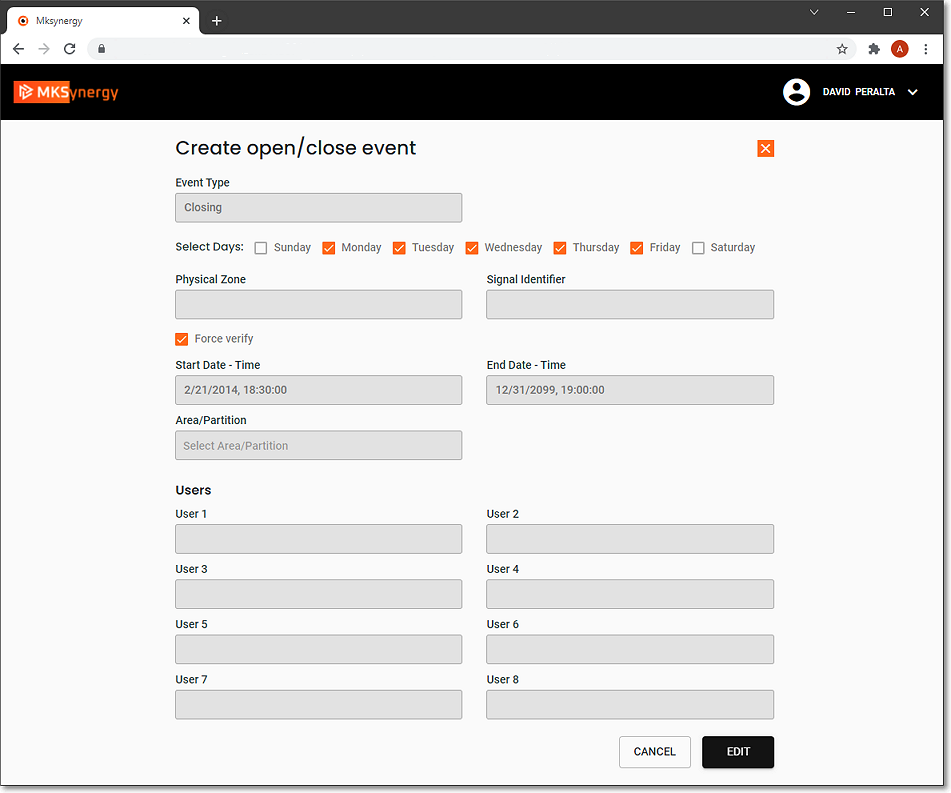
MKSynergy - Subscriber Information - Local Central Station Menu - Create open/close event page
a)Event Type - Use the Drop-Down Selection List provided to Choose the Type of Event (is this for an Opening, Closing, Multiple, Holiday, or Other?) which this Opening/Closing Event schedule entry will represent.
i.Opening - The default selection - This is an Event record that will supervise an Opening at the Premises [One (1) minute after the End Time, if this Opening Event Signal has not been received, the system will generate a FO* Signal with a Failed To Open Condition Code]
ii.Closing - This is an Event record that will supervise a Closing at the Premises [One (1) minute after the End Time, if this Closing Event Signal has not been received, the system will generate a FC* Signal with a Failed To Close Condition Code].
iii.Multiple - This is an Event record that will supervise a Premises that may have multiple Openings and Closings occur within the specified time frame.
▪An Opening Signal and/or a Closing Signal is not required, but is permitted at any time within the Start and End Times for this type of Event.
▪Any number of Opening and Closing Signals may be received within the Start and End Times, and all will be considered Valid Openings and/or Closings Signals.
▪To have the Closing time specifically Supervised, define that Closing Event separately (see the Closing instructions above).
iv.Holiday - This is an Event record that will supervise a Holiday during which the Premises should remain Closed.
v.Other - This is an Event record - that requires a corresponding CSID Zone which has a User Defined Signal ID, and optionally a Physical Zone Code, that is designed to alert the Operator when it's the time specified to perform a specific task
b)Select Days - Check the Day(s) of the Week in which this Events schedule will be enforced.
c)Start Date Time- Enter the Starting Date and Time for this Event Type using the Pop-up Date/Calendar provided.
d) End Date Time - Enter the Ending Date and Time for this Event Type using the Pop-up Date/Calendar provided.
❖ UL® Supervised Open and Closing Events - For those Subscribers who are designated as UL® Classified Accounts (in the Central Station Data section) special consideration should be given to have a sufficient grace period before and after their regularly scheduled opening and closing times:
▪Each opening schedule's Start & End Date and Time "Windows" should have an additional 5 minutes added before, and 30 minutes added after their regularly scheduled opening time.
▪Each closing schedule's Start & End Date and Time "Windows" should have an additional 30 minutes added their regularly scheduled closing time.
e)Area/Partition - For systems with multiple Partitions, when this Supervised Event is to be enforced only on a specifically designated Partition, use the Drop-Down Selection List provided to Choose the appropriate Area.
f)Users - Sometimes, to be considered valid, Event signals must be received from specifically identified Users. If all Users are permitted to initiate this Event, do not enter any User IDs.
i.Use the Drop-Down Selection Lists provided to identify up to eight (8) Users who are permitted to transmit this Event Type.
ii.The User ID #s transmitted by the control panel, that identifies the individual who disarmed or armed the Alarm System, is entered on the Central Station tab of the People To Call Form.
iii.Entering a User limits which individuals may transmit this Event to only those User IDs identified here.
• SAVE - Tap (Click) the Save button to record this entry.
3)Delete - Tap (Click) the Delete option and Tap (Click) DELETE to remove this Area information
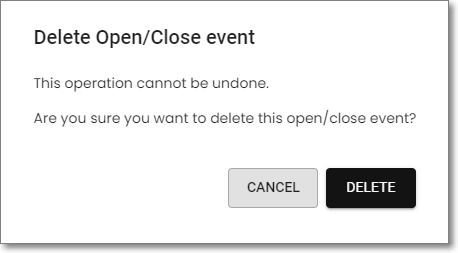
MKSynergy - Local Central Station Menu - Events - Delete Open/Close event
7.Notes - Tap (Click) this option to display the Notes page

MKSynergy - Subscriber Information -Local Central Station Menu - Notes page
a.PANEL button - Tap (Click) the ![]() button which will display the Select panel dialog to select a different Panel's Notes
button which will display the Select panel dialog to select a different Panel's Notes
Local Central Station Menu - Notes option - Select panel dialog
1)Select Panel - Use the Drop-Down Selection List to Choose the Panel (CSID) whose Notes are to be listed.
b.Add - Tap (Click) the ADD button to display the Create note page.
✓Any active Note(s) will be displayed for the Operator when an Alarm Signal is first presented on the Signal Processing screen.
✓If the Subscriber has an active Note entry (one or more Temporary Notes which are currently dated within the Date & Time Range it is to be displayed),
✓Before the Alarm Signal is acknowledged, the Temp Notes dialog will be displayed automatically.
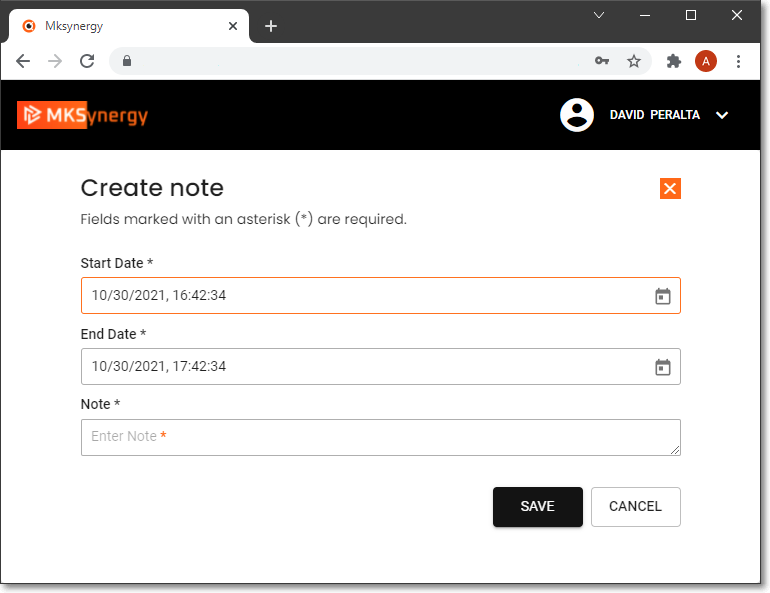
MKSynergy - Subscriber Information -Local Central Station Menu - Notes - Create Note page
1)Start Date - Enter the Starting Date and Time to display this Note using the Pop-up Date/Calendar provided.
2)End Date - Enter the Ending Date and Time to display this Note using the Pop-up Date/Calendar provided
3)Note - Enter the appropriate Note
• SAVE - Tap (Click) the Save button to record this entry.
8.Call List page - Tap (Click) this option to display the Call List page
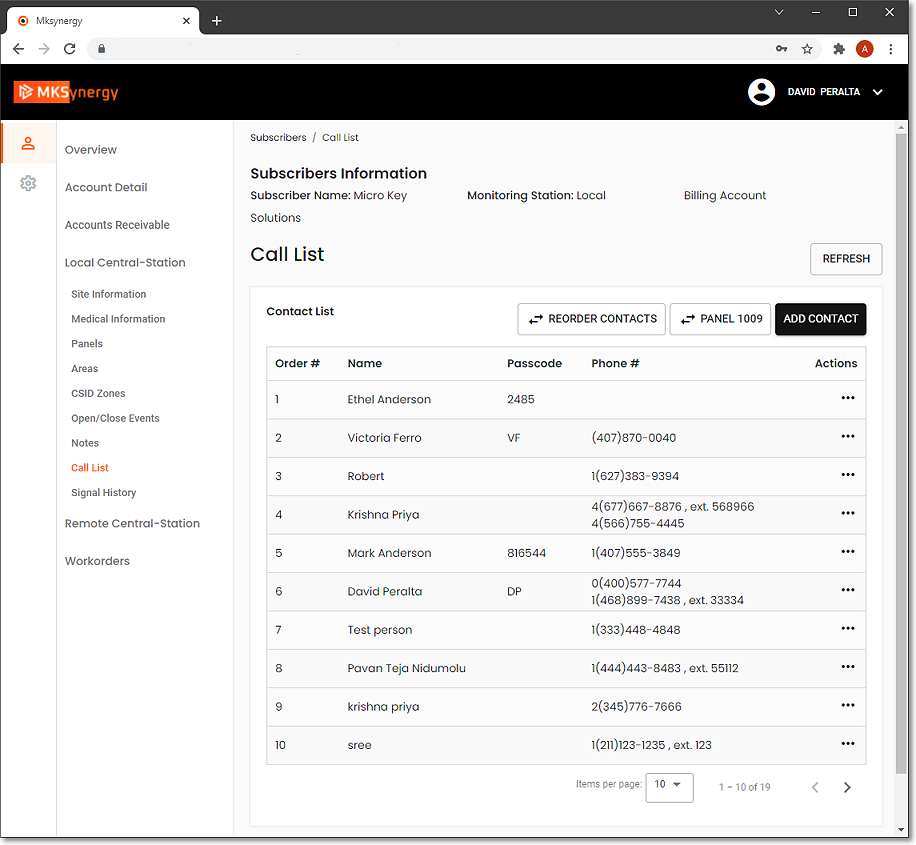
MKSynergy - Subscriber Information -Local Central Station Menu - Call List page
a.Call List - All of the Contacts previously identified for this Subscriber are listed and the Call List page will also provide these Actions (...) options:
1)View - This Action option will display the Contact Information page in a read-only mode for the currently selected Panel
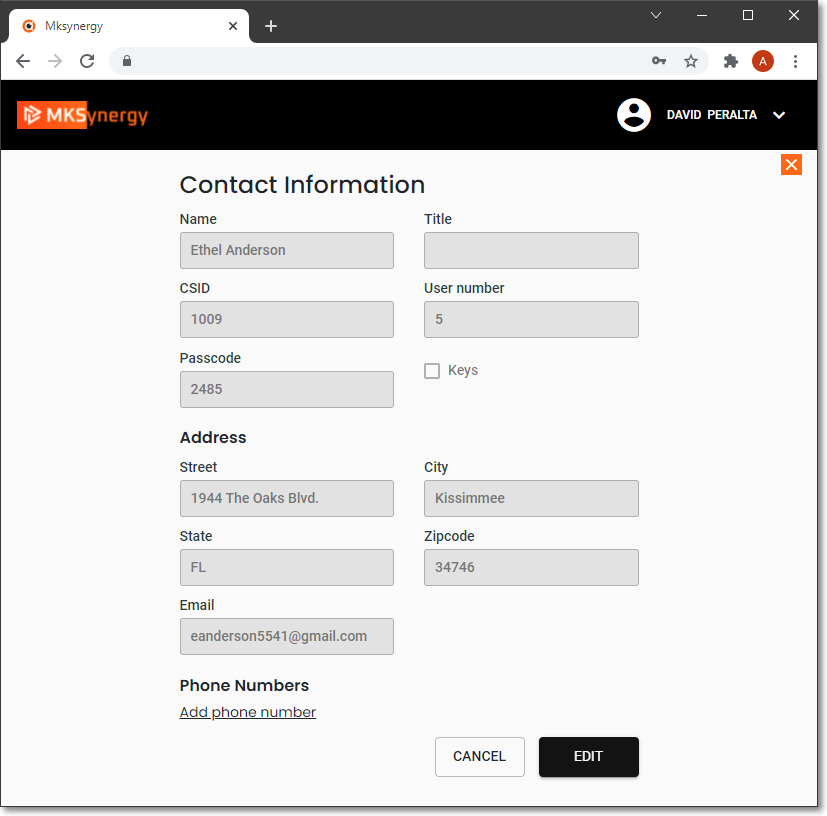
MKSynergy - Subscriber Information -Local Central Station Menu - Call List - view Contact Information page
2)Edit - This Action option will display the Edit contact page for the currently selected Panel
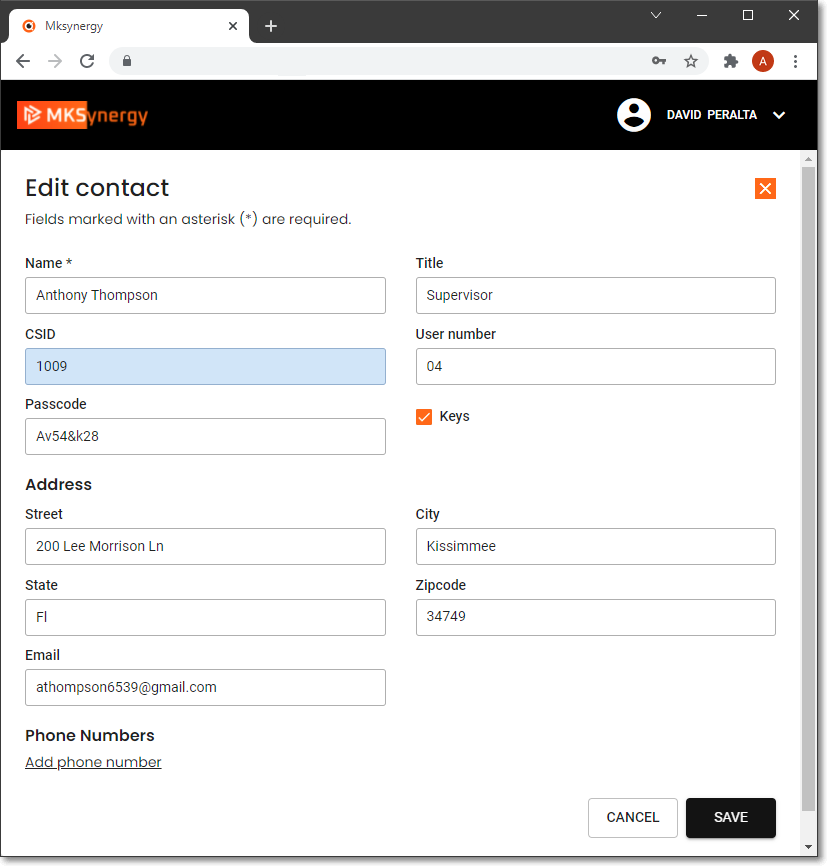
MKSynergy - Subscriber Information -Local Central Station Menu - Call List - Edit contact page
a)Name - Enter the Name - as the Operator should normally say it.
b)Title - Enter the appropriate title of this individual, if needed.
i.The same person may have many telephone numbers defined.
ii.However, if there is more than one individual with this same Name, be sure to enter a different Title for each person with that Name.
c)CSID - For information only to identify the Panel to which this Contact will be assigned.
d)User Number - When appropriate, enter the User ID number that will be transmitted when this person Activates or Deactivates their system
e)Passcode - Enter the Passcode that will be assigned to this Contact.
f)Keys - Tap (Click) in this box to indicate the Contact has keys to the premises
Address
g)Street - Enter the person's street address.
h)City - Enter their city.
i)State - Enter the state.
j)Zip - Enter the zip code.
k)Email - Enter the appropriate Email address for this Contact
• SAVE - Tap (Click) the Save button to record this entry.
Phone Numbers - Add phone number

MKSynergy - Subscriber Information -Local Central Station Menu - Edit Contact - Create phone number
a)Phone number - Enter the new telephone number for this Contact (no automatic formatting is applied)
b)Extension - If required, enter the appropriate Extension
c)Type - Using the Drop-Down Selection List provided, Choose what type of phone number this is (e.g., Home, Work, Mobile, Other)
d)SMS - Tap (Click) in this box to indicate that this number may be used for Text Messaging
• SAVE - Tap (Click) the Save button to record this entry.
3)Delete - Tap (Click) the Delete option and Tap (Click) DELETE to remove the selected Contact information
b.REORDER CONTACTS - Tap (Click) this option to reset the desired calling order for the Operator.
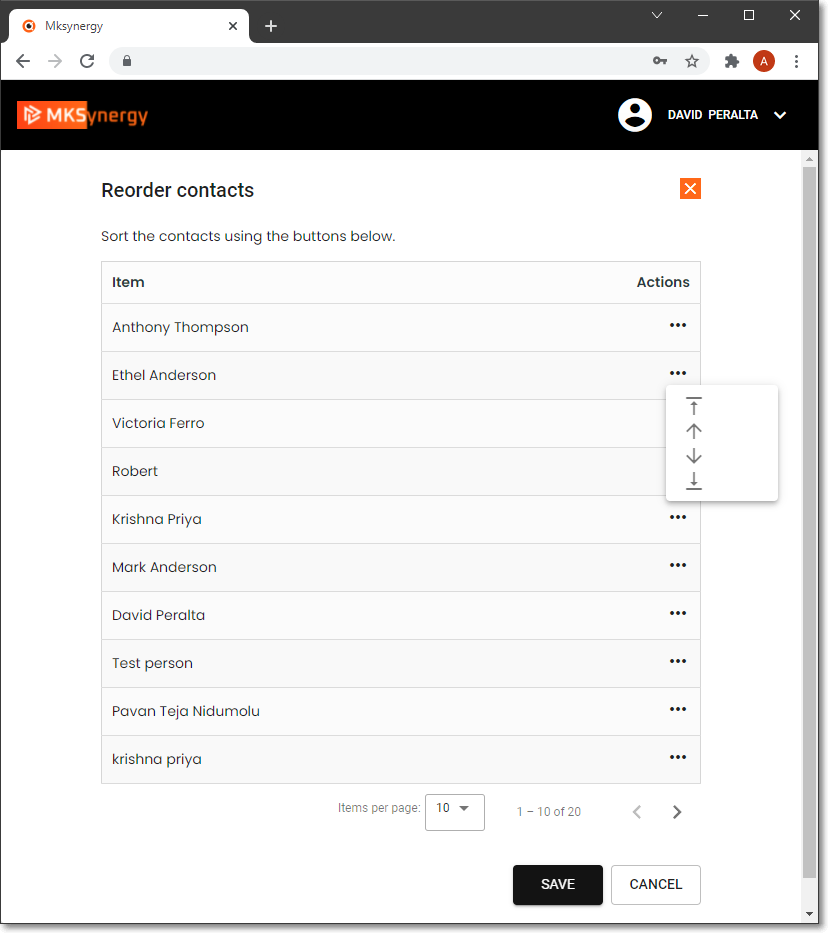
MKSynergy - Subscriber Information -Local Central Station Menu - Call List - Reorder Contacts
a)Using the First one, Up one, Down one or Last one Icons to reset the position of a selected Contact
•Tap (Click) the Save button to record this new sequence.
c.PANEL - Tap (Click) the ![]() button which will display the Select panel dialog to select a different Panel's Call List
button which will display the Select panel dialog to select a different Panel's Call List
Local Central Station Menu - Call List option - Select panel dialog
d. ADD CONTACT - Tap (Click) this option to enter a new Contact
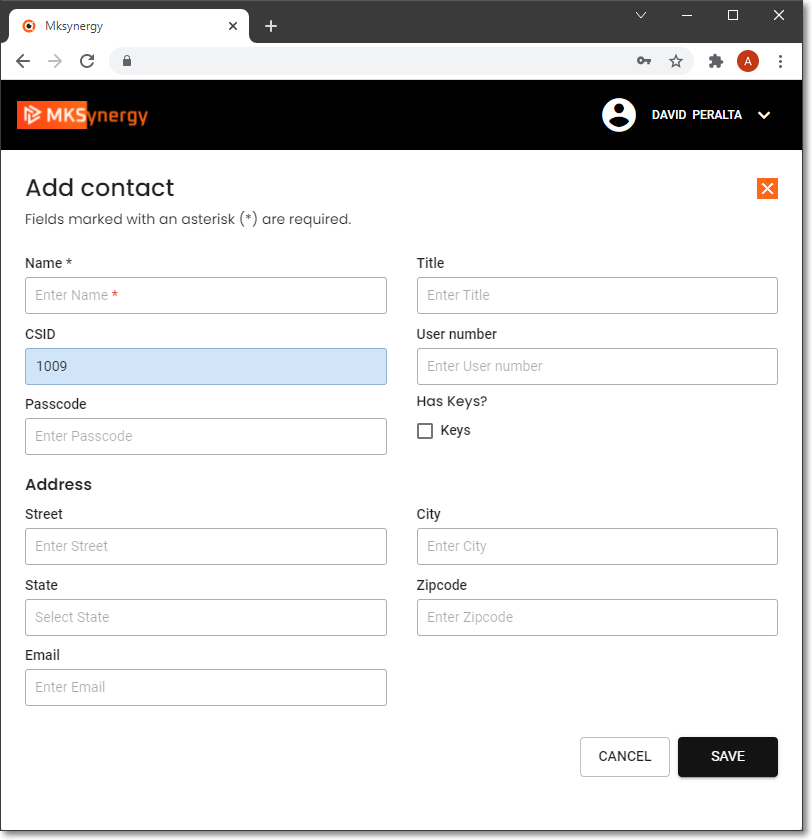
MKSynergy - Subscriber Information -Local Central Station Menu - Call List - Add contact page
a)Name - Enter the Name - as the Operator should normally say it.
b)Title - Enter the appropriate title of this individual, if needed.
i.The same person may have many telephone numbers defined.
ii.However, if there is more than one individual with this same Name, be sure to enter a different Title for each person with that Name.
c)CSID - For information only to identify the Panel to which this Contact will be assigned.
d)User Number - When appropriate, enter the User ID number that will be transmitted when this person Activates or Deactivates their system
e)Passcode - Enter the Passcode that will be assigned to this Contact.
f)Keys - Tap (Click) in this box to indicate the Contact has keys to the premises
Address
a)Street - Enter the person's street address.
b)City - Enter their city.
c)State - Enter the state.
d)Zip - Enter the zip code.
e)Email - Enter the appropriate Email address for this Contact
▪ SAVE - Tap (Click) the Save button to record this entry.
9.Signal History page - Tap (Click) this option to view the Signal History page
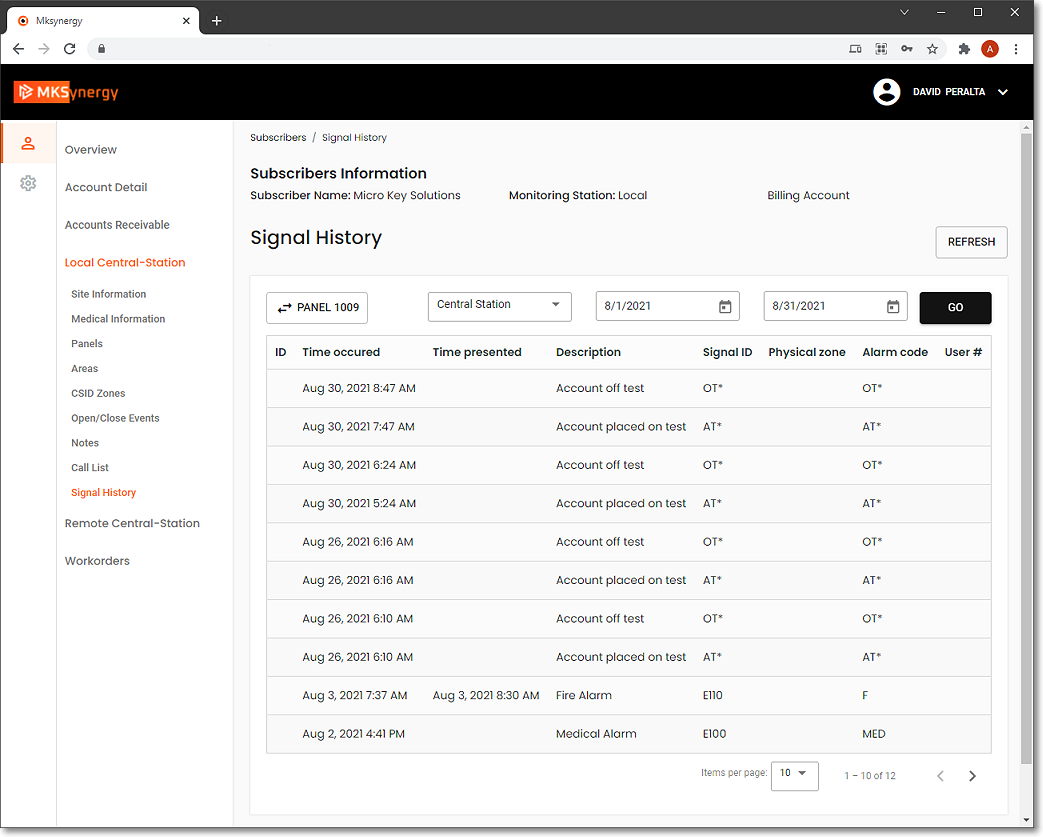
MKSynergy - Subscriber Information - Local Central Station Menu - Signal History page
a.Panel - Tap (Click) the ![]() button which will display the Select panel dialog to select a different Panel's Signal History
button which will display the Select panel dialog to select a different Panel's Signal History
b.Time - Tap (Click) the Drop-Down Selection List to Choose whether this Dates below should reflect Central Station of Customer Time
c.Start Date - Use the Drop-Down Calendar/Date Entry field to enter the Date from which this Signal History list should be created
d.End Date - Use the Drop-Down Calendar/Date Entry field to enter the Date to which this Signal History list should be created
e. GO - Tap (Click) this option to display the desired list