❑Below the Subscriber Search section on the Subscribers page (illustrated immediately below) is the Subscribers Accounts list

MKSynergy - Subscribers Search section - Search options
•The Subscribers Accounts list contains all previously entered Subscriber Accounts, and an Add Subscribers option
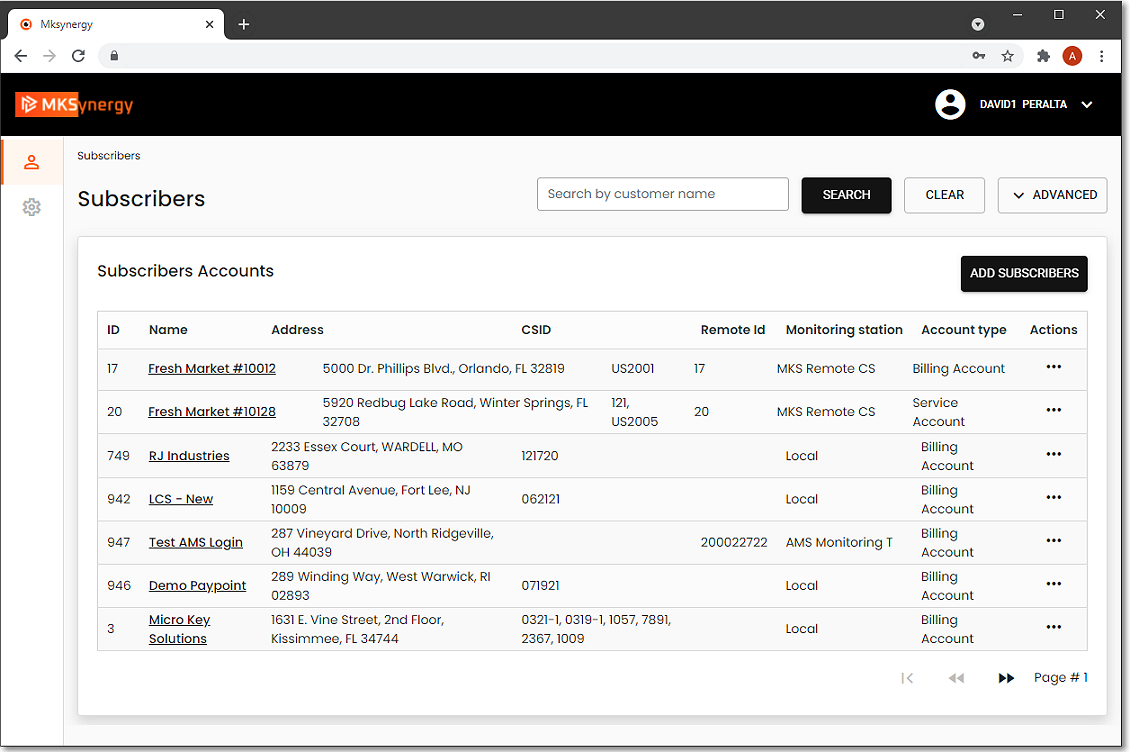
MKSynergy - Subscribers page with Subscribers Accounts list, SEARCH options, and the ADD SUBSCRIBERS option
•Add Subscriber - Tap (Click) the ADD SUBSCRIBER option to create an additional (new) Subscriber record
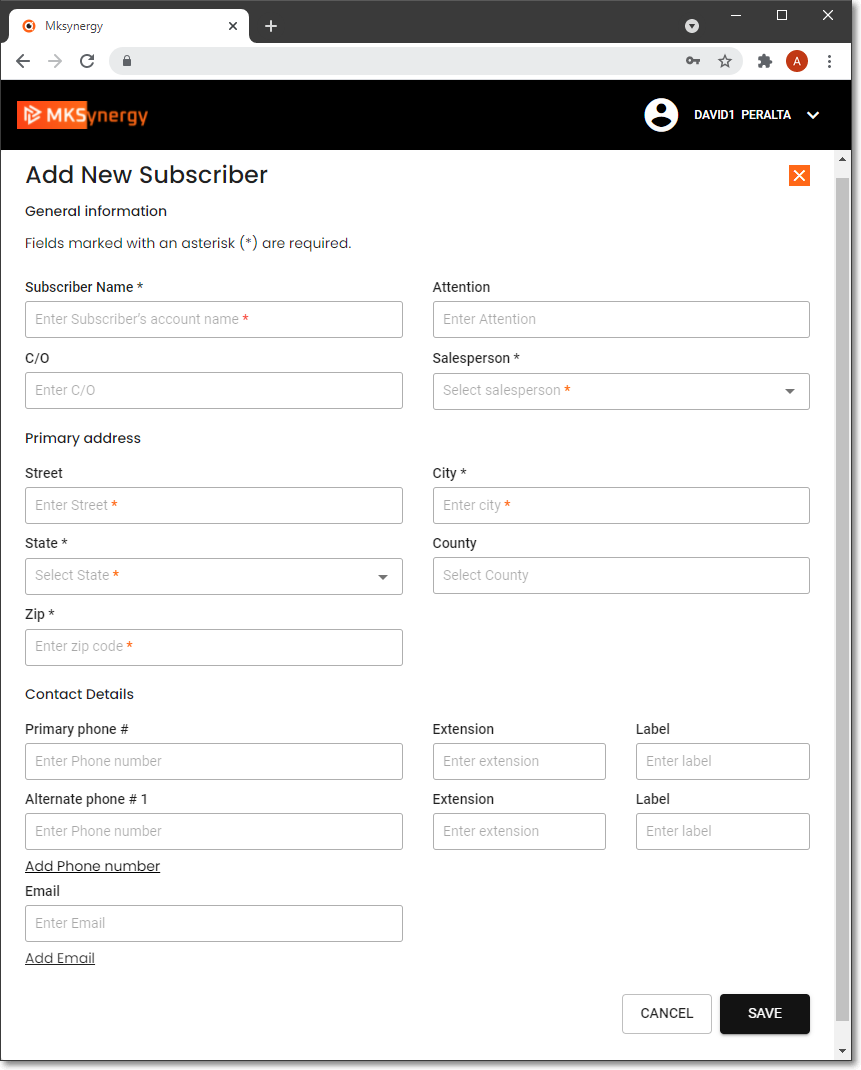
MKSynergy - Subscribers - Add New Subscriber page
✓General information
« An asterisk next to a field name indicates that this is a mandatory field!
a.Subscriber Name * - Tap (Click) this field to enter the customer's account name (up to 70 characters in length - but keep in mind the limited display area of a standard #10 Window Envelope).
▪Entering a Business Name:
Enter the Name as it would be listed in the Telephone Directory
If a prefix is part of the name but that name is not normally alphabetized by that prefix (such as the word "the"), enter the name followed by a tilde ("~") and the prefix.
Example: "ABC Company~The"
▪Entering an individual Person's Name
Last Name is entered first
Type a tilde ("~")
(The tilde tells the system that everything after it is the Employee's first name and middle initial.)
Enter the First Name and Middle Initial
For Prefixes (Mr., Mrs., Ms., etc.), enter them after the Tilde and before the first name
For Suffixes (MD., Jr., III, etc.), enter them after the last name and before the tilde.
Example: "Smith, MD~Dr. James T."
b.Attention - Tap (Click) this field to enter an Attention line.
i.The Attention line will be printed below the Customer's Name on their Invoice's Mailing Address (up to 30 characters in length).
ii.This may be used for a building name, a person, suite number, additional address information or skipped entirely - depending on what you need.
d.C/O - Tap (Click) this field to enter a Care Of line.
i.The Care Of field also provides a place to expand the Customer's address information, and will appear below the Attention line (up to 30 characters in length), if entered.
e.Salesman * - Choose the Employee who is assigned to this Account
✓Primary address
a.Street * - Tap (Click) this field to enter the customer's street address
b.City * - Tap (Click) this field to enter the City.
c.County - Tap (Click) this field to enter the name of their County
d.State * - Tap (Click) the down-arrow ‚on the right of this field and select the State in which this Account resides
e.Zip * - Tap (Click) this field to enter their Zip code.
✓Contact Details
a.Primary phone # - Tap (Click) this field and enter the appropriate Telephone Number
b.Extension - Tap (Click) this field and enter an Extension when required
c.Label - A specific "title" for this Telephone Number (e.g., 'Main', 'Back Room', 'Warehouse', 'Boss', 'Security', etc.) may be defined. Tap (Click) this field and enter that name
d.Alternate phone # 1 - Tap (Click) this field and enter the appropriate Telephone Number, if available
e.Extension - Tap (Click) this field and enter an Extension when required
f.Label - A specific "title" for this Telephone Number (e.g., 'Main', 'Back Room', 'Warehouse', 'Boss', 'Security', etc.) may be defined. Tap (Click) this field and enter that name
g.Alternate phone # 2 - Tap (Click) this field and enter the appropriate Telephone Number, if available
h.Extension - Tap (Click) this field and enter an Extension when required
i.Label - A specific "title" for this Telephone Number (e.g., 'Main', 'Back Room', 'Warehouse', 'Boss', 'Security', etc.) may be defined. Tap (Click) this field and enter that name
▪Add Phone Number - Tap (Click) the Add button to enter another Phone Number
j.Email - A list of the Email addresses identified for the Customer Account are listed
▪Add Email - - Tap (Click) the Add button to enter another Email address
✓Save - Tap (Click) the SAVE button to record this entry
•Subscriber Information - Overview page - Tap/Click on any Subscriber's Name (or Tap/Click the Actions ellipse and Choose Edit) to open the Subscriber Information - Overview page for the selected Subscriber and its associated Menu
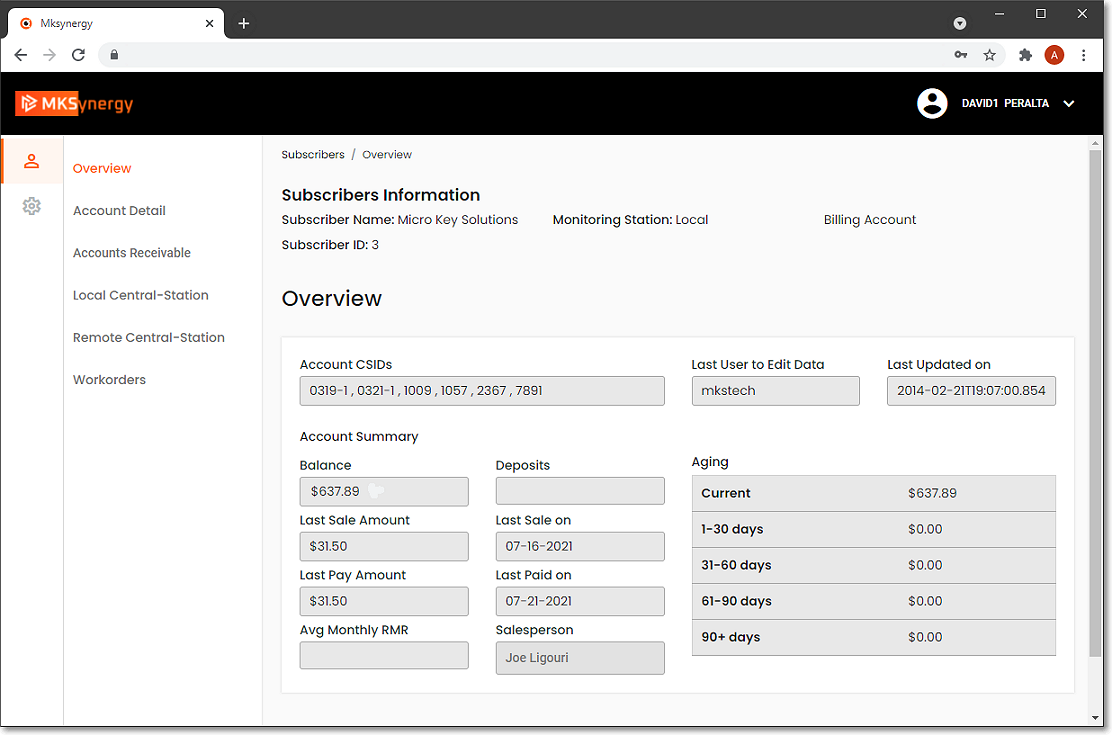
MKSynergy - Subscribers Information - Overview page
•Overview page - Account Detail Menu's sub-menu options -
a.Account Detail - Sub-Menu options are:
1)Account Information page - contains location and contact information, plus an EDIT option which provides a User the means to update and/or add to the existing Account Information

MKSynergy - Account Detail Menu options - displaying the Account Information page and its EDIT option
2)Addresses page - contains:
a)A list of previously defined alternate mailing Addresses
b)An ADD option that provides a User the means to identify additional alternate mailing Addresses
c)An Actions Ellipse to option a pop-up menu with Edit or Remove choices to update or delete an existing alternate mailing Address
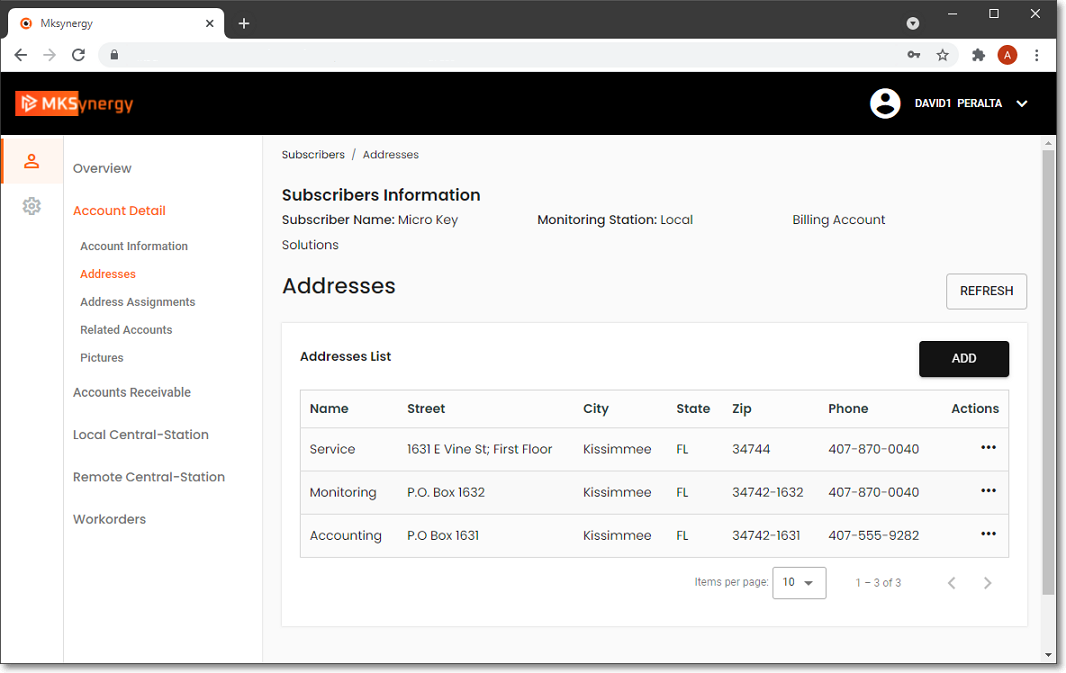
MKSynergy - Addresses page - displaying an alternate Addresses List and an ADD option
3)Address Assignments page - Addresses entered on the Addresses page [see 2) above] may be used to:
a)Assign an alternate mailing address to a specific type of document (e.g., Invoices, Account Statements) based on the month those documents were dated
b)Selectively assign an alternate mailing address to any of several Other documents types regardless of when they were produced
c) EDIT existing alternate mailing address assignments as may be required
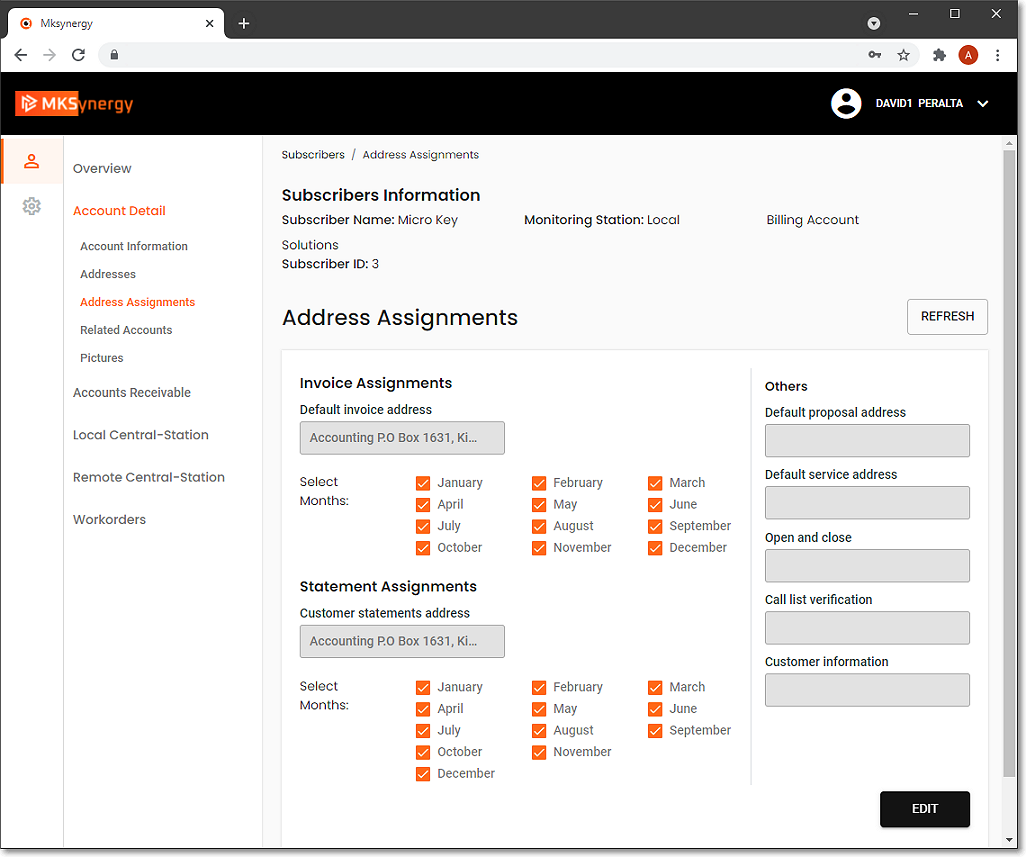
MKSynergy - Address Assignments page - displaying alternate mailing address assignments and its EDIT option
4)Related Accounts page - displays all of the Bill Payer and Service accounts associated with this Subscriber Name and an ADD option for entering Account Information [see 1) above] for a new Subscriber account
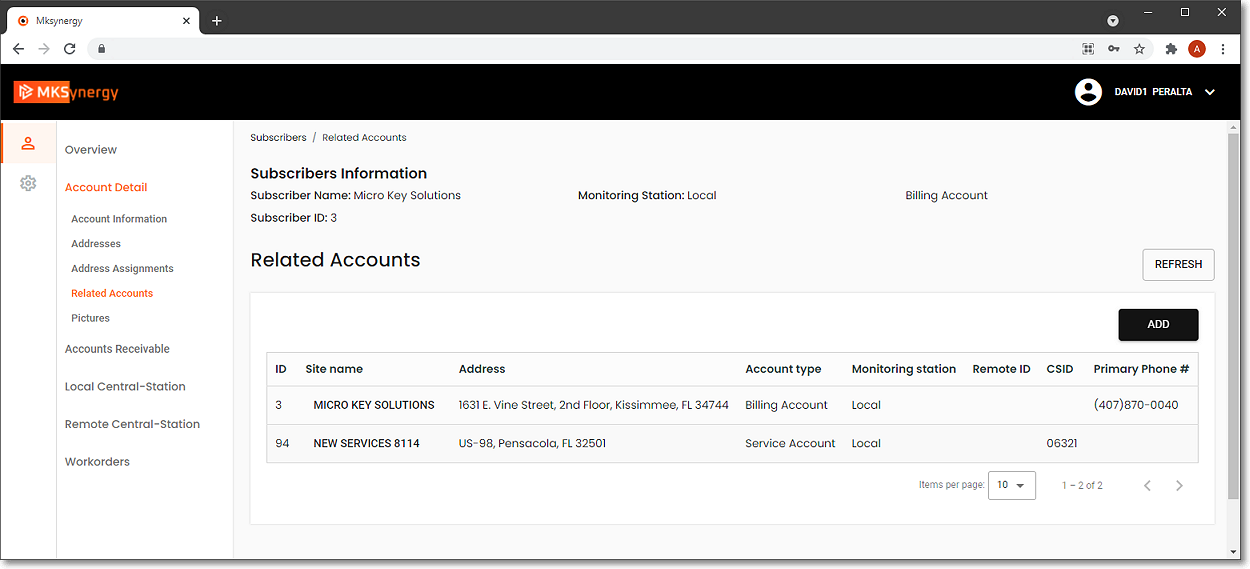
MKSynergy - Related Accounts page - displaying the Billing and Service accounts associated with this Subscriber Name, plus an ADD option
a) ADD option - This opens the Add New Subscriber page documented above which allows the User to enter an additional Subscriber record.
MKSynergy - Subscribers page - Add New Subscriber page
5)Pictures page - displays a list of the Pictures which have been associated with this Subscriber and offers:

MKSynergy - Pictures page - displaying a list of the Pictures previously attached to this Subscriber plus View, Edit and Delete Actions and an ADD PICTURE option
a)An ADD PICTURE option used to attach an additional Picture to this Subscriber
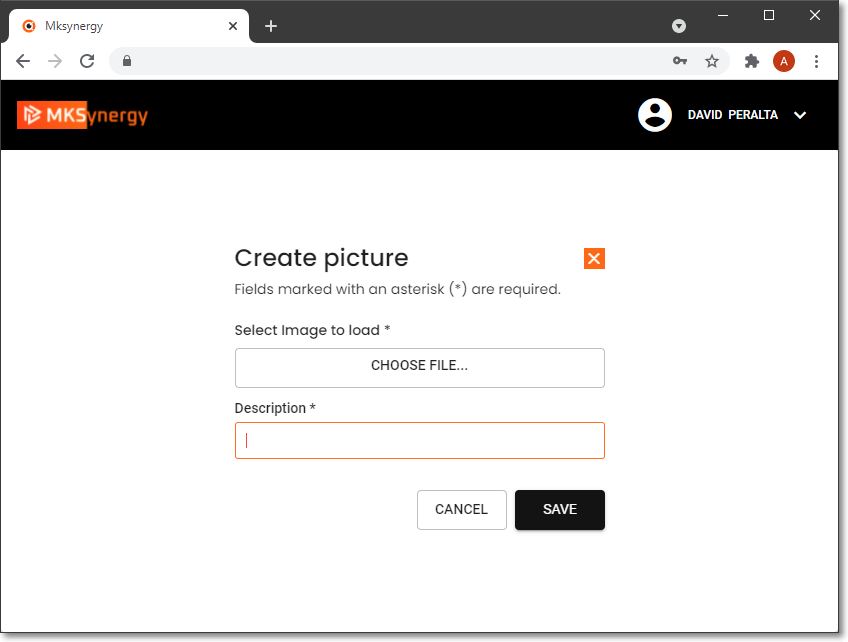
MKSynergy - Create Picture page
▪Select image to load - Using the Windows® Open dialog provided, locate and select the desired Picture image
oThe Image file you choose must be a ".BMP" file saved with 256 colors (or Less) and be no larger than 64K.
oThe file must be on your Computer (or, if you're using a Networking System, on the File Server where MKMS is installed)
▪Description - Enter a brief description of the Image
b)An Actions Ellipse option which presents a pop-up menu with View, Edit or Remove choices
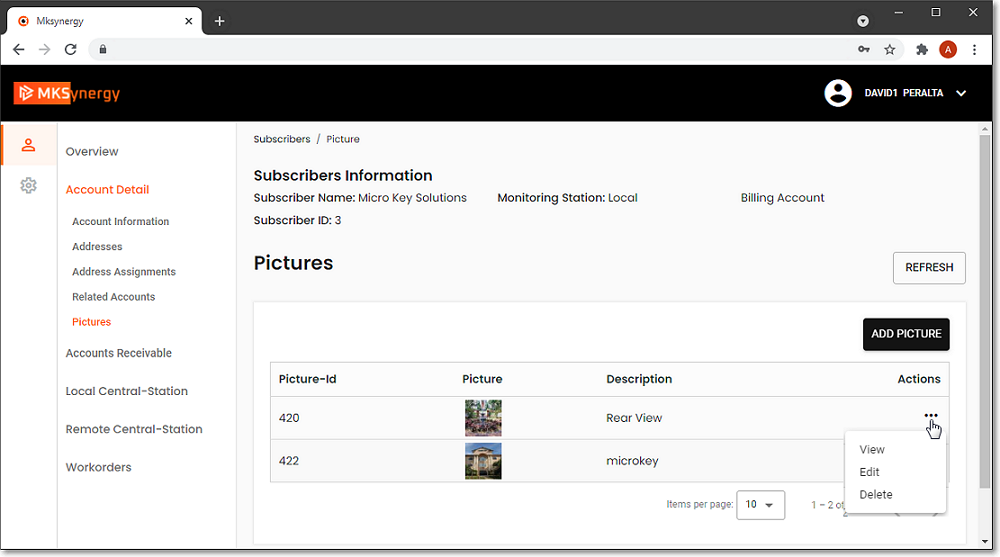
MKSynergy - Pictures page - displaying the Actions choices
b.Accounts Receivable Sub-Menu options:
1)Receivable Settings page -
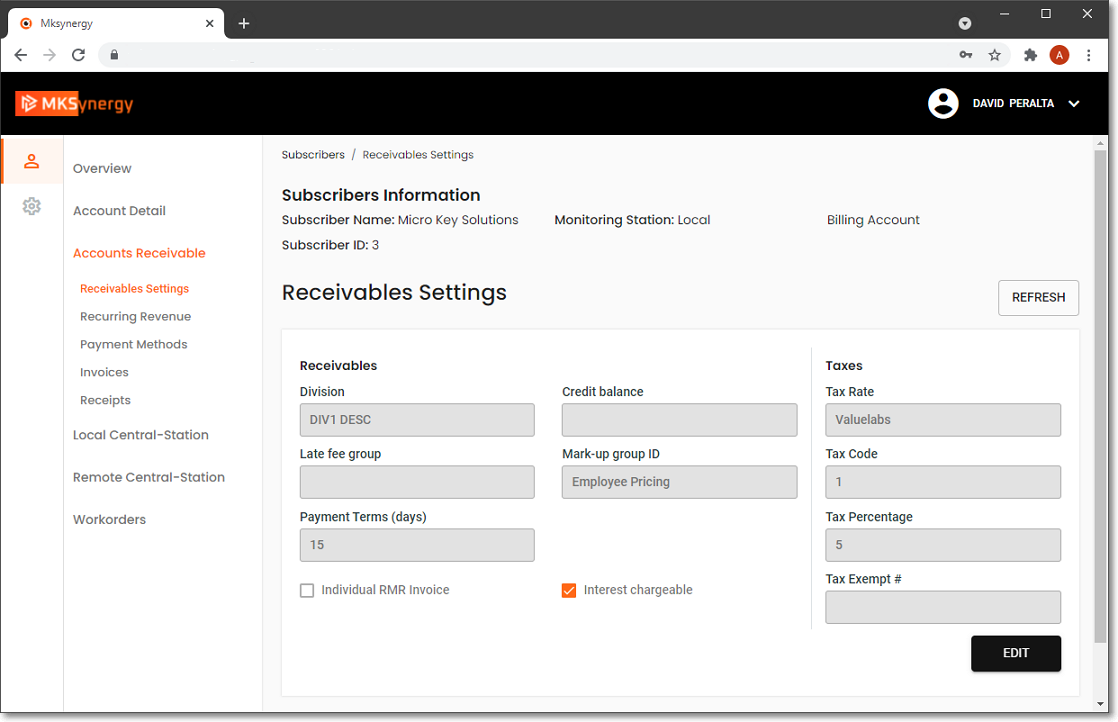
MKSynergy - Accounts Receivable Menu - Receivable Settings page
a) EDIT option - Tab (Click) this option to add/modify the Receivable Settings information
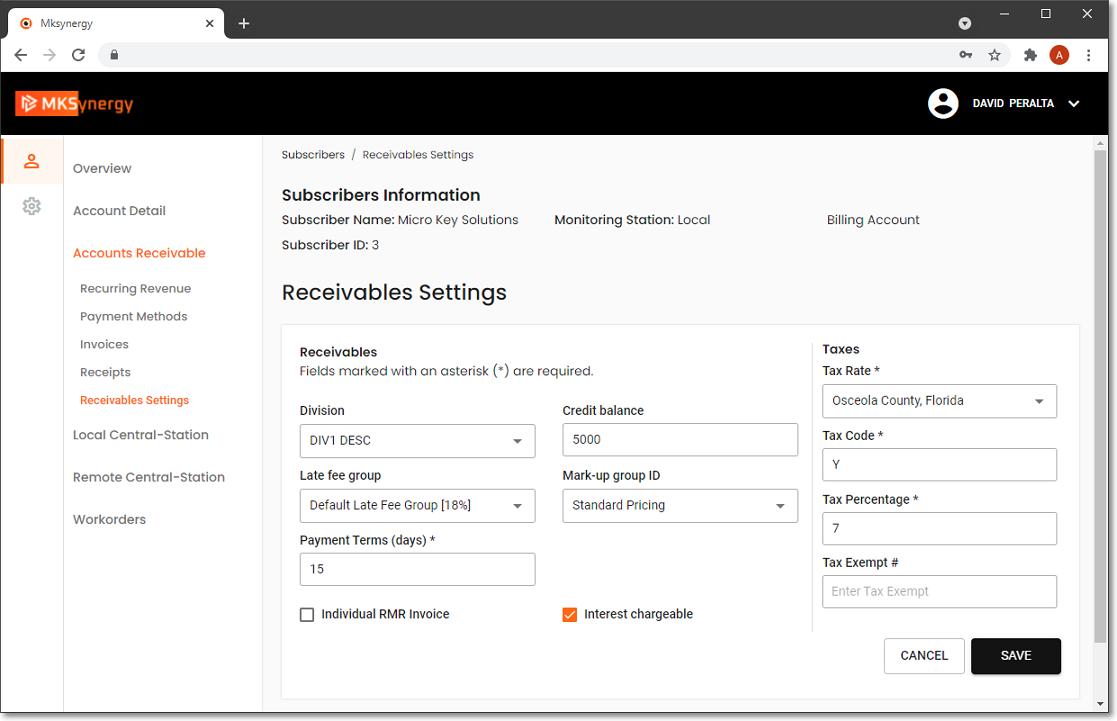
MKSynergy - Accounts Receivable Menu - Receivable Settings page
i.Receivables
▪Division - If your Company have implemented the Division Codes functionality, using the Drop-Down Selection List provided, Tap (Click) on the appropriate Division code when (if) this Subscriber should be associated with one of those Divisions..
▪Late fee group - If your Company has Chosen to Charge Interest (see Interest chargeable below), using the Drop-Down Selection List provided, Tap (Click) on the appropriate Late Fee Group
▪Terms - This field is shown, enter the Days after an Invoice's Sale Date when each Invoice will be considered Due
▪Credit balance - If you want this Subscriber to have a Credit Limit, enter that maximum Credit Limit amount.
▪Mark-up group ID - Using the Drop-Down Selection List provided, using the Drop-Down Selection List provided, Tap (Click) on the appropriate Pricing Mark Up Group
ii.Taxes
▪Tax Rate - Using the Drop-Down Selection List provided, Tap (Click) on the appropriate Sales Tax Authority for this Subscriber
▪Tax Code - Using the Drop-Down Selection List provided, Select the appropriate Tax Code (from those defined for the assigned Tax Rate ID):
oY - Yes they are Taxable and the assigned Tax Rate ID was defined as not having Multiple Tax Rates
o1 - Yes they are Taxable and the assigned Tax Rate ID was defined as a Multiple Tax Rates class and this Tax Code number represents the Tax Rate to be assessed.
o2 - Same as 1 above.
o3 - Same as 1 above.
oN - No the Subscriber is Not Taxable.
oE - This Subscriber is always Sales Tax Exempt.
▪Tax Percentage - When the Tax Rate authority's name and Tax Code are selected above, the Tax Percentage is inserted automatically.
▪Tax Exempt # - If this Subscriber is Sales tax Exempt, enter the Tax Exemption ID number here.
iii. Save - Tap (Click) on the Save button to record your updated Receivables Settings
2)Recurring Revenue page - displays the list of Recurring Monthly Revenue items previously identified for this Subscriber
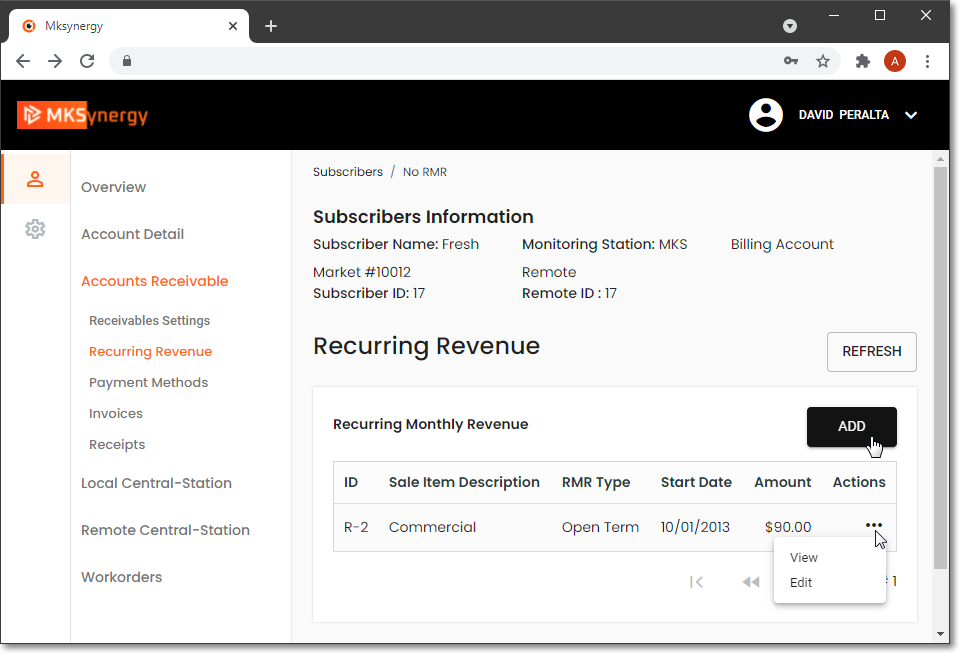
MKSynergy -Overview - Accounts Receivable sub-menu - Recurring Revenue page - ADD and Actions options
a)Actions - Offers View and Edit options for the selected Recurring Revenue item
i.View - displays the Open-Term RMR Item Detail (or Fixed-Term RMR Item Detail) page based on the Recurring Monthly Revenue item that is currently selected
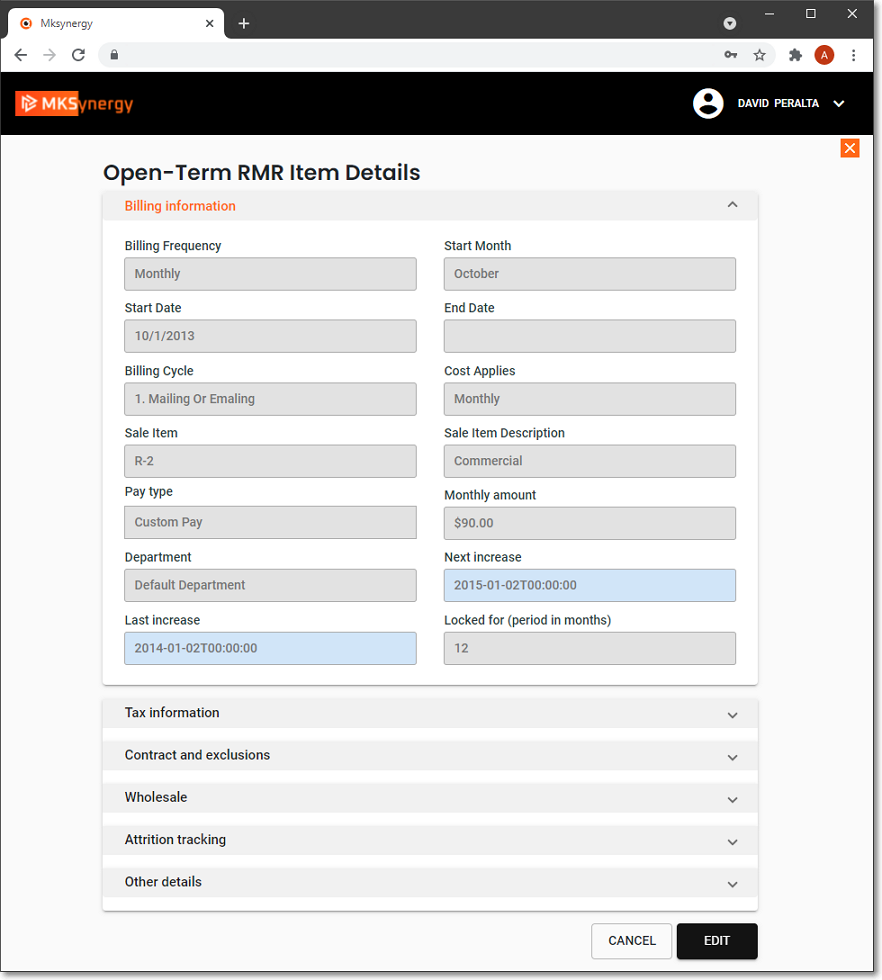
MKSynergy - Recurring Revenue - View Action option showing Open Term RMR Item Details
ii.Edit - displays the Edit open-term RMR item (or Edit fixed term RMR item) page based on the Recurring Monthly Revenue item that is currently selected
❖See b). ADD - - adding an Open-Term RMR Item for detailed information
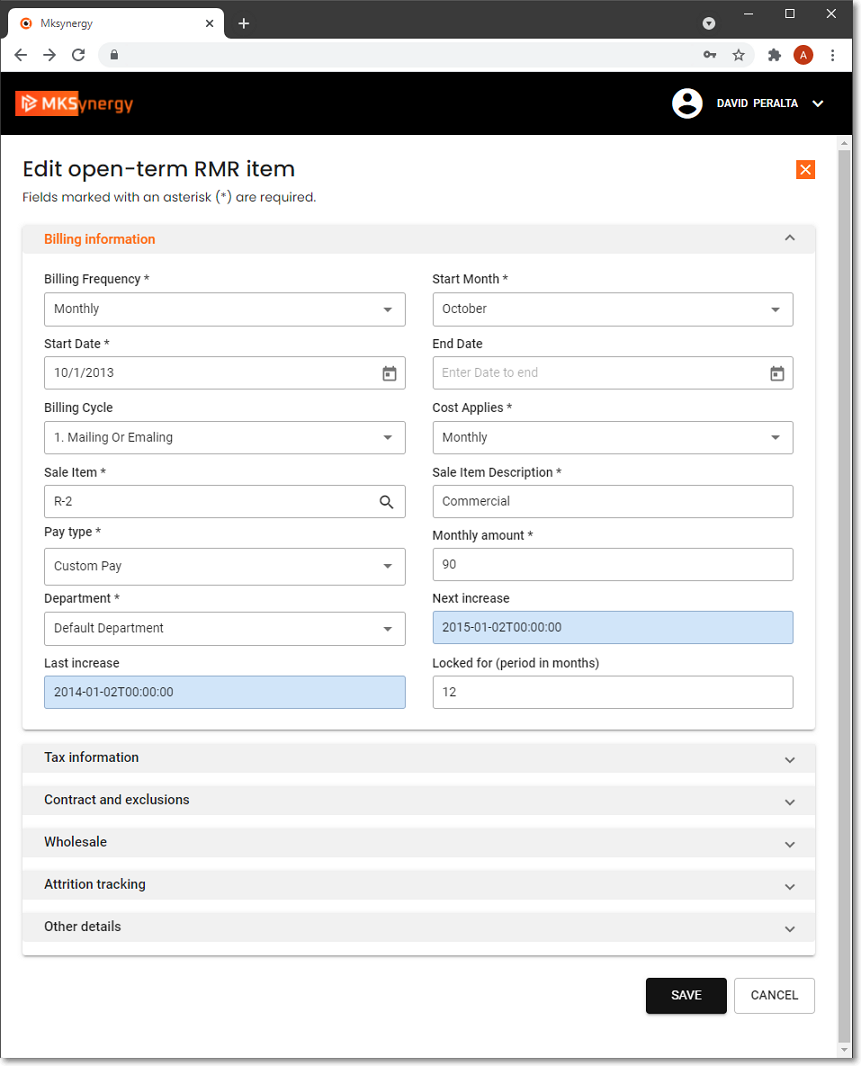
MKSynergy - Recurring Revenue - Edit Action option showing Edit open term RMR item page
b) ADD - adding an Open-Term RMR Item:
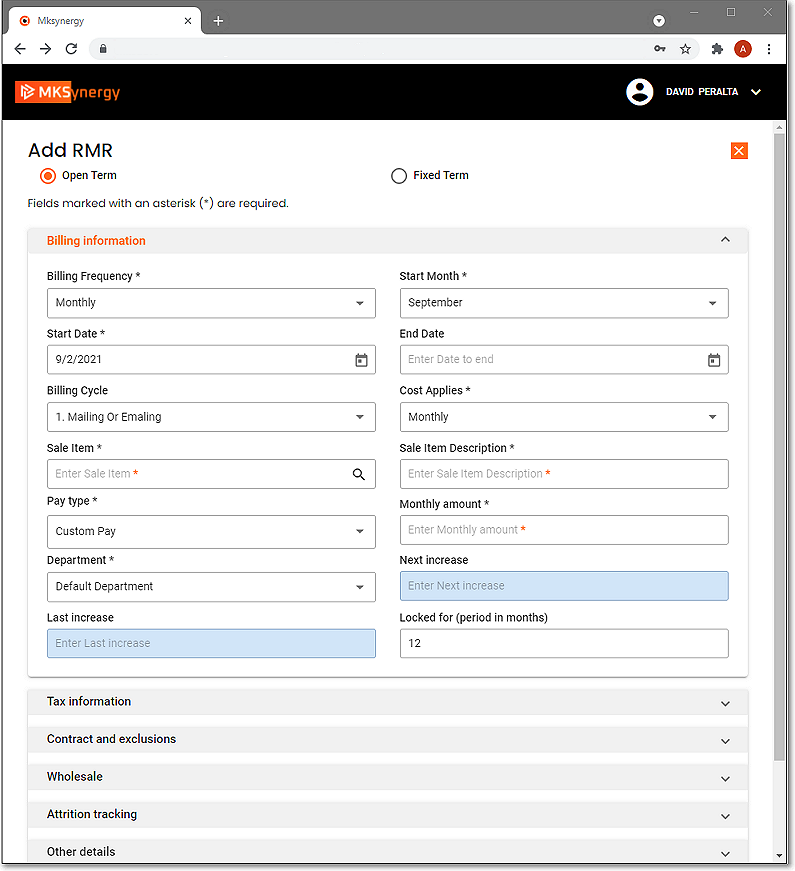
MKSynergy - Recurring Revenue - Add option displays the Add RMR page - shown here with Open Term selected
i.Billing Terms - Tap (Click) the Open Term button.
ii.Billing Information Section - This Section deals with When, What, How Much and How frequently this Recurring Billing record should be Invoiced.
▪Frequency - Using the Drop-Down Selection List provided, Choose how often this item is to be billed:
oMonthly - They are to be billed once every month for one month of service (the default).
oBi-Monthly - They are to be billed once every two months for two months of service. All other capabilities are the same as they are for Annual billing.
oQuarterly - They are to be billed once every three months for three months of service. All other capabilities are the same as they are for Annual billing.
oSemi-Annual - They are to be billed once every six months for six months of service. All other capabilities are the same as they are for Annual billing.
oAnnual - They are to be billed once each year for 12 months of service.
i.Note that, just because you select Annually, the Invoice will reflect a Monthly Rate Amount, show that the bill is for 12 Months and calculate the Total Amount.
ii.You may override this behavior: Check Excl Period Covered (see below) and the Monthly Rate and Number of Months being billed will not be printed - only the total Amount and Description and any information that was entered in the Note box (see below) of the service.
iii.This "exclude" feature is available for any item being billed for a period greater than one month.
oBi-Annual - They are to be billed once every other year for two years of service.
▪Start Month - The Next Calendar Month will be the default.
oUsing the Drop-Down Selection List provided, Choose the Month in which this billing should be started.
▪Start Date - Choose the appropriate Starting Month and Year.
oBy identifying when the Invoicing should start, the start month may be set for next month, a later month, or even years later.
oThis is useful when you provide some months of free service(s) prior to commencement of Invoicing.
oBy setting it up in advance, that Invoicing will start automatically later, when appropriate.
oUsing the Drop-Down Calendar boxprovided Choose the Date on which Invoicing for this Service should start.
▪End Date - Not used for an Open Term entry.
▪Billing Cycle - The default is Standard.
oHowever, if your Company has enabled multiple Recurring Billing Cycles (or are simply using any of the system's Recurring Billing Cycle default choices) to implement the multiple recurring billing process where different groups of Subscribers may be billed at different times within the same month, use the Drop-Down Selection List to Choose the appropriate Recurring Billing Cycle.
oIt is important to remember that when your Company is using the:
1.Fully Automated Recurring Billing process, the entry made in the Sale Day field on the Billing Cycle Form determines the Day within each Month that this Recurring Revenue item will be Invoiced. The system will not allow a Sale Day Number greater than 28 to be used.
2.Manually executed Auto Billing process, the Sale Date will be determined at the time thees Auto Billing process is run.
▪Cost Applies - There are two ways the predefined cost for this service may be applied. Use the Drop-Down Selection List to make your choice.
1)Monthly - The charge will be the preset Pay Group Amount multiplied by the number of months of service being billed - unless you override the default price with a Custom Pay Amount (see below).
2)Per Billing Frequency - The charge will be the preset Pay Group Amount regardless of the number of months of service being Invoiced - the default price may be overridden with a Custom Pay Amount (see below).
▪Sale Item - Using the Drop-Down Selection List provided, Choose the Recurring Revenue Service to be billed from among those previously defined in the Sale-Purchase Items Form.
oThe Pay Group (assigned below) determines the Price that will be billed during the Automatic Recurring Revenue Billing process.
oTo assign a unique Recurring Billing Price for this specific Subscriber, use the Custom Pay Amount feature (see below).
➢Note #1: However, the default Price for this service, that was set when this Recurring Revenue Sale-Purchase Item was defined, is still the default Price that is inserted when manually entering a Recurring Revenue Service item on an Invoice.
➢Note #2: The Department assigned for this Sale-Purchase Item will be used for recording the associated Financial Transactions to the General Ledger for the Recurring Revenue Invoice, but this Number may be changed, if appropriate.
▪Sale Item Description - By default the system will enter what was defined in the Sale-Purchase Items Form.
oModify the Description for this Service for this specific Recurring Billing, if needed.
▪Pay Type - Using the Drop-Down Selection List provided, Choose the appropriate Pay Type (i.e., Custom Pay or Pay Group )
1)Custom Pay - To assign an individual Recurring Billing Price for this specific Subscriber's Recurring Billing record, use the Custom Pay Amount feature.
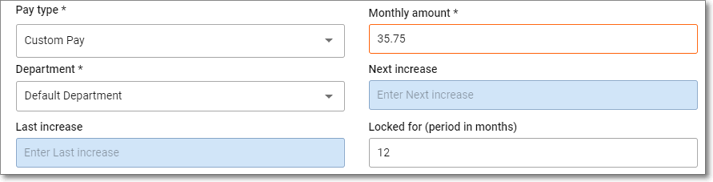
Recurring Revenue page - Custom Pay - with Monthly Amount, Next & Last Increase, and Locked for (period of months) fields
a)Monthly Amount - If Custom Pay is Selected, enter the Payment Amount (the appropriate Monthly Rate) to be Invoiced for this Recurring Billing record.
i.If the record was previously assigned a Pay Group Code, once a Custom Pay Amount has been set, the previous Pay Group assignment is canceled automatically.
b)When the Custom Pay Amount box is Checked, the Rate Increase information fields will appear.
i.Locked For - By default, it is set at 12 months. If needed, enter a different number of months that this rate is to be Locked For.
ii.Next Increase & Last Increase - When "Locked for" is entered, the system will populate these fields after the record is Saved.
2)Pay Group - If Pay Group is Selected. a Pay Group will determine the Price that will be billed during the Automatic Recurring Revenue Billing process.

Recurring Revenue page - Pay Type = Pay Group - the Pay Group is selected
a)Use the Drop-Down Selection List in the Pay Group field to Choose the appropriate Pay Group for setting the Payment Amount for this Recurring Billing record.
b)Remember this Pay Group's Payment Amount is also subject to how you assess that Payment Amount (identified in the Cost Applies field as either Monthly or on a Per Billing Cycle basis - see Cost Applies above).
▪Department - If your Company is using the General Ledger System and has defined multiple Departments for tracking Revenue by Department, use the Drop-Down Selection List to Choose the appropriate Department Number.
oBy default, this will be the Department Number assigned to the Selected Sale-Purchase Item.
oIf you are not using Departments, it is Default
❖ Save - Tap (Click) on the Save button to record this information.
iii.Tax information - The Sales Tax Authority has already been assigned to the Subscriber but the Sales Tax Rate information for this Recurring Revenue Item must be identified
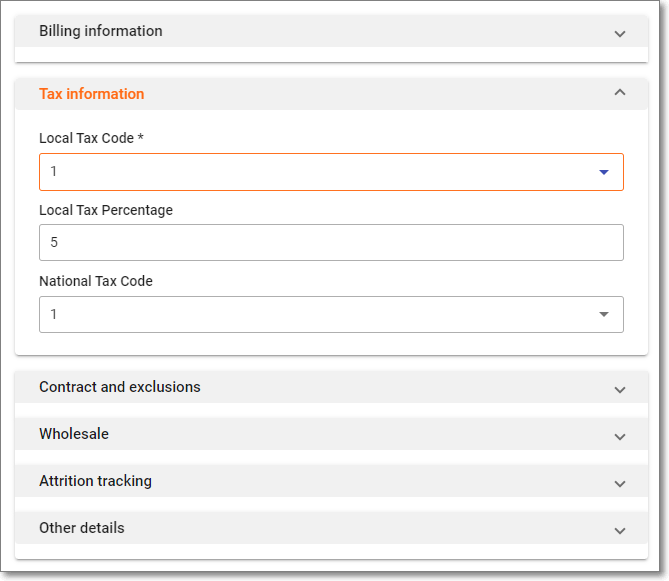
MKSynergy - Accounts Receivable - Add/Edit Recurring Revenue - Tax Information section
▪Local Tax Code - Use the Drop-Down Selection List to Choose the appropriate Sales Tax Code Sales Tax Rate Code (Y,N,1,2 or 3) representing the Sales Tax Rate that must be charged.
▪Local Tax Rate - The Sales Tax Rate will be inserted automatically based on the selected Local Sales Tax Rate Code.
▪National Tax Code - This field is only displayed if your Company has to charge a National Sales Tax.
o Use the Drop-Down Selection List to Choose the appropriate National Tax Code - Sales Tax Rate Code (N,1,2 or 3) representing the Sales Tax Rate that must be charged.
❖ Save - Tap (Click) on the Save button to record this information.
iv.Contract and Exclusions - Link this Recurring Revenue record to a specific Monitoring related Contract when appropriate.
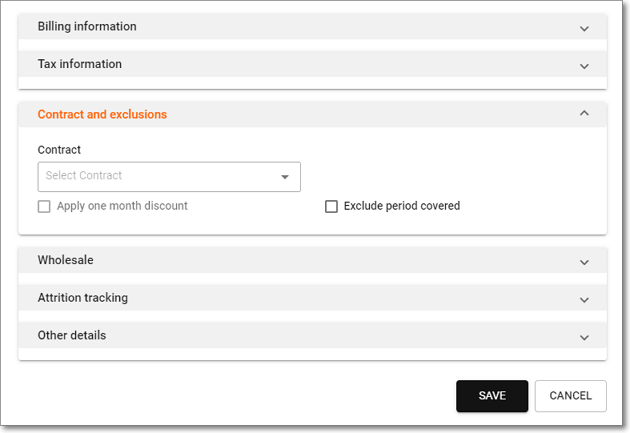
MKSynergy - Accounts Receivable - Add/Edit Recurring Revenue - Contract and Exclusions section
▪Contract - Each Subscriber may enter into one or more Monitoring related Contracts.
oIf this Recurring Revenue item is associated with one of those Contracts,
oUse the Drop-Down Selection List to Choose the appropriate Contract
▪Apply One Month Discount - If this Recurring Revenue item is being billed Annually, Check this box to provide One Month Free when paid annually
▪Exclude Period Covered - Check this box and the Monthly Rate and Number of Months being billed will not be printed on the Recurring Revenue Invoice - only the total Amount and Description
❖ Save - Tap (Click) on the Save button to record this information.
v.Wholesale - Group & Rate Information - For the Subscribers whose Monitoring Service is outsourced to a Contract Monitoring Provider,
▪Group - Enter that Company's Wholesale Group information using the Drop-Down Selection List provided
▪Rate - Enter the Wholesale Rate which is being billed by that Contract Monitoring Provider.
❖ Save - Tap (Click) on the Save button to record this information.
vi.Attrition tracking - Identify how this Recurring Revenue Item was Acquired, and/or How it was Lost.
▪Acquired - Use the Drop-Down Selection List provided to Choose the appropriate Revenue Acquired Attrition Type code that best explains how you got this Account.
▪Lost - Use the Drop-Down Selection List provided to identify the appropriate Revenue Lost Attrition Type code that best explains the reason why this Account was Lost.
▪Acquired Date - By default, this will be the Today but this may be changed, as appropriate.
oThis Date is used when calculating a Prorated Invoice for the time between the Acquired Date and the Start Date (entered above) when the Auto Billing process will generate the Subscriber's first Recurring Revenue Invoice for this service.
oUse the Drop-Down Calendar/Date Entry field to reset the Date, as appropriate.
❖ Save - Tap (Click) on the Save button to record this information.
vii.Other details - Enter the information as appropriate:
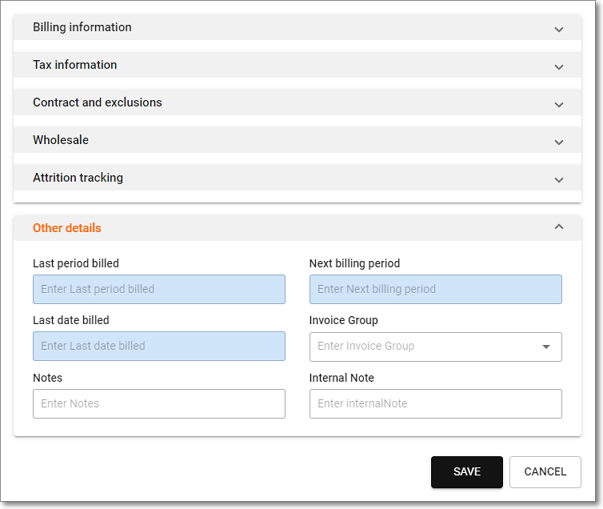
MKSynergy - Accounts Receivable - Add/Edit Recurring Revenue - Other details
▪Last Period Billed - The Month and Year in which Auto Billing was executed for this Recurring Revenue item (Read Only).
▪Last Date Billed - The Billing Date assigned to that Recurring Revenue item's Invoice.
▪Next Billing Period - The Month and Year in which Auto Billing should be executed for this Recurring Revenue item (Read Only).
▪Invoice Group - Invoicing Groups are provided for those Companies who have a large number of Accounts (Subscribers), many of whom are Invoiced for on-going monitoring and recurring maintenance services, and often these services are provided at multiple locations for varying sets of those recurring services.
oUnder these circumstances, the associated Recurring Revenue Invoices can become extremely long, complicated to read, and difficult to comprehend.
oWhen a Recurring Revenue Item should be grouped with other similar items to simplify and clarify the resulting Recurring Billing Invoices: the Summarize Recurring Items option is chosen on the Print Invoices dialog,
oUse the Drop-Down Selection List provided to Choose the appropriate Invoicing Groups Description from that list, when appropriate.
▪Note - Enter any comment or additional information for the service being billed.
oThis information is printed on the Recurring Revenue Invoice to clarify the purpose of the charge(s)
oThe additional information will be included on the Invoice when created and may include:
i.a Purchase Order Number,
ii.a more detailed Explanation of the Service being provided,
iii.any other Reference Information that will help the Subscriber better understand this recurring charge.
▪Internal Note - Enter any comment or additional information for internal use only. This information will NOT be printed on the Recurring Revenue Invoice
❖ Save - Tap (Click) on the Save button to record this information.
3)Payment Methods page - List, View, and Add additional Payment Methods
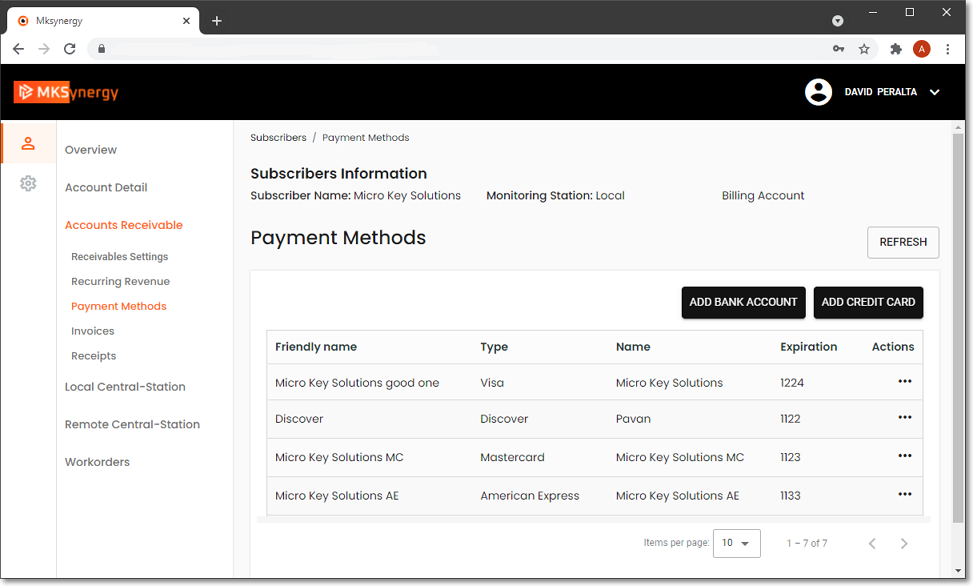
MKSynergy - Accounts Receivable Menu -Payment Methods page
a) ADD BANK ACCOUNT - Tap (Click) this button to add a new Bank Account Payment Method
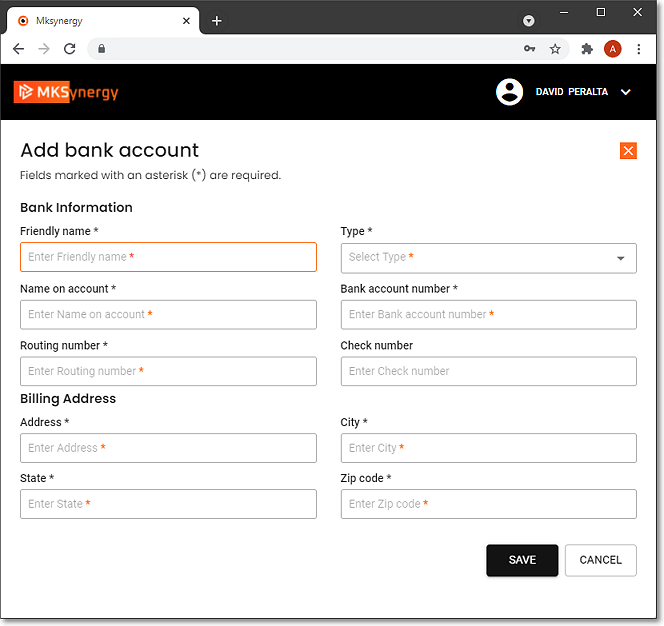
MKSynergy - Accounts Receivable Menu -Payment Methods - Add Bank Account page
▪Bank Information
i.Friendly Name - It is recommended that you enter a person or company name and some specific title (to differentiate it from other bank accounts that may be entered for the Subscriber)
ii.Type - Use the Drop-Down Selection Box provided to Choose the type of payment method being entered (Check. Electronic Transfer, Other)
iii.Name on Account - Enter the First and Last name, or if a purely business account, the Business name of the Account Holder.
oOnly alphabetic characters are permitted
oTherefore, No numbers or punctuation marks should be used (e.g., "2", "8", ",", ".", "-")
iv.Bank Account Number - Enter the bank account number
v.Routing Number - Enter the Routing Number for this Bank
vi.Check Number - Usually not entered
▪Billing Address
i.Address - Enter the bank statement's street (or PO Box) address for this Subscriber
ii.City - Enter the bank statement's city name for this Subscriber
iii.State - Enter the bank statement's state for this Subscriber
iv.Zip code - Enter the bank statement's Zip code for this Subscriber
❖ Save - Tap (Click) on the Save button to record this Bank Account information.
b) ADD CREDIT CARD - Tap (Click) this button to add a new Credit Card Payment Method
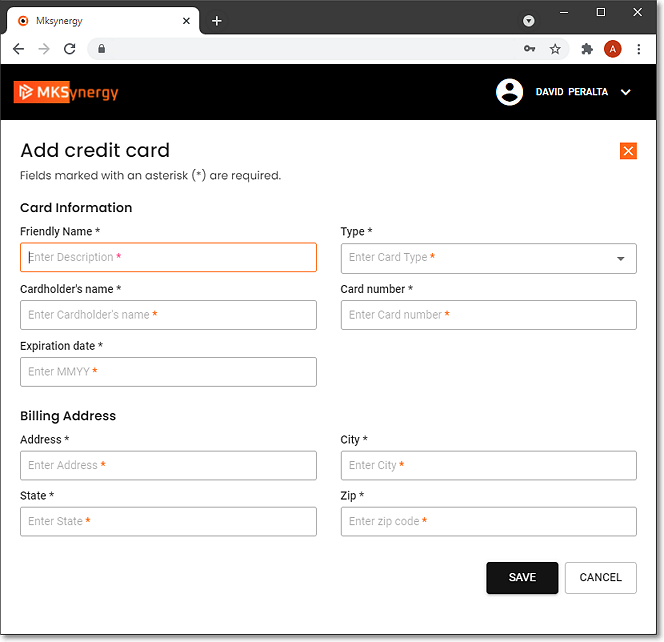
MKSynergy - Accounts Receivable Menu -Payment Methods - Add Credit Card page
▪Card Information
i.Friendly Name - It is recommended that you enter a person or company name and some specific title (to differentiate it from other Cred card accounts that may be entered for the Subscriber)
ii.Type - Use the Drop-Down Selection Box provided to Choose the type credit card being defined
iii.Cardholder's Name - Enter the First and Last name, or if a purely business account, the Business name of the Credit Card Holder.
oOnly alphabetic characters are permitted
oTherefore, No numbers or punctuation marks should be used (e.g., "2", "8", ",", ".", "-")
iv.Card Number - Enter the credit card number
v.Expiration date - Enter the credit card's expiration date (formatted as mmyy)
▪Billing Address
i.Address - Enter the street (or PO Box) of the credit card account's billing address
ii.City - Enter the credit card account's billing city name
iii.State - Enter the credit card account's billing State code
iv.Zip code - Enter the credit card account's billing Zip code
❖ Save - Tap (Click) on the Save button to record this Credit Card information.
c)Actions - Tap (Click) the Action Ellipse to access either of these Action options
i.View - Tap (Click) this option to view the data entered for an existing Bank Account or Credit Card Payment Method
ii.Delete - Tap (Click) this option to delete the data previously entered for a Bank Account or Credit Card Payment Method
4)Invoices page - displays a list of Invoices created for this Subscriber
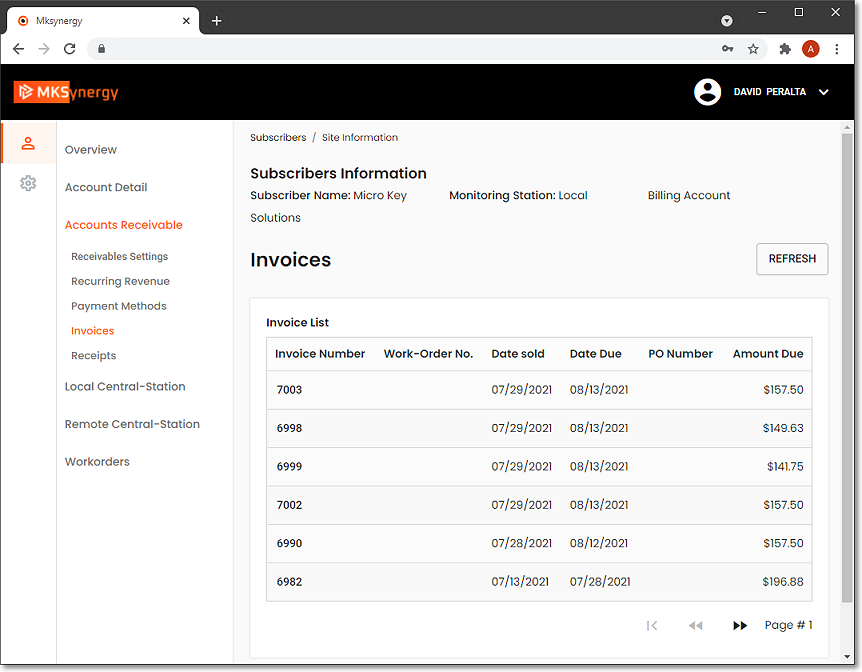
MKSynergy - Accounts Receivable Menu - Invoices page
a)View - Tap (Click) on a listed Invoice's Number to View its Invoice Detail page
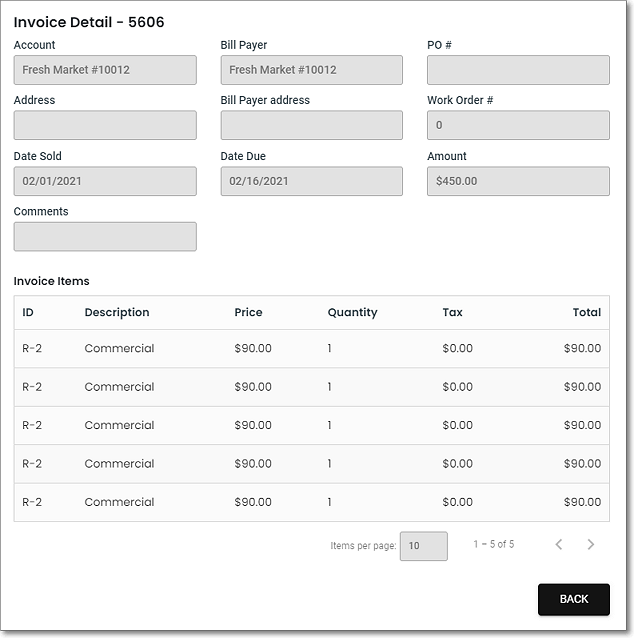
MKSynergy - Accounts Receivable Menu -Invoices - Invoice Detail page
❖ Back - Tap (Click) on the Back button to return to the Invoices page
5)Receipts page - displays a list of Receipts posted for this Subscriber
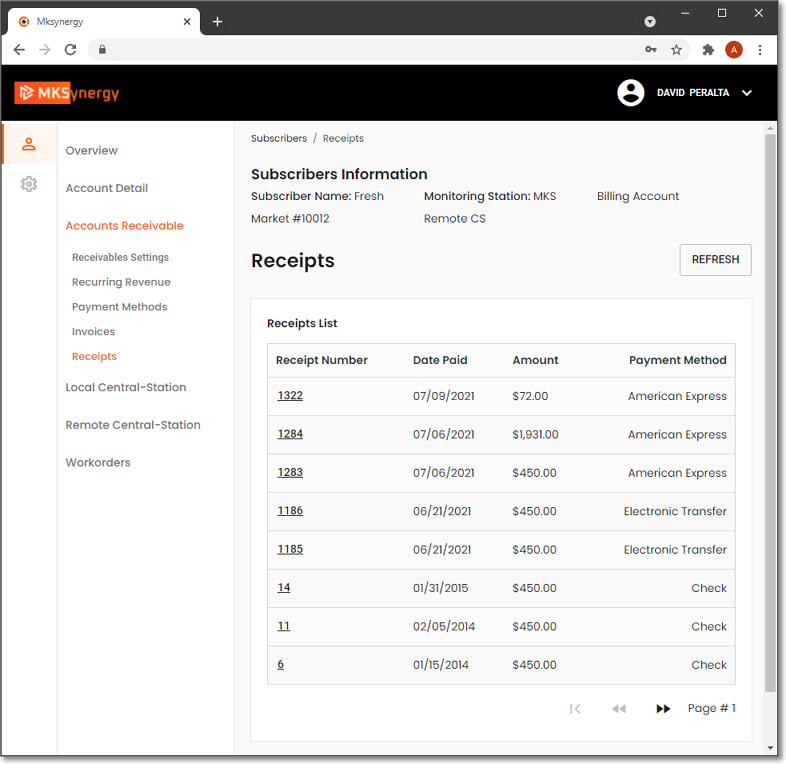
MKSynergy - Accounts Receivable Menu - Receipts page
a)View - Tap (Click) on a listed Receipt (underlined) Number to View its Receipt Details page
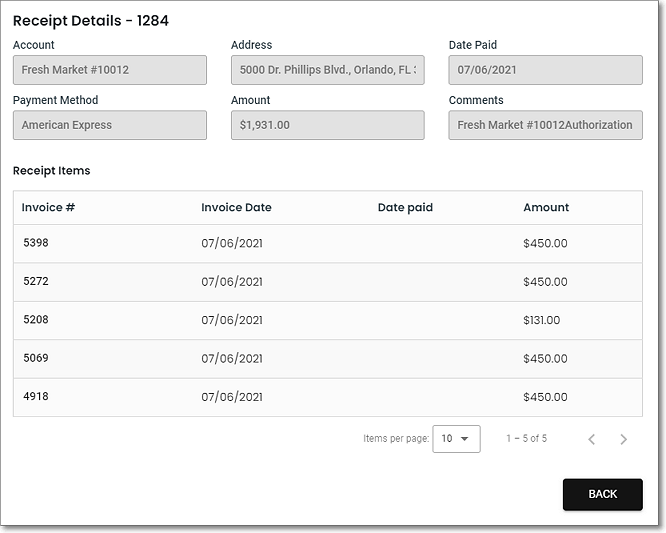
MKSynergy - Accounts Receivable Menu -Receipts - Receipt Details page
❖ Back - Tap (Click) on the Back button to return to the Invoices page
c.Local Central-Station - See the Central Station Options chapter for complete information
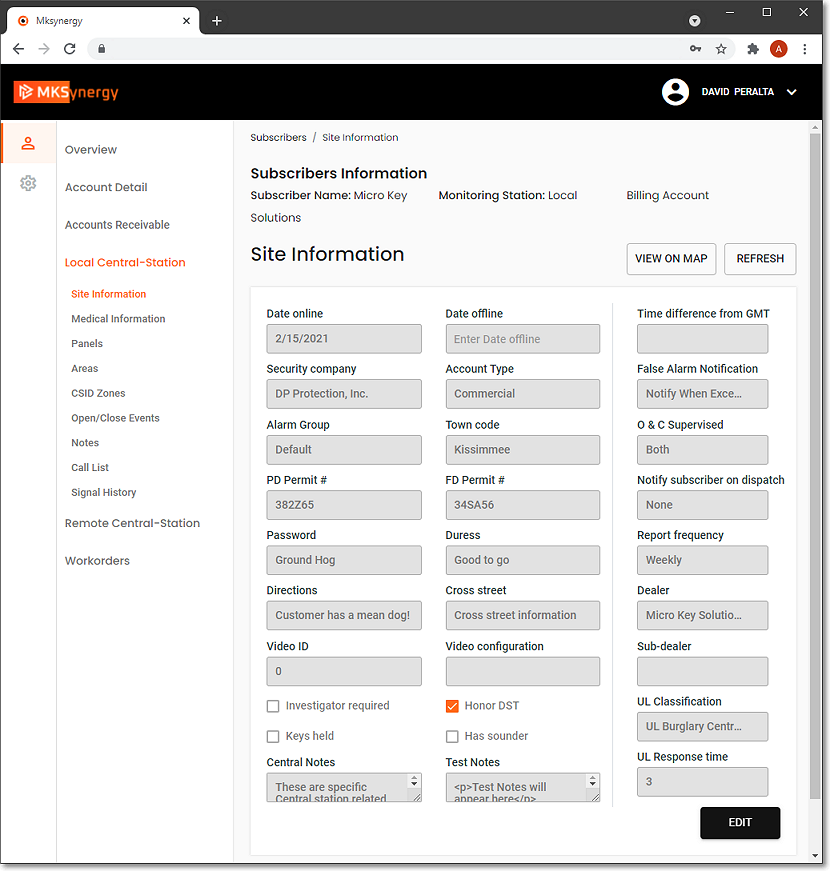
MKSynergy - Subscriber Information -Local Central Station Menu - Site Information page
d.Remote Central Station - See the Remote Central Station Options chapter for complete information
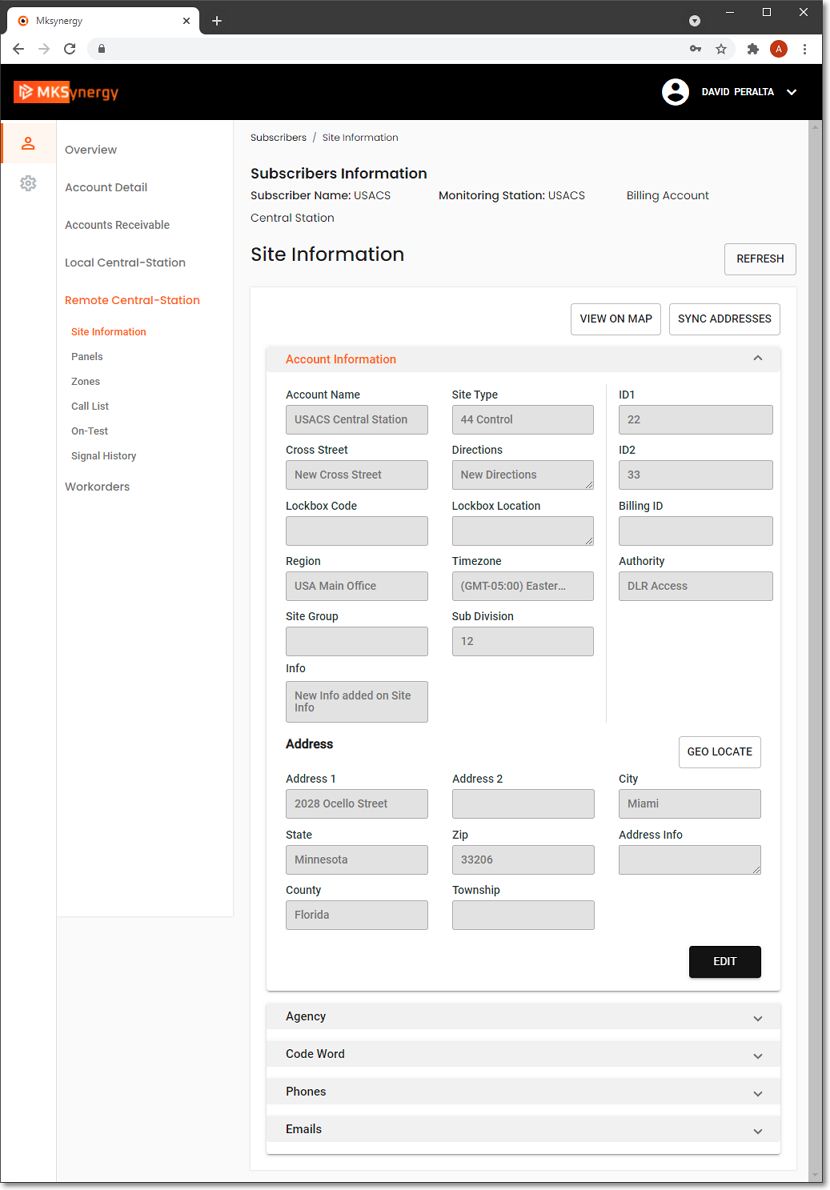
MKSynergy - Subscriber Information -Remote Central Station Menu - Site Information page - (STAGES example)
e.Work Orders page - This option displays a list of previously created Work Orders for the selected Subscriber
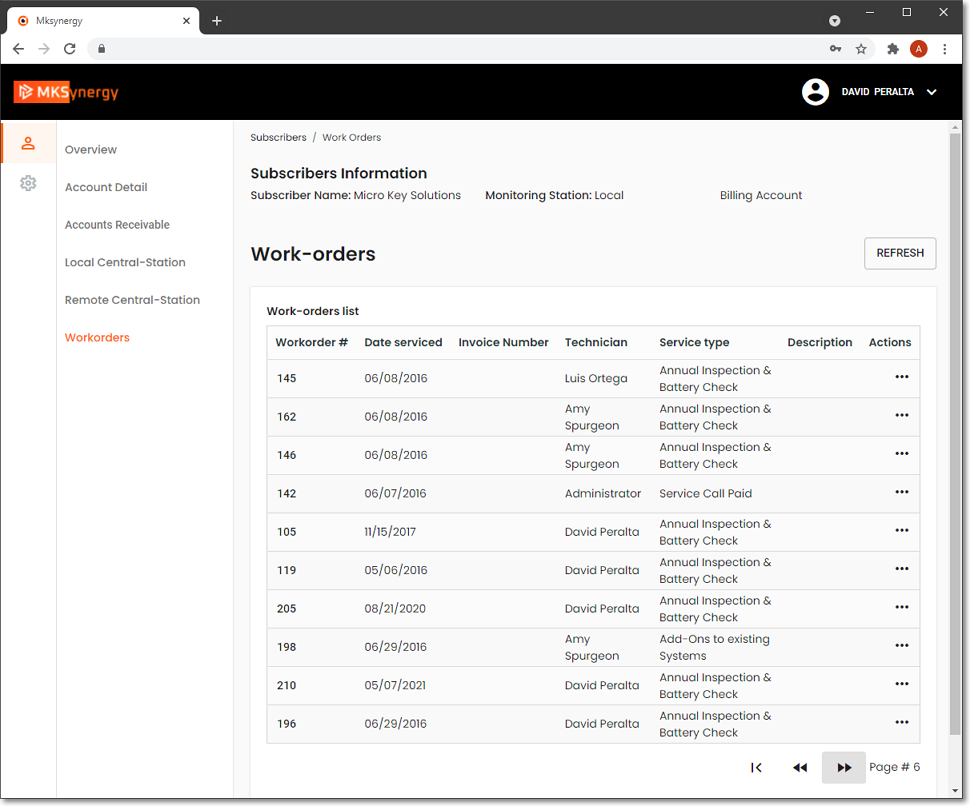
MKSynergy - Subscriber Information - Work-orders page
1)View - There are two ways to view the contents of a listed Work Order (Tap (Click) on the the Work Order Number or the Ellipse in the Actions column both of which will display the Work-order Details page which is Read-Only
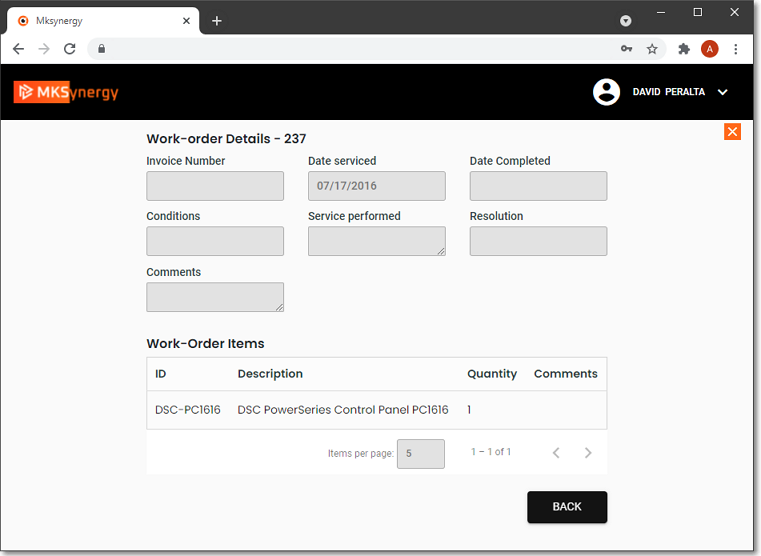
MKSynergy - Subscriber Information - Work-orders - Work-order Details page