❑You may Auto Draft Accounts for the payment of their their outstanding Invoices using an Electronic Funds Transfer process to charge their Credit Card or their Bank Account as the Payment Method.
•The Payment Method(s) each Subscriber has authorized may be entered in either of two ways:
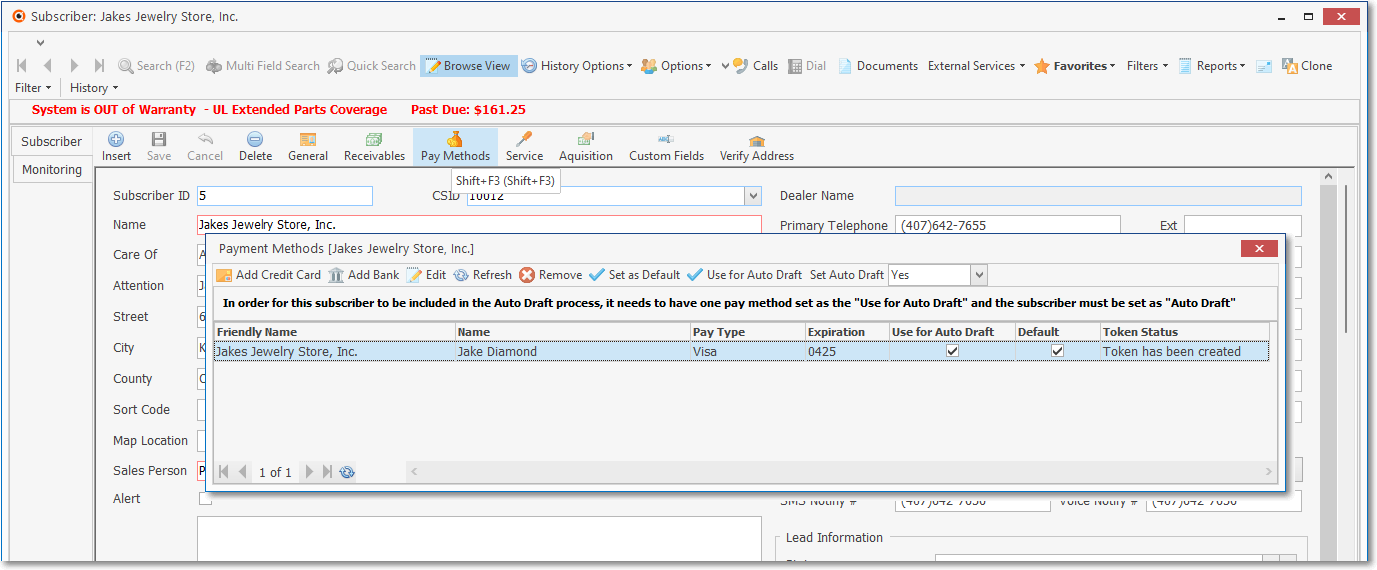
1)Select the Pay Methods option on the Receivables Menu on the Subscribers Form - which opens the Payment Methods dialog, or

Subscribers Form - Receivables Menu - Pay Methods option - Payment Methods Form
2)Choose the Pay Methods option within the Edit View of the Subscribers Form - which also opens the Payment Methods dialog
Subscribers Edit View - Pay Methods option - Payment Methods Form
•This Auto Draft Accounts Report provides a fully functioning Grid listing all previously defined Payment Methods, or listing only the Credit Card or only the Bank Account Payment Methods.
✓See the data grid chapter for more information about using the features of a Grid.
•There are two ways to access the Auto Draft Accounts dialog:
a)From the Backstage Menu System Select Reports and Choose Receivable Reports, or
b)From the Quick Access Menu, Select Reports and Choose Receivable Reports.
✓Then, Select the Auto Draft Accounts option.
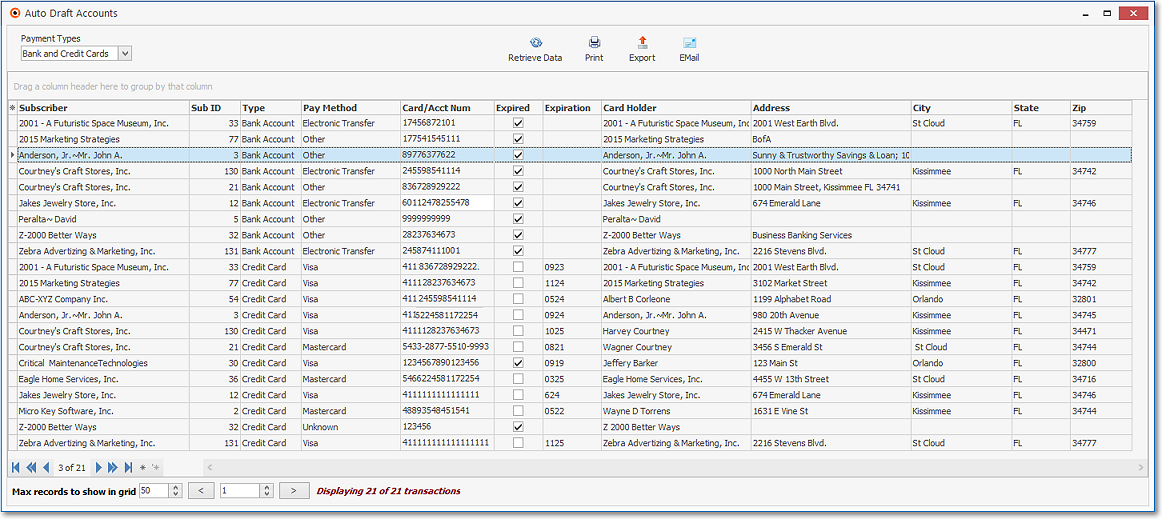
Auto Draft Accounts report grid
❑Auto Draft Accounts Report options

Auto Draft Accounts report options
•Payment Types - Identify what Payment Methods will be listed:
a)Bank and Credit Cards - Select this option to show each Account that is set up with any type of Payment Method
b)Bank Accounts Only - Select this option to only show those Accounts set up for Bank Draft payments
c)Credit Cards Only - Select this option to only show those Accounts set up for Credit Card payment
•Retrieve Data - Click this option to populate the Grid based on the Payment Types selection made above.
✓Now is the time to format, filter, sort, and/or reconfigured the listed data and columns, as needed
•Columns - Select which columns of data are to be displayed in the Customer Deposit Report:
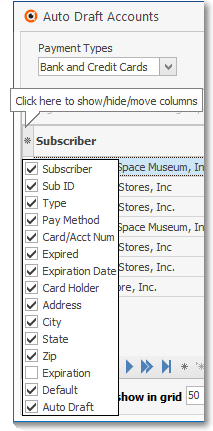
Available Columns
✓Click the asterisk (¬) at the left of the data grid's Header row (see the mouse pointer in the illustration above) to display a list of all of the column names - and associated data - which may be displayed.
✓By default, all Column Names will be Checked.
✓Remove the Check mark (Click on the Check to remove it) to hide that column of data from the data grid.
•Print - Once the data has been formatted, filtered, sorted and configured as needed, Click the Print Icon to see the Print Preview of the selected data.
•Export - Once the data has been formatted, filtered, sorted and configured as needed, Click the Export Icon to display the standard Windows® Save As dialog.
✓Exporting the data from this grid:
▪Export to CSV - Click the first button after the arrows to export the data to a Comma Separated Values (CSV) file format.
▪Export To XLS - Click the second button after the arrows to export the data to an Excel (.xls) file format.
▪Export To TXT - Click the third button after the arrows to export the data to an formatted text file.
•EMail - Once the data has been formatted, filtered, sorted and configured as needed, Click the EMail Icon to send this data as a PDF attachment to an Email address of your choosing.