❑The Accounts Payable As Of Form's List of outstanding Bills owed to, and Credit Memos issued by Vendors, and is presented as a Grid
a)It provides an anytime "look-back" and the related Aging information for any Outstanding Balance(s) owed to those Vendors
b)A Show Detail option offers a detailed view of what was purchased on the Bills making up the Outstanding Balance, and/or any Payments which have not been fully Allocated to Invoice(s).
c)The Vendor Form associated with any line on the List may be displayed.
d)Because the List of Vendors to whom your Company owes the Outstanding Balances is a Grid, it may be filtered, sorted, reconfigured, provide drill down information.
e)Produce (i.e., View, Print, Export) the Outstanding Balances data for any As Of Date (i.e., Today, or any previous Date in the past for which Bills (including Credit Memos), and Payment records have been entered in the MKMS Accounts Payable module.
❑When is this Look Back list needed?
•As part of an Accounting Period Closing process which includes the Accounts Payable module, typically an Accounts Payable Report is created (and printed to a File or on Paper) to record a snap-shot view of the Company's Payables which existed at that time.
✓When you don't have this "look-back" capability:
▪A reporting (accuracy) problem could occur if the typical type of Accounts Payable Report was not printed at the end of the month - before new Bills and/or Payments were recorded for the next month.
▪Thereafter, once Bills and/or Payments are posted for the following month, a complex process (i.e., reporting and deducting these new Purchases, and then reporting and deducting the new Payments) is required to recalculate what Accounts Payable Balance would have existed at the end of the previous month.
▪This becomes even more difficult as additional months pass before recalculating what the Accounts Payable Balance should have been at the end of an even "older" month.
•The solution to this problem is to use this Accounts Payable (As Of) dialog
✓The Accounts Payable (As Of) dialog provides:
i.A List of Vendors to whom your Company owes Outstanding Balances (i.e., a data grid with this information), plus
ii.Additional columns listing how long (old) those Outstanding Balances are, and
iii.A "look-back" capability so you can view that list of Outstanding Balances as it existed on any Date within any Month (now or in the past)
iv.Assuming that Bills (including Credit Memos), and/or Payment records have been entered within the MKMS Accounts Payable module prior to that Date.
✓Because this is a true Grid (see the Grids & Lists - Print Preview - Exporting Data chapter for much more information), it also offers the Filtering, Configuration, Sorting, Printing and Export capabilities that are inherently part of an MKMS based data grid - examples of which are discussed later in the chapter.
✓Again, the solution to this "how much did we owe on?" question is found in this Accounts Payable (As Of) dialog.
•To View, Print, and/or Export this Accounts Payable As Of Form:
a)From the Backstage Menu System Select Reports then Choose Payable Reports, or
b)From the Quick Access Menu, Select Reports then Choose Payable Reports
✓Click on the Accounts Payable option
❑Setting Up the Accounts Payable As Of dialog's data grid Options:
•As Of Date - Initially, the default As Of Date field is set as Today (until you make your selections and Select Print) which will provide an Aged List of all Outstanding Balances owed to Vendors as of Today.
Accounts Payable As Of Form - with Field selection options - all fields displayed
✓If the Accounts Payable Balance Due data for Today is not what needs to be seen (e.g., reported, saved as a PDF file, or exported), use the Drop-Down Calendar/Date Entry field provided to Choose whatever As Of Date is required.
✓The only restriction is that Purchases and/or Payments must have been recorded for the Date that is selected.
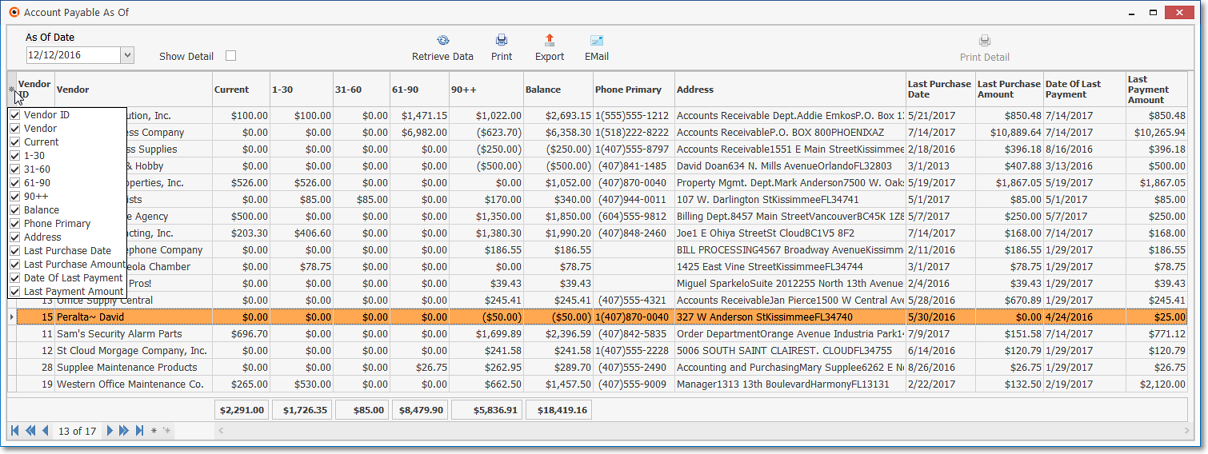
•Columns - Select which columns of data are to be displayed:
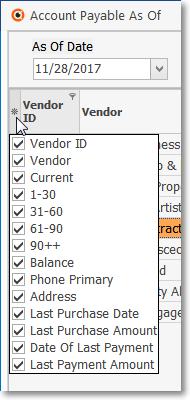
Available Columns
✓Click the asterisk (¬) at the left of the data grid's Header row (see the mouse pointer in the illustration above) to display a list of all of the column names - and associated data - which may be displayed.
✓By default, all Column Names will be Checked.
✓Remove the Check mark (Click on the Check to remove it) to hide that column of data from the data grid.
•Show Detail - Check this box to display a sidebar drill-down Grid that will list the two (2) Types of data: 1.) Bill and 2.) Payment transactions which are affecting the Outstanding Balance owed to the Vendor and therefore are being Listed.
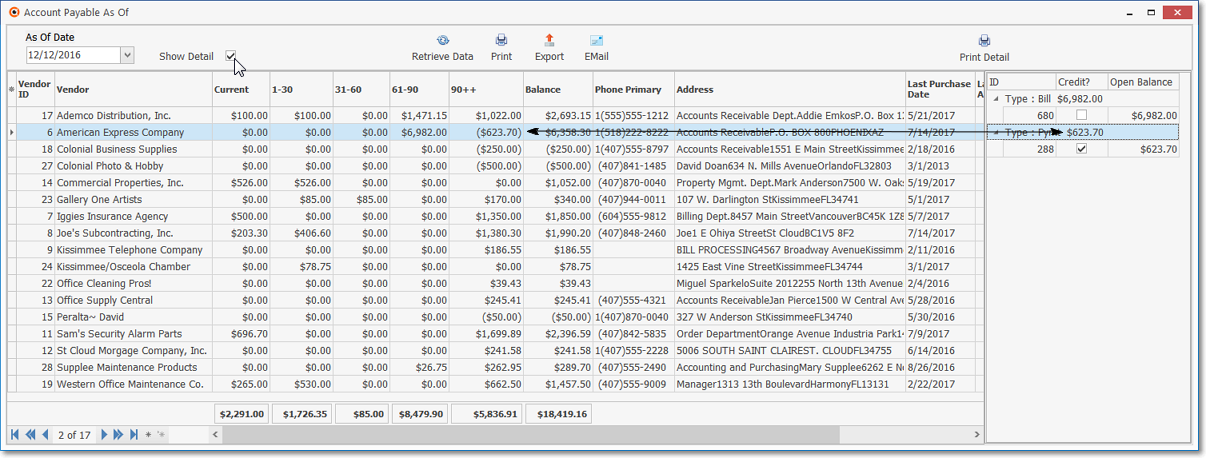
1.Bill - Click the small right arrow } next to the Type : Bill data line (see the image above) to display a List of all Bills and Credit Memos with an Outstanding Balance owed to the selected Vendor.
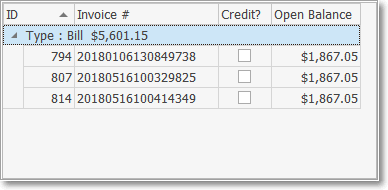
a.ID - The Bill's internal record Number listed numerically from lowest to highest.
i.Because this is also functional data grid, you may Click the ID Header Name to sort these Bills from highest (newest) to lowest (oldest) record Number.
b.Invoice # - The Bill's Invoice Number
c.Credit - The line item will be Checked if this is a Credit Memo.
i.Because this is also functional data grid, you may Click the Credit Header Name to list any Credits first, or last, as needed.
d.Open Balance - The Open Balance your Company owes (based on the As Of date entered - see "As Of Date" above) on this Bill (the original Total of the Bill less any Payments applied to it = Open Balance) .
i.Because this is also functional data grid, you may Click the Open Balance Header Name to sort these Bills from highest to lowest (or visa versa) Balance Due.
✓Double-Click on any Bill record Number to open and view that Bill Form.
✓Remove the Check from the Show Detail box to hide this sidebar drill-down Grid.
2.Payment - Click the small right arrow } next to the Type : Pymt data line (see the image above) to display a List of all Payments with a portion (or all) of that Payment not yet Allocated to a Bill.
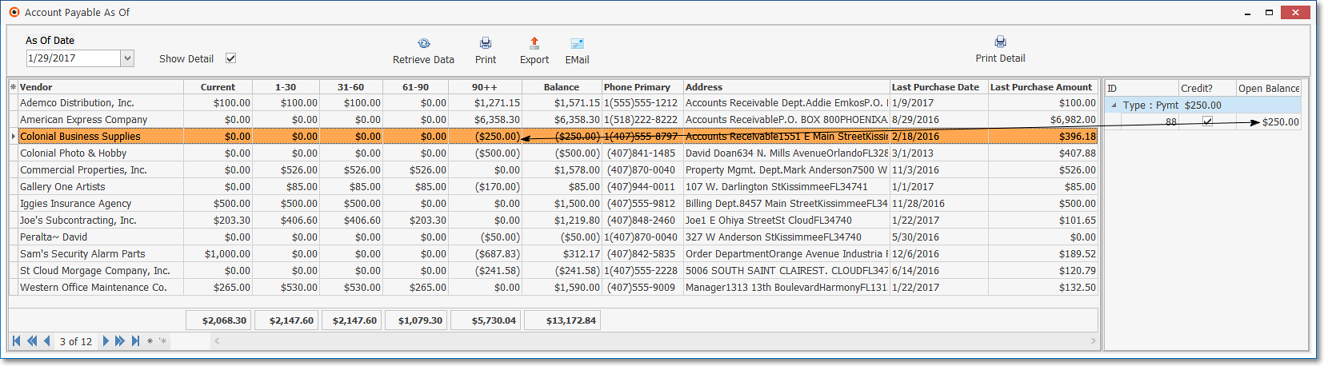
a.ID - The Record ID of the Payment listed lowest to highest (based on the system assigned record number).
i.Because this is also functional data grid, you may Click the ID Header Name to sort these Payments from highest to lowest record number.
b.Credit - The line item will be Checked because this will be a wholly or partially unallocated Payment.
c.Open Balance -The Balance of the Payment which has not been allocated to a Bill (based on the As Of date entered (the original Payment less any portion that has been Allocated = Open Balance).
ii.Because this is also functional data grid, you may Click the Open Balance Header Name to sort these Payments from highest to lowest (or visa versa) Open Balance.
▪Double-Click on any Record ID to open and view that Payments Form.
✓Remove the Check from the Show Detail box to hide this sidebar drill-down Grid.
•Retrieve - Once the As Of Date has been set, Click the Retrieve Icon to populate the Grid.
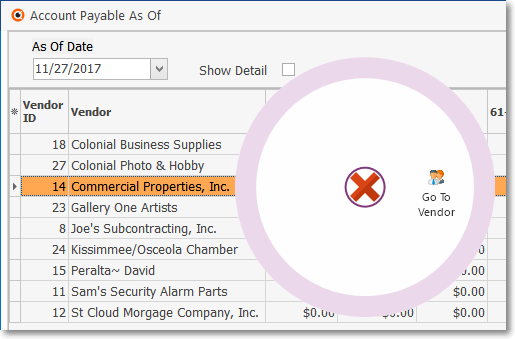
•Go To Vendor - Right-Click on any line item within the Grid to open the Radial Right-Click Menu to access the Go To Vendor option which will open the associated Vendor Form.
Accounts Payable As Of data-grid - Radial Right-Click menu
•Print - When the Accounts Payable As Of list has been formatted as needed, the User may Click the Print Icon to create a Print Preview.
✓See the "Printing the Accounts Payable As Of dialog's data grid " discussion at the end of this chapter for more information.
•Export - Once the data has been formatted, filtered, sorted and configured as needed, Click the Export Icon to display the standard Windows® Save As dialog.
✓See the data grid chapter for more information.
•EMail - Once the data has been formatted, filtered, sorted and configured as needed, Click the EMail Icon to send this data as a PDF attachment to an Email address of your choosing.
•Print Detail - If the Show Detail box was Checked (see Show Detail above), the Print Detail option will be available.
•Accessing the Vendor Form of any listed Vendor who is owed an Outstanding Balance
✓Double-Click on Vendor field to open and view that Vendor Form.
•Setting the Order in which the data in the grid is Listed within the Accounts Payable As Of Form (Report):
✓The default sorted order of the Accounts Payable As Of List is based on the second column in the List - the Vendor's Name - which is ordered from lowest to highest (1 - 9, a-z, then A - Z).
✓Thereafter, the column that determines the sorted order of the List may be easily changed, whenever needed.
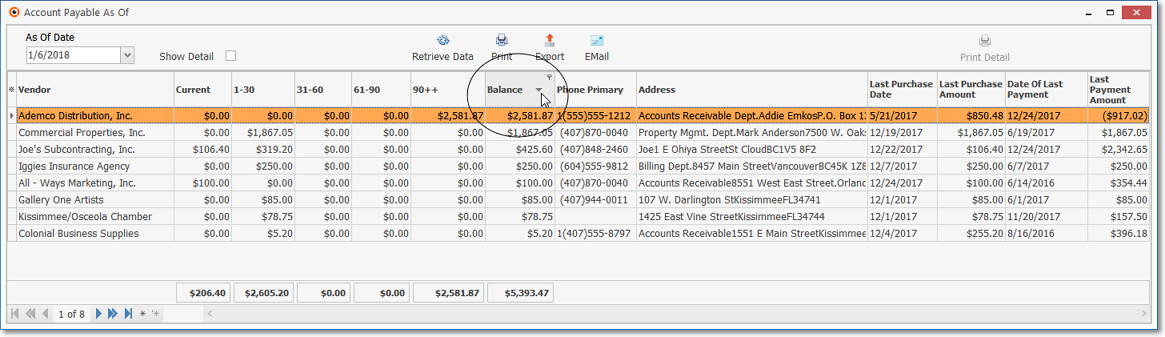
Accounts Payable As Of Form - Data Grid sorted by Balance - highest to lowest
✓To do so:
▪Click another column's Header Name (the mouse points to the sorting arrow within the Balance Header Name in the illustration above) to change the sorted order to by on that column of data, with the sorted order automatically set from lowest to highest (a-z or 1 - 9).
▪To change this newly selected column's sorted order from highest to lowest, Click that column's Header Name again.
▪An Arrow next to the Header Name indicates the column that is determining the sorted order of the Grid Data.
o~ indicates lowest to highest (a-z or 1 - 9)
o€ indicates highest to lowest (z-a or 9-1).
❑Creating various Custom Filters for the Accounts Payable As Of Form's data grid.
•Filtering the data that will be displayed in the grid:
✓Once the specific columns that are to be displayed have been chosen, and the sorted order in which those columns will be listed is set, then one or more additional filters may be applied to the listed data, if desired.
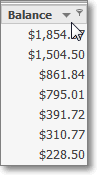
•Special Selection - Click the Special Selection Icon (see mouse pointer next to the Balance header name illustrated above) associated with that column's Header Name to display its associated Drop-Down Selection List
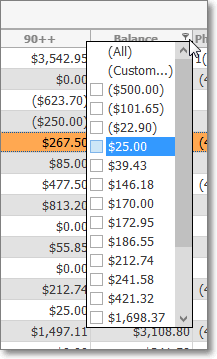
✓The List will contain the available options available for that column's Header Name
✓The List that is presented contains each item in that column (in this case, each Balance Amount)
✓In the example above, the Balance column will contain the list of available Amounts and a Check Box is positioned next to each Amount
✓Check each Amount that is to be included.
✓Any remaining un-checked Amounts will disappear from the Form's data grid.
•Sometimes the User may need a more refined method to Choose which Data will be included in the Accounts Payable As Of Form's data grid.
✓To accommodate this need, the Special Selection Icon's Drop-Down Selection List (see illustration below) also offers a "(Custom...)" option.
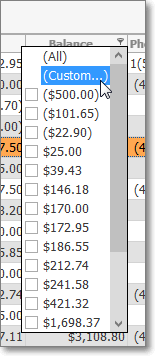
✓This Custom Filter option is available whenever the Special Selection Icon is displayed - which is anytime the mouse pointer is positioned over a Header Name in the Grid - and is accessed by Clicking that Icon and then Choosing the (Custom...) option.
•When the Custom Filter option is selected, the Custom Filter dialog is displayed.
✓The first filtering choice is "Show rows where" with the selected Header Name shown below.
✓If a previously defined Special Selection was entered for the selected column (as was documented and illustrated above), that Header Namet will be entered automatically as shown below.
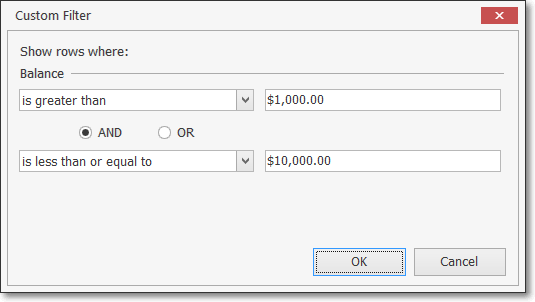
✓To (re-)define this initial filtering criteria, the User is requested to quantify how the selected column's data should compare to a value (or a different field) in one or two situations (e.g., one comparison, an OR comparison, or an AND comparison).
•Using the illustration below (unrelated to the illustration above and based on a column containing Dates rather than Amounts) as a training example, let's assume the User needs to see Purchases dated from 01/01/2016 through 02/29/2016 (the first two months of that year)
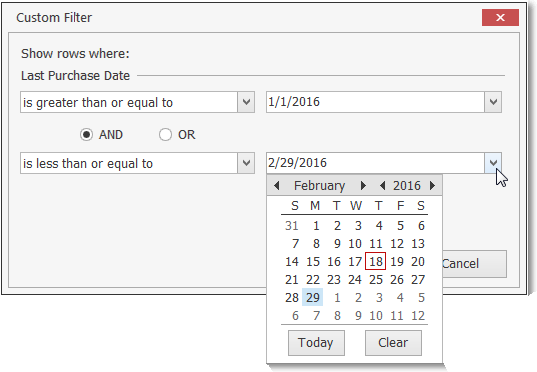
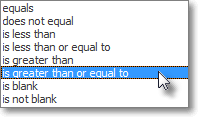
▪Using the first Drop-Down Selection List the User would choose the first "comparative" phrase from the list provided.
▪Then, the User would enter the value to be compared, and because the system knows it will be a Document's Date, it offers a Drop-Down Calendar/Date Entry field from which a Date may be chosen.
▪Next, the AND button is selected (by default) - but this may be changed, if appropriate; or ignored if no additional comparison is needed (e.g., any Purchase Dated after 01/01/2016 would be acceptable)
▪Assuming a comparison is needed (it would be in this case), use the second Drop-Down Selection List to choose the other "comparative" phrase from the list provided.
▪Finally, the User would enter the other value to be compared, and because the system knows it too will be a Document's Date, it offers a Drop-Down Calendar/Date Entry field from which a Date may be chosen.
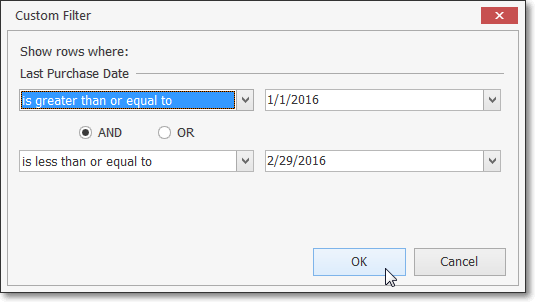
✓Click OK and the Custom Filter is implemented.
•When a Custom Filter is active, that Filter Criteria is displayed at the bottom of the Grid.
✓The User may Check and un-check the Filter Criteria box (see hand pointer in the illustration below) to quickly see the data differences when the filter is active, or inactive
![]()
✓To Cancel the Custom Filter, Click on the Close box on the bottom left side of the Filter Criteria line (see mouse pointer in the illustration above) and that Custom Filter will be canceled.
•Enhancing the Custom Filter:
✓Once defined, a Custom Filter may be further refined or expanded by Clicking the "Customize..." button at the bottom right side of the Filter Criteria line.
✓The Filter Builder dialog will be displayed with the original Custom Filter information already inserted..
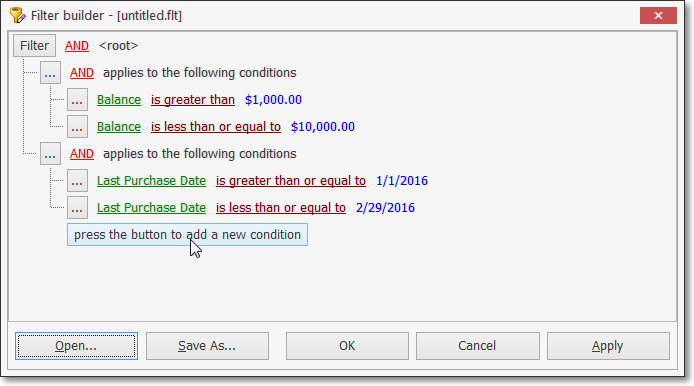
✓press the button to add a new condition - Click this button bar to insert a new filter line
▪By default, the first field name in the Header will be displayed (i.e., Vendor ID).
▪Click that Vendor ID field name to open a Drop Down Selection List of all available field names.
▪Choose the desired field name and it will replace the original default Vendor ID field name.
▪equals will be the default logic name displayed next to that field name.
▪Click that equals logic name to open a Drop Down Selection List of all available logic names.
▪Choose the desired logic name
▪Enter the appropriate condition Value.
✓Repeat this process as needed to define the filter that is needed.
✓Save - If you will need to use this exact filter again, Click the Save As... button and name this filter.
✓Apply - To implement this filer, Click the Apply button.
❑Printing the Accounts Payable As Of dialog's data grid:
•Print - Once you have:
a)Chosen which columns of data are to be included,
b)Set the order in which they are to be listed, related any columns (if appropriate),
c)Adjusted any column's width,
d)Then, you are ready to Print the resulting Accounts Payable Report.
•Click the Print Icon at the top of the Form to display the Print Preview dialog.
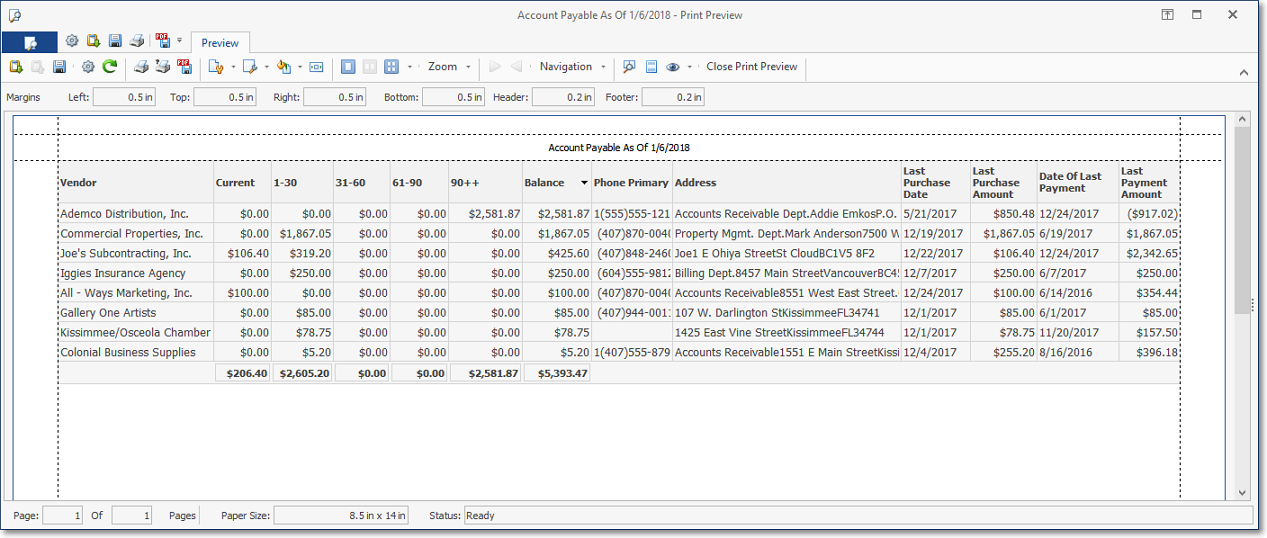
✓The Print Preview dialog will be displayed exactly as the data grid was formatted.
✓It is easy to Close the Print Preview, make formatting adjustments (if needed), then Click the Print Icon again until you have the Accounts Payable report displayed in the Print Preview dialog exactly as needed.
✓The example below illustrates how an Accounts Payable Report may ultimately be customized, formatted and printed (or exported as a PDF file).
•See the Grids & Lists - Print Preview - Exporting Data chapter for much more information about formatting and printing (and exporting) the Accounts Payable As Of Form's data grid