❑Anytime a Prospects Form is open, Click the History Options Icon on the Navigation section of its Ribbon Menu to display the History Options Menu.
•A History Grid may be displayed at the bottom for the Prospects Form and each User is able to customize the contents of the Account History Grid to include:
✓A Filter : All - or the option to pick one - of the various Types of Data Entries and Financial Transactions which have been entered for the currently selected Prospect.
✓A Date Range: Set the Time Frame within which the selected item(s) were posted
•This Account History Grid provides a complete and immediate listing of the previous Entries for this Prospect (i.e., Calls, Emails, Jobs, Proposals, Work Orders, and Emails).
![]()
•The History Grid may be displayed "Full-Screen" by Clicking the ..... (5 Dots) option just above the History Grid section.
✓To return the the normal "Split-Screen" view, Click the 5 Dots option again.
•The History Grid may be hidden by selecting Hide Grid on the History Options Menu.
❑Understanding the History Options Menu
•The three History Options are:
1. Filter - Choose this Grid Option to display a Drop-Down Selection List of the available Grid Data Filtering options
✓This will identify the type of transactional and data entry History which is to be included in the Grid.
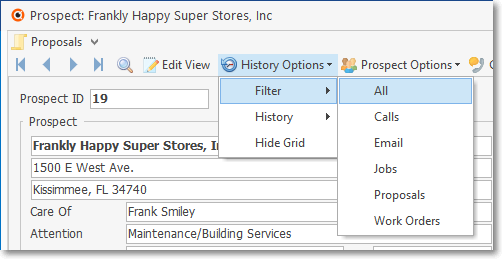
a.By default, All of the available Data (within the Data Types listed) will be included in the Grid.
b.However, the User may Select the specific Type of Data that should be included in the Grid.
2. History - Once the History Data Filtering option has been chosen, the Time Frame in which the chosen Grid Data was entered may be specified.
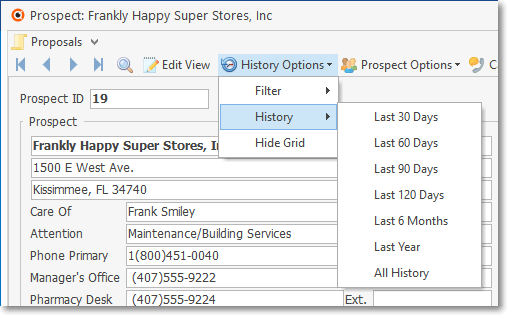
a.The is no default Time Frame.
b.Use the Drop-Down Selection List that displays the available Time Frames from which to Choose.
c.Consider the practical limitations of the number of records which can be effectively viewed and/or analyzed.

Prospects Form - History tab Grid
3. Hide Grid - Click the Hide Grid option to remove the History Grid from the Prospects Form.
▪This option becomes Show Grid when the History Grid is hidden and will be the only available option of the History Options Menu.
▪Show Grid may then be selected to re-display the History Grid, whenever needed.
•Contacts tab - The Contacts tab will list the Contacts records which have been associated with this Prospect.

Prospects Form - Contacts tab
❑Understanding the Power of the Prospects Form Data Grid - This History Grid (a sample of which is shown below) offers several ways to manipulate, and Print the Grid Data
![]()
➢Note: Remember, the Prospect History Grid may be displayed "full-screen" by Clicking the ..... (5 Dots) option just above the Prospect History Grid section.
•Setting the Order in which the Grid Data is Listed
✓The sorted order of the Grid is, by default, the Document Date listed from newest to oldest.
▪Click the Header Name (i.e., "Document Date") to change this sorted order to oldest to newest, and Click it again to return it to newest to oldest.
✓However, the column that determines the sorted order in which the data is listed may be easily changed, as needed.
▪Click another column's Header Name to change the sorted order to that column, with the sorted order automatically set from lowest to highest (a-z or 1 - 9).
▪To change this sorted order from highest to lowest, Click that column's Header Name again.
•Opening the associated Document - Double-Click on any Detail Line Item to display the Form associated with that History entry.

•Grouping the Grid Data - Grid Data may be separated into Groups based on a selected column's Header Name.
✓Click the Header Name (i.e., "Description" in the illustration below) and Drag that Header Name to the "Drag a column header here to group by that column" message area at the top of the Grid.
✓The Grid Data will be sorted by that Header Name and each unique example of that Header Name will be listed but the contents of each Group will be concealed.
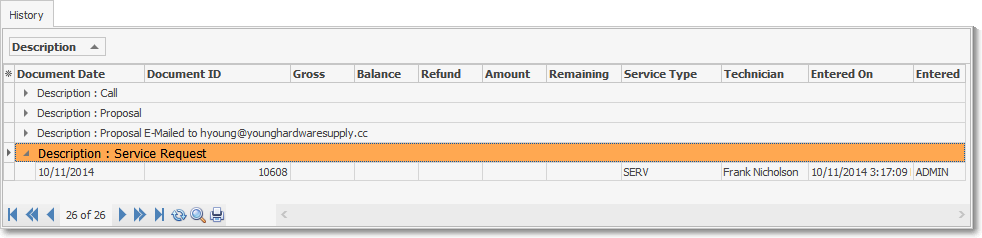
•Viewing each Group's Grid Data - Once a Grid has been sorted into Groups, each Group's Data may be displayed by Clicking the special Arrow to the left of a specific Group Name.
✓The mouse pointer in the illustration above shows the small Arrow to the left of the "Description:Cash Receipt" Group.
▪In the illustration above, the Group Description of Invoice orders the Document column from lowest to highest - in this case, the Invoice Number is the Document's type.
•Sorting each Group's Grid Data Detail
✓Once a Group's Grid Data Detail has been displayed, the sorted order of the Grid Data Detail may be reset by the User by Clicking the Header Name representing the desired sort order.
▪The sorted order of the Invoice Numbers may be reversed by Clicking the Document column (see the mouse pointer above).
▪To change this sorted order of the Grid Data Detail from highest to lowest, back to lowest to highest, Click that column's Header Name again.
•Limiting the specific Group(s) to be displayed, and/or the specific Grid Data Detail Items that are displayed, using the Special Selection Icon - ![]()
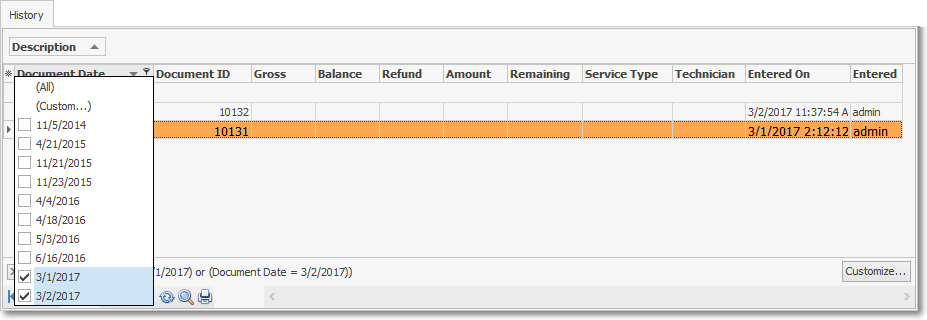
✓Click the Special Selection Icon associated with that column's Header Name (or Group's Name) to display its Drop-Down Selection List
▪The List will contain the available options for that specific column's Header Name (or Group's Name)
▪In the example above, the Document column contains the available items and a Check Box is positioned next to each item
✓Check each item that is to be included.
✓The un-checked items will disappear.
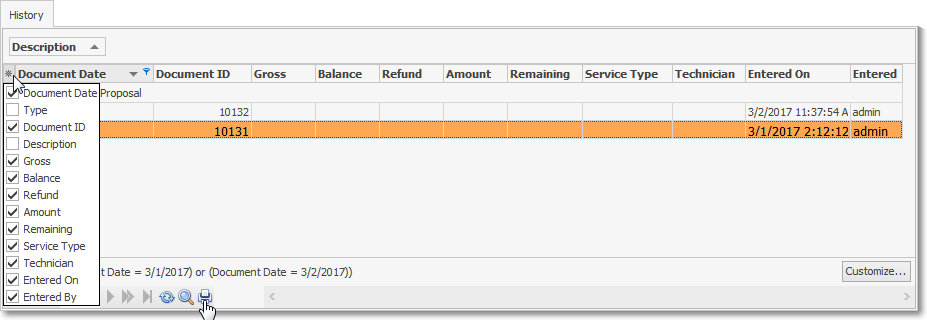
•Select which Header Names are to be Displayed:
✓Click the Asterisk at the top left of the History Grid's Header to show a list of all of the available Header Names that may be included in the History Grid.
✓Check each Header Name that is to be included (by default, all of the Header Names will be Checked).
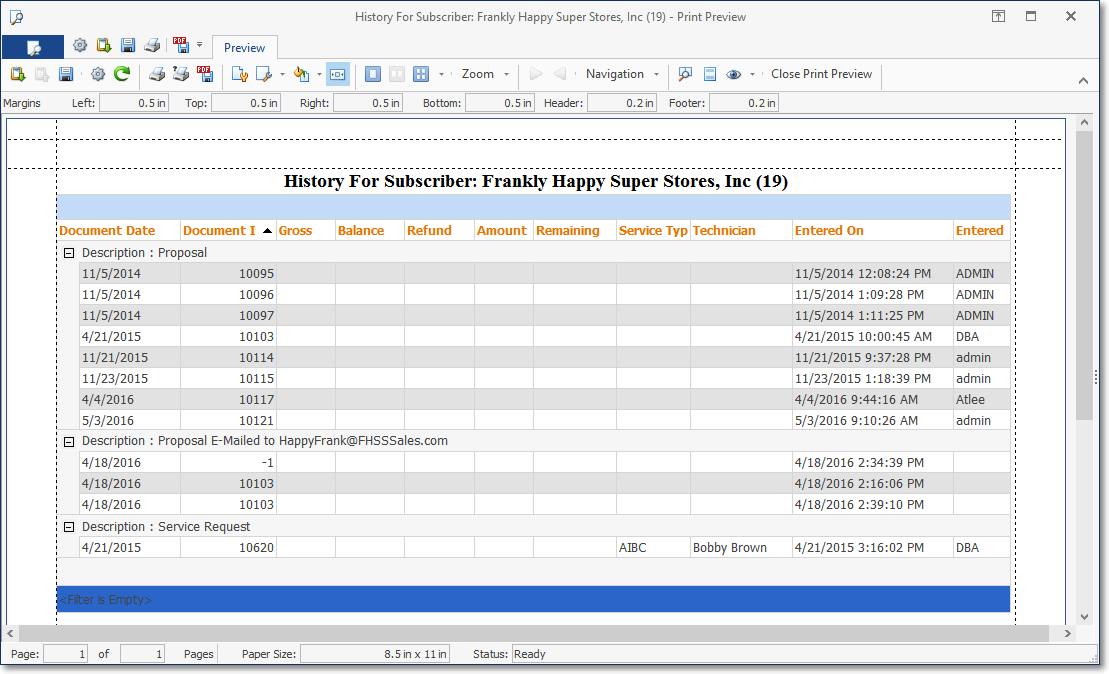
•Print - The Print option at the top of the Data Grid will provide a Print Preview of the data listed in the Grid as it is currently configured and filtered (see above).
❑Creating a Custom Filter for the Grid, a Group, and/or Grid Data Detail
•Sometimes the User may need a more refined method to Chose which Data Entries and/or Financial Transactions will be included in the Prospects Form Grid.
✓To accommodate this need, the Special Selection Icon's Drop-Down Selection List - described above - also has a "(Custom...)" option.
✓This Custom Filter option is available whenever the Special Selection Icon is displayed - which is anytime the mouse pointer is positioned over a Header Name in the Grid - by Clicking that Icon and then Choosing the (Custom...) option.
•When the Custom Filter option is selected, the Custom Filter dialog is displayed.
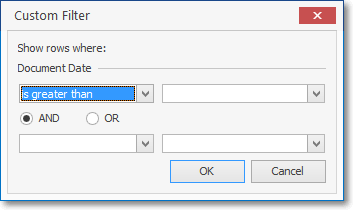
✓The first filtering choice is "Show rows where" with the selected Header Name shown.
•To define this initial filtering criteria, the User is requested to quantify how the selected column's data should compare to a value (or a different field) in one or two situations (e.g., one comparison or an and/or comparison).
✓Using the illustration below as a training example, let's assume the User needs to see Documents dated from 01/01/2014 through 06/30/2014 (the first half of that year)
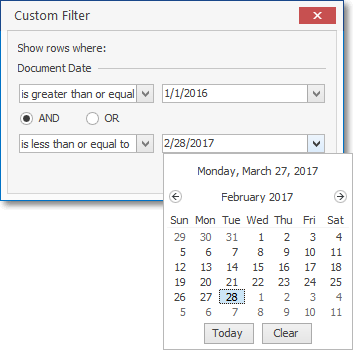
▪Using the first Drop-Down Selection List the User would choose the first "comparative" phrase from the list provided.
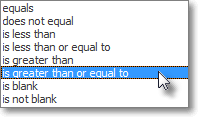
▪Then, the User would enter the value to be compared, and because the system knows it will be a Document's Date, it offers a Drop-Down Calendar/Date Entry field from which a Date may be chosen.
▪Next, the AND button is selected (by default) - but this may be changed, if appropriate; or ignored if no additional comparison is needed (e.g., any Document Dated after 01/01/2014 would be acceptable)
▪Assuming a comparison is needed (it wold be in this case), use the second Drop-Down Selection List to choose the other "comparative" phrase from the list provided.
▪Finally, the User would enter the other value to be compared, and because the system knows it too will be a Document's Date, it offers a Drop-Down Calendar/Date Entry field from which a Date may be chosen.
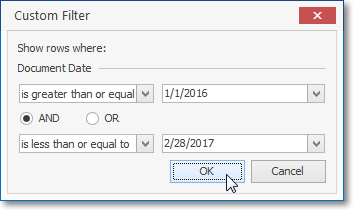
✓Click OK and the Custom Filter is implemented.
•When a Custom Filter is active, that Filter Criteria is displayed at the bottom of the Grid.
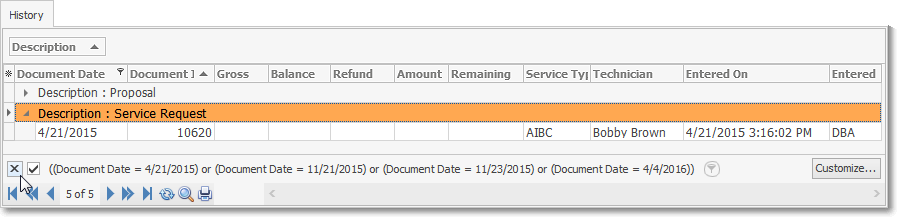
✓The User may Check and un-check the Filter Criteria to quickly see the data differences when the filter is active, or inactive
✓To Cancel the Custom Filter, Click the Close box on the left side of the Filter Criteria line (as shown above).
•Enhancing the Custom Filter:
✓Once defined, a Custom Filter may be further refined by Clicking the "Customize..." button at the bottom right of the Grid (which only appears if a Custom Filter is active - see arrow in the illustration below).
✓The Filter Builder dialog will be displayed with the original Custom Filter information already inserted.
✓Using the available Filter Builder tools, create the additional filtering needed to list the required data.