❑Using the Edit CSID page:
Web Dealer Access - Subscriber Information - Panels tab
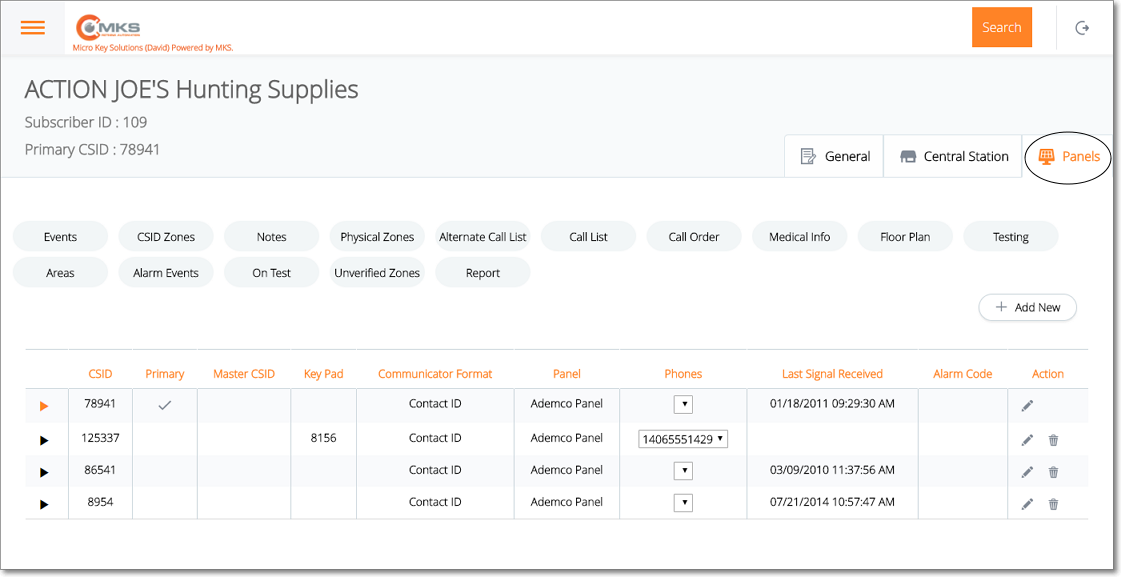
•On the Subscriber Information page select the Panels tab.
✓Once a new Panel CSID has been added, you will often need to edit that basic information to provide additional information.
•Tap or Click on the Panel CSID which is to be edited
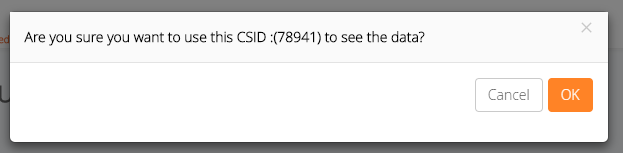
✓OK - Confirm that you want to edit this selected CSID.
•Edit - Tap or Click ![]() for the selected CSID to display the Edit CSID page of the Panels tab
for the selected CSID to display the Edit CSID page of the Panels tab

Web Dealer Enhanced Access - Subscriber Information - Panels tab - Edit CSID section
✓CSID - Unless you have logged in as the Dealer, the Subscriber's CSID which cannot be changed.
▪Modify the Subscriber's CSID (which may be up to 40 characters in length) if required.
✓Is Primary - Unless you have logged in as the Dealer, the Is Primary option cannot be changed.
▪Answer Yes if this CSID is the Primary CSID for this Subscriber - the one that is to be shown initially on the Subscriber Information page.
▪One, and only one, of the Subscriber Panel(s) CSIDs is designated as the Primary CSID.
✓Master CSID - Unless you have logged in as the Dealer, the Master CSID cannot be changed.
▪Use the Drop-Down Selection List provided to Choose from the list of the previously entered Panel CSIDs if required.
✓Alternate Call List CSID - Unless you have logged in as the Dealer, the Alternate Call List CSID cannot be changed.
▪The Alternate Call List CSID is used to attach an Alternate (additional) Contacts List of People To Call to the selected Subscriber Panel's CSID:
oUse the Drop-Down Selection List provided in the Alternate Call List field to Choose the CSID that has the desired People To Call List that is to be added to this CSID as a set of Alternate Contacts.
oThis selection may be a "real" Account, or a fictitious Account established specifically to hold a set of People To Call that may be used by a group of Accounts (e.g., Restaurant Chain, Sub Dealer, affiliated Big Box Stores, Convenience Stores, etc.) all of whom are being monitored by your Central Station.
✓Key Pad - Unless you have logged in as the Dealer, the Subscriber's Key Pad ID cannot be changed.
▪Modify the master Key Pad Code for this Control Panel.
✓Communicator Format - Unless you have logged in as the Dealer, the Communicator Format cannot be changed.
▪Use the Drop-Down Selection List provided to Choose from the list of the Communicator Formats the one that is being transmitted by the system's Control Panel.
✓Panel - Unless you have logged in as the Dealer, the Panel cannot be changed.
▪Use the Drop-Down Selection List provided to Choose from the list of the Installed Equipment Codes representing the Control Panel programmed with this CSID.
✓Last Signal Received At - This field is maintained by the system and represents the most recent signal received for this CSID.
✓Alarm Code - This field is maintained by the system and represents the most recent Alarm Condition Code received at the Central Station for this CSID.
✓Phone List - Unless you have logged in as the Dealer, the Phone List cannot be changed.
▪This is used to enter the telephone number(s) that will transmit their Caller ID when an Alarm Signal is sent.
+ Add New - Tap or Click this button to add a Phone Number
oPhone Number - Enter the numbers - no automatic formatting is implemented, nor required.
▪Repeat to add more Caller ID Telephone Numbers for this Panel, if additional ones may be used.
✓Save - Tap or Click the Save option to record any changes or updates to this information.
▪A confirmation message will be displayed when the changes have successfully been posted to the database.
▪Tap or Click the OK button to continue.