❑The General Journal Report provides - on a month by month (or selectable Date Range) basis - a report of all, or certain specified (i.e., by Bank, Transaction Amount, General Ledger Account Number, Division or Division Group) Financial Transactions that were manually entered using the General Journal Form.
•To access the General Journal Report dialog use either of these two methods:
a)From the Backstage Menu System Select Reports and Choose the General Ledger sub-menu, then Select the General Journal option, or
b)From the Quick Access Menu, Select Reports and Choose the General Ledger sub-menu, then Select the General Journal option.
❑ General Journal Report tabs - There are three tabs on the General Journal Listing report dialog.
•Options - Initially only the Options tab is shown (until you make your Options selections and Select Print).
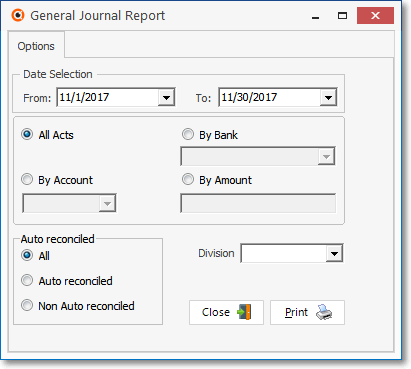
General Journal Report - Options tab
✓Date Selection - Enter the Date Range for this report:
▪From: - By default, the first Day of the current Month is inserted.
oUse the Drop-Down Calendar/Date Entry field to Choose the desired starting Date.
▪To: - By default, the last Day of the current Month is inserted.
oUse the Drop-Down Calendar/Date Entry field to Choose the desired ending Date.
✓All Accts - By default, All General Ledger Account Numbers for all Financial Transactions entered using the General Journal Form will be included in the report.
✓By Bank - By default, Financial Transactions posted to the to any Bank's assigned General Ledger Account Number will be reported.
▪Click this button to include only those General Journal Entries containing Financial Transactions Debiting or Crediting the General Ledger Account Number assigned to a selected Bank.
▪Bank - Use the Drop-Down Selection List to Choose that Bank.
✓By Account - By default, Financial Transactions posted to any General Ledger Account Numbers are reported.
▪Click this button to list only those General Journal Entries containing Financial Transactions for a designated General Ledger Account Number.
▪Account - Use the Drop-Down Selection List to Choose that General Ledger Account Number.
✓By Amount - By default, Financial Transactions posted for any Amount will be reported.
▪Click this button to include only those General Journal Entries for Financial Transactions containing a designated Amount.
▪Amount - Enter that Amount in the field provided (only Numbers and a Decimal Point are permitted).
✓Auto reconciled - Indicate which report content is required:
▪All - All General Journal Entries (for the specified dates, etc.) will be included in this General Journal Listing report.
▪Auto reconciled - Only those General Journal Entries with a Check in the Auto Reconcile column (for the specified dates, etc.) will be included in this General Journal Listing report.
▪Non Auto reconciled - Only those General Journal Entries without a Check in the Auto Reconcile column (for the specified dates, etc.) will be included in this General Journal Listing report.
✓Division - By default, Financial Transactions posted within any Company Division or Division Group will be reported.
▪Use the Drop-Down Selection List to Choose the specific Division or Division Group (both will be included in the Selection List) that is to be reported.
✓Print - Click the Print button ![]() to Preview and optionally Print (to a File or a Printer) this General Journal Listing.
to Preview and optionally Print (to a File or a Printer) this General Journal Listing.
•The Preview tab presents the report which resulted from the Options you've selected.
✓Up Arrow/Down Arrow - hi - Moves the report one line up, or one line down, respectively.
✓Page Up/Page Down - Moves the report to the previous or next page, respectively.
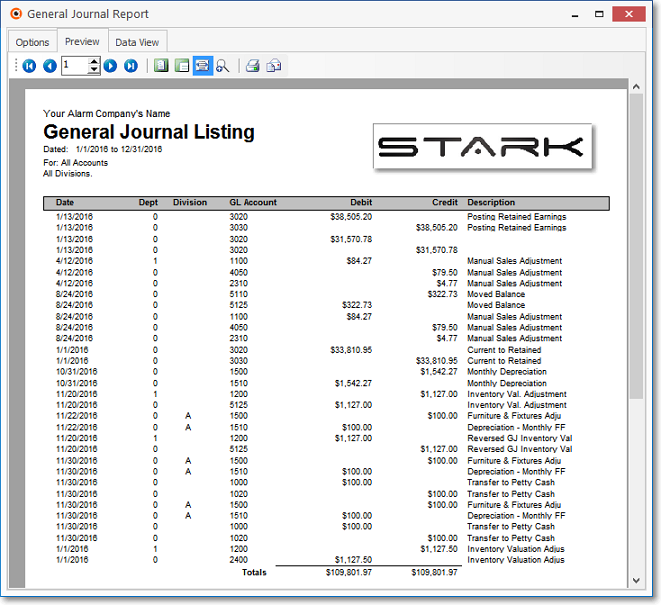
General Journal Report - Preview tab
✓Arrows - The arrows allow you to move back and forth, from page to page.
✓Number - Indicates the page number you are viewing.
▪You may also type in a specific page number, Press 8 Enter and that page will be displayed immediately.
▪If you enter an invalid page number, it will be ignored.
✓Fit To Page - Click the first button after the arrows to size a full page of the report to fit the screen.
✓Zoom To 100% - Click the second button after the arrows to display the page at 100% (of the printed view).
✓Fit To Page Width - Click the third button after the arrows to size the page of the report to fit the full width of the screen.
✓Zoom To Percentage - Click the fourth button after the arrows to re-size the page of the report by percentage.
![]()
▪When you Click the Zoom To Percentage button, the Percentage selector will be displayed.
▪You may then Click the Up or Down ‚ arrows to set the exact amount of Zoom you want.
✓Print - Click the Print button to Print (to a File or a Printer) ![]() the displayed General Journal Report, and may also be converted to a PDF or various other types of documents, or into an Excel® Spreadsheet file.
the displayed General Journal Report, and may also be converted to a PDF or various other types of documents, or into an Excel® Spreadsheet file.
✓Email - Click the Email button ![]() to send the Report to an Email Address of your choosing.
to send the Report to an Email Address of your choosing.
✓To Exit the Preview tab and Close this Report dialog Form, Click the Close ![]() box on the right at the top of the Preview tab.
box on the right at the top of the Preview tab.
•Data View - This view provides a tabular (spreadsheet style) presentation of the selected data.
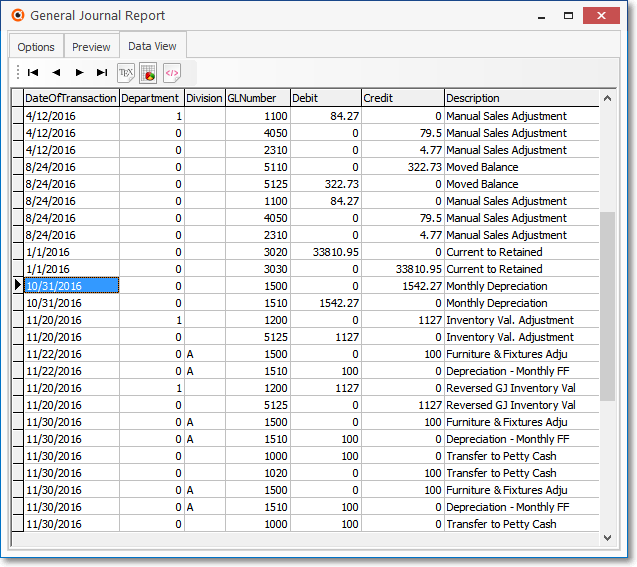
General Journal Report - Data View tab
✓Arrows - Click the arrows to move through the record.
✓Export - Exporting the data from this Data View tab (note the "fly-over" help available on these buttons):
▪Export to CSV - Click the first button after the arrows to export the data to a Comma Separated Values (CSV) file format.
▪Export To Excel - Click the second button after the arrows to export the data to an Excel (.xls) file format.
▪Export To Html - Click the third button after the arrows to export the data to an HTML formatted file.
✓To Exit the Data View tab and Close this Report dialog Form, Click the Close ![]() box on the right at the top of the Data View tab.
box on the right at the top of the Data View tab.