❑There are many types of Email Account Settings that may need to be defined for your Company's Employees.
•This Email Accounts Form contains the fields representing the data required by most Email protocols that may be implemented.
✓This information must then be assigned to each Employee who will be sending/receiving Reports, Invoices , Proposals, Work Orders, Statements, etc., via Email using a Mail Server other than Microsoft® Outlook®.
✓If no SMTP Setup data is identified for an Employee who is sending/receiving Reports, Invoices, Proposals, Work Orders, Statements, etc., via Email, the system will default to using Microsoft® Outlook® (and/or Outlook Express®), if available.
➢Note: The SMTP Account Settings were previously identified individually, on an Employee by Employee basis in the SMTP Setup tab on the Employees Form.
With the MKMS 5.1.35.8400 release, this Email Accounts Form is now used to create these SMTP definitions.
Once created, the appropriate Email Account definition may simply be assigned to any Employee in the revised SMTP Setup tab
❑To create an Email Account Setting,
a)From the Backstage Menu System Select Maintenance and Choose the General option, then select the General Maintenance option which displays the secondary Communications Menu, or
b)From the Quick Access Menu, Select Maintenance and Choose General Maintenance to display the secondary Communications Menu.
✓Once the Communications Menu is displayed, Choose the Email Accounts option.
✓The Email Accounts Form will be displayed
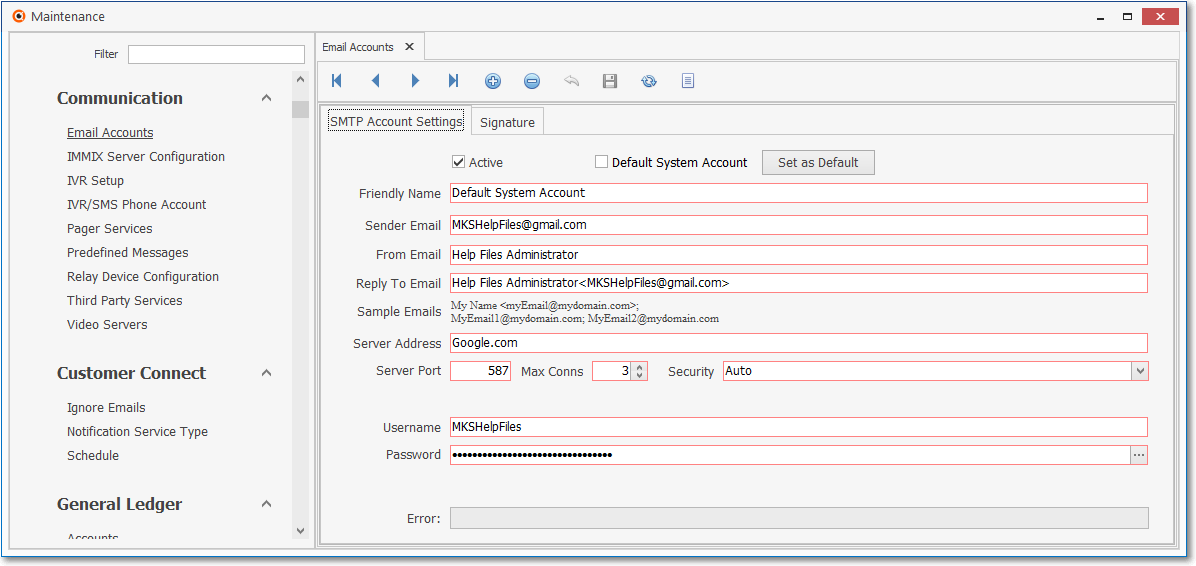
Email Accounts Form
✓This Email Accounts Form may be Re-sized by Dragging the Top and/or Bottom up or down, and/or the Right side in or out.
•Navigation Menu - The Navigation Menu is located at the top of the Email Accounts Form.

✓This Navigation Menu provides the normal Record Movement, New, Edit, Delete, Cancel, Save, and Refresh options; as well as special Print and Search functions.
•Record Editing section - The details of the currently selected record are displayed below the Navigation Menu at the center (Main Body) of the Email Accounts Form.
Email Accounts Form - Record Editing View with Email Account entry
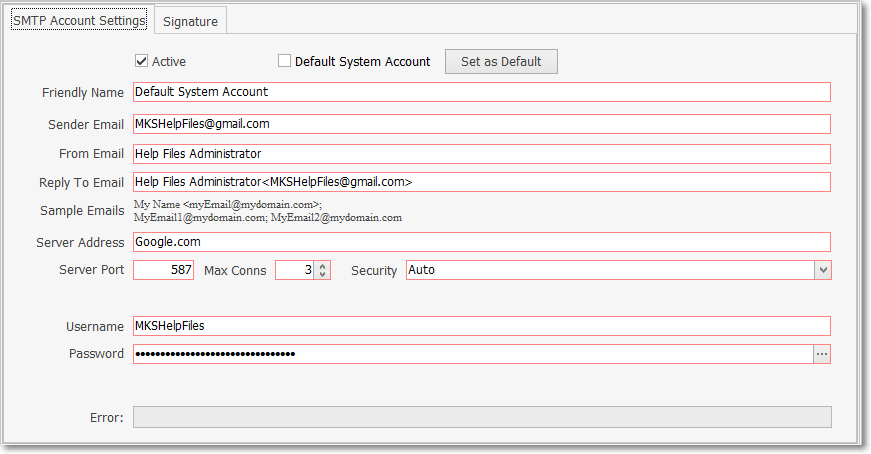
Email Accounts Form - SMTP Account Settings - Record Editing View
•To define the required Email Accounts, Choose the SMTP Account Settings tab then Click the ![]() Icon to start the Email Accounts entry in the Record Editing section.
Icon to start the Email Accounts entry in the Record Editing section.
✓Active - Check this box to activate the entry
✓Default System Account - Checked for the Default System Account record
✓Set As System Default - To make this new record the System Default, Click this button
▪Certain fields must be defined before this option may be selected.

✓Friendly Name - Enter a Name for this Email Account to differentiate it from the others
✓Sender Email - Enter the Email address of the Sender
✓From Email - Enter the Name of the Sender
✓Reply To Email - Enter the Email address to which a Reply is to be sent
✓Sample Emails - Email entry's illustrative samples
✓Server Address - Enter the Server address of the Email Account
✓Server Port - Enter the Port address for the Email Account
✓Max Conns - Enter the maximum allowable number of connections
✓Security - Using the Drop-Down Selection List provided, select the appropriate Security Protocol

✓User Name - Enter the User Name for this Email Account
✓Password - Enter the Password for this Email Account
✓Error - System presents this information when appropriate
✓Set/Remove as Default for CS - This is (or is not) the default account for CS
▪Click this button to identify this SMTP Account Setting record as the default for your Company's Central Station
▪When this SMTP Account Setting record has already be identified as the default for your Company's Central Station, Click this button to remove (cancel) that assignment
▪When removing this CS assignment, a Confirmation Message with Yes/No buttons will be presented.
✓Set/Remove as Default for Management - This is (or is not) the default account for Management
▪Click this button to identify this SMTP Account Setting record as the default for your MKMS program
▪When this SMTP Account Setting record has already be identified as the default for your MKMS program, Click this button to remove (cancel) that assignment
▪When removing this MKMS assignment, a Confirmation Message with Yes/No buttons will be presented
✓Click the ![]() Icon to record this Email Account entry.
Icon to record this Email Account entry.
✓Repeat this process, as needed, to define each required Email Account.
•To enter Signature information, Choose the Signature tab
✓HTML Signature - Create an HTML Signature, if desired
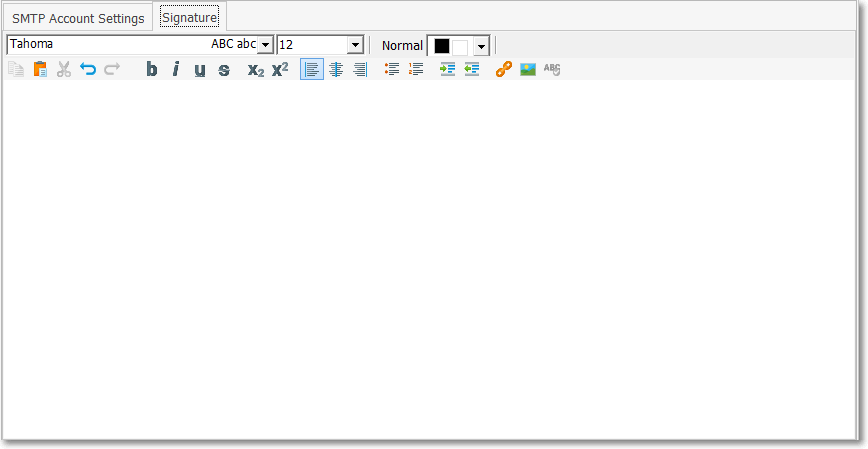
Email Accounts Form - Signature tab - Record Editing View
✓This Signature tab provides a modified set of Rich Text Editing capabilities
![]() List Icon - The Navigation Menu also has a List option which provides a tabular view of these Email Accounts records.
List Icon - The Navigation Menu also has a List option which provides a tabular view of these Email Accounts records.
✓Click the List Icon to display the associated Grid Data.
✓The columns of Grid Data may be rearranged, filtered, sorted, and exported as a PDF file and/or an Excel formatted file.

✓Find - Enter text to search for a specific record, then Click the Find option.
✓Clear - To remove the text to search for entry, Click the Clear option

Navigation Menu shown with the List Options for Export & Print
✓Click the List Icon again to Close the List View and return to the Record Editing View.
❖See the Grid & Lists - Print Preview - Export Data chapter for complete information on using the List View, including its Export & Print options.