❑Entering a New Appointment -
•The Employee Calendar Form is accessible three ways:
a)From the Backstage Menu System Select the Maintenance Menu then Click Employee Calendar.
b)From the Quick Access Menu, Select the Maintenance Menu then Click Employee Calendar.
c)On the Shortcuts Tab on the MKMS Desktop Select the Employee Calendar Icon.
•Select the Day View tab.
✓If more than one Employee's Schedule is being displayed, Select the appropriate Employee's column.
✓Click the time slot for the proposed appointment.
•Click the New Icon.
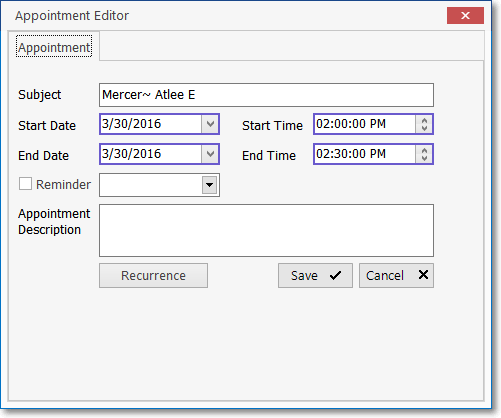
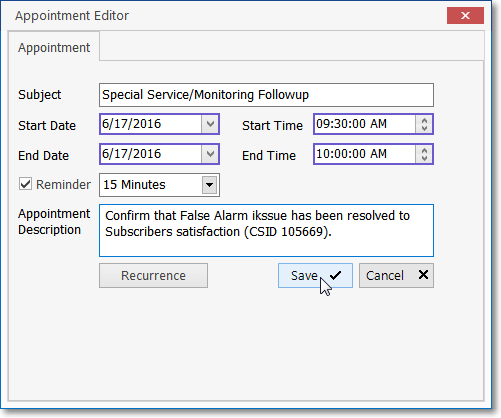
Employee Calendar - New Appointment Form
•The New Appointment dialog will be displayed.
•Subject - By default, the selected Employee Name will be displayed.
✓Replace This Name with an actual Description of, or the Purpose for, this Appointment.
✓Enter up to 40 characters: including Upper and lower case letters, numbers, spaces and/or punctuation marks.
•Start Date - By default, this will be Today. Use the Drop-Down Calendar/Date Entry field to Choose a different date, if necessary.
•Start Time - By default, this will be the time slot selected when this New Appointment Form was opened. Modify as needed.
•End Date - By default, this will be Today. Use the Drop-Down Calendar/Date Entry field to Choose a different date, if necessary.
•End Time - By default, this will be the time period each grid represents as defined in the Planner View Form, added to the time slot selected when this New Appointment Form was opened. Modify as needed.
•Reminder - To set-up a reminder (see About Reminders below) for this New Appointment, Check the Reminder box.
✓Use the Drop-Down Selection List to Choose a pre-appointment reminder time of either 0 minutes (Reminder appears at the time of the appointment),.5 minutes, 10 minutes, 15 minutes, 30 minutes, 1 hour or 1 day.
•Appointment Description - Enter the description for this New Appointment that you want displayed on the Employee Calendar.
•Save - Be sure to Click the Save button < at the bottom of the Appointment Editor Form to properly save this Appointment record.
•Recurrence - If this Appointment is an ongoing obligation, after saving the Appointment, Click the Recurrence button to open the Recurrency Form.
![]()
❑Defining a Recurring Appointment:
•Settings tab - Establish when and how often this Appointment should be in effect.
Recurrency Form - Settings tab
✓Recurrency pattern:
▪Click the button representing the frequency which this Appointment should be repeated.
✓Pattern details:
▪Based on the frequency selected, Choose the specific sequence pattern when this Appointment should occur.
▪Some examples of possible Recurrency Patterns are shown below:
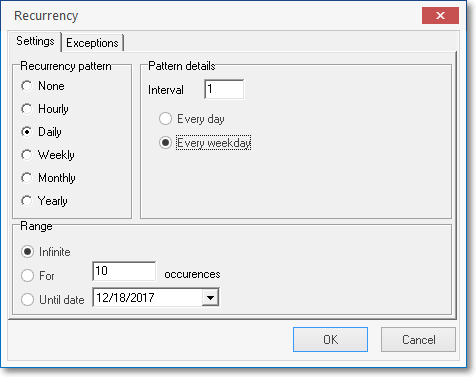
Recurs Daily - Either Every Day or only on a Weekday
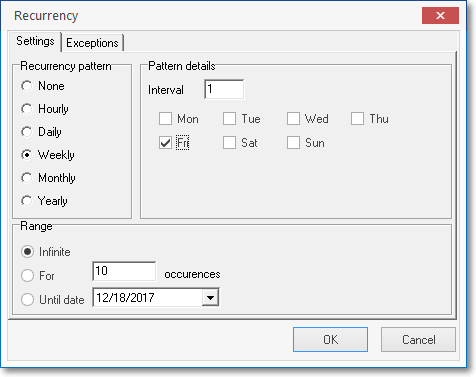
Recurs Weekly - Specify the Day of the Week
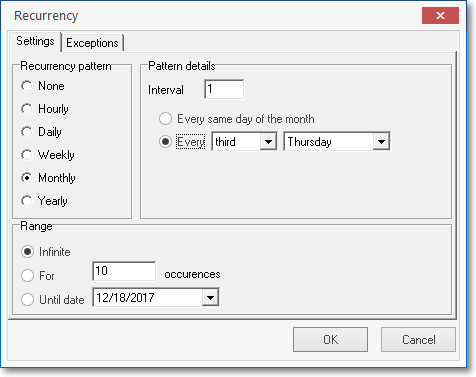
Recurs Monthly - Specify the Day of the Month
Every same day of the month = The Same Date as original appointment
Every needs entry of numerical occurrence of the day and of which day
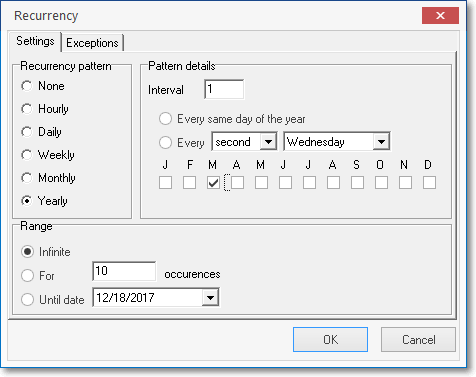
Recurs Yearly - Either on the same Date or on the specified Day
✓Range:
▪Select the time range - after which the Recurrence is canceled - of this recurring occurrence based on the Pattern details you've chosen.
✓Save - Click the OK button to record your entry.
•Exceptions tab - Establish when and how often this Appointment should not be in effect.
✓If there are exceptions to the Recurrency Settings, first save the Recurrency Pattern.
✓Then, Click the Exceptions tab to record the exception(s).
✓Any number of Exceptions may be defined.
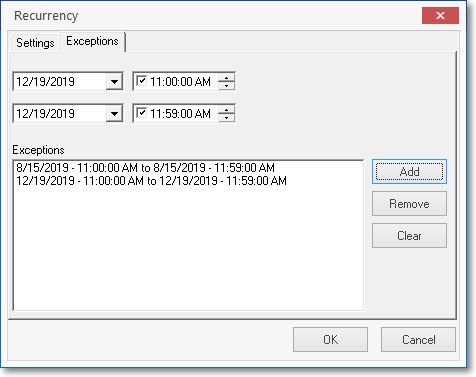
Exceptions tab on the Recurrency Form
•Adding an Exception:
✓Date Range - Establish when this exception will be in effect.
▪Enter a starting Date for this Exception using the Drop-Down Calendar/Date Entry field provided.
▪Optionally, Check the Time box and enter a starting Time, if needed
o(HR:MN:SE:AM) Enter the values in this sequence: 4:45PM would be entered 04à45à00àP with à representing the Pressing of the Right-Arrow on your keyboard.
▪Enter an ending Date for this Exception using the Drop-Down Calendar/Date Entry field provided.
▪Optionally, Check the Time box and enter an ending Time, if needed.
o(HR:MN:SE:AM) Enter the values in this sequence: 4:45PM would be entered 04à45à00àP with à representing the Pressing of the Right-Arrow on your keyboard.
✓Click the Add button to insert this Exception into the Exceptions List.
•Removing an Exception:
✓Select the Exception on the Exceptions List that is to be removed.
✓Click the Remove button to delete the selected Exception from the Exceptions List.
•Removing All Exceptions:
✓Click the Clear button to delete all of the Exceptions from the Exceptions List.
❑About Reminders:
•When the Appointment Reminder is displayed:
➢Note: If more than one Appointment is displayed, Select the appropriate Appointment first.

Appointment Reminders message
✓Snooze - If you want to be reminded later, set the Snooze Time (see Set Snooze Time below), then Click the Snooze alarm button to re-set the reminder time.
✓Set Snooze Time - Use the Drop-Down Selection List to Choose a new reminder time.
✓Dismiss - Click the Dismiss button to cancel additional Reminders for this Employee Appointment and to Close the Form.
❑Editing an Employee Calendar Appointment
•Select the Day View tab.
✓If more than one Employee's Schedule is being displayed, Select the appropriate Employee column.
•Select the Appointment to be modified.
•There are three ways to implement an Edit:
1.Click the Edit Icon at the top of the Employee Calendar Form.
2.Double-Click on the Appointment.
3.Right-Click on the Appointment to open the Appointment Options list and Select Edit.
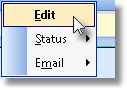
Appointment Options
•In either case, Modify the Appointment information, as needed.
•Save - Click the Save button at the bottom of the New Appointment Form to save the changes to this Appointment record.
•Updating an Appointment Status:
✓Click on an Appointment for an Employee on the Day View of the Employee Calendar Form.
✓Then, Right-Click on the selected Appointment to (re-)set it's Appointment Status.
✓Select Status from the Appointment Options list that appears.
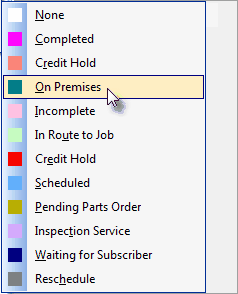
✓Choose the appropriate Appointment Status.
•Email an Employee Calendar Appointment
✓Right-Click on any Employee Calendar's Appointment to create an Emailed message
✓Select Email on the Appointment Options list, then Choose the Email option.
✓There are two things that are required before this feature will work:
1.Outlook® must be installed on the workstation because the Email will be created automatically within Outlook.
2.The Employee, whose Appointment is to be Emailed, should have an Email address entered on the Personal tab of their Employee record if you want the system to automatically enter that Employee's Email address in the To... field.
➢Note: You may still send an Email but the To... Email address must be manually entered.
✓Once the system creates the Email, you may modify it, as needed.
✓Click the Send button to complete the process.
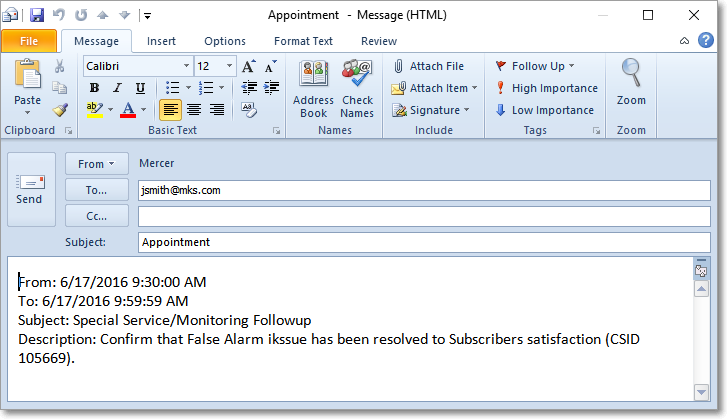
Appointment Format for Email to Employee
❑Modifying the Date and Time of the Appointment - Changes to the Appointment record may easily be made without actually opening this Appointment Editor by using the keyboard's arrow keys:
•Once an Appointment has been set, it can be quickly and easily moved (re-scheduled) within the Day View area of the Employee Calendar Form using these methods:
✓Select the Appointment that you want to move to a different Time and/or Day slot on the Day View schedule and, using the up and down #$ arrow keys, move that Appointment to a different open Time Slot, as needed.
✓If more than one Employee's Schedule is being displayed, Select the Appointment and using the left ! or right " arrow keys, move the Appointment to a different Employee's open Time Slot, if needed.
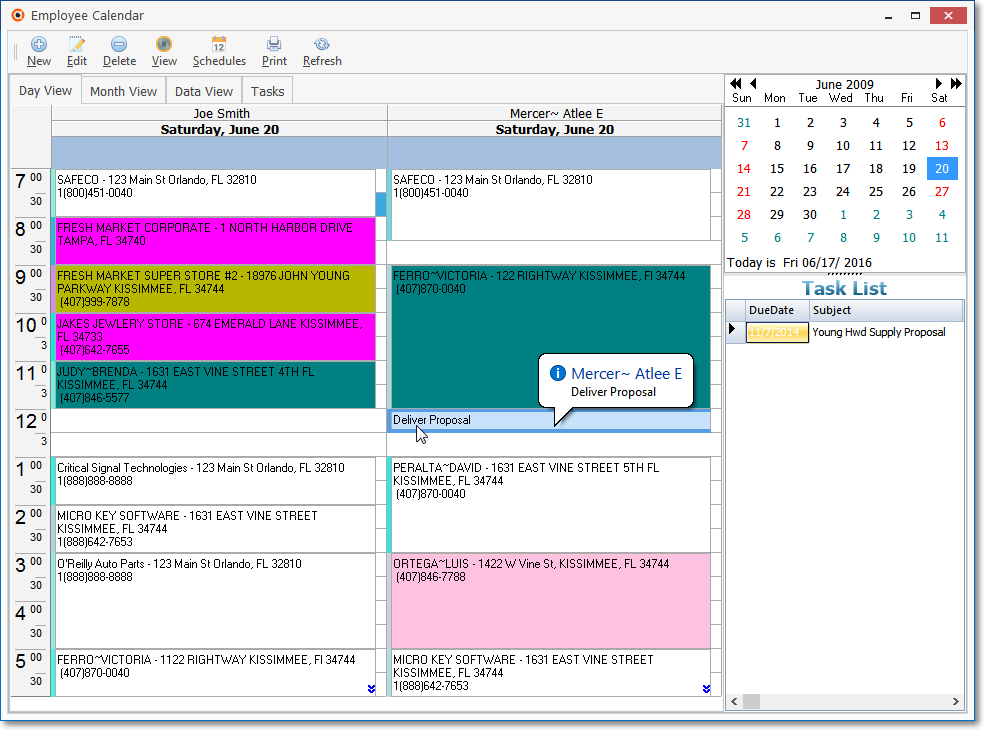
Employee Calendar Form with the special Appointment Mover pointer activated
✓You can also Select an Appointment and then Click on the bold left side border of that Appointment which activates the special Appointment Mover pointer that enables the ability to Drag and Drop the Appointment up, down and/or laterally to another Time of Day, a different Day, and even to another Employee's column.
✓Finally, after Selecting an Appointment, you may Click on the bold bottom or top border of that Appointment to enable the ability to Drag either (or both) of these borders to lengthen the time range for that Appointment.
•These changes in Time of Day, a different Day, Length of Time and to another Employee will be instantly updated within the Appointment Editor.
❑Delete an Employee Calendar Appointment
•Select the Day View tab.
✓If more than one Employee's Schedule is being displayed, Select the appropriate Employee column.
•Click the Appointment to be deleted.
•Click the Delete Icon.