❑There are two Appointment Entry Systems within MKMS:
1.The Appointment Editor - available in the Technicians Scheduling Form - allows the User to set Work Order and other types of appointments only for those Employees who have been designated as Technicians.
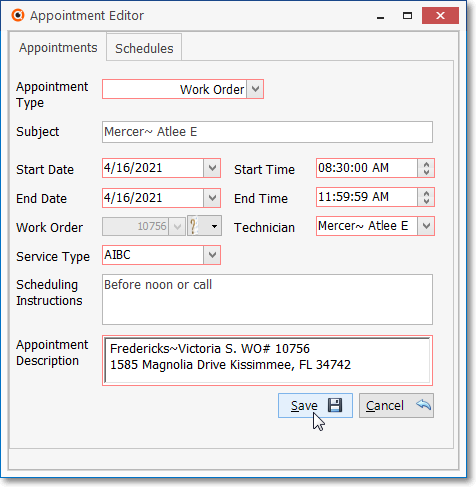
Technicians Scheduling - Appointment Editor Form - Work Order
2.The Employee Calendar - available within the Accounts Receivable System - allows the User to enter, view, and track Appointments for any type of Employees.
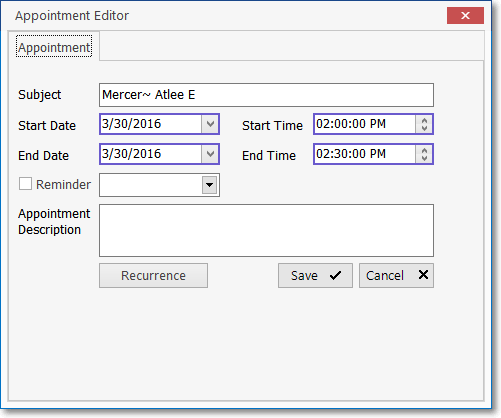
Employee Calendar - New Appointment Form
❑From time to time it is prudent to Purge the Appointment History - either selectively or globally - after a month or so (or any selected period of time) has passed.
•Use this feature carefully!
✓Appointment History - (the record of Appointments entered in the Technicians Scheduling and Employee Calendar Forms) is maintained indefinitely, until deleted (Purged).
✓These Appointment records may be referenced at any time in the future by choosing the required Schedule for the Employee whose Appointment is to be viewed, then using the Calendar on the Technicians Scheduling and/or Employee Calendar Forms to select any Date in the past, then viewing the Scheduled Appointments for that Day.
✓Therefore, this Purge Appointments function should only be used (based on your Company's Appointment Deletion Policy) if it is certain that reference to those Appointment records will no longer be needed.
•If All Types and All Employees are selected (see below), the Purge Appointment function purges all Appointments - those recorded in both the Technicians Scheduling and the Employee Calendar Forms.
❑To Purge Appointments,
•To access the Purge Appointments Form:
a)From the Backstage Menu System Select Maintenance and Choose Service Tracking then Select the Purge Appointments option, or
b)From the Quick Access Menu, Select Maintenance and Choose Service Tracking then Select the Purge Appointments option
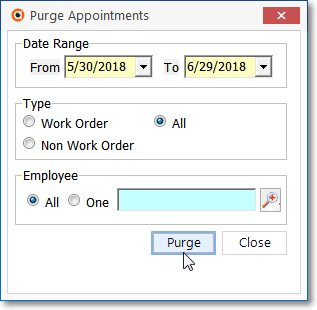
Purge Appointments Dialog
•Date Range - By default, the last 30 days will be offered.
➢Note: In most cases, the Date Range will need to be changed to accommodate your Company's Appointment Deletion Policy.
✓From - By default, it will be One Month prior to Today.
a)Click on the Date field and type the desired Date using a MM/DD/YYYY format; or
b)Use the Drop-Down Calendar/Date Entry field provided to Choose the desired Date
▪Use the Drop-Down Calendar/Date Entry field to Choose the appropriate Purge Starting From Date.
✓To - By default, it will be Today.
▪Use the Drop-Down Calendar/Date Entry field to Choose the appropriate Purge up To and including Date.
•Type - All Types of Appointments is the default choice.
✓Select which Type of Appointments will be Purged:
➢Note: It is important to understand what will occur here:
a)The Appointment Editor may be used to Schedule Technicians for Work Order related Service Requests and to schedule Technicians for any other Type of Non Work Order related Appointments, as needed.
b)"Technician" - by definition - means any Employee whose assigned Employee Type is either Technician or All.
c)The Employee Calendar in the Accounts Receivable System allows you to enter and track and view Appointments for All Employees assigned any Employee Type - not just those that are a "Technician".
✓Work Order - Click to have only Work Order related Technician Appointments Purged within the specified Date Range.
✓Non Work Order - Click to have only Non Work Order related Appointments - including the Employee Calendar records - that were not Work Order related - Purged within the specified Date Range.
✓All - Click to have All Appointments (for any Type of Employee) Purged within the specified Date Range.
•Employee - Appointments are made for your Employees.
✓All - The default is that All Employee's Appointments will be Purged based on the Type selection made above, and the specified Date Range.
▪If All Types and All Employees are selected (see above), the Purge Appointment function purges all Appointments - those recorded in both the Technicians Scheduling and the Employee Calendar Forms.
✓One - However, to Purge Appointments for a specific Employee (perhaps because of a termination or re-assignment to a different position):
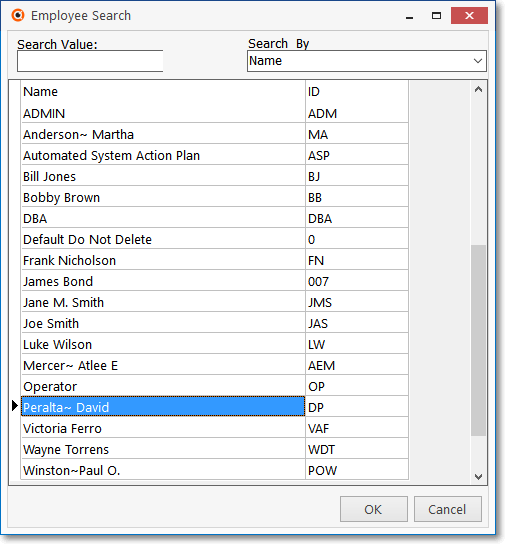
Employee Search dialog
▪Click the One button to activate the Employee Search dialog.
oUsing the Drop-Down Selection List provided, Choose the Search By method (Employee Code or Name).
oEnter a few characters in the Search Value field to locate the desired Employee (as characters are typed, an incremental search is performed).
oOnce the Employee record is located, Click on that Employee record.
oClick the OK button to Close the Employee Search dialog and return to the Purge Appointments Form.
▪The Selected Employee is inserted into the Employee field.
•Carefully examine each of your choices.
•Click the OK button to complete the Purge, or the Cancel button to exit without executing a Purge request.
✓Confirm that you do want to Purge the selected Appointments by Clicking the OK button.
✓The process executes and displays a message indicating how many Appointment records were deleted.