❑For Web Tech Service Users only, this Work Order Fields option allows you to define up to 40 Custom Work Order Fields which, once defined, would appear in the Work Order Completion section of the Web Tech Work Order Form.
•To create these Custom Work Order Fields, on the Main Menu, Select Maintenance and Choose the Service Tracking Items sub-menu, then Click Work Order Fields.
•See the Web Tech Work Order Completion chapter for more information on how these Custom Work Order Fields are used.
❑Defining Work Order Fields for the Web Tech Service:
•To access the Work Order Fields Form:
a)From the Backstage Menu System Select Maintenance and Choose Service Tracking then Select the Work Order Fields option, or
b)From the Quick Access Menu, Select Maintenance and Choose Service Tracking then Select the Work Order Fields option
•To create a Custom Field, you must Click on each column of that row and enter the appropriate information as described below:
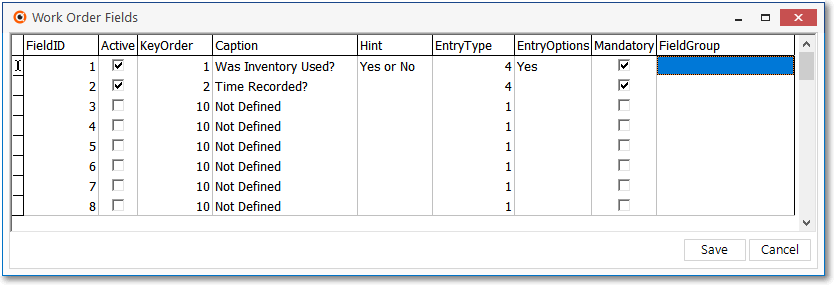
Work Order Fields dialog
1.Field ID - The system number of this User defined Work Order Field.
2.Active - Check the Active box to turn on the selected Custom Field in the Work Order Completion section of the Web Tech Work Order Form
3.Key Order - Set the Order number in which this Custom Work Order Field's Caption will appear in the Work Order Completion section of the Web Tech Work Order Form.
✓By default, that number is ten (10) but may be any number up to 9999.
✓If you entered 10 for every Custom Field item, they would appear in the order in which they were defined..
✓To change that order, assign an Order number either above or below the number 10.
✓The end result is that the Custom Fields will be displayed in numerical order - from lowest to highest, and skipping numbers in between is OK.
4.Caption - Enter a Caption representing the Name of this Custom Field that will be displayed in the Work Order Completion section.
✓This is the Name of the Custom Field.
✓Each Custom Field must be named uniquely.
5.Hint - Enter a "Hint" that briefly defines what type of information is needed.
✓This Hint will be displayed like a Tool Tip.
✓As such, when a Technician holds his/her mouse over the field, the Hint will be displayed.
✓Although normally the entry should be brief, you may enter a considerable number of lines of text to make the explanation as detailed as necessary.
▪Because of screen size limitations, each information line should be brief.
▪It should not fill the distance across the screen.
▪So each line should be somewhat less than 80 characters.
▪To start the next line, Press 8 Enter.
▪Repeat as needed.
6.Entry Type - There are five (5) types of entries that may be specified.
✓Using the Drop-Down Selection List, Select the Entry Type for this Custom Field.
1)Edit Field - Specifies a field that will accept up to 50 characters of any type.
2)Number - Displays a field with an up and down arrow. You may Click either one to (re-)set that field's value or simply enter a number of your choosing.
3)Drop-Down - Allows for the creation of selections for a Drop Down Selection List which offers suggestions, but the actual entry may be different than any of the suggested entries.
4)Drop Down List - Allows for the creation of selections for a Drop Down Selection List which will be the only ones accepted in this field.
5)Check Box - Displays a Check Box next to the Caption, Checking the box indicates that the Technician has done, agrees with, or in some other way had complied with the question or statement contained in that Caption.
✓Define Drop Down or Drop Down List selections, if needed.
7.Entry Options - Double-Click (Memo)to further define your Custom Field by defining the Entry Options (which are based on the Entry Type defined above):
✓Drop Down - In the Entry Type column, Select Drop Down
▪Double-Click the Entry Options column.
▪Define this Drop Down selections by entering each selection on its own line.
▪To start the next available selection, Press 8 Enter.
▪Repeat this process until you have defined all the necessary Drop-Down Selection List choices.
▪Remember that the selections defined in this list are merely suggestions and the user may type in their own entry.
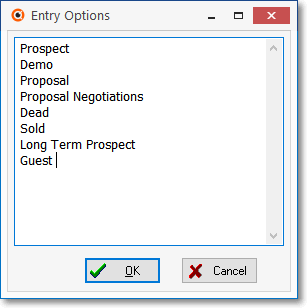
Drop-Down list selections for Entry Options
▪Click OK ü to save the list.
✓Drop Down List - In the Entry Type column, Select Drop Down List
▪Double-Click the Entry Options column
▪Define this Drop Down List selections by entering each selection on its own line.
▪To start the next available selection, Press 8 Enter.
▪Repeat this process until you have defined all the necessary Drop-Down Selection List choices.
▪Remember that the selections defined in this list are the only choices the user will be able to enter.
8.Mandatory - Check this box if information for this Custom Field must be entered.
9.Field Group - A Field Group entry defines both the Name of a Group of Custom Work Order Fields which are to be displayed together, and that Group's Title which will be displayed in the Completion Section of the Web Tech Service, and may be no longer than 40 characters in length.
✓A Field Group may have any number of Group Members - each of which must be defined as Custom Work Order Fields, and all of which will share the same Field Group Name.
▪It is best to "Copy & Paste" the Field Group's Name to any additional Members (Custom Work Order Fields) of that Group to assure absolute accuracy.
✓The Order in which these Custom Work Order Fields will be displayed within a Field Group is determined by the Key Order Number assigned to each Custom Work Order Field (See the 4. Key Order section above).
▪More than one Field Group may be defined and these Field Groups will be displayed alphabetically by the Field Group's Name, then within each Field Group, the Members will be listed in Key (number) Order.
▪Each Field Group's Name will be displayed only Once!
▪Each Caption of each Custom Work Order Field that is a Member of that Field Group will be displayed along with any associated information (based on the Entry Type - see 7. Entry Type above) of each of those Custom Work Order Fields.