❑An Overview of Restoral Information (see this Restoral Information chapter for more detailed information):
•There are three ways to identify a Trouble Signal that requires follow up by an Operator and/or a Technician, and then to specify what type of Operator Response is required.
1.Trouble Signals requiring an immediate Operator Response:
2.Trouble Signals requiring an Operator Response, but only if a specified Restoral Signal is not received within a specified number of Minutes:
3.Trouble Signals that require follow up, but that follow up does not have to be performed immediately and so a response is not required within a designated time frame (and a Restoral Signal may subsequently be transmitted, thereby eliminating the need for any follow up):
✓The Non-Restored Alarms Report will list those Trouble Signals which:
▪Reported Alarm Conditions that need to be corrected (Restored to a Normal Condition), but the Restoral Signal (Representing the return to the Normal Condition) has not yet been received, but
▪These Trouble Signals have no time frame defined so they are not presented to an Operator as a Failed To Restore signal.
❑Many Signals identify a problem (e.g., High Temperature, Low Temperature, Power Loss, Low Battery) and so are referred to as Trouble Signals.
•If the problem reported by a Trouble Signal is not corrected promptly, it will generally require a special Operator Response of some type by presenting to the Operator a Failed To Restore signal.
✓This is accomplished by defined a time frame whereby - if the appropriate Restoral Signal is received within that time frame - no action would need to be taken by an Operator.
✓However, if that required Restoral Signal is not received - within the time frame defined - to signify that the trouble condition is now OK (Returned to the Normal Operating Condition), an Operator Response Signal (i.e., a Failed To Restore alarm) will be generated.
•However, not all Trouble Signals that can be transmitted from a Subscriber's system will have a Restoral Signal time frame defined.
✓The Non-Restored Alarms Report will list those Trouble Signals that reported Alarm Conditions needing some type of correction, and a Restoral Signal has not yet been received -
✓But, because these Trouble Signals have no time frame defined, they were never presented to an Operator as a Failed To Restore signal.
▪In other words, the Operator would have previously processed the Trouble Signal and while doing so, contacted that Subscriber.
▪But, the Central Station (and the Service Department) has no assurance that corrective action was actually taken by that Subscriber because there is no specified time frame defined within which the Trouble must be corrected and the associated Restoral Signal transmitted.
▪This Non-Restored Alarms report provides the Central Station with a list of those Subscribers, and the associated Trouble Signal information, which may be used for follow up, if and when appropriate.
•To access the Non-Restored Alarms Report dialog:
1.From the Backstage Menu System Select Reports and Choose Monitoring and Select the Non-Restored Alarms option
2.From the Quick Access Menu, Select Reports and Choose Monitoring and Select the Non-Restored Alarms option
❑ Non-Restored Alarms tabs - There are three tabs on the Non-Restored Alarms dialog.
•Options - Initially only the Options tab is shown (until you make your Options selections and Select Print).
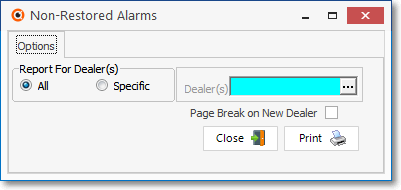
Non-Restored Alarms - Options tab
✓Report For - Choose whether to list the Non-Restored Alarms for All Alarm Dealers, or for a selected set of (one or more) of those Dealer(s).
▪All - By default, all Non-Restored Alarms, for All Alarm Dealers, will be listed
▪Specific - To limit the report to Non-Restored Alarms from a set of (one or more) Dealers:
oClick the Specific button to activate the Dealer(s) field.
oClick the Ellipse on the Dealer(s) field to open the Select Dealers dialog.
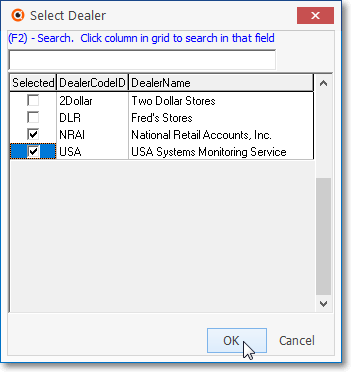
Select Dealers dialog
oCheck the Selected field of each Alarm Dealers that is to be included in the report.
oClick the OK button to Close the Select Dealers dialog.
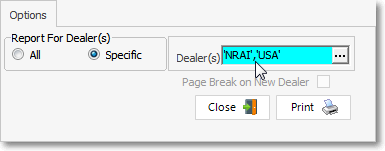
oThe Alarm Dealer Codes that were selected will be inserted in the Dealer(s) field.
✓Page Break on New Dealer - This report lists In-House Accounts first, then the remaining Accounts in Alarm Dealer order, and within each Dealer, in Subscriber Name order.
▪To start the beginning of each Dealer's section on a new page, Check this box.
✓Print - Click the Print button ![]() to Preview and optionally Print (to a File or a Printer) this Non-Restored Alarms Report.
to Preview and optionally Print (to a File or a Printer) this Non-Restored Alarms Report.
✓To Exit this Non-Restored Alarms dialog, Click the Close button ![]() toward the bottom of the Options tab.
toward the bottom of the Options tab.
•Preview - The Preview tab presents the report which resulted from the Options you've selected.
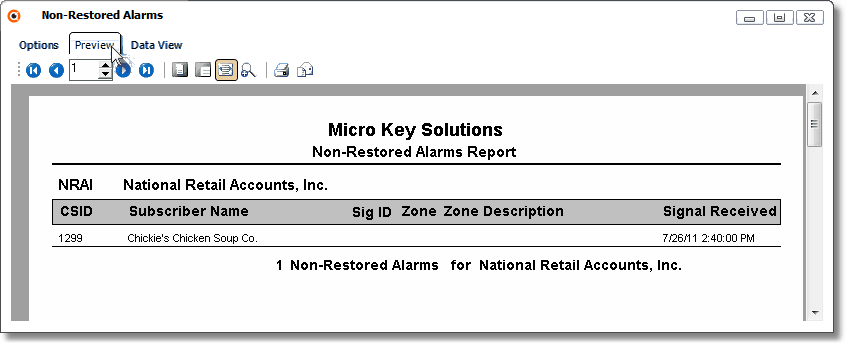
Non Restored Alarms Report Preview
✓Home - ![]() - Using either the screen Icon or your Keyboard's Home key, moves the report to the top of the first page.
- Using either the screen Icon or your Keyboard's Home key, moves the report to the top of the first page.
✓End - ![]() - Using either the screen Icon or your Keyboard's End key, moves the report to the bottom of the last page.
- Using either the screen Icon or your Keyboard's End key, moves the report to the bottom of the last page.
✓Arrows - The arrows allow you to move back and forth, from page to page.
✓Number - Indicates the page number you are viewing.
▪You may also type in a specific page number, Press 8 Enter and that page will be displayed immediately.
▪If you enter an invalid page number, it will be ignored.
✓Fit To Page - Click the first button after the arrows to size a full page of the report to fit the screen.
✓Zoom To 100% - Click the second button after the arrows to display the page at 100% (of the printed view).
✓Fit To Page Width - Click the third button after the arrows to size the page of the report to fit the full width of the screen.
✓Zoom To Percentage - Click the fourth button after the arrows to re-size the page of the report by percentage.
![]()
▪When you Click the Zoom To Percentage button, the Percentage selector will be displayed.
▪You may then Click the Up or Down ‚ arrows to set the exact amount of Zoom you want.
✓Print - Click the Print button to Print (to a File or a Printer) ![]() the displayed Non-Restored Alarms Report.
the displayed Non-Restored Alarms Report.
✓Email - Click the Email ![]() button to send this report to an Email address of your choosing.
button to send this report to an Email address of your choosing.
✓To Exit the Preview tab and Close this Report dialog Form, Click the Close ![]() box on the right at the top of the Preview tab.
box on the right at the top of the Preview tab.
•