❑This Loss Prevention Application Interface provides the ability to record, track, review, amend, and export Loss data relating to criminal activity.
•These Loss Prevention tracking services may be implemented by the Central Station as an additional service provided to Subscribers, and/or as an internal process used by the Central Station Company itself.
✓The independent Loss Prevention application may not be used until certain Loss Prevention Maintenance Items are defined.
▪These are:
oAlcohol/Tobacco Violations - This is used to define the types of Violations which will be tracked by the Loss Prevention system.
oIncident Categories - This is used to define the types of Incident Categories which will be tracked by the Loss Prevention system.
oViolation Dispositions - This is used to define the types of Violation Dispositions which will be tracked by the Loss Prevention system.
✓Once these Loss Prevention Maintenance Items have been reviewed, and additional ones added as needed, the Loss Prevention application and its related Loss Prevention Forms will be operational.
❑Starting the Loss Prevention application:
•Locate and Double-Click the Loss Prevention Icon.
✓The MKMS Loss Prevention Log In dialog will be presented.
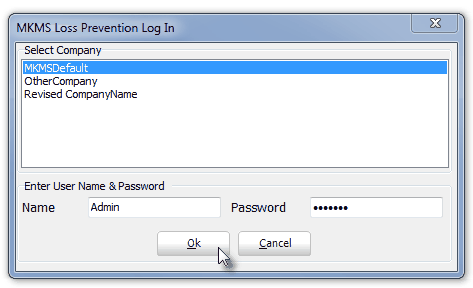
MKMS - Loss Prevention Log In dialog
✓Select Company - Click on the desired Database Name
✓Name - Enter a valid User Name
✓Password - Enter the Password associated to the User Name.
✓OK - Click the OK button to execute the Log In.
•The Loss Prevention Application Interface will be displayed.
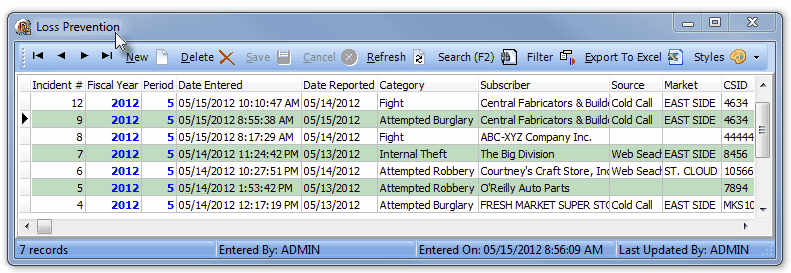
Loss Prevention Application Interface
✓All Loss Prevention and and related Violation Incidents are initially listed in Entry Date Order from the Newest to the Oldest, by default.
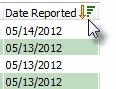
✓However, the sorted order may be changed, as needed, by Clicking the Header Name representing the desired order.
▪The result will be an alphabetical (a - z) or numerical (0 - 9) sorting.
oThe Header Name which is controlling the sorted order will display a Sort Indicator Icon.
Sort Indicator Icon
▪A second Click on the same Header Name will reverse that order - alphabetical (z - a) or numerical (9 - 0).
oThe Sort Indicator Icon will indicate that change.
▪Any Header Name may be used to establish the sorted order.
oThe sorted order may be changed at any time.
✓Select an existing record and Open its associated Loss Prevention Subscriber Information Form, by Double-Clicking on that record.
❑Navigation bar and Special Icons on the Loss Prevention Application Interface:
![]()
Navigation bar and Special Icons on the Loss Prevention Application Interface
•Navigation bar - Beginning It, Previous t, Next u, Ending uI record may be selected by Clicking the appropriate Icon.
•New - Click New to Open the Loss Prevention Subscriber Information Form to add a new Loss Prevention Incident record.
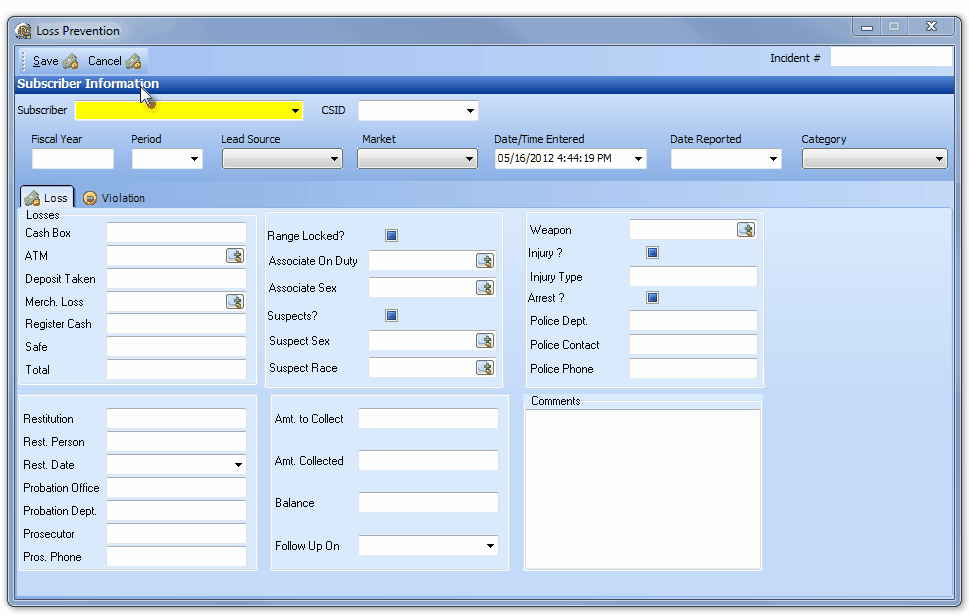
Loss Prevention - Subscriber Information Form
•Delete - Click Delete to Remove a Loss Prevention Subscriber Information Loss Prevention Incident record.
•Save - Click the Save < Icon to record a new (or modified) Loss Prevention Incident record.
•Cancel - Click Cancel V to abort the Loss Prevention Incident record entry.
•Refresh - Click the Refresh button to update the Loss Prevention Application Interface Form with the most recently entered data.
•Search (F2) - Click the ![]() button to locate a specific Loss Prevention Incident record.
button to locate a specific Loss Prevention Incident record.
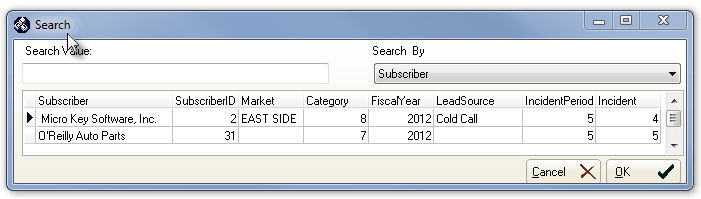
Search dialog to locate a specific Loss Prevention Incident record
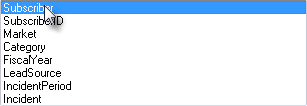
✓Search By - Using the Drop-Down Selection List provided, Choose the Search By field.
✓Search Value - Enter the characters that will best identify the desired Loss Prevention Incident record.
✓Click on the desired record.
✓OK - Click the OK button to position the record pointer4to that record.
✓Double-Click that Loss Prevention Incident record to open the Loss Prevention Subscriber Information Form.
Loss Prevention Subscriber Information Form
▪See the "Entering Data into the Loss Prevention Subscriber Information Form" section below.
•Filter - Click the ![]() button to Open the Filter Options dialog.
button to Open the Filter Options dialog.
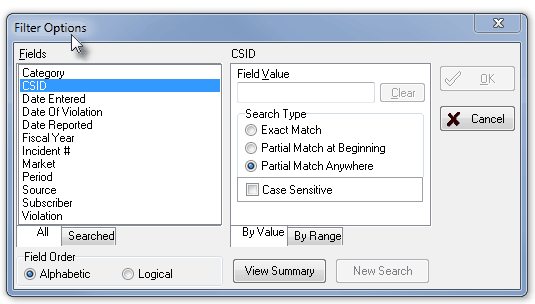
Loss Prevention - Filter Options dialog
✓Designing a Filter as required - This is a complex Form with many options. Use it with care, and Validate the results carefully.
▪However, creating a list will never harm the underlying database so there really is no downside for experimenting unless, because of a badly designed filter, you make decisions based on results that are incorrect.
✓Fields - Click the Field name you would like to use for this special filter.
▪Once the Filter's Field is selected, that field name appears on the right just above the Field Value selection.
▪All - This tab will list all of the fields in the Loss Prevention Incident table.
▪Field Order - Allows you to select the order in which the Subscribers table fields will be listed for selection.
oAlphabetic - Listed alphabetically by name.
oLogical - The default, listed in the logical order of the fields most commonly used for filters.
▪Searched - This tab will list all of the Special Filters you've defined in this session.
oWhen the Form is closed, this tab is cleared.
✓By Value - The default method for the filter is to match a selected Field's actual Value.
✓Field Value - Enter the expression that would limit which Subscribers would be included in this list.
▪Clear - Click the Clear button to clear the Field Value entry.
✓Search Type - Select the type of search that should be performed.
▪Exact Match - The Field Value entered must match the actual information in the selected Field precisely.
▪Partial Match at Beginning - The Field Value entered must match the actual information in the selected Field from the beginning of the entry up to the length of the data you entered. The Field Value filter does not have to match anything beyond the length of your entered filter itself.
▪Partial Match Anywhere - The Field Value entered must match the actual information in the selected Field somewhere within entry. The Field Value filter does not have to match anything before or after the filter phrase itself.
▪Case Sensitive - Check this box if the Field Value entry must also match the Case of the characters in the selected field
✓By Range - You may also make a selection based on a range of values such as Fiscal Year Dates.
▪Starting Range - The filter entry that will represent the first value that is acceptable
▪Ending Range - The filter entry that will represent the last value that is acceptable
✓Clear - Click the Clear button to clear the entry.
✓View Summary - Click this button to see the resulting filter expression.
✓New Search - Click this button to clear your By Value or By Range entry and choices, resetting the Form to it's defaults (your selected Field will remain).
✓OK - Click OK to accept the Filter entry and return to the Loss Prevention Application Interface to make any other required settings.
•Export To Excel - Once the record set is determined, you may Click the ![]() button to copy the selected and filtered data to an Excel® compatible file.
button to copy the selected and filtered data to an Excel® compatible file.
❑Entering Loss Prevention Data into the Loss Prevention Subscriber Information Form:
•There are two (2) tabs on the Loss Prevention Subscriber Information Form:
1.Loss - This tab is used to define a Loss Prevention Incident record and the information related to that Loss.
2.Violation - This tab is used to define an Alcohol/Tobacco Violation and the information related to the eventual Violation Disposition.
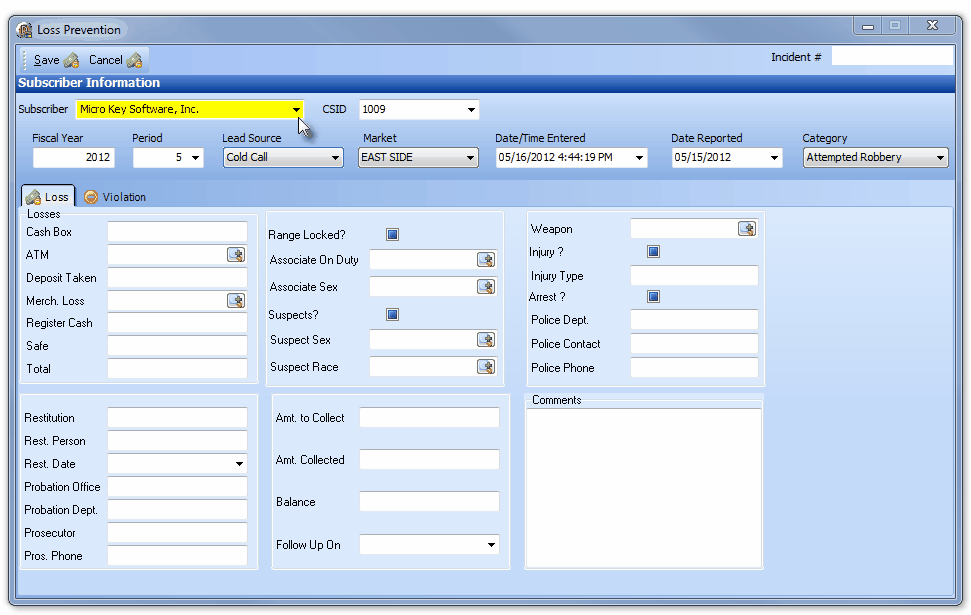
•Selecting the appropriate Subscriber:
✓Before defining a Loss Prevention Incident or Violation Incident, the appropriate Subscriber record must be selected.
▪Click New to Open the Subscriber Information Form to add a new Loss Prevention Incident or Violation Incident record.

Loss Prevention - Subscriber Information Header
▪Subscriber - Using the Drop-Down Search & Selection List provided, enter the first few letters of the Subscriber's Name until the desired Subscriber is displayed.
oClick on that Subscriber Name.
oPress the Tab F key
▪CSID - Select the CSID using the Drop-Down Selection List provided, if appropriate.
oPress the Tab F key
✓Complete the remaining Subscriber Information Header Information for this record, Pressing the Tab F key after filling in each field to move the to next field.
▪Fiscal Year - Enter the Fiscal Year (e.g., 2012) that will be affected by the Loss.
▪Period - Using the Drop-Down Selection List provided, Choose the Fiscal Period (Month 1 - 13) in which this Incident occurred.
▪Lead Search - By default, this will be the Lead Source identified for the selected Subscriber on the Leads tab of the Subscribers Form.
oIf a Lead Source had not been previously identified, use the Drop-Down Selection List provided to make that Lead Source selection.
▪Market - By default, this will be the Market Area identified for the selected Subscriber on the Leads tab of the Subscribers Form.
o If a Market Area had not been previously identified, use the Drop-Down Selection List provided to make that Market Area selection.
▪Date/Time Entered - The current Date and Time will be inserted.
▪Date Reported - Using the Drop-Down Calendar/Date Entry field provided, Choose the Date on which this Incident actually occurred.
▪Category - Using the Drop-Down Selection List provided, Choose the appropriate Incident Category.
✓Click the Save button at the top of the Loss Prevention Subscriber Information Form to record the entry.
•Defining a Loss (For a new Loss Prevention Incident record):
Loss tab on the Subscriber Information Form
✓Complete this Loss tab by entering the information that is currently available.
▪Depending on what Incident Category was assigned, not all fields will be initially completed, and some fields will not need to ever be completed.
✓Periodically, this information must be updated as additional information becomes available.
✓Always Click the Save button at the top of the Loss Prevention Subscriber Information Form to record the entry.
•Defining a Violation (For a new Violation and Disposition of the Incident record):
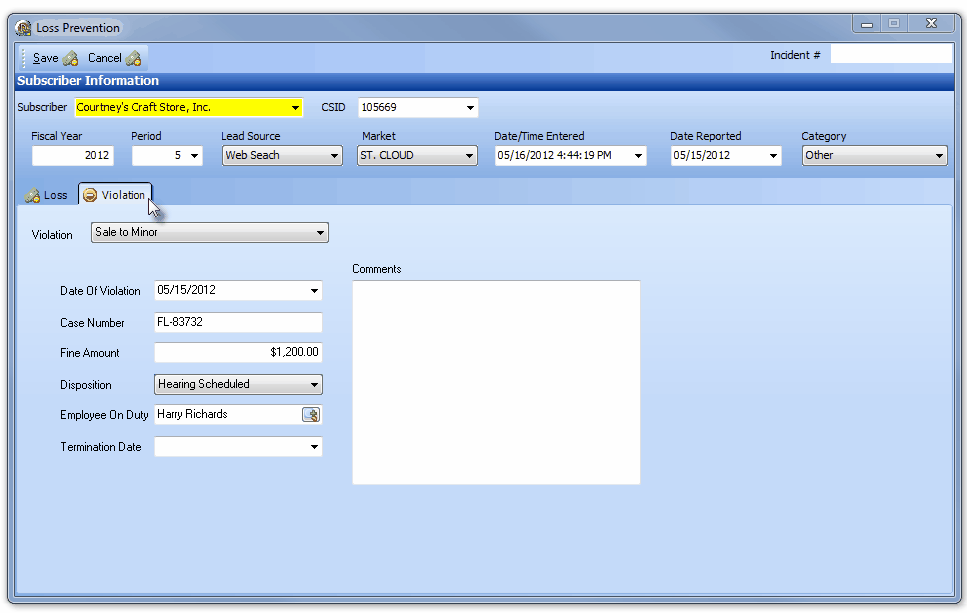
Violation tab on the Subscriber Information Form
✓Complete this Violation tab by entering the Violation Disposition and the information related to that Violation Disposition.
▪Violation - Use the Drop-Down Selection List provided to Choose the appropriate Alcohol/Tobacco Violation.
oThe remaining fields may not be initially completed, and some fields may not need to ever be completed.
✓Periodically, this information must be updated as additional information becomes available.
▪Disposition - When this information is available, use the Drop-Down Selection List provided to Choose the appropriate Violation Disposition.
✓Always Click the Save button at the top of the Loss Prevention Subscriber Information Form to record the entry/changes.