❑Overview - The purpose of this chapter is to identify certain steps which are required when implementing the Third Edition UL® 1981 Standard
•Audit - Setting the Audit Access Rights for Form Names - Access Rights that are established using the User Access Rights, and/or the Employee Groups, and/or the Security tab on the Employee Forms for assigning Access Rights to Forms, must Check (turn on) the Audit Access Right for the All Form Names which have access granted to any Employee using those User Access Rights, and/or the Employee Groups, and/or the Security tab on the Employee Forms.
✓This will occur automatically when the UL® Version is active.
✓Specific Audit Reports are used to comply with 6.2.3 - (relating to Tracking User Changes) of the Third Edition UL® 1981 Standard (i.e., Any modification made to the database shall be logged with a unique personal identification (Employee ID) belonging to the person performing the modification).
➢Note: It is important to remember that when an Employee has specific rights assigned by using the User Access Rights Form,
The rights that were granted or restricted by using the User Access Rights Form will override those granted or restricted on the Employee Groups Form!
Make certain that - when restricting or granting any access or specific rights to a Form or a Field - those restricted or granted rights are not negated in the User Access Rights Form
•UL® Requirements: As part of properly implementing the Third Edition UL® 1981 Standard, specifically for compliance with section 6.2 Sign-on Security and 6.3 (1-7) Five Security Levels of the Third Edition UL® 1981 Standard:
6.2.1 - The Employee's Password (i.e., Passcode) shall consist of the following:
a)A Username of at least six (6) characters
b)A Password which shall consist of a minimum of six alpha-numeric characters with at least one alpha and one numeric character
6.2.3 - Any modification made to the database shall be logged with a unique personal identification (Employee ID) belonging to the person performing the modification).
i.To comply with 6.2.3 of the Third Edition UL® 1981 Standard, the Audit box must always be Checked for All Form Names when User Access Rights are assigned to any Employee or Employee Group
ii.Users cannot turn auditing off when the UL® Version is Registered (i.e., Active).
iii.In the User Access Rights and the Employee Groups Forms - when the UL® Version is Active -, the Audit option box will always be Checked on all Form Names.
iv.No User will be able to remove that Check Mark.
6.2.6 - The automation system shall prevent: (the CheckULPasswordRestrictions option in Company Settings must be set to True ("T") to comply with Section 6.2.6 in the Third Edition UL® 1981 Standard).
a)Repeated passwords, used within the last six changes;
b)Passwords that are a derivative of the user name(s); and
▪[e.g., Password cannot contain 50% of a Username so a User "Stacy" cannot have a Password of "STA3841"]
c)Passwords that are simply letters or numbers in order (e.g.: abcd, 1234, etc.).
▪[e.g., any type of sequence is prohibited such as 'ab', '34', '89', 'xy']
6.3 (1-7) - A minimum of Five Security Levels must be defined and the appropriate one assigned to each specific Employee based on that Employee's Need for Access.
•Special Settings - The data entry requirements for a Subscriber with a UL® Classified (Certificated) installation:
1.Security Company - If required, identify what Security Company will be providing Investigator Response Services (i.e., alarm runner) for each Subscriber (documented in the Central Station Data chapter).
a.If an alarm runner (Investigator) will be required, Check the Investigator Required box in the Central Station Data section within the Monitoring tab.
2.Open & Close Supervision - Specify what type of supervision, if any, is required (documented in the Central Station Data chapter and the Events chapter)
3.Supervised Events - Explain how to adjust the supervisory "Windows" properly to have a sufficient grace period before and after their regularly scheduled opening and closing times (documented in the "UL® Supervised Open and Closing Events" section of the Events chapter).
4.UL Classification - Identify the UL® Classification (documented in the Central Station Data chapter).
5.UL Response Time - Enter the appropriate Investigator Response Time in minutes (documented in the Central Station Data chapter).
6.Investigator Required - Check this box when the Account requires (either by the Third Edition UL® 1981 Standard and/or by company policy) that an Investigator (alarm runner) be dispatched (documented in the Central Station Data chapter).
7.Sounder - Check this box when the Account has an Audible Alarm (documented in the Central Station Data chapter).
8.Keys Held - Check this box when your Company has the Keys to the premises of the Account (documented in the Central Station Data chapter).
9.Restored Signals - In addition to the Failed to Restore Signal (which is assigned the FR* Alarm Condition Code in the Panel Zones and/or the CSID Zones Forms) resulting from a previously reported System Fault or Trouble Signal that has not been corrected within the designated Restoral Information Minutes entry, for those Subscribers who are designated as UL® Classified Accounts, a Restoral Signal resulting from the correction of that System Fault must also be acknowledged by an Operator when that associated Restoral Signal is received (documented in the "UL® Restoral Considerations" section of the Restoral Information chapter) and so must be defined, as well.
•Operator Procedures - The steps required by an Operator when processing an Alarm Signal received from a Subscriber identified as having a UL® Classified (Certificated) installation (documented in "The Operator Procedures" section in this chapter, and again in each of the associated chapters - as noted below - throughout this Electronic Manual).
•Reporting Requirements - The instructions for how the required Alarm Ticket Report are provided (documented in "The Reporting Requirements" section in this chapter, and again in each of the associated chapters throughout this Electronic Manual).
•Company Settings - Priority Alarm Notification: (Items n. o., p., q. in the Company Settings chapter are designed to comply with Section 11.1.5 (c) of the Third Edition UL® 1981 Standard)
c)When an audible signal that alerts the operator to receipt of a change-of-status signal is silenced, it is to be re-energized upon receipt of a subsequent change-of-status signal with higher priority from the same account or a change-of-status signal requiring operator action from another account.
✓The first four Company Settings will enable the functionality required and described above:
i.Notify Non Related Alarms - By default, the NotifyNonRelatedAlarms option is set to False ("F") in the Company Settings Form
▪For Third Edition UL® 1981 Standard compliance, setting the NotifyNonRelatedAlarms option to True ("T") enables the specialized Signal Processing feature to warn an Operator that there is an Alarm Signal pending with a higher priority that is not for the same Subscriber Account (CSID) currently on their screen (also see Non Related Alarm Notification Skip Value)
ii.Use Related Alarms Intercept - By default, the UseRelatedAlarmsIntercept option is set to False ("F") in the Company Settings Form.
▪For Third Edition UL® 1981 Standard compliance, setting the UseRelatedAlarmsIntercept option to True ("T") will turn on the Related Alarm Intercept feature.
▪This Related Alarm Intercept feature will cause a higher priority Alarm Signal if received by the same Subscriber with a lower priority Alarm Signal currently being processed, to be automatically switched to the higher priority Alarm Signal.
iii.Intercept Priority Threshold - By default, the InterceptPriorityThreshold option is set to "3" in the Company Settings Form
▪This value setting represents the signal priority that triggers the Related Alarm Intercept feature described above
▪It may be reset to a different signal priority value.
iv.Non Related Alarm Notification Skip Value - By default, the NonRelatedAlarmNotificationSkipValue option is set to '1'.
▪This feature allows the authorized MKMSCS User to determine the interval between each Notify Non Related Alarm notification (this feature warns an Operator that there is an Alarm Signal pending with a higher priority which is not for the same Subscriber Account (CSID) currently on their screen).
▪Each value of the Number increases the delay by 4 seconds (e.g., if number value is set at 5 the result would be a 20 second delay)
▪Also see the Non Related Alarm Notification Skip Value discussion for additional information
•The Company Settings listed below enable and describe other required functions:
v.UL Stale Alarm Priority Cutoff - By default, the ULStaleAlarmPriorityCutoff option in Company Settings is set to Zero ("0").
▪For those Companies who are using the recommended Priority Levels for UL Certificated Alarm Systems documented in Section 11.1.5 (g) in the Third Edition UL® 1981 Standard, this should be set to seven ("7").
▪For those Companies who are using an optional set of Priority Levels allowed in Section 11.1.5 (g) in the Third Edition UL® 1981 Standard, this should be set to five ("5") assuming the the 2, 3, and 4 recommended Priority Levels have been combined (adjust accordingly).
vi.Inactivity Disconnect - When the UL® 1981 Version is Registered (i.e., Active), this InactivityDisconnect option should be set to True ("T") to comply with Section 6.2.7 in the Third Edition UL® 1981 Standard - "Once communication of a session has been idle for a maximum of 15 minutes the session shall be automatically terminated."
▪When the InactivityDisconnect option should be set to True ("T"): after 15 minutes of inactivity by the current User, a Warning Message is displayed and if not acknowledged, the system will disconnect (log out of the database) and the User must Log In again to continue to use the system.
▪If the InactivityDisconnect option is set to False ("F"), this Inactivity Disconnect feature will be turned off.
vii.Check UL Password Restrictions - When the UL® 1981 Version is Registered (i.e., Active), this new The CheckULPasswordRestrictions option in Company Settings must be set to True ("T") to comply with Section 6.2.6 relating to Password Restrictions in the Third Edition UL® 1981 Standard.
▪If the CheckULPasswordRestrictions option is set to False ("F"), this Password Restrictions feature will be turned off.
➢Note: The procedures within this Electronic Manual that reference the Third Edition UL® 1981 Standard are those dated on or after October 29, 2014.
❑Other Special Settings Requirements:
•Most of the Alarm Ticket Report requirements enumerated in items 10.1.3(a-u) Third Edition UL® 1981 Standard are produced by default.
✓But, there are a few Special Settings within the database that will need to be properly configured to automatically produce the required Alarm Ticket Report for a Subscriber with a UL® Grade (Certificated) installation.
✓Each applicable 10.1.3(a-u) Third Edition UL® 1981 Standard that necessitates a special setting is listed below.
▪The required instructions for these Other Settings are explained in detail.
✓Links to the appropriate chapter(s) within this Electronic Manual are also provided.
▪These Links offer the full instructions for all of the information which may be entered into the associated Forms.
•Other Settings - The following information will explain how to identify line security, and record the method used to verify the alarm investigator's arrival, whether the central station holds keys, whether the keys were used by the investigator, and if a sounding device is provided on the alarm system:
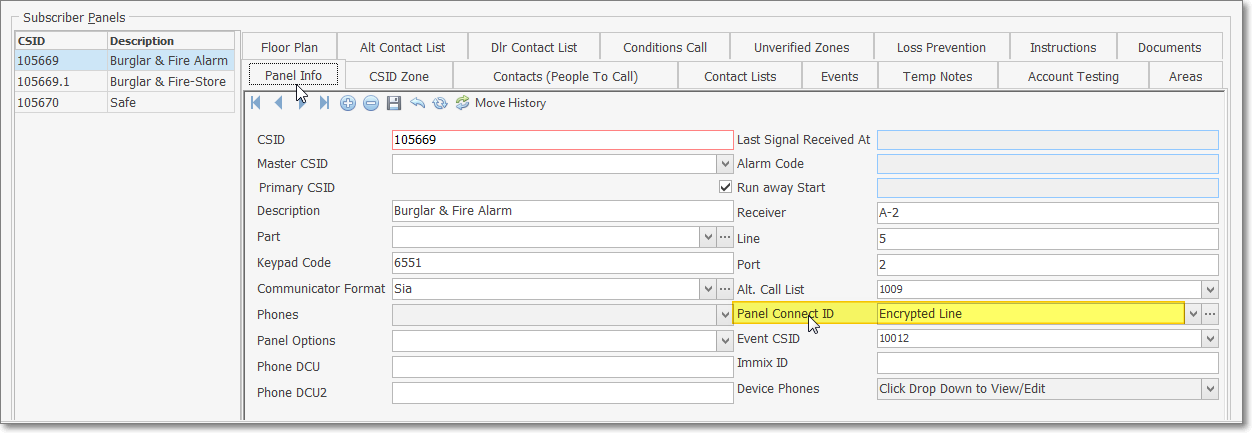
d) "If the alarm system has security, whether it is encrypted line security."
▪If the line security for the Account is encrypted, within MKMS open a Subscribers Form and locate that Account.
▪Select the Edit View Icon, Choose the Monitoring tab to display their Central Station Data.
oTowards the bottom of that Monitoring tab is the Subscriber Panel(s) section where each CSID used by this Account will be listed.
oLocate each CSID with encrypted line security.

Subscribers Form - Edit View - Monitoring tab - Subscriber Panels section - Panel connection ID - Encrypted Line
▪Panel Connection ID - In the Panel connection ID field within the Subscriber Panel(s) section, (see mouse pointer in the illustration above) using the Drop-Down Selection List provided, Choose the Encrypted Line option.
➢Note: See "The Operator Procedures" discussion below which will explain how to:
orecord the time an event was received,
orecord alarm verification when used,
orecord when Police or Fire responders were dispatched,
orecord when any alarm runner was dispatched,
orecord when the alarm runner(s) arrived,
oetc.

Investigator 1 Sent dialog
j) "The time the alarm runner No. 1 was dispatched"
k) "The time the alarm runner No. 2 was dispatched"
l) "The time the alarm runner No. 1 arrived (if dispatched"
m) "The time the alarm runner No. 2 arrived (if dispatched"
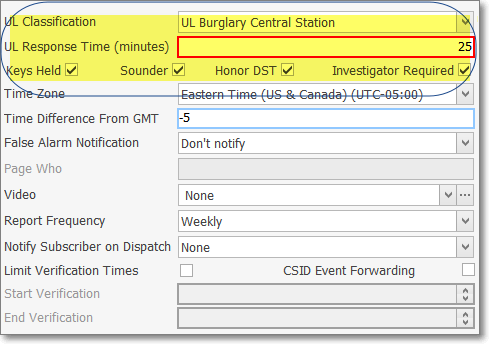
▪The method used to require the Operator to verify the alarm investigator's arrival is triggered by an entry in the UL Classification field in the Central Station Data section of the Monitoring tab in the Edit View of the Subscribers Form:
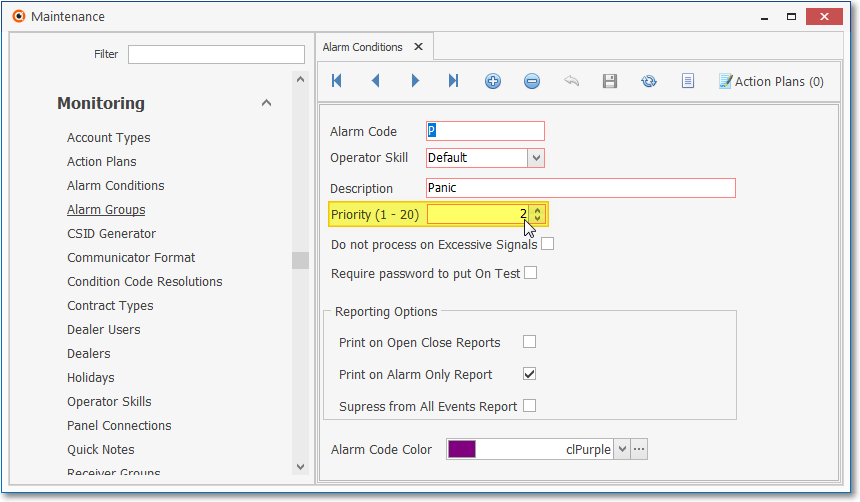
oThe Priority Level is set for the Alarm Condition of the incoming signal.

Alarm Condition Form - Priority field
oSelecting the proper UL® Classification (see the yellow highlight and the mouse pointer in the illustration below) for the Subscriber, in combination with having the triggering Priority Level assigned to the Alarm Condition Code (see the yellow highlight and the mouse pointer in the illustration above) of the alarm event being reported, will allow the application when processing an alarm to ask the Operator for the “Investigator’s arrival verified by?" by prompting the Operator for a typed response in that dialog box.
Special UL fields

Subscribers Form - Edit View - Monitoring tab
UL Classification - UL Response Time - Keys Held - Sounder - Investigator fields
▪The Investigator Sent entry is automatically time-stamped when it is saved by Clicking the OK button.
n) "The elapsed time between the receipt of the alarm signal ... and the arrival of the runner at the premises runner at the premises"
▪The elapsed time from Dispatch to Arrival will then be calculated.

Investigator 2 Arrival dialog - Elapsed Time calculated automatically
p) "Whether the central-station holds keys"
▪Keys Held - In the same Central Station Data section, Check the Keys Held box, if appropriate (that field is also shown in the Special UL fields illustration above).
oWhen this central-station does in fact have keys for this protected premises information, it will be included on the Alarm Ticket Report.
q) "Whether the keys were used or not used (fire / burglar)"
▪Selecting the proper UL® Classification in the the Central Station Data section and assuming the Alarm Condition of the incoming signal is assigned the triggering Priority Level will force the application - when completing an alarm - to ask the Operator "Were keys used?" and prompt that Operator with a 'YES' or 'NO' selection.

Confirm - Were keys used?
•Special Procedures: The following Operator actions will record the required Times, record the method used to verify the alarm investigator's arrival, and identify whether the keys were used by the Investigator:
e) "The time the alarm was received by the automation system (fire/burglar)"
▪This information is captured, recorded in the Signal History table, and included in the Alarm Ticket Report automatically.
h) "The time the police / fire department was notified, and the police / fire department identification number (fire/burglar)"
▪When and to whom an Operator requests a Dispatch of Police or Fire Responders is captured, recorded in the Signal History table, and included in the Alarm Ticket Report automatically.
▪All UL® Certificated Accounts require a Resolution, Disposition or Reason for the Alarm incident or investigation, (e.g., False Alarm, or Actual Alarm, Subscriber Error, etc.) be recorded.
▪This requirement is implemented by requiring that the appropriate Resolution Code be identified before the Alarm Signal is Completed by the Operator.
j) "The time the alarm investigator No. 1 was dispatched, and the investigator's name and employee ID (burglar)"

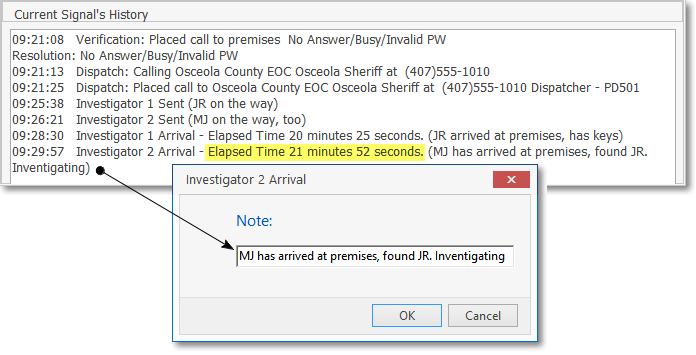
▪When an Alarm Investigator (e.g., Security Company) is Dispatched, the Operator must enter a Note using the available Notes tab on the Signal Processing Form, and include that Investigator's Name and Employee ID (see typical example of a Note entry in the illustration above).
▪The Note, and the time of this action is captured, recorded in the Signal History table, and included in the Alarm Ticket Report automatically.
k) "The time the alarm investigator No. 2 (if any) was dispatched, and the investigator's name and employee ID (burglar)"
▪If a second Alarm Investigator is Dispatched, the Operator must enter a Note using the available Notes tab on the Signal Processing Form, and include that second Investigator's Name and Employee ID (see typical example in the illustration above).
▪The Note, and the time of this action is captured, recorded in the Signal History table, and included in the Alarm Ticket Report automatically.
l) "The time the alarm investigator No. 1 arrived"
▪The Investigator Arrival Note, and the time of this action, along with the elapsed time from Dispatch is captured, recorded in the Signal History table, and included in the Alarm Ticket Report automatically.
m) "The time the alarm investigator No.2 arrived (if dispatched)"
▪The Investigator Arrival Note, and the time of this action, along with the elapsed time from Dispatch is captured, recorded in the Signal History table, and included in the Alarm Ticket Report automatically.

Note entry of Investigator Dispatch - Investigator Arrival dialog - Current Signal's History notation
▪While Processing the Alarm, when an Alarm Investigator (either #1 or #2) arrives on Premises:

Signal Processing Form - Actions button - Investigated #1 Arrival option
oThe Operator will Select the Actions button to open the Actions button Menu
oOn that Menu, Select the Investigated option
oType in the Name of the arriving Alarm Investigator in the Investigator Arrival dialog
oClick the OK button
▪The Investigator Arrival Note is automatically time-stamped when saved by Clicking the OK button.
oThe time of arrival, and the elapsed time between when the Investigator was Sent and the Investigator's Arrival, is calculated and both are included in the Alarm Ticket Report automatically.
o) "The method used to verify the alarm arrival of the runner"
▪Investigator's arrival verified by - For a UL® Classified Alarm System, when completing an Alarm Signal with a Priority Level requiring the identification of the Verification Method used by a "runner", answer accordingly when this dialog is displayed.

Verification Method - Investigator's arrival verified by
•The remaining requirements in the 10.1.3 Third Edition UL® 1981 Standard are accommodated automatically in the Alarm Ticket Report.
✓Before completing the alarm, the Operator may make note of the Alarm Event's incident number (which is also saved automatically in the Signal History table), if and when they want to print the UL® Alarm Ticket Report at a later time.
•The Alarm Ticket Report is a detailed report of exactly what was done while an Operator processed of an Alarm Signal.
✓The Special Settings Requirements and Operator Procedures (documented above to comply with the Third Edition UL® 1981 Standard) must be followed when Processing Alarm Signals with a Priority Level from 1 to 6 for those Subscribers with a UL® Classification assigned in the Central Station Data section.
✓The Alarm Ticket Report for the currently displayed alarm event may be Emailed at any time while that alarm event is still being Processed by selecting the Email Alarm Ticket option accessed on the Actions menu

•To access the Alarm Tickets Report dialog (within MKMS):
1.From the Backstage Menu System Select Reports and Choose Monitoring and Select the Alarm Ticket option
2.From the Quick Access Menu, Select Reports and Choose Monitoring and Select the Alarm Ticket option

Alarm Tickets dialog
✓When the Alarm Tickets Report dialog is presented:
▪Report For - Choose the One Alarm Only option.
▪Incident Number - Enter the Incident Number to be reported.
▪Print - Click the Print button to produce the report.

Alarm Ticket - Preview - UL Status & Dispatch information