|
|
Alarm TicketsThis Help File Page was issued on 09/30/2017 This Help File Page was last Modified on 09/28/2024 |


|
|
Alarm TicketsThis Help File Page was issued on 09/30/2017 This Help File Page was last Modified on 09/28/2024 |
 Scroll to Top of Page
 Print Topic
 Email Feedback
 Show/Hide Expanders
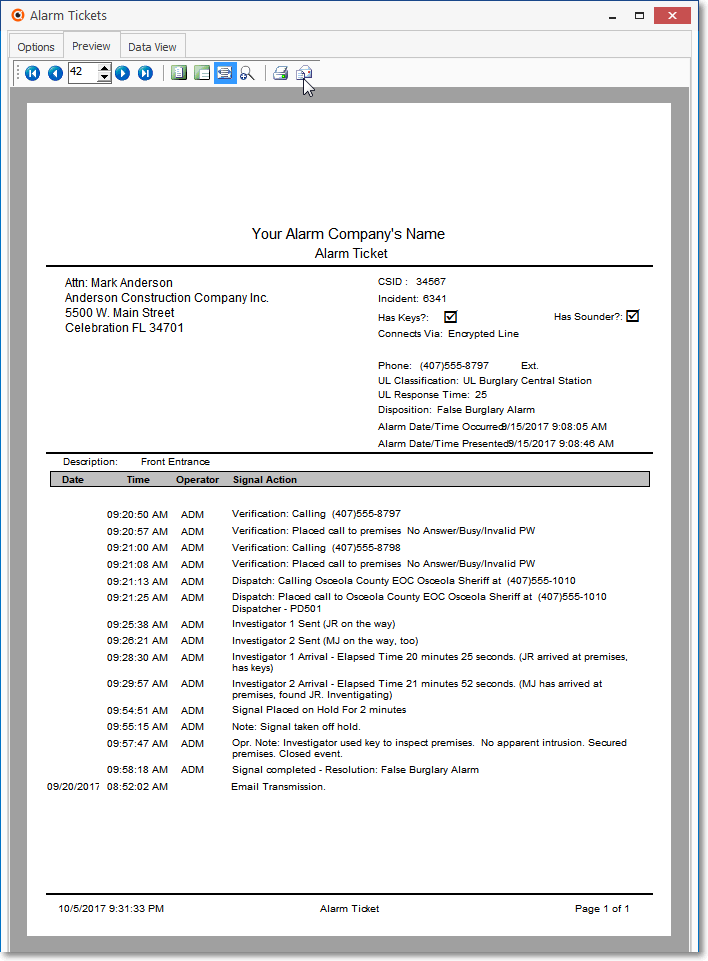
❑The Alarm Ticket is a detailed report listing exactly what was done while an Operator processed of an Alarm Signal.
•To access the Alarm Tickets report dialog:
1.From the Backstage Menu System Select Reports and Choose Monitoring and Select the Alarm Ticket option
2.From the Quick Access Menu, Select Reports and Choose Monitoring and Select the Alarm Ticket option
❖Special Settings and Procedures must be followed when Processing Alarm Signals for Subscribers with a UL® Classification assigned in the Central Station Data section (see below).
Other Special Settings
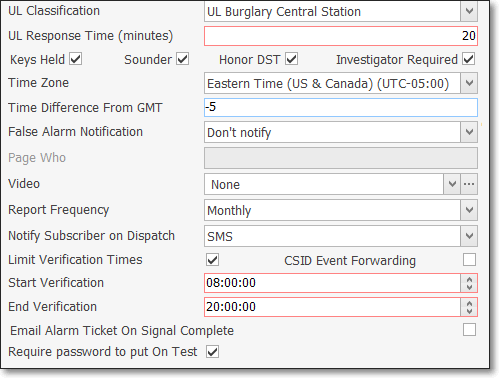
✓UL Classification - If the installation will be issued a UL® Alarm Certificate, use the Drop-Down Selection List provided to Choose the UL Classification category of the system.
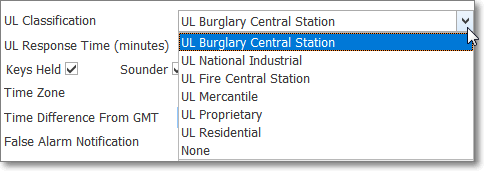
❖UL® Categories: All statistics shall be broken down by certificate type, which are
1.UL® Central Station fire alarm systems,
2.UL® Central station burglar alarm systems,
3.UL® proprietary burglar alarm systems,
4.UL® national industrial burglar alarm systems,
5.UL® mercantile burglar alarm systems,
6.UL® residential burglar alarm systems, and account number.
•The Alarm Ticket Report (designed and documented to comply with the Third Edition UL® 1981 Standard) is the detailed report of exactly what was done while an Operator processed an Alarm Signal.
✓Whenever an Alarm Ticket is printed or emailed while an Operator is Processing an Alarm Signal, an Alarm Ticket Printed/Emailed entry is inserted into the Alarm Activity Report for that alarm event.
✓The Special Settings Requirements and Operator Procedures must be followed when Processing Alarm Signals with a Priority Level from 1 to 6 for those Subscribers with a UL® Classification assigned in the Central Station Data section.
✓The Alarm Ticket Report for a currently displayed alarm event may be (re-)emailed at any time while that alarm event is still being Processed by selecting the Print Alarm Ticket option accessed using the Actions button as shown below:

❑Alarm Tickets report tabs - There are three tabs on the Alarm Tickets dialog.
•Options - Initially only the Options tab is shown (until you make your Options selections and Select Print).
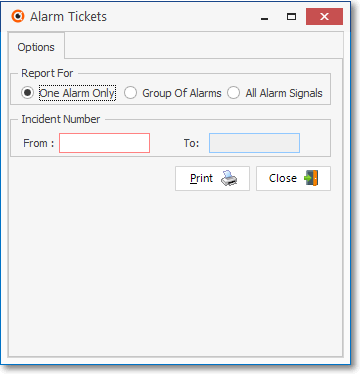
Alarm Tickets Report dialog
✓Report For - Select which Alarms Signals will be reported.
▪One Alarm Only - One Signal is the default choice. Enter the desired Incident Number. See Incident Number below.
▪Group Of Alarms - Click this option to have several Alarm Tickets produced. See Incident Number below.
▪All Alarm Signals - Click this option to have all Alarm Tickets produced.
✓Incident Number - If One, or a Group of Alarms is chosen, you must enter the appropriate Incident Number(s) to be reported.
▪If One Alarm Only was selected:
oFrom - Enter the One Incident Number to be reported.
oTo - No number is required.
▪If a Group Of Alarms was selected:
oFrom - Enter the Starting Incident Number to be reported.
oTo - Enter the Final Incident Number to be reported.
▪If All Alarm Signals was selected:
oFrom - The original Starting Incident Number is automatically selected.
oTo - The Final Incident Number is automatically selected.
✓Print - Click the Print button ![]() to Preview and optionally Print (to a File or a Printer) the selected Alarm Tickets.
to Preview and optionally Print (to a File or a Printer) the selected Alarm Tickets.
✓To Exit this Alarm Tickets dialog, Click the Close button ![]() at the bottom of the Options tab.
at the bottom of the Options tab.
•Preview - The Preview tab presents the report which resulted from the Options you've selected.
✓Up Arrow/Down Arrow - hi - Moves the report one line up, or one line down, respectively.
✓Page Up/Page Down - Moves the report to the previous or next page, respectively.

Alarm Tickets - Preview tab options
✓Home - ![]() - Using either the screen Icon or your Keyboard's Home key, moves the report to the top of the first page.
- Using either the screen Icon or your Keyboard's Home key, moves the report to the top of the first page.
✓End - ![]() - Using either the screen Icon or your Keyboard's End key, moves the report to the bottom of the last page.
- Using either the screen Icon or your Keyboard's End key, moves the report to the bottom of the last page.
✓Arrows - The arrows allow you to move back and forth, from page to page.
✓Number - Indicates the page number you are viewing.
▪You may also type in a specific page number, Press 8 Enter and that page will be displayed immediately.
▪If you enter an invalid page number, it will be ignored.
✓Fit To Page - Click the first button after the arrows to size a full page of the report to fit the screen.
✓Zoom To 100% - Click the second button after the arrows to display the page at 100% (of the printed view).
✓Fit To Page Width - Click the third button after the arrows to size the page of the report to fit the full width of the screen.
✓Zoom To Percentage - Click the fourth button after the arrows to re-size the page of the report by percentage.
![]()
▪When you Click the Zoom To Percentage button, the Percentage selector will be displayed.
▪You may then Click the Up or Down ‚ arrows to set the exact amount of Zoom you want.
✓Print - Click the Print button to Print (to a File or a Printer) ![]() the displayed Alarm Ticket(s).
the displayed Alarm Ticket(s).
✓Email - Click the Email ![]() button to send this report to an Email address of your choosing.
button to send this report to an Email address of your choosing.
✓To Exit the Preview tab and Close this Report dialog Form, Click the Close ![]() box on the right at the top of the Preview tab.
box on the right at the top of the Preview tab.
 \
\
Alarm Ticket - Preview tab - Email option
•Data View - This view provides a tabular (spreadsheet style) presentation of the selected data.
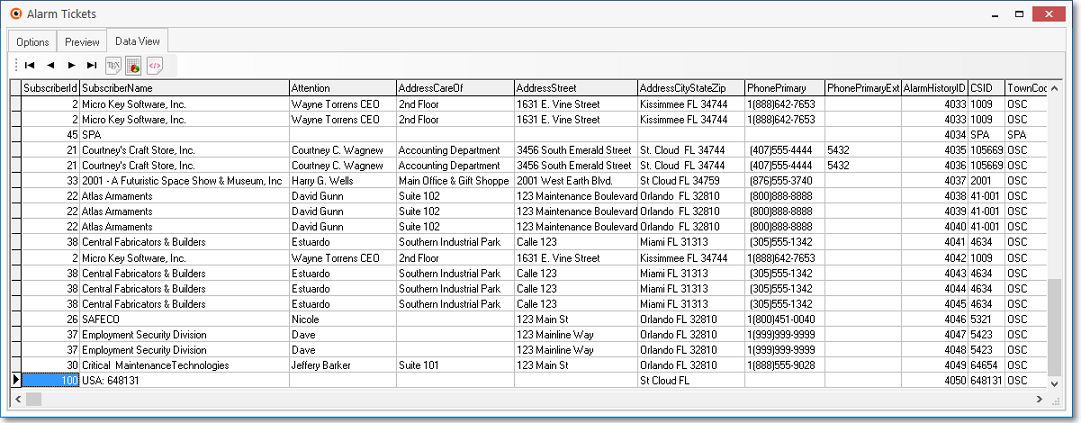
Alarm Tickets - Data View Tab
✓Arrows - Click the arrows to move through the record.
✓Export - Exporting the data from this Data View tab (note the "fly-over" help available on these buttons):
▪Export to CSV - Click the first button after the arrows to export the data to a Comma Separated Values (CSV) file format.
▪Export To Excel - Click the second button after the arrows to export the data to an Excel (.xls) file format.
▪Export To Html - Click the third button after the arrows to export the data to an HTML formatted file.
✓To Exit the Data View tab and Close this Report dialog Form, Click the Close ![]() box on the right at the top of the Data View tab.
box on the right at the top of the Data View tab.