Technician's Guide to Using Tech Pro II
❑Getting Started with Tech Pro II
• If you are the Service Manager, read the Operational Overview for the Service Manager chapter.
✓ That chapter provides a review of how Technicians are Scheduled, Dispatched, Tracked, Inventory is accounted for, and their Labor Hours are posted within the Service Tracking System of MKMS
✓This Tech Pro II app connects and posts directly to that Service Tracking System
•The Tech Pro II App may be used on a smart phone, tablet or iPad: and/or by entering the correct URL and Login information into almost any device (laptop, desktop PC, etc.) that has access to an Internet Web Browser.

Default Tech Pro II page displayed when the application or Web Page is opened
•LOGIN - The first step is to Tap (Click) (Tap) this LOGIN option to open the Log-in page.
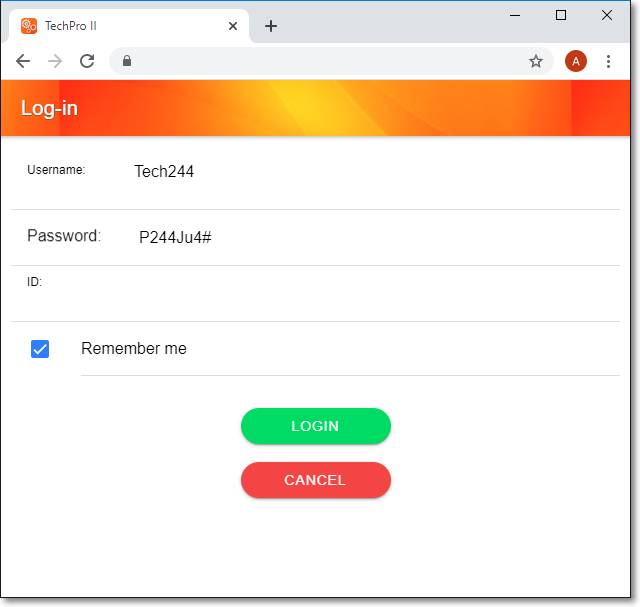
Tech Pro II - Log-in page
✓Username - Tap (Click) (Tap) the title Username and enter your assigned User name
✓Password - Tap (Click) (Tap) the title Password and enter your assigned Password
✓ID - Tap (Click) the title ID and enter your assigned ID
✓Remember me - Check (Tap) on this Check box to have your Username and Password filled in automatically the next time you open Tech Pro II
▪You will always have to enter your assigned ID.
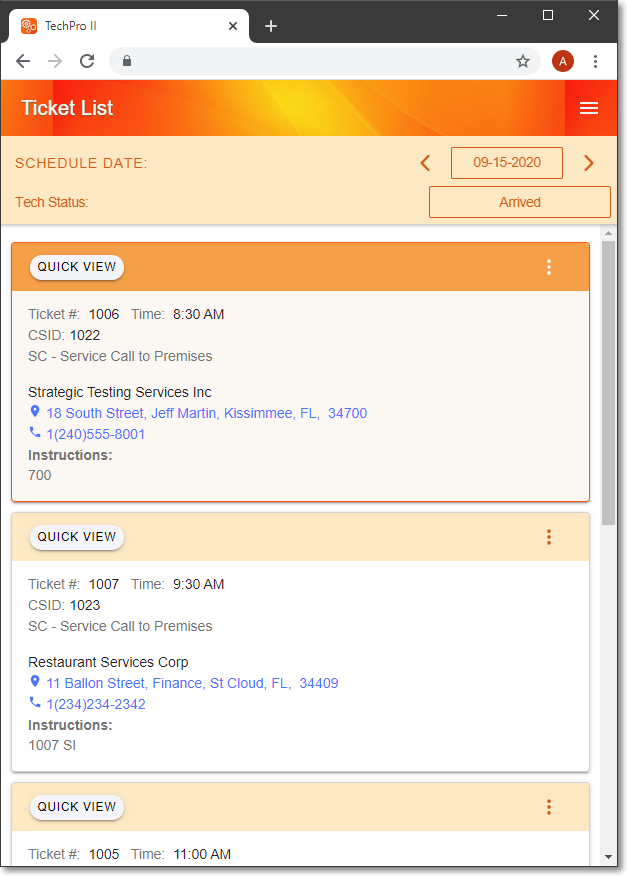
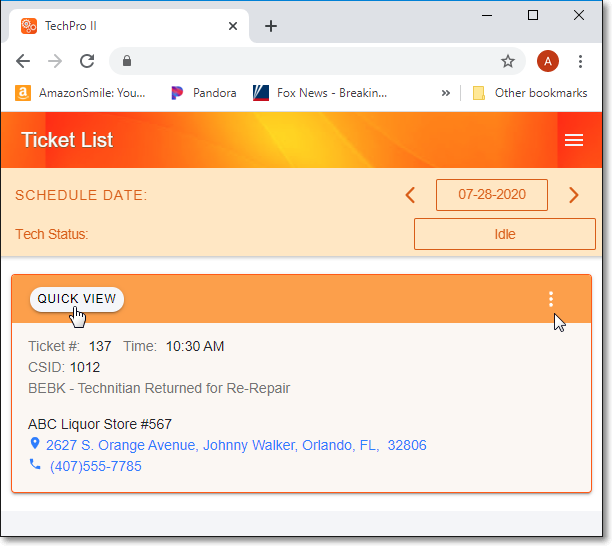
▪The Ticket List page will be displayed
•The Ticket List page offers a QUICK VIEW of each listed Service Ticket (Work Order) - currently assigned to the Technician who just logged on - that is scheduled Today
Tech Pro II page with Ticket List Quick Views
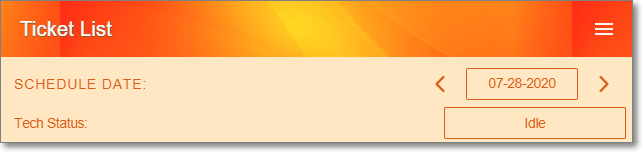
•There are two options on the top of the Ticket List page:
Tech Pro II page - Ticket List page - 2 Option
1.SCHEDULE DATE - By default, the Schedule Date will be set as Today
▪Tap (Click) the Date box to display a Calendar Date Selection pop-up
oSlide the Month, Day, or Year columns up or down - as needed - and Tap (Click) DONE to reset the Schedule Date
▪Or, Tap (Click) the Left < or Right > Arrow to move the Schedule Date Forward or Backward, one Day at a time
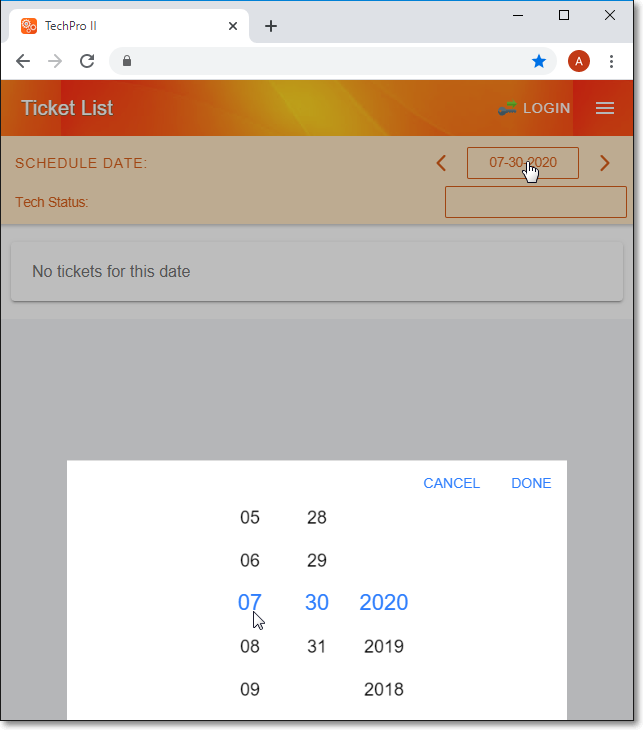
Tech Pro II Ticket List page with Calendar Date Selection pop-up
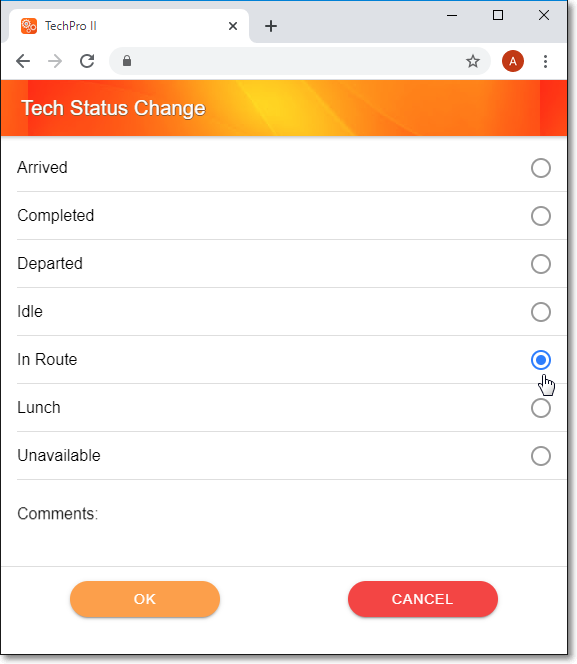
2.Tech Status - By default, the Technician's work Status will be set to Idle.
▪The Technician's current working status can (should) be maintained in real time.
▪Tap (Click) the box to the right of the Tech Status title to display the Tech Status Change page
▪Or, use the 3 Bar Menu Icon  (see hand pointer pictured in Using the Ticket List page Options discussion below) and choose My Status
Tech Pro II - Tech Status Change options
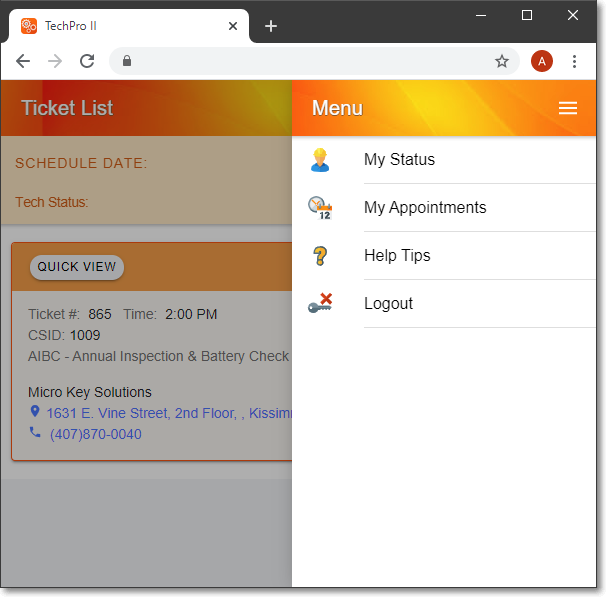
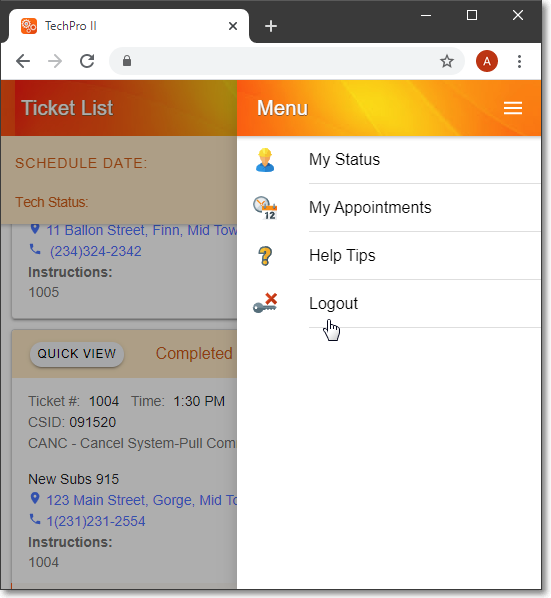
•Using the Ticket List page Options Menu
- Tap (Click) the 3 Bar Menu Icon to display the Ticket List page's Options Menu
Tech Pro II Ticket List page Options Menu
✓My Status - This My Status option displays the Tech Status Change page
Tech Pro II - Tech Status Change options
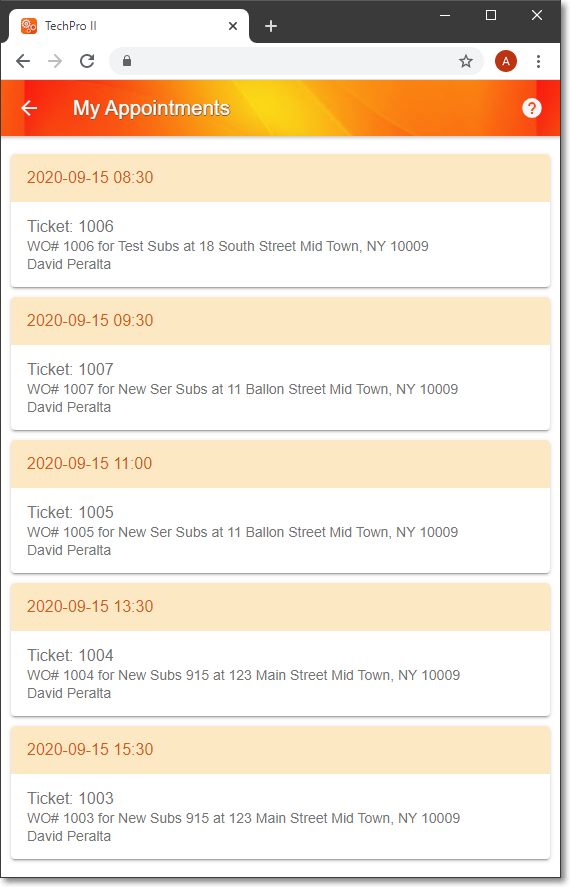
✓My Appointments - This My Appointments option displays the My Appointments page
Tech Pro II - My Appointments page
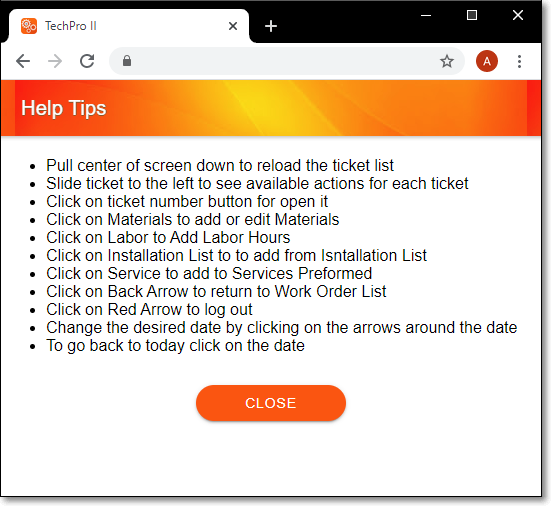
✓Help Tips - Tap (Click) this Help Tips option to display the associated Help Tips page
Tech Pro II - Help Tips page
✓Logout -The Logout option is on the Ticket List page's Menu
Tech Pro II - Ticket List page - Menu - Logout option
▪Tap (Click) Logout
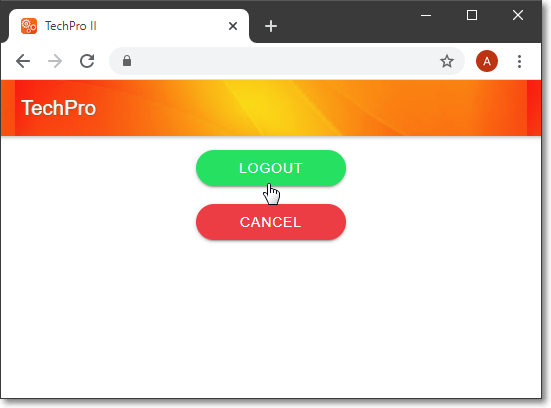
Tech Pro II - "LOGOUT" option
▪The Technician will be disconnected and Tech Pro II will re-display the initial LOGIN page.
Tech Pro II - "LOGIN" page is re-displayed after Logout
•QUICK VIEW - Each Service Ticket in the Ticket List offers a Quick View section with the basic information for that selected Service Ticket
Tech Pro II - Ticket List - QUICK VIEW option
✓Tap (Click) this QUICK VIEW option to display its Ticket Quick View page.
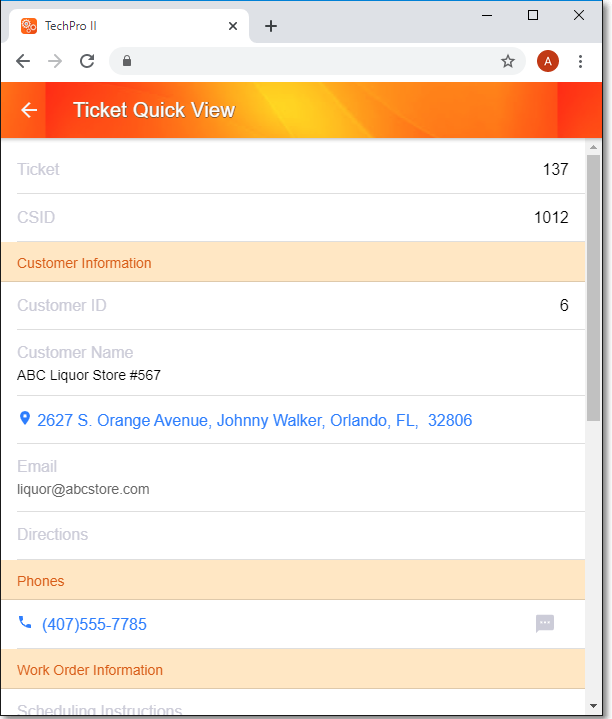
Tech Pro II - Ticket Quick View page
✓Tap (Click) the Left Arrow next to the Ticket Quick View page's title (shown above) to return to the Ticket List page.
Tech Pro II - Ticket List page
![]() - Tap (Click) the three vertical dots option to the far right of the Quick View title of a selected Service Ticket to display that Ticket's Quick View Menu
- Tap (Click) the three vertical dots option to the far right of the Quick View title of a selected Service Ticket to display that Ticket's Quick View Menu
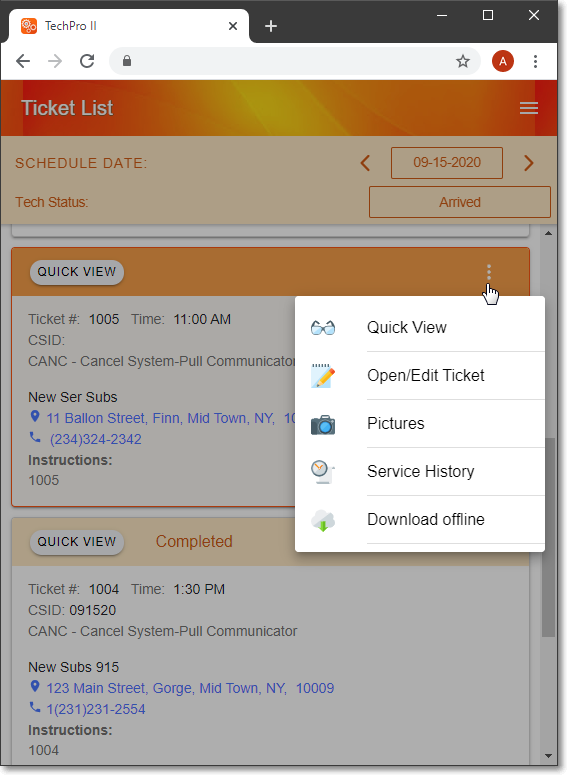
Tech Pro II - Quick View - Menu options
1)Quick View - Tap (Click) this Quick View option to open the Ticket Quick View page for the selected Service Ticket.
Tech Pro II - Ticket Quick View page
▪Tap (Click) the ![]() left arrow Ñ to return to the Ticket List page
left arrow Ñ to return to the Ticket List page
2)Edit Ticket - Tap (Click) this Edit Ticket option to display the Service Ticket page for the currently selected Service Ticket
▪This Service Ticket page has five (5) Tabs on the top and a 3 Bar Menu Icon (see hand pointer in the illustration below) which is used to display the Service Ticket page's Menu.options
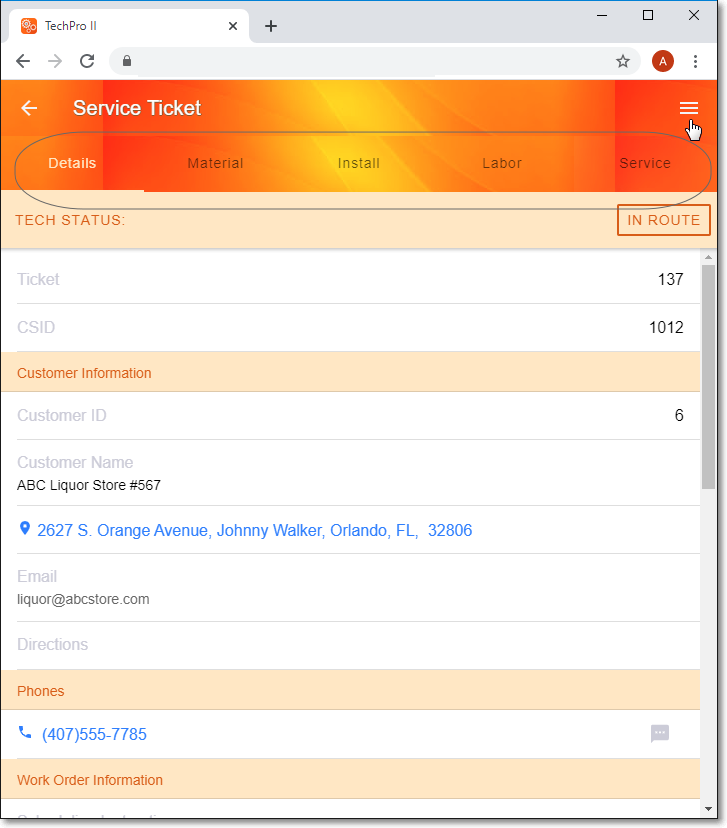
Tech Pro II - Service Ticket page with Tabs and Menu Icon
▪Tap (Click) the ![]() left arrow Ñ to return to the Ticket List page
left arrow Ñ to return to the Ticket List page
▪See the "Understanding and Using the Service Ticket page's Service Ticket Menu.options" discussion below.
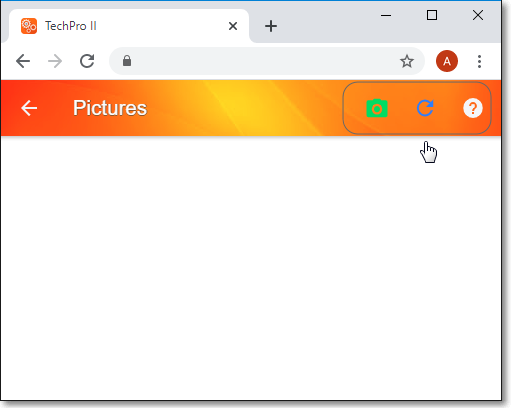
3)Pictures - Tap (Click) this Pictures option to open the Pictures page for the selected Service Ticket.
▪This Pictures page has three Icons: 1) Camera, 2) Refresh, and 3) Help ("?").
Tech Pro II - Service Ticket - Pictures page
i.Camera - Tap (Click) this Camera option to open Camera page
▪This page provides a test image and four (4) Icons - 1) Take Picture, 2) Discard Picture, 3) Save Picture, 4) Cancel session

Tech Pro II - Service Ticket - Pictures page - with test image
ii.Refresh - Tap (Click) this Refresh option to download the most recent data from the host server.
iii.Help - Tap (Click) this Help option to view a brief Help page (This feature is being reviewed/revised)
▪Tap (Click) the ![]() left arrow Ñ to return to the Ticket List page
left arrow Ñ to return to the Ticket List page
4)Service History - Tap (Click) this Service History option to display the Customer's Service History List of the selected Service Ticket.
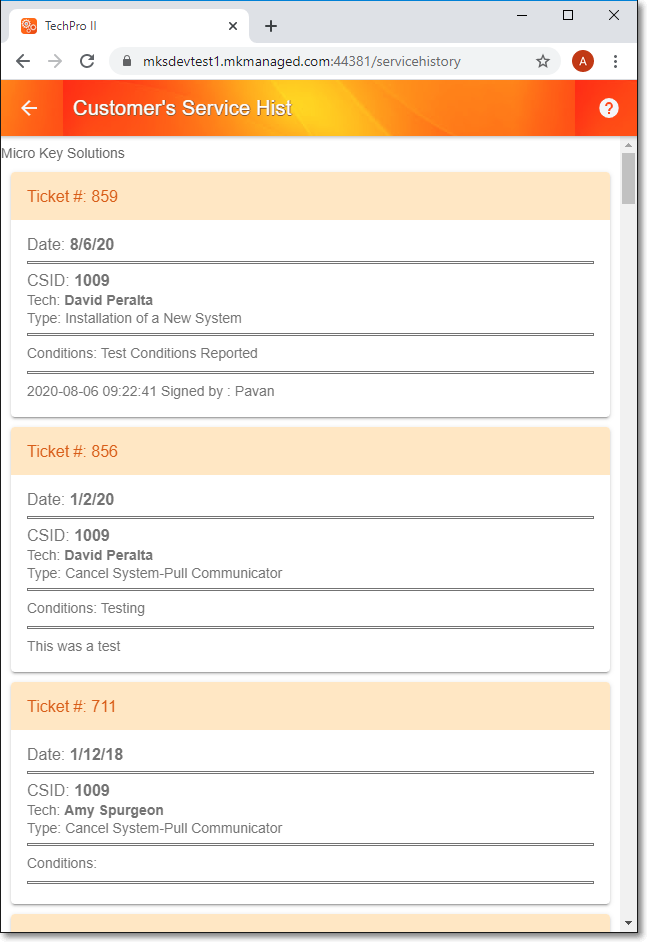
Tech Pro II - Service Ticket - Customer's Service Hist(ory) page
▪Tap (Click) the ![]() left arrow Ñ to return to the Ticket List page
left arrow Ñ to return to the Ticket List page
5)Download offline - Tap (Click) this Download offline option to download a full data set for the selected Service Ticket
▪This selection will return you to the Ticket List page when the download is completed
❑Understanding and Using the Service Ticket page's Service Ticket Menu.options (shown in the illustration below):
•Based on what data was previously entered for this Account, some options shown in the illustration below may not appear on every Service Ticket's Menu
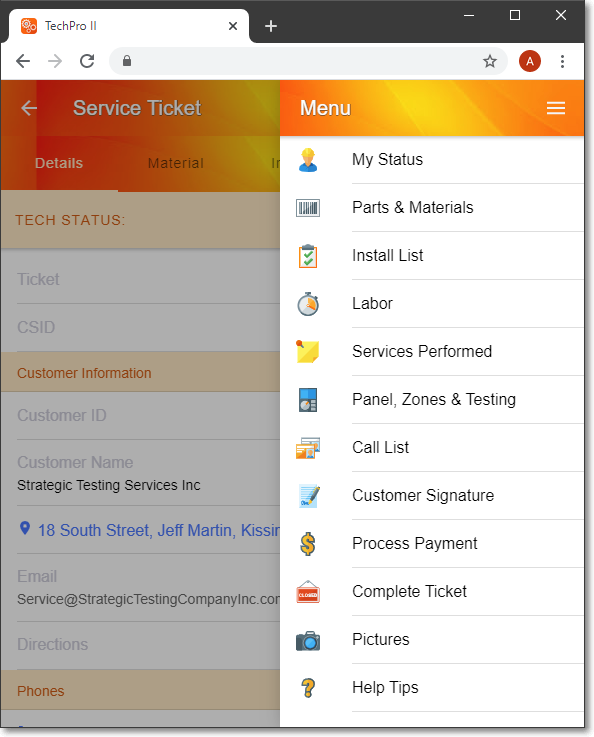
Service Ticket page - Service Ticket Menu options
- Tap (Click) the 3 Bar Menu Icon on the Service Ticket page to display its Service Ticket Menu.options
1)My Status - Tap (Click) My Status to display the Tech Status Change page .
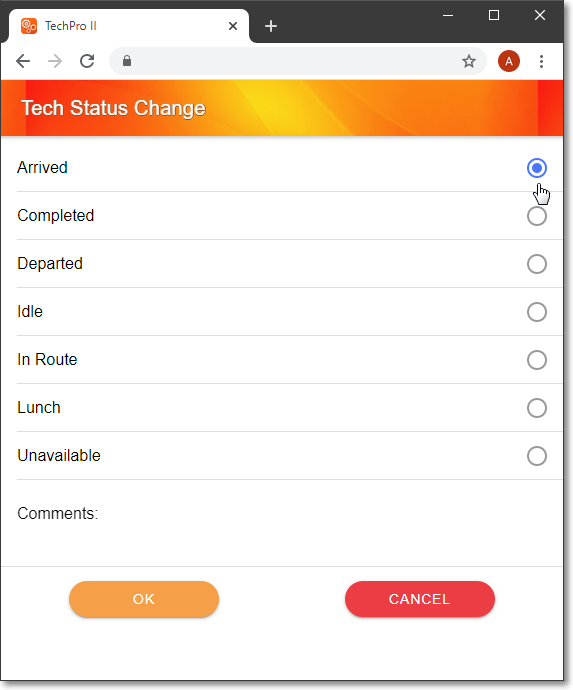
Service Ticket Menu - My Status option - Tech Status Change page
a.Tap (Click) your (now/changed to) current Status
b.Tap (Click) OK
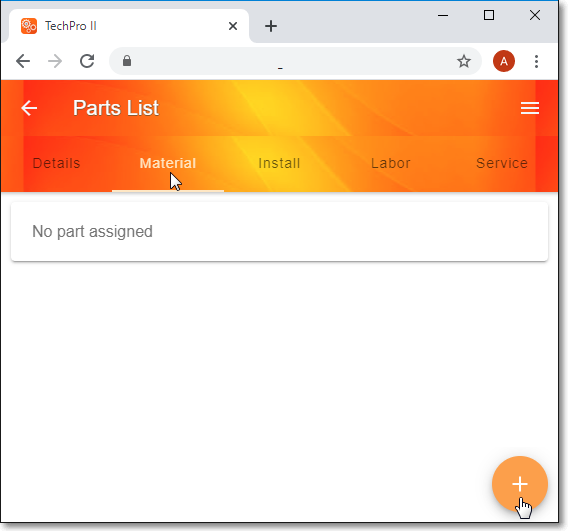
2)Parts & Materials - Tap (Click) this Parts & Materials option to display the Parts List page.
a.The Parts List page will be displayed with the Material tab selected
b.This Parts List page will list the Materials previously recorded as Used (see 3) Install List below) to Complete this Service Ticket
c.If no Materials have been identified as Used, a "No part assigned" message will be shown
Service Ticket Menu - Parts & Materials option - Parts List page
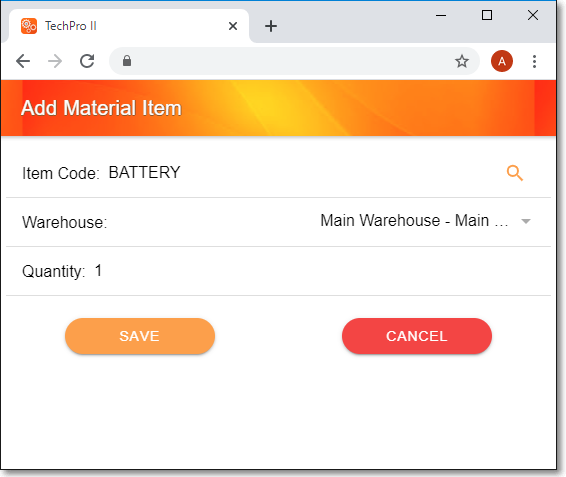
d.The Add Material Item page is used to identify a Material Item which has been used to Complete this Service Ticket
i.The Installation List page - accessed from the Install tab (see 3) Install List below) on the Service Ticket page - may also be used to identify items which have been used to complete this Work Order (Service Ticket)
 - Tap (Click) the Add Icon at the bottom of this page to display the Add Material Item page.
e.Item Code - Enter the Inventory Item's ID code for the Material that was used , OR
f. - Tap (Click) the Search Icon to open the Sale Item Search page.
i.Item - Enter the desired Inventory Item's ID code
ii.Tap (Click) the Search Icon on the Sale Item Search page to view a list of Items matching the entry.
iii.Tap (Click) the Item matching what was Used.
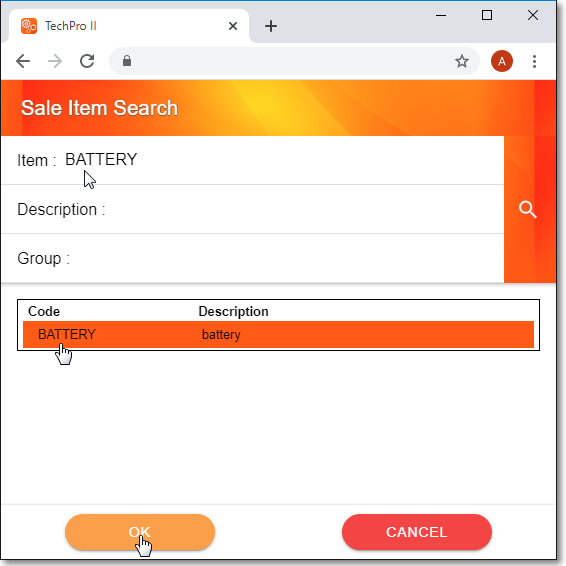
Sale Item Search page with required item
iv.Tap (Click) the OK button to close the Sale Item Search page and return to the Add Material Item page
v.The Add Material Item page will be re-displayed with that selected Item inserted.
Service Ticket Menu - Parts & Materials option - Parts List page - Add Material Item page
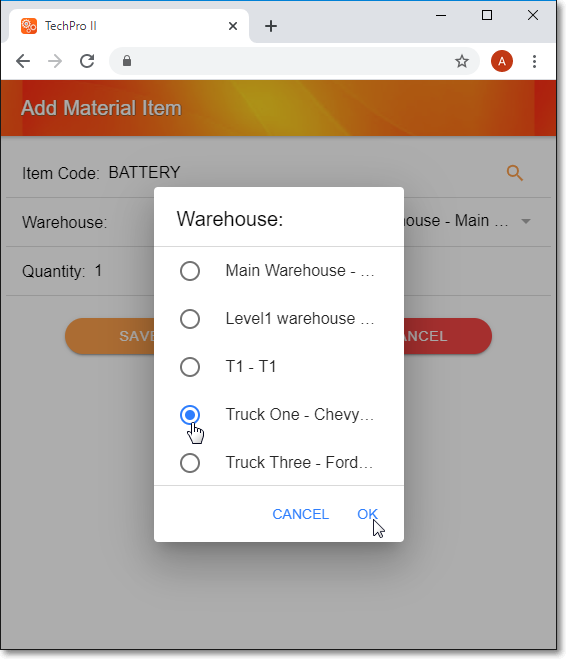
g.Warehouse - Once the required Item has been identified, identify from where is was taken.
i.By default, the Main (default) Warehouse will be inserted in the Warehouse field.
ii.If the Item was retrieved from a different Warehouse, Tap (Click) the down-arrow ‚ to open the Warehouse selection pop-up
Service Ticket Menu - Parts & Materials option - Parts List page
Add Material Item page - Warehouse selection pop-up
iii.Tap (Click) on the correct Warehouse.
iv.Tap (Click) the OK. option to return to the Add Material Item page
h.Quantity - By default, the Quantity used will be set a "1".
i.If this is incorrect, Tap (Click) on up-down arrow to set the actual number used.
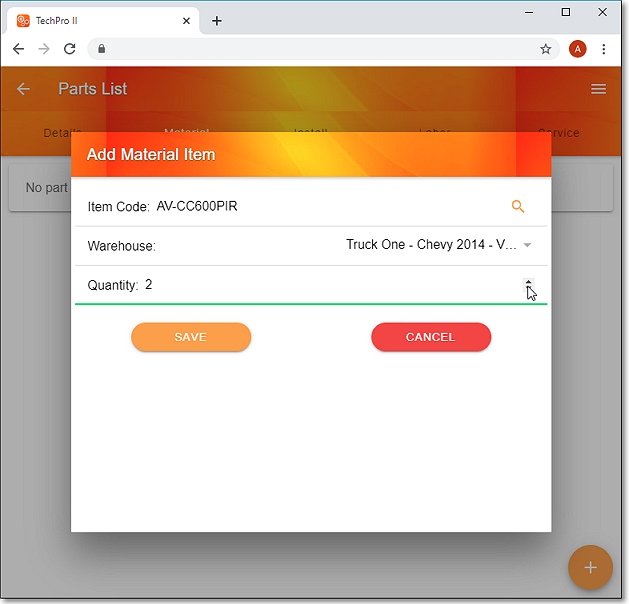
Service Ticket Menu - Parts & Materials option - Parts List page
Add Material Item page - Quantity selection arrows
i.Save - Tap (Click) Save to record the Used Inventory Item.
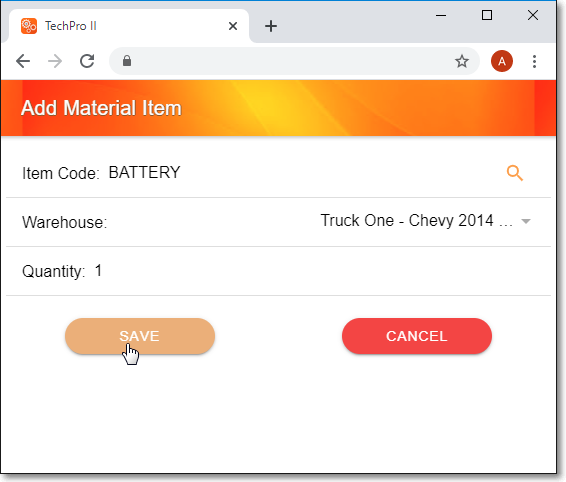
Service Ticket Menu - Parts & Materials option - Parts List page
Add Material Item page - Save option
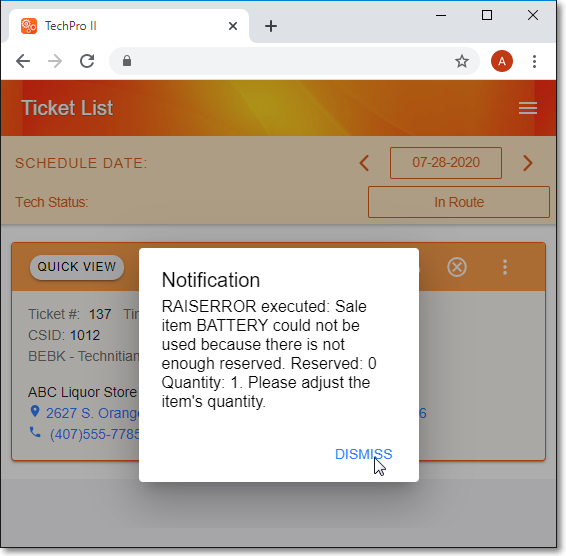
j.Notification - If the Item you (attempted to) add was not Reserved in advance for this Service Ticket, it cannot be added to the Parts List page.
i.Tap (Click) DISMISS to return to the Parts List page.
Service Ticket Menu - Parts & Materials option - Parts List page
Add Material Item page - Notification pop-up
3)Install List - Tap (Click) this Install List option to display the Installation List page.
i.This Installation List page is displayed for information only unless a specific listed item was actually used to complete the selected Service Ticket
ii.The contents of the Installation List corresponds to the content of the Parts List tab of the selected Work Order (i.e., Service Ticket)
iii.No changes are permitted to quantity or description.
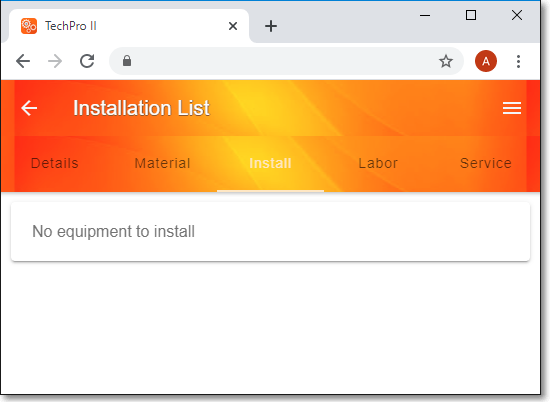
Service Ticket Menu - Install List option - Installation List page - no Parts List items defined
▪When any Installation List page item was actually Used to complete the selected Service Ticket, Tap (Click) the USE option (see below) of that item
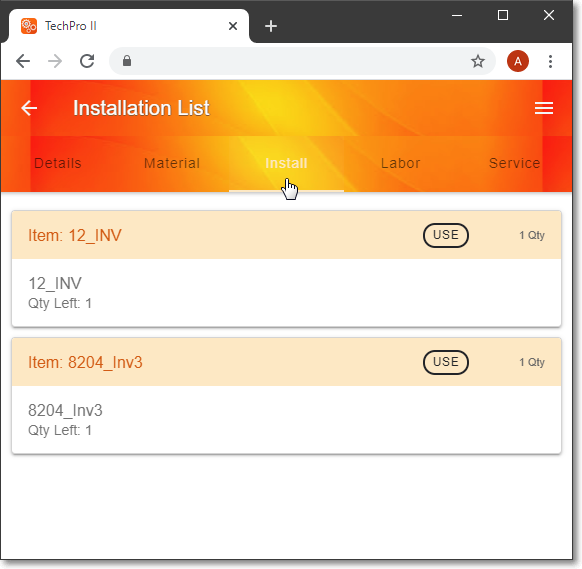
Service Ticket Menu - Install List option - Installation List page - with Parts List items defined
i.USE - Tap (Click) the USE option to indicate the selected item was actually used while completing this Service Ticket
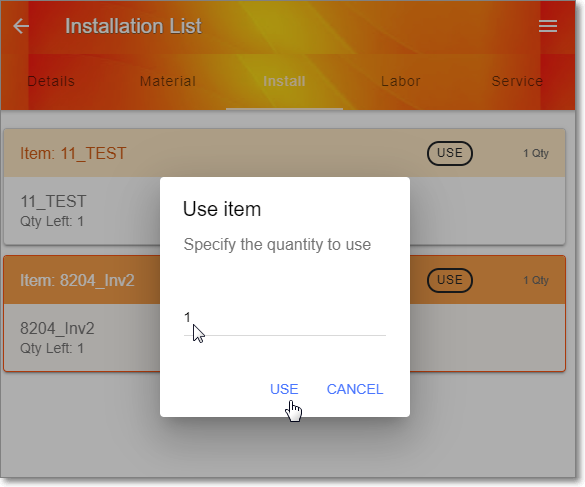
Installation List page - with Parts List items defined - Use item pop-up
ii.Specify the quantity to use - By default, this will be the Quantity (Qty) identified for this item but it may be changed, as appropriate
iii.Use - Tap (Click) the Use option to record this usage
iv.This information (Item and Quantity used) will be added to the Material tab of the Service Ticket page
4)Labor - Tap (Click) this Labor option to display the Time Sheets page.
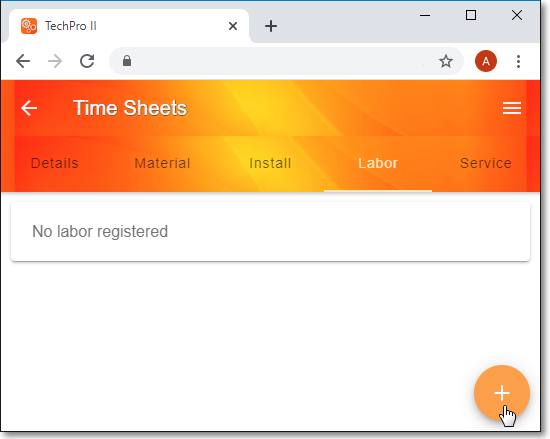
Service Ticket Menu - Labor option - Time Sheets page - No labor registered
- Tap (Click) the Add Icon at the bottom of this page to Time Sheets page where labor time worked by this Technician may be identified
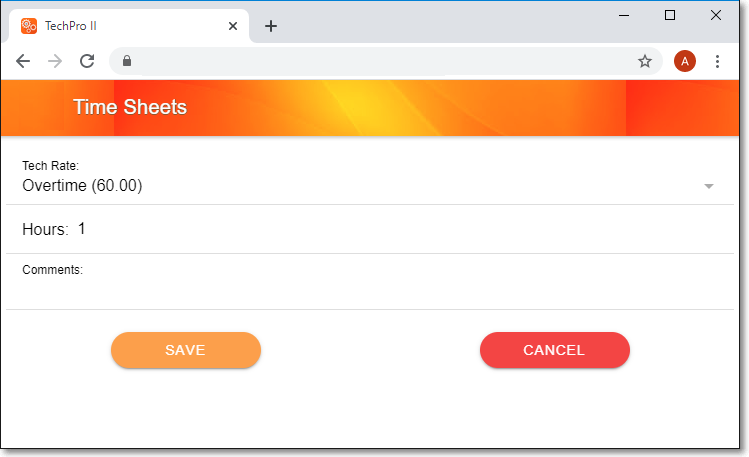
Service Ticket Menu - Labor option - Time Sheets - Labor Entry page
i.Tech Rate - By default, the Tech Rate used will be set the highest rate.
▪If this is incorrect, Tap (Click) on up-down arrow to open the Tech Rate pop-up where you can select the correct Rate.
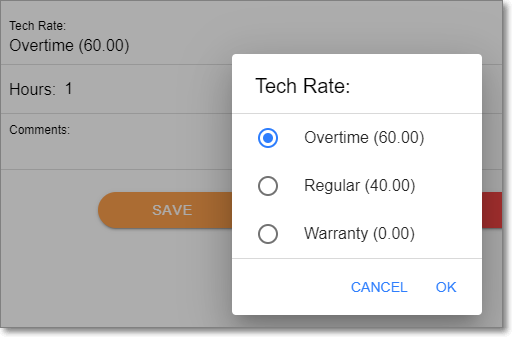
Service Ticket Menu - Time Sheets page - Tech Rate entry
ii.Hours - Enter the Labor Hours worked. Decimal entries are permitted.
iii.Comments - Enter any Comment that will better clarify this Labor charge

Service Ticket Menu - Time Sheets page - with data
iv.Save - Tap (Click) the Save option to record this Time Sheet entry
v.You will be returned to the Time Sheets page with this Time Sheet information added.
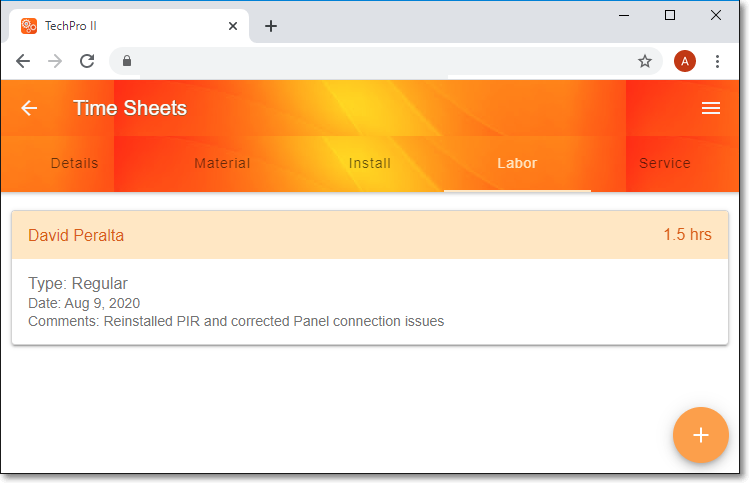
Service Ticket Menu - Time Sheets page - Labor charge detail included
▪Tap (Click) the ![]() left arrow Ñ to return to the Ticket List page
left arrow Ñ to return to the Ticket List page
5)Services Performed - Tap (Click) this Services Performed option to display the Service tab titled Services Performed
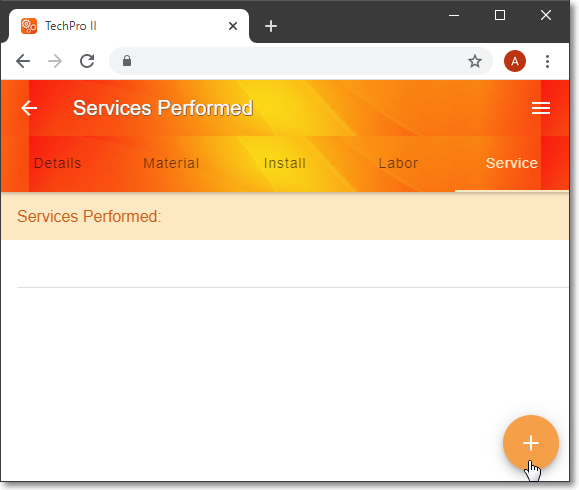
Service Ticket Menu - Service Notes option - Service Notes page
- Tap (Click) the Add Icon at the bottom of this page to display the Add new service note pop-up
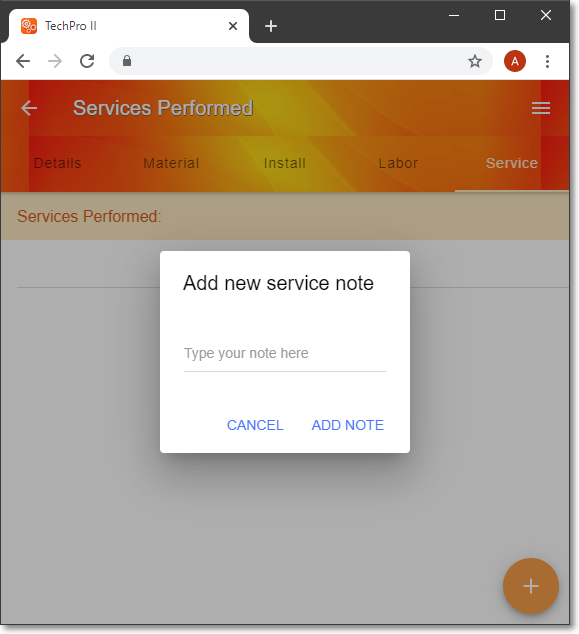
Service Ticket Menu - Services Performed option - Services Performed page - Add new service note
i.Type you note here - Enter any service related notes and/or comments to briefly describe the work performed.
ii.Type your note here - Tap (Click) this line and enter the required Note
iii.ADD NOTE - Tap (Click) this option to record the Note
▪The Services Performed page will be displayed with this Service Note added to the list
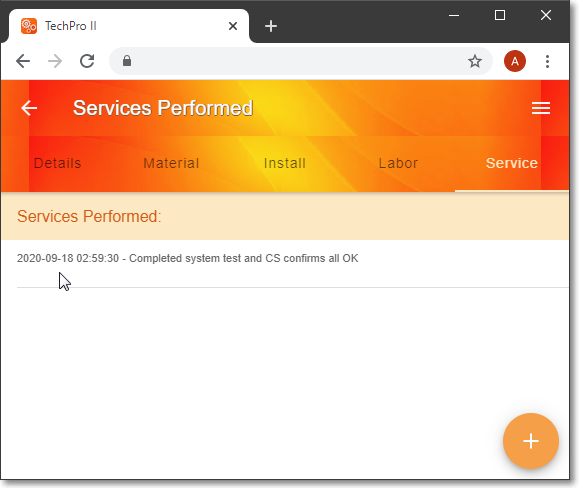
Service Ticket Menu - Services Performed option - Services Performed page - with entry
▪Tap (Click) the Services Performed left arrow Ñ to return to the Ticket List page
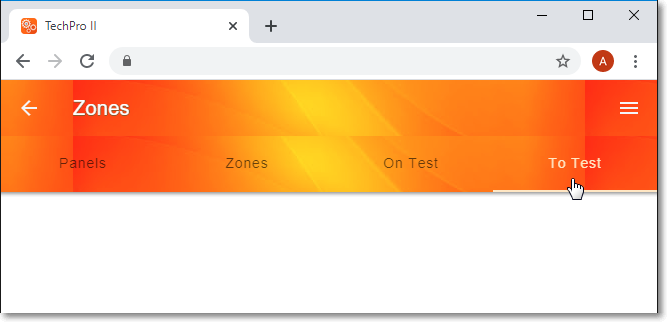
6)Panel, Zones & Testing - Tap (Click) this Panel, Zones & Testing option to display the Panels List page.
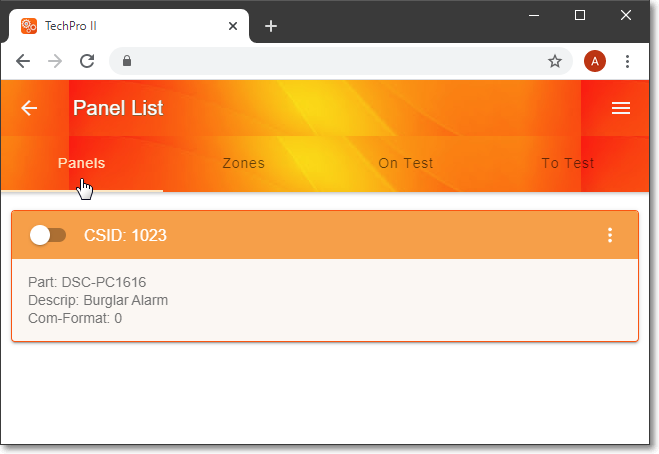
Service Ticket Menu - Panels, Zones & Testing option - Panel List page
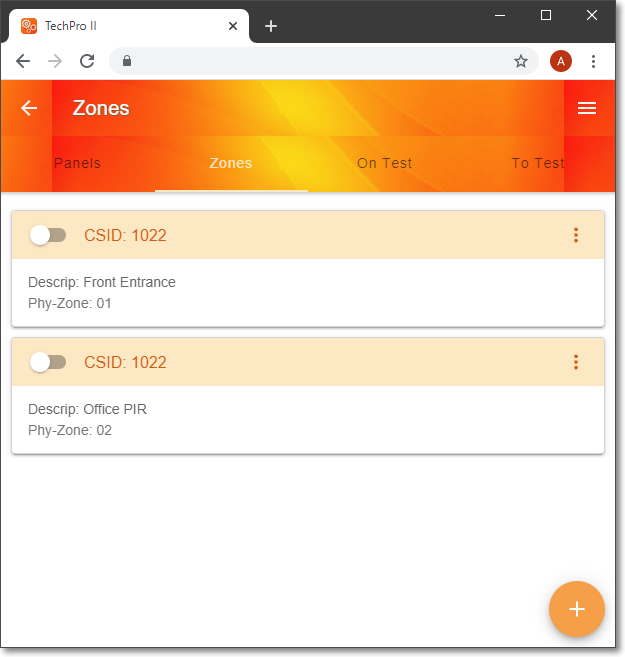
i.The Panels List page has four tabs (Panels, Zones, On Test, To Test)
ii.Each of the Panels (CSIDs) listed on this Panels List page may have its own set of Zones and each listed Panel may be individually placed On Test
iii.The Panels List page also has its own Menu (as shown below) and each of these Menu options is explained below.
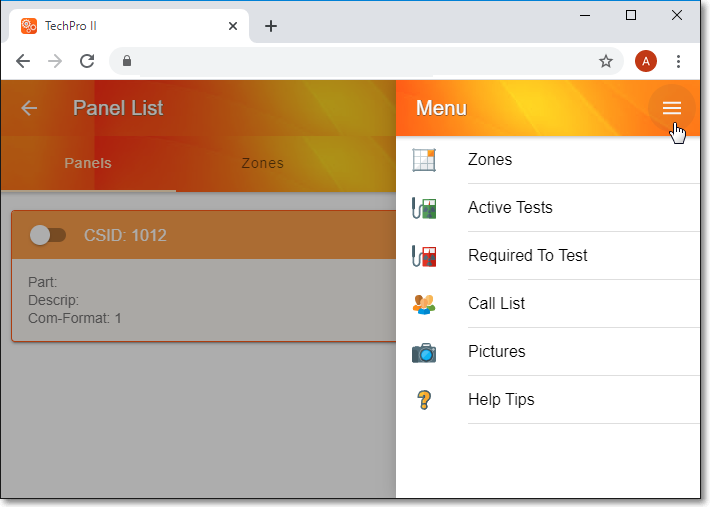
Service Ticket Menu - Panels, Zones & Testing option - Panel List page - Menu options
- Tap (Click) the 3 Bar Menu Icon on the Panel List page to display its Menu.options
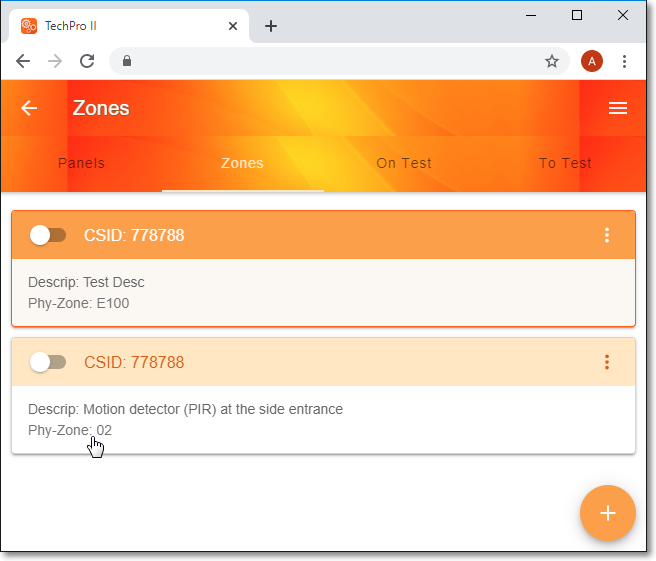
i.Zones option displays the Zones page with a list of the CSID Zones defined with a Physical Zone and Description (but not an Alarm Condition Code) for the selected Panel.
Service Ticket Menu - Panels, Zones & Testing option - Panel List page's Menu - Zones option
a.Each Zone may also be individually Placed On Test
1.Tap (Click) the CSID Slide Button to the Right to Put the selected Zone On Test (or slide it to the Left to take the Zone Off Test)
b.Each Zone has its own Add Test Time option
![]() - Tap (Click) the three vertical dots option to open the Add Test Time pop-up to increase the duration of the On Test Time
- Tap (Click) the three vertical dots option to open the Add Test Time pop-up to increase the duration of the On Test Time
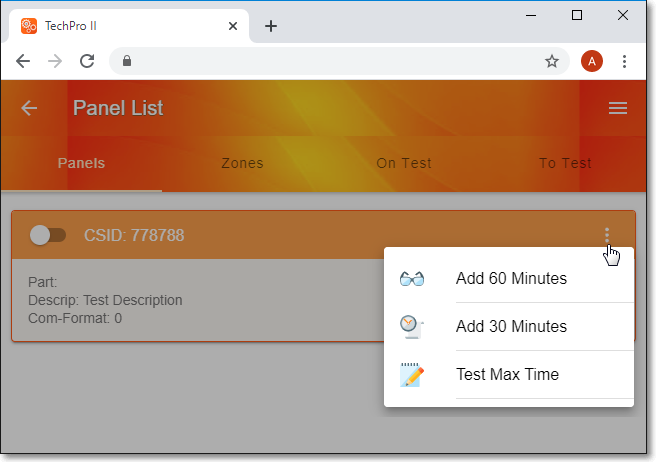
Panels, Zones & Testing option - Panel List page - Zones page - Add Test Time - pop-up
c.Additional Zones may be placed On Test:
- Tap (Click) the Add Icon at the bottom of this Zones page to display the Add New Zone page
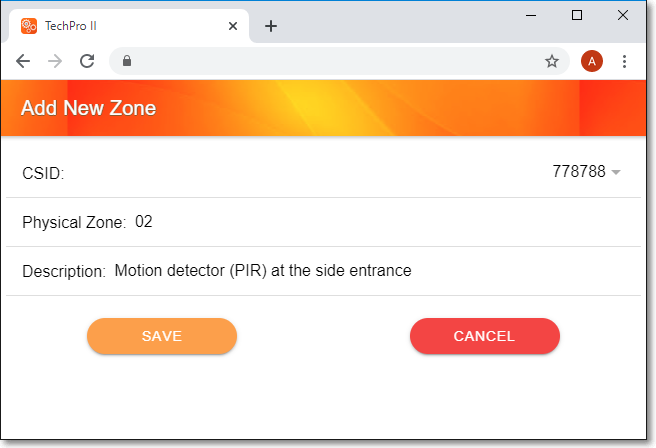
Panels, Zones & Testing option - Panel List page - Zones page - Add New Zone page
1.CSID - The CSID is inserted by the App
2.Physical Zone - Enter the new Zone (exactly as it will be transmitted to the Central Station)
3.Description - Enter a brief description of this new Zone
Service Ticket Menu - Panels, Zones & Testing option - Panel List page's Menu - Zones option with new Zone Added
4.Save - Tap (Click) Save to record this new Zone.
5.The Zones page will be displayed with the new Zone added to the list (as shown below)
Service Ticket Menu - Panels, Zones & Testing option - Panel List page's Menu - Zones option with new Zone Added
ii.Active Tests option displays the Active Tests page with a list of the CSID Zones which are currently On Test.
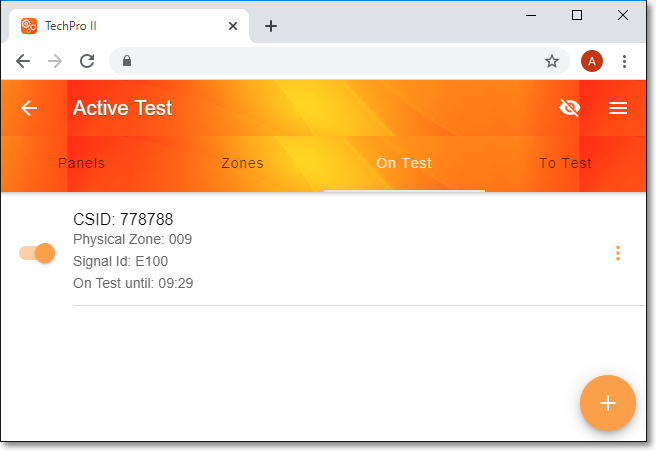
Service Ticket Menu - Panels, Zones & Testing option - Panel List page's Menu - Active Tests page
- Tap (Click) the Add Icon at the bottom of this Active Tests page to display the Add Test Zone page
1.CSID - The CSID is inserted by the App
2.Zone - Enter the Zone to be placed On Test
3.Signal - Enter Alarm Condition this Zone reports
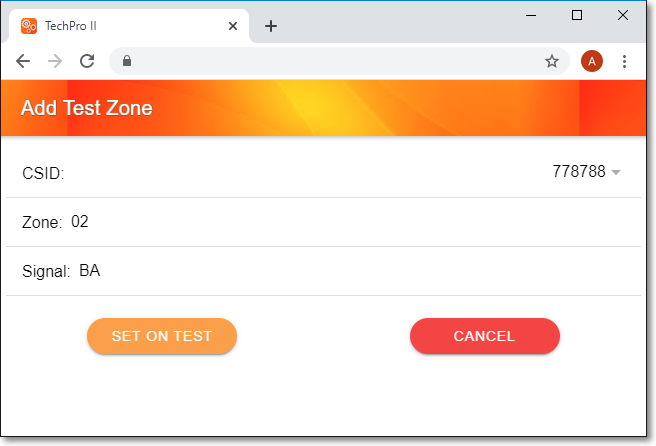
Service Ticket Menu - Panels, Zones & Testing option - Panel List page's Menu - Active Tests page - Add Test Zone page
4.Save - Tap (Click) Save to record this new Test Zone.
5.The Active Test page will be displayed with the new Active Test Zone included in the list (as shown below)
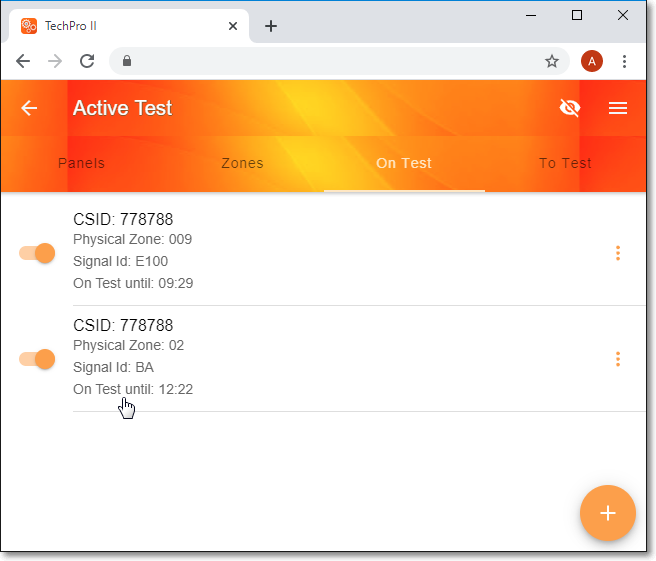
Panels, Zones & Testing option - Panel List page's Menu - Active Tests page - with new Active Test
iii.Required To Test option displays the Zones page with a list of the CSID Zones which are required to send a Test Signal (aka Unverified Zones).
Service Ticket Menu - Panels, Zones & Testing option - Zones page - required To Test tab
iv.Call List - See 7) Call List immediately below
v.Pictures - See 3) Pictures above
vi.Help Tips - See Help Tips at the beginning of this chapter
7)Call List - Tap (Click) Call List to display the Contact List page.
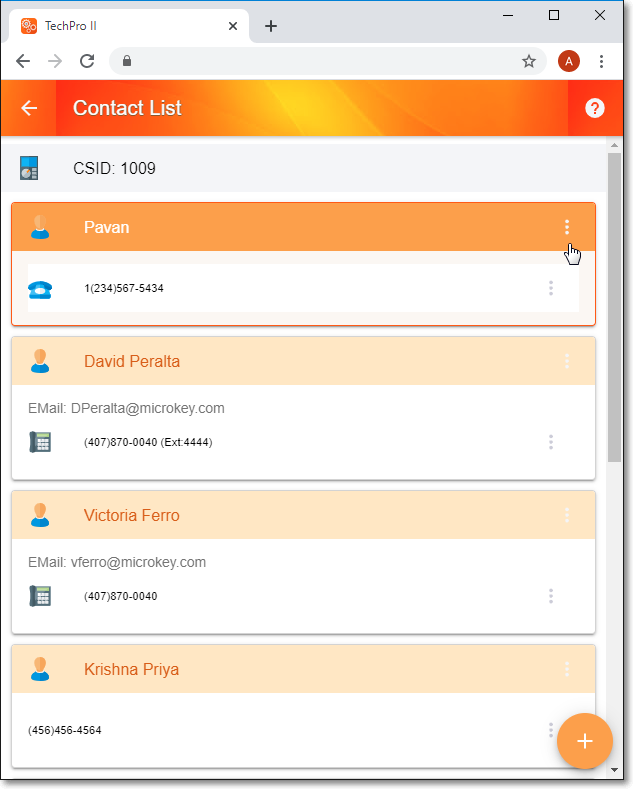
Ticket List - Quick View section - Edit Ticket option - Service Ticket page Menu - Contact List page
![]() - Tap (Click) the three vertical dots option on the Contact List page to open the Contact List - Edit Options pop-up
- Tap (Click) the three vertical dots option on the Contact List page to open the Contact List - Edit Options pop-up
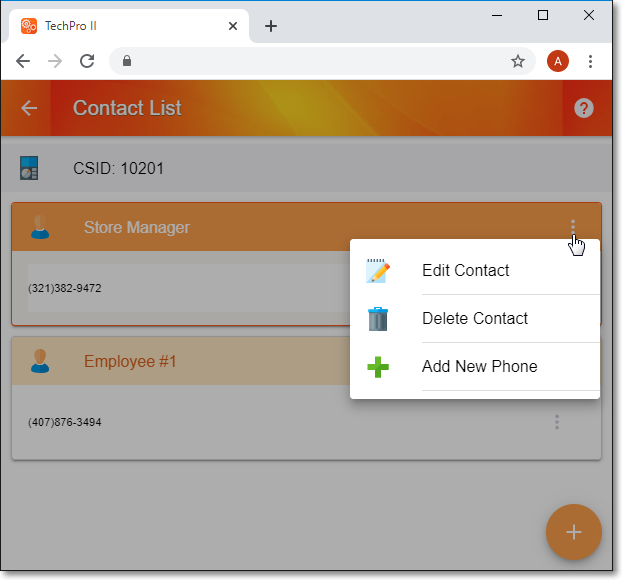
Ticket List - Quick View section - Edit Ticket option - Service Ticket page Menu - Contact List page - Menu options
1.Edit Contact - Tap (Click) this Edit Contact option to display the <>?<> Edit Contact <>?<> page
Service Ticket page Menu - Call List option - Contact List page - Edit Contact page
a.Modify the Contact information as needed.
b.Save - Tap (Click) Save to record this new Contact information.
2.Delete Contact - Tap (Click) this Delete Contact option to Delete the currently selected Contact.
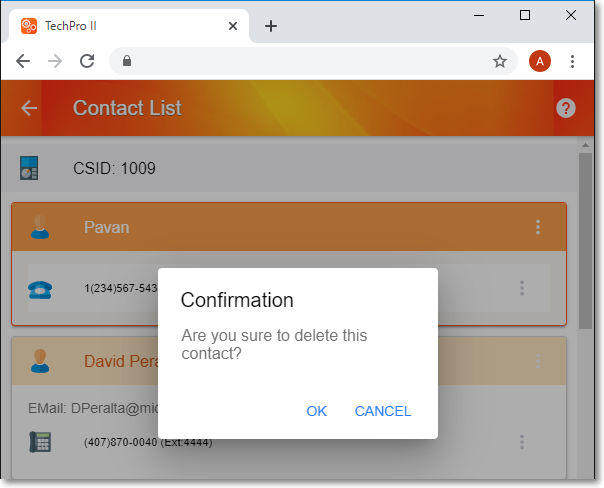
Service Ticket page Menu - Call List option - Contact List page - Delete Contact Confirmation
3.Add New Phone Number - Tap (Click) this Add New Phone Number option to display the <>?<> Ad New Phone Number <>?<> page

Service Ticket page Menu - Call List option - Contact List page - Edit Contact page - Add New Phone
i.Type - Tap (Click) the Type (default entry is Home) down-arrow ‚ to open the Type pop-up to Choose the Type of Telephone for this Contact's Telephone Number entry.
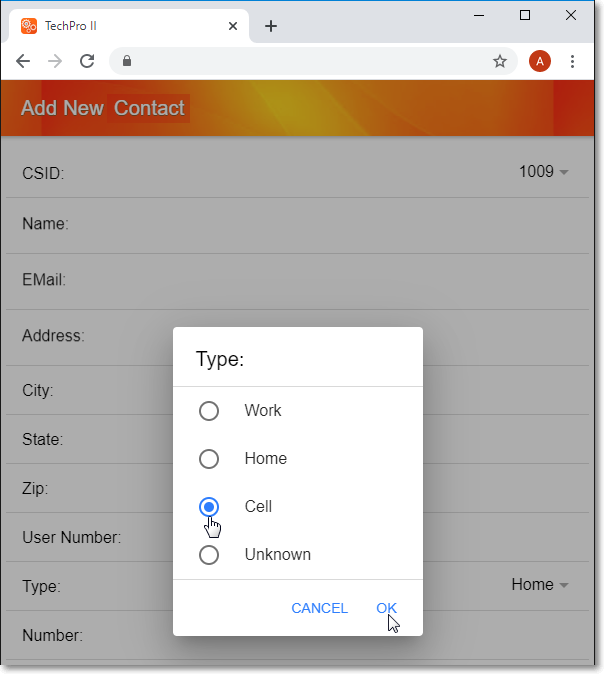
Contact List page - Add New Contact - Type of Telephone
ii.Number - Enter the Telephone Number starting with 1 and formatting will automatically be applied to the remaining part of the telephone number
iii.Ext - Enter any extension that must be used.
iv.Notify Alarms by Sms: - Tap (Click) the box to indicate that Text Messages may be sent when an Alarm Signal is Dispatched.
v.Order - Tap (Click) on up-down arrow to set this Telephone Number's Calling Order position.
vi.Save - Tap (Click) Save to record this Contact information.
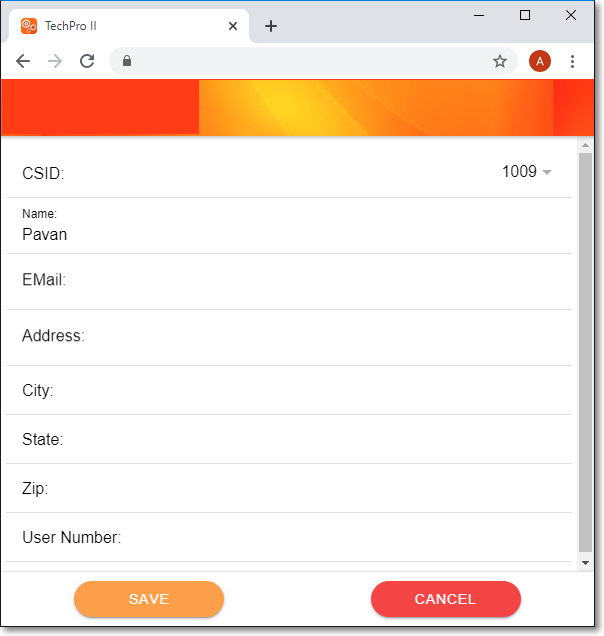
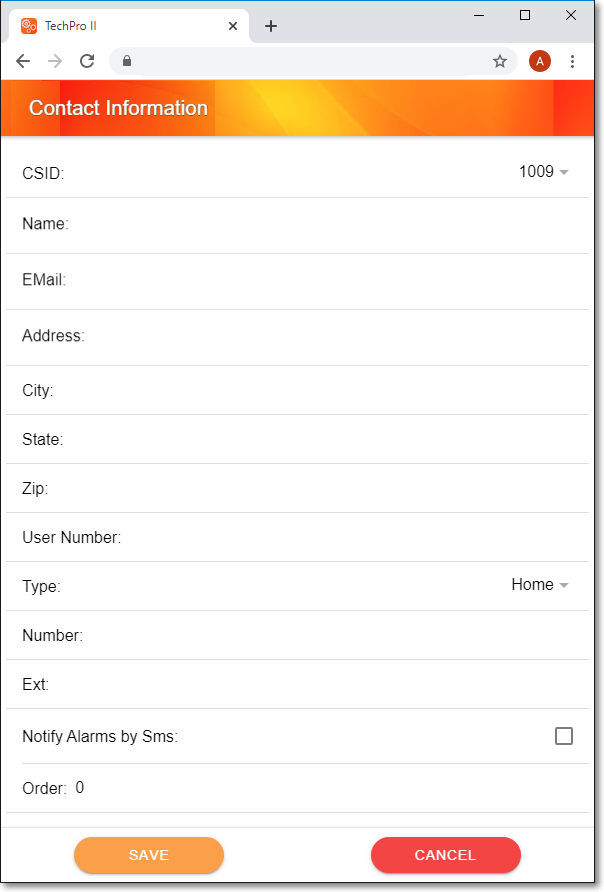
4.Add New Contact - Tap (Click) this Add New Contact option to display the <>?<> Add New Contact <>?<> page
- Tap (Click) the Add Icon at the bottom of this Contacts List page to display the Add New Contact page
Ticket List - Quick View section - Edit Ticket option - Service Ticket page Menu
Contact List page - Add New Contact
i.CSID - The CSID is inserted by the App
ii.Name - Enter their Name
iii.Email - Enter their Email Address, if available
iv.Address - Enter their Address, if available
v.City - Enter their City, if available
vi.State - Enter their State Code, if available
vii.Zip - Enter their Zip Code, if available
viii.User Number - Enter the Contact's User Number if appropriate.
ix.Type - Tap (Click) the Type (default entry is Home) down-arrow ‚ to open the Type pop-up to Choose the Type of Telephone for this Contact's Telephone Number entry and Tap (Click) OK.
Contact List page - Add New Contact - Type of Telephone
x.Number: - Enter the Telephone Number starting with 1 and formatting will automatically be applied to the remaining part of the telephone number
xi.Ext - Enter any extension that must be used.
xii.Notify Alarms by SMS -
xiii.Order - Tap (Click) on up-down arrow to set this Telephone Number's Calling Order position.
xiv.Save - Tap (Click) Save to record this new Contact.
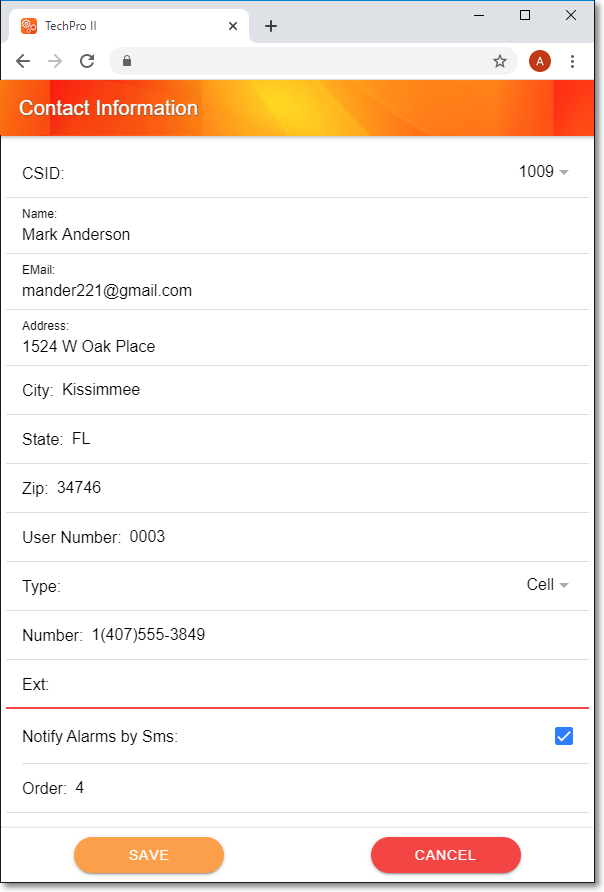
Contact List page - Add New Contact - New Contact entry
8)Customer Signature - Tap (Click) Customer Signature to display the Signature page.
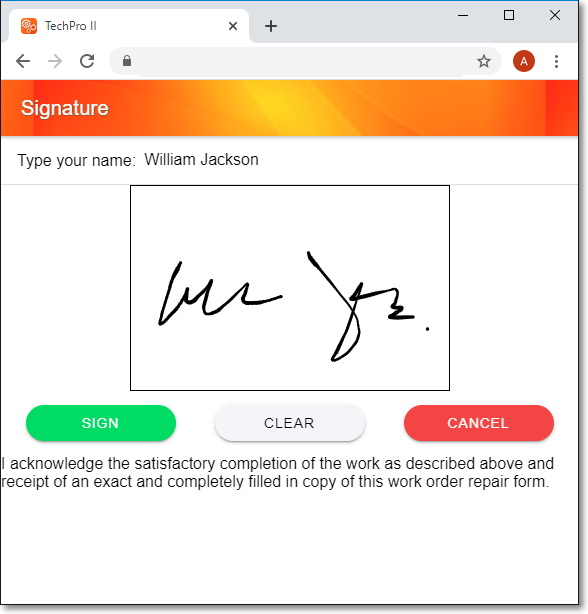
Ticket List - Quick View section - Edit Ticket option - Service Ticket page Menu - Signature page
i.Type your name: - The Customer should Type their Name and it will be signed.
ii.Using a stylus or their finger, have the Customer sign their name.
iii.Sign - Tap (Click) Sign to accept that signature
iv.Clear - Tap (Click) Sign to get a new copy of their signature
v.Cancel - Tap (Click) Cancel to abort getting their signature
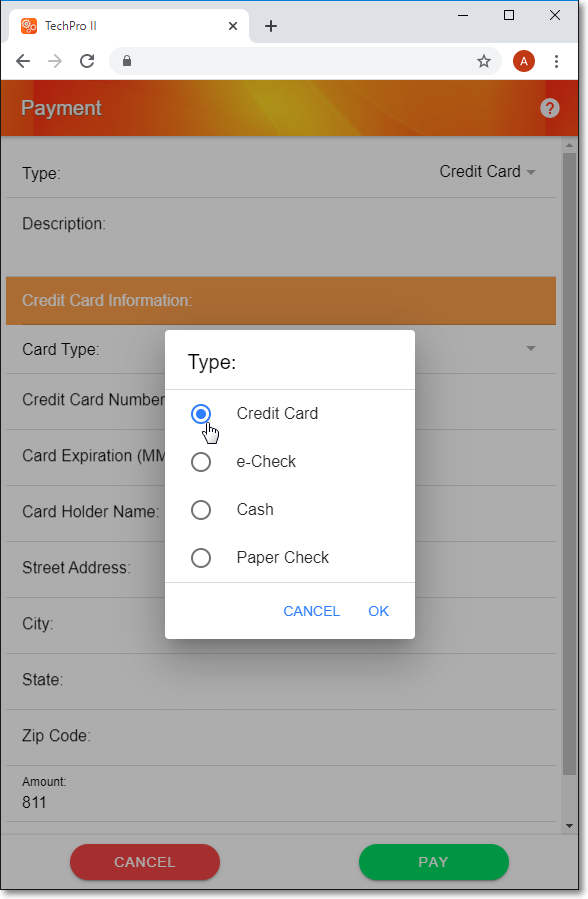
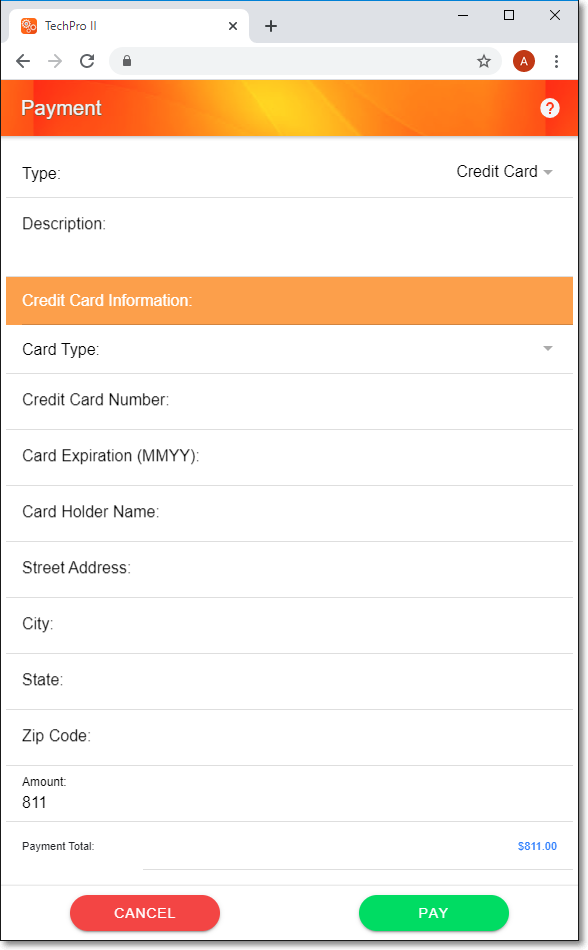
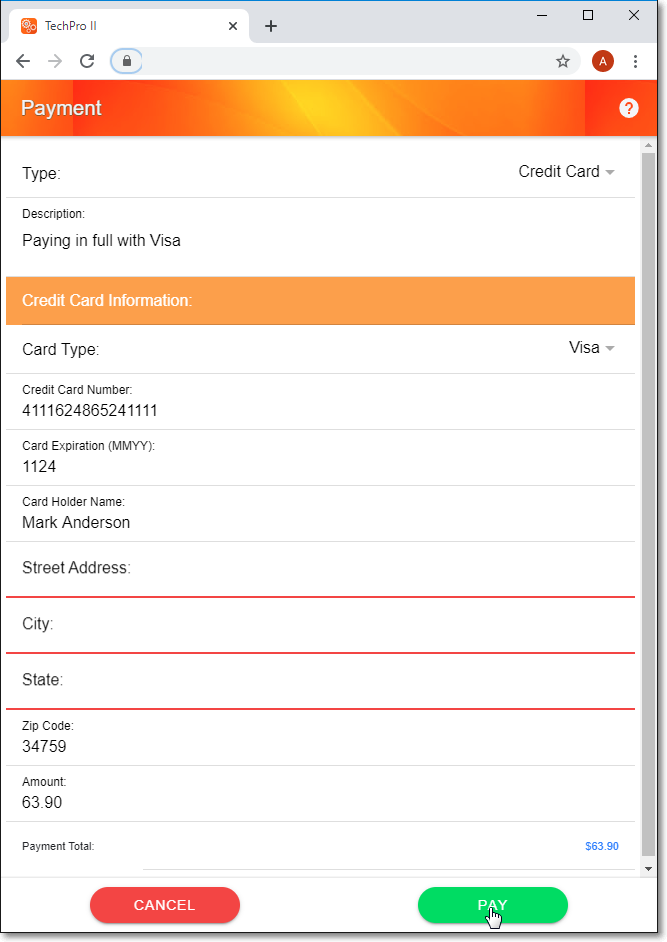
9)Process Payment - Tap (Click) Process Payment to display the Payment page.
✓Type - The default Payment Method is Credit Card.
a) Tap (Click) the Type down-arrow ‚ to open the Type pop-up to Choose a different Payment Method's Type if needed.
Ticket List - Quick View section - Edit Ticket option - Service Ticket page Menu
Process Payment option - Payment page - payment method Type pop-up
b)Description - Enter a brief description of the payment, if appropriate.
✓Credit Card - If Credit Card was selected as the Payment Method Type, the Credit Card Information sub-header will be displayed.
Ticket List - Quick View section - Edit Ticket option - Service Ticket page Menu
Payment page - Credit Card Information
i.Card Type - Tap (Click) the down-arrow ‚ to open the Card Type selection pop-up
a)Card Type - Tap (Click) the correct Credit Card Type
b)Save - Tap (Click) OK
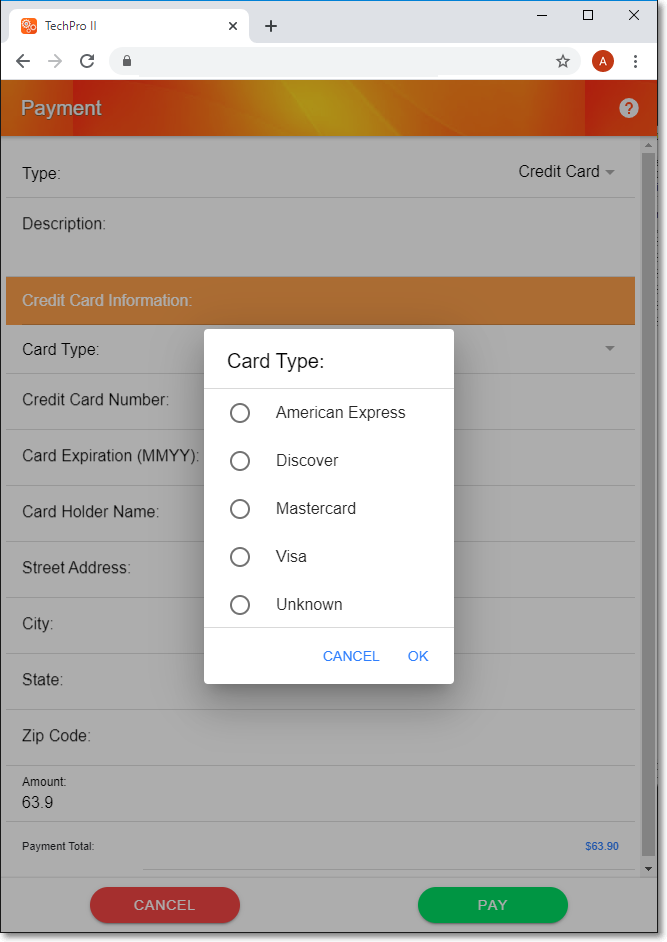
Payment page - Credit Card Information - Card Type pop-up
ii.Credit Card Number: Enter the Credit Card Number
iii.Card Expiration (MMYY): Enter the Expiration Date using a four digit MMYY format
iv.Card Holder Name: Enter the Name as it appears on the Credit Card (no punctuation marks)
v.Street Address: Enter the Billing Address street address (optional)
vi.City: Enter the Billing Address City (optional)
vii.State: Enter the Billing Address State Code (optional)
viii.Zip Code: Enter the Billing Address Zip Code
ix.Amount: Enter the Amount to be paid (it will be defaulted to the Payment Total initially shown below)
x.Payment Total: Value inserted is based on the charges displayed in the Estimate section on the Service Ticket page which may be amended by entering a different Amount above.
xi.Pay - Tap (Click) PAY to record this Payment information
Ticket List - Quick View section - Edit Ticket option - Service Ticket page Menu
Payment page - Credit Card Information - Ready to Process
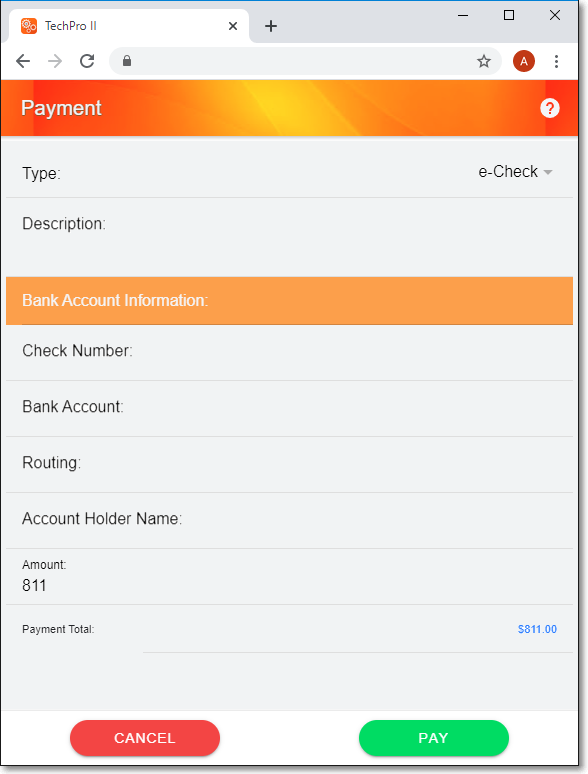
✓e-Check - If e-Check was selected as the Payment's Type, the Bank Account Information sub-header will be displayed.
Ticket List - Quick View section - Edit Ticket option - Service Ticket page Menu
Payment page - Bank Account Information
i.Check Number: Enter the Check Number the customer will use to track this payment.
ii.Bank Account: Enter the customer's Bank Account number
iii.Routing: Enter the customer's Bank Account number
iv.Account Holder Name: - Enter the Name on this Bank Account
v.Amount: Enter the Amount to be paid (it will be defaulted to the Payment Total initially shown below)
vi.Payment Total: Value inserted is based on the charges displayed in the Estimate section on the Service Ticket page which may be amended by entering a different Amount above.
vii.Pay - Tap (Click) PAY to record this Payment information
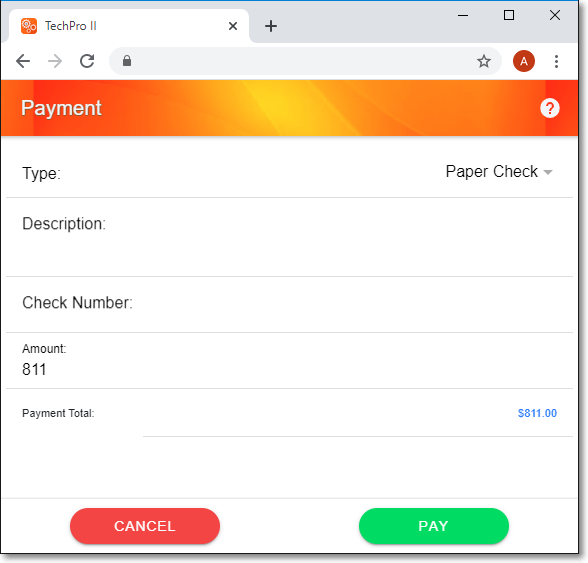
✓Paper Check - If Payer Check was selected as the Payment's Type, the Payment header will be displayed as shown below
Ticket List - Quick View section - Edit Ticket option - Service Ticket page Menu
Payment page - Paper Check
i.Description - Enter any description or comment needed
ii.Check Number: Enter the Check Number the customer used for this payment.
iii.Amount: Enter the Amount to be paid (it will be defaulted to the Payment Total initially shown below)
iv.Payment Total: Value inserted is based on the charges displayed in the Estimate section on the Service Ticket page which may be amended by entering a different Amount above.
v.Pay - Tap (Click) PAY to record this Payment information
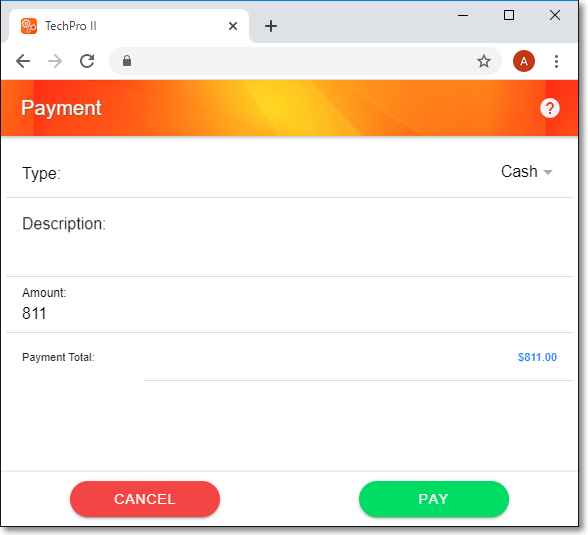
✓Cash - If Cash was selected as the Payment's Type, the Payment header will be displayed as shown below
Ticket List - Quick View section - Edit Ticket option - Service Ticket page Menu
Payment page - Cash
i.Description - Enter any description or comment needed
ii.Amount: Enter the Amount to be paid (it will be defaulted to the Payment Total shown below)
iii.Payment Total: Value inserted is based on the charges displayed in the Estimate section on the Service Ticket page which may be amended by entering a different Amount above.
1.The Material tab on the Service Ticket page is used to identify the inventory item(s) used and the associated cost and is included in the Estimate
2.The Labor tab n the Service Ticket page is used to identify the hours required and the associated cost and is included in the Estimate
iv.Pay - Tap (Click) PAY to record this Payment information
✓Notification - Once the Payment is recorded, the Receipt number - which serves as a Confirmation number for this transaction will be displayed
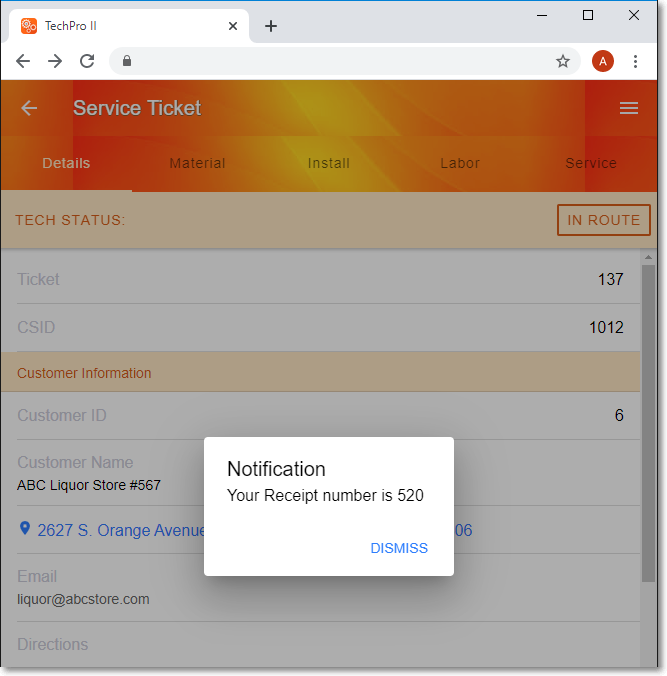
Ticket List - Quick View section - Edit Ticket option - Service Ticket page with Notification number
i.Tap (Click) the DISMISS option and the Service Ticket page will be re-displayed
10) Complete Ticket - Tap (Click) Complete Ticket to display the Ticket completion page.
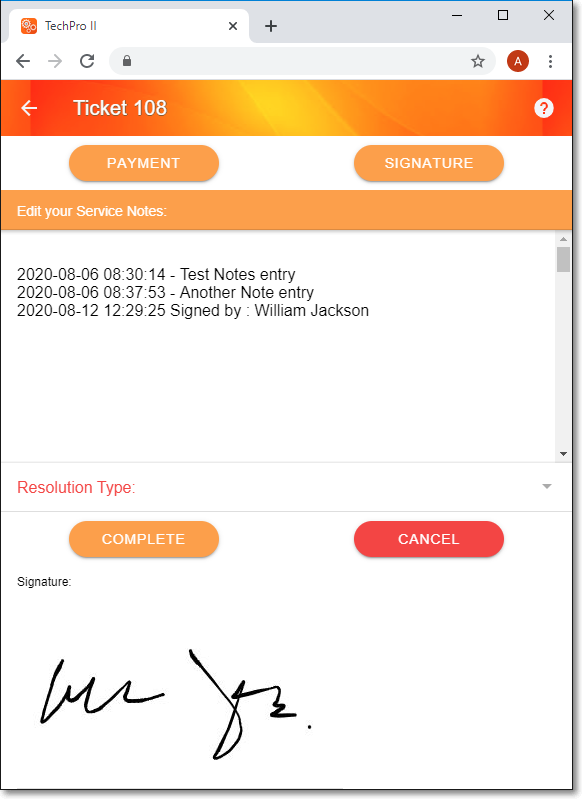
Ticket List - Quick View section - Edit Ticket option - Service Ticket page Menu - Ticket completion page
i.Payment - Tap (Click) Payment to display the Payment page [see item 9) Process Payment above].
ii.Signature - Tap (Click) Signature to display the Signature page [[see item 8) Customer Signature above].
iii.Edit Service Notes - Tap (Click) on any Service Note line to edit the Service Note
▪These edits are temporary to the current time so the Service Ticket must be completed immediately after the edit.
▪Otherwise, go to the Service Notes page and add additional Notes as needed [see item 5) Service Notes above].
iv.Resolution Type - Tap (Click) the Resolution Type down-arrow ‚ to open the Resolution Type pop-up to Choose the appropriate Resolution Type description.

Ticket List - Quick View section - Edit Ticket option - Service Ticket page Menu
Ticket completion page - Resolution Type pop-up
•Tap (Click) the appropriate Resolution Type
•Tap (Click) OK
v.Complete - Tap (Click) Complete when finished and you have reviewed steps i. to iv.
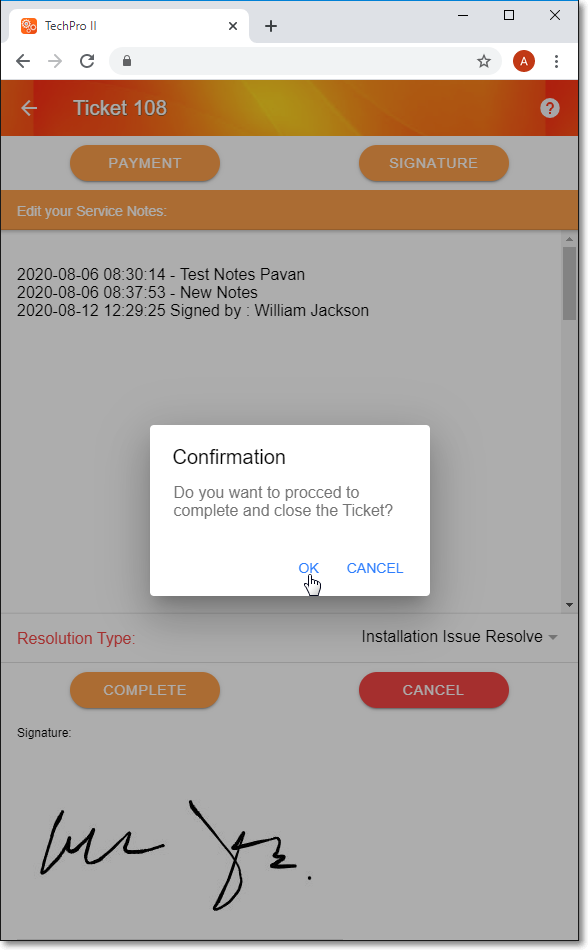
Service Ticket page - Ticket completion - Confirmation pop-up
▪Confirmation - Tap (Click) OK.
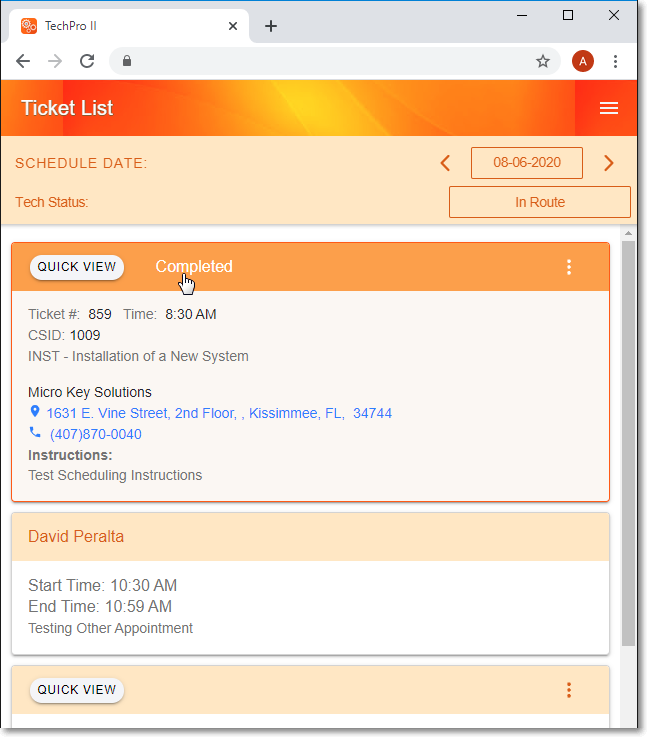
Ticket List page - Quick View section - Ticket Completed
▪The Ticket List page will be displayed and the associated Quick View data will indicate that this Service Ticket has been Completed.
▪Tech Status - Tap (Click) the box to the right of the Tech Status title to display the Tech Status Change page (see 2. Tech Status above) and re-set your Status appropriately
Tech Pro II - Tech Status Change options
11) Pictures - When appropriate, the Technician may want to photograph some portion of their work. - See 3) Pictures above for more information
12) Help Tips - When available, the Technician may Tap (Click) to display the associated Help Tips page - See Help Tips above