❑The Metrologic Voyager USB Barcode Scanner model 9520 is easily connected to MKMS for the purpose of recognizing and taking appropriate action when an Invoice or a Service Request Form's barcode is scanned, as well as the Call List Verification Form..
•This is the process to configure the Metrologic Voyager USB Barcode Scanner to work with MKMS.
•This procedure has been tested with the model Voyager 9520 - right out of the box.
•The scanner requires an initialization process, then MKMS must be updated (within the Personal Options tab of the User Options Form) to recognize the device.
➢Important Note: Because the model 9520 has now been discontinued by Metrologic.
If you cannot find that device, new model information will be required.
This information will be provided when a replacement device is chosen.
❑Initializing the Metrologic Voyager USB Barcode Scanner model 9520:
•Copy the Metrologic USB.Zip file into the MKS sub-directory of the Program Files folder on your computer's hard drive.
•Extract the USB-to-Serial Drivers from the Metrologic USB.Zip file into the MKS sub-directory.
•Connect the USB Barcode Scanner model 9520 to one of the computer's USB ports
•Once connected wait until the Scanner's front light (red) is lit indicating that it is in scanning mode.
•If you are running MKMS, close the program now. Then scan the following codes:
➢Notes: 1.) Each scan should generate a 3 tone sound if scanned correctly;
2.) The page number indicates where the required barcode to be scanned is located within the Metrologic Voyager USB Barcode Scanner model 9520's manual;
3.) To save time, try printing this page and scan from the printed Help Files page.

✓Enable USB Serial Emulation Mode Defaults (Page 68)
✓Disable STX (page 38)
✓Disable Nixdorf ID Character (page 38)
✓Enable CR Suffix (Page 40)
✓Disable ETX (page 40)
✓Disable Transmit of LRC Calculation (Page 41)
•When you have completed these scans, your computer should display a "Found New Hardware" wizard; Click "Next".
✓Select "Install from a specific location" and Click "Next".
✓Select "Search for the best driver in these locations".
✓Check "Include this location in the search".
✓Click "Browse" and specify a location where you unzipped the driver files (C:\Program Files\MKS\ )
✓Remove the Check Mark from all other options, then Click "Next".
✓Click "Next" after Windows finds the driver to install.
✓Important - Click "Continue anyway" if you get a warning that the driver has not been digitally signed.
✓When driver installation is complete, Click "Finish".
❑Initializing MKMS to recognize the Metrologic Voyager USB Barcode Scanner:
•Open the MKMS application and login as as the Administrator.
•On the Main Menu Select Maintenance and Choose the User Options sub-menu. Click the Personal Options tab.
❑Identifying the Scanner's Port Number
•You must enter the information MKMS needs to properly use your new Scanner.
•This requires that you know the "Port Number" to which the scanner is connected.
•To do so:
✓Minimize MKMS
✓Open the Windows® Control Panel dialog (if using Windows 7, Click the Start button, Choose Settings and then Select the Classic View).
✓Select System and Choose the Device Manager tab.
✓Select Ports
✓A "Metrologic USB Scanner" will be displayed with the proper port number
•Maximize MKMS and complete the required information in the Personal Options tab.
a. ComPort: Enter the Metrologic USB Scanner port number derived from the procedure above.
b. Baud Rate: 9600
c. Parity: Space
d. Data: 7
e. Stop: 2
f. Start: 0
g. Stop: 13
•Save the configuration.
•Exit MKMS completely (do NOT simply Log Out then Login).
•Open the MKMS application and login - the scanner should now be available.
❑Using the Barcode Scanner to speed your work -
➢On any MKMS document that has a printed barcode, the first character in the barcode tells MKMS its origin and purpose.
•Invoice - When no forms are open, scan the barcode on the return stub of an Invoice and that Subscriber and the specific Invoice form will be opened automatically.
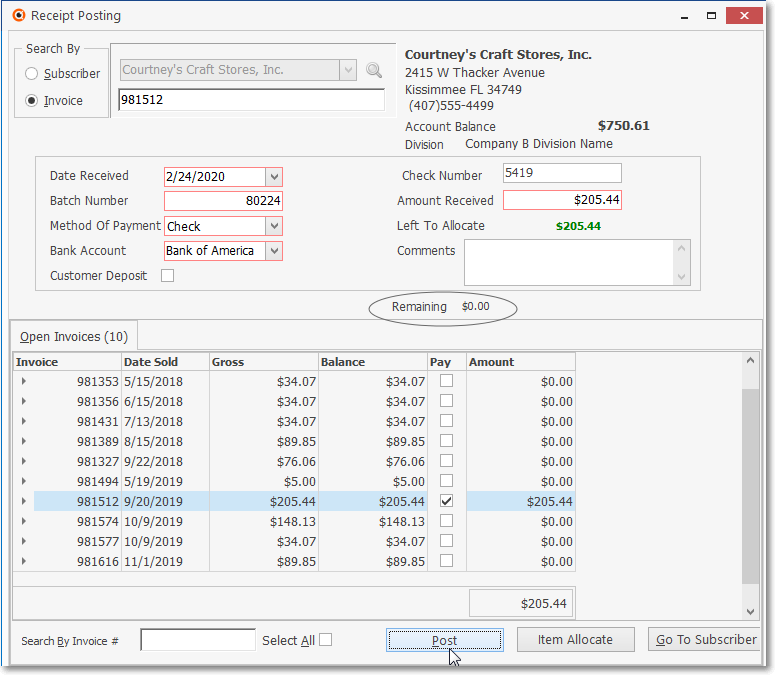
•Post Receipts - With the Receipts Posting Form open, scan the barcode on the return stub of an Invoice and a Receipts Posting entry for that Invoice Amount will be created.
✓This has the same functionality as if you opened the Receipts Posting Form, Selected Search By Invoice, entered the Invoice's Number, and entered the Amount Received.

Receipt Posting form by Invoice Number
✓If the payment received was greater or less than the Invoice amount, you must manually adjust the amount received accordingly.
✓Then tab to the next field so the Left To Allocate value, and the Pay Amount at the bottom of the form, is updated.
✓Click Post when the information is displayed.
•Service Requests - Scan the barcode on the Service Request form and the Subscriber and specific Service Request form will be opened to facilitate the Work Order Completion process.

Service Request Completion information
•Call List Verification - Scan the barcode on the Call List Verification Form and the Subscriber and its People To Call Form will be opened automatically to facilitate entering any corrections that may be necessary.