❑The MKS Web Dealer (and Web Dealer Enhanced) Access - Dashboard is displayed by default when the MKS Web Dealer (and Web Dealer Enhanced) Access module is opened.
•Tap or Click the Main Menu Icon (see the Hand Pointer in the illustration below) to open the Main Menu.
![]()
MKS Web Dealer Access - Main Menu Icon
•Tap or Click the Insurance Certificate option to view the Insurance Certificate listing.

MKS Web Dealer Access - Insurance Certificate option - Insurance Certificate listing
❑Understanding and Using the Insurance Certificate page:
•This Insurance Certificate page accessed with the Main Menu's On Test option provides four features:
a)Search - Uses the Multi Field Search dialog to locate a specific set of one or more Subscriber(s) by their CSID, Name, and/or many other data types.
b)List - A List of all previously entered Insurance Certificate records
c)Actions - Ability to produce an Alarm Certificate as a PDF file, and to Edit and/or Delete previously defined Insurance Certificate information.
d)Add New - Ability to Add a new Insurance Certificate entry
A.Search - Locate a specific Subscriber by their CSID or Name.
✓Tap or Click the Search button at the top of the Insurance Certificate page to locate a specific Subscriber Information page.
▪The Search dialog described below will be activated.
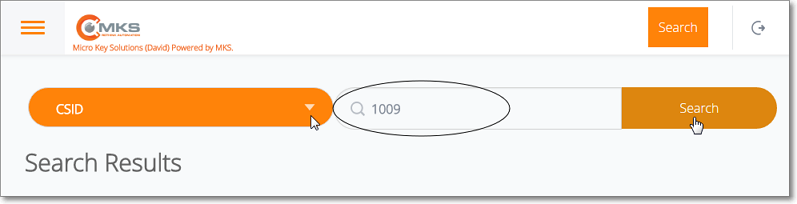
MKS Web Dealer Access- Search option
a.Search By - Tap or Click the down arrow in this Search By field (see the mouse pointer in the illustration above) to display a Drop-Down Selection List from which the appropriate Search By method (i.e. field name) may be chosen.
b.Search Text - Enter the characters that will identify the desired Subscriber record (see the circled data in the illustration above) based on the Search By method chosen above.
c.Search - Tap or Click this Search button (see the hand pointer in the illustration above) to execute the Search.
d.List - The Subscriber(s) that best match your entry will be listed.
e.Go To Subscriber - Tap or Click on the desired Subscriber record within this list to open that Subscriber Information page.
B.List - List of Insurance Certificate records has several columns
i.Subscriber Name - The Subscriber's Name on the Account
ii.Company Name - The name of the Insurance Company that provides the Insurance Coverage
iii.Installation Date - Date when this system was placed On Line
iv.Phone - The Telephone Number of the Insurance Company that provides the Insurance Coverage
v.Actions - The Actions available (see C. Actions below)
C.Actions - Offers an Icon to produce an Alarm Certificate, and an Edit (select to update existing Insurance Certificate records), and a Delete (select to remove an Insurance Certificate record) option
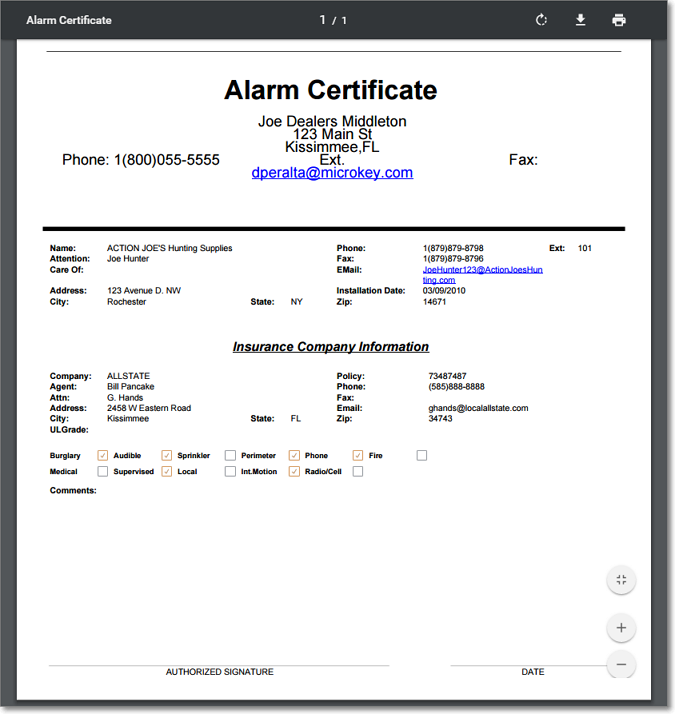
MKS Web Dealer Access - Insurance Certificate option - Alarm Certificate form
D.+ Add New - Tap or Click this button to open the Insurance Certificate entry page.
•The Search dialog will be presented (see A. Search above for those instructions) which you will use to Locate the Subscriber whose Insurance Certificate information will be entered..
MKS Web Dealer Access- Search option
•Once a Subscriber is selected, the Insurance Certificate entry page will be presented.
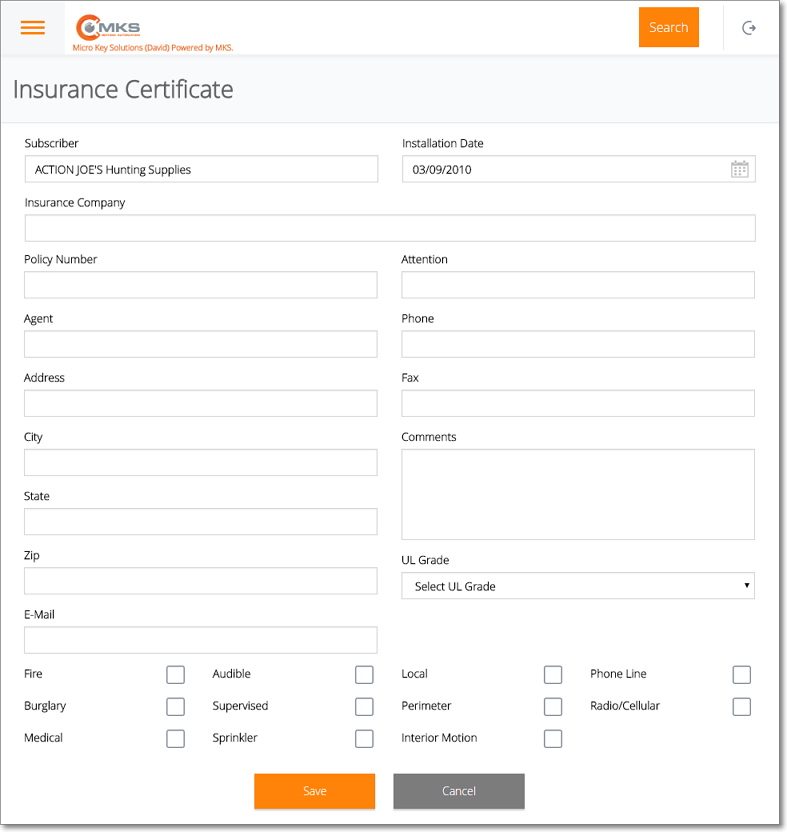
MKS Web Dealer Access - Insurance Certificate entry page
✓Left Column
▪Subscriber - The name of the selected Subscriber will be inserted automatically.
▪Insurance Company - Enter the name of the Insurance Company as it appears on their Policy.
▪Policy Number - Enter the Insurance Policy Number
▪Agent - Enter the name of the Agent associated with this Insurance Policy
▪Address - Enter the address of the Agent
▪City - Enter the city of the Agent
▪State - Enter the state of the Agent
▪Zip - Enter the Zip Code of the Agent
▪E-Mail - Enter the E-Mail address of the Agent
✓Right Column
▪Installation Date - The On Line Date of the selected Subscriber will be inserted automatically.
▪Attention - Enter any required Attention line information for the Agent associated with this Insurance Policy
▪Phone - Enter the Telephone Number of the Agent
▪Fax - Enter the Fax Number of the Agent
▪Comments - Enter any other Comments about the Agent and/or the Insurance Company
▪UL Grade - Use the Drop-Down Selection List provided to Choose the UL Classification (or select None).
oUL® Grade Categories:
1.UL® Central Station fire alarm systems,
2.UL® Central station burglar alarm systems,
3.UL® proprietary burglar alarm systems,
4.UL® national industrial burglar alarm systems,
5.UL® mercantile burglar alarm systems,
6.UL® residential burglar alarm systems, and account number.
✓Installation Features - Tap or Click in the box to insert a Check Mark indicating that Feature or Functionality is installed.
▪Fire - Does this system include a Fire Alarm System?
▪Burglary - Does this system include a Burglar Alarm System?
▪Medical - Does this system include a Medical Alert System?
▪Audible - Does this system include an Audible Sounder?
▪Supervised - Is this system Supervised (for Opening/Closing)?
▪Sprinkler - Does this system include a Sprinkler System?
▪Local - Is this a Local Alarm only?
▪Perimeter - Does this system include perimeter protection?
▪Interior Motion - Does this system include one or more motion detectors?
▪Phone Line - Is a Phone Line used to communicate with the Central Station?
▪Radio/Cellular - Is a Radio and/or Cellular deviced used to communicate with the Central Station?
✓Save - Tap or Click the Save option to record any changes or updates to this Insurance Certificate information.
▪A confirmation message will be displayed when the changes have successfully been posted to the database.
▪Tap or Click the OK button to continue.
✓Cancel - To abort this Insurance Certificate entry, Tap or Click this option.