❑Accessing and Using the Relay Device Configuration Form
•To access the Relay Device Configuration Form:
a)From the Backstage Menu System Select Maintenance and Choose the General option, then select the General Maintenance option which displays the secondary Maintenance Menu, or
b)From the Quick Access Menu, Select Maintenance and Choose General Maintenance to display the secondary Maintenance Menu.
✓Once this Maintenance Menu is displayed
1)Choose the Communication sub-menu,
2)Then Click on the Relay Device Configuration option.
✓The Relay Device Configuration Form will be displayed
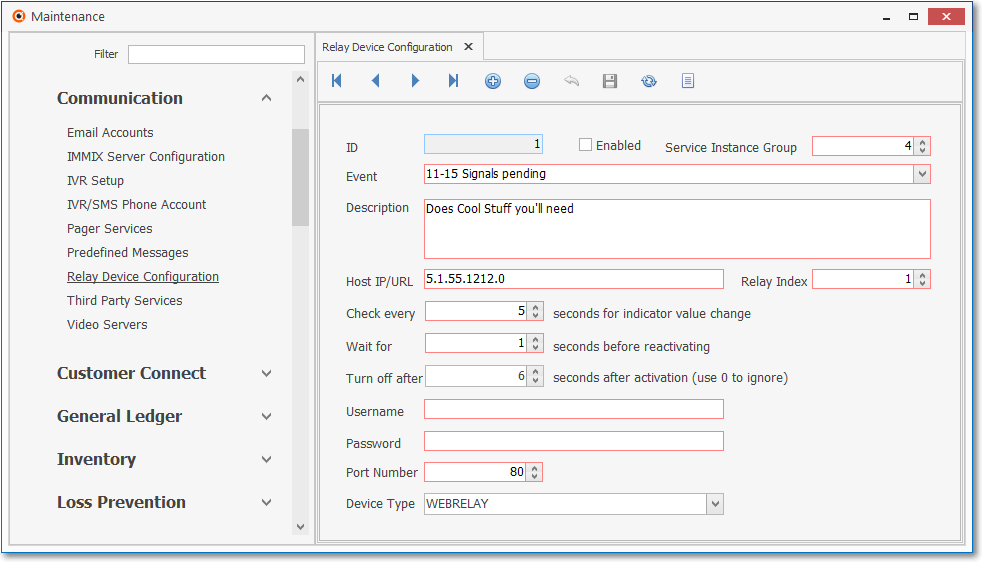
Relay Device Configuration Form
✓This Relay Device Configuration Form may be Re-sized by Dragging the Top and/or Bottom up or down, and/or the Right side in or out.
•Navigation Menu - The Navigation Menu is located at the top of the Relay Device Configuration Form.

✓This Navigation Menu provides the normal Record Movement, New, Delete, Save, Refresh, and List options.
•Record Editing section - The details of the currently selected record are displayed below the Navigation Menu at the center (Main Body) of the Relay Device Configuration Form.
✓Micro Key is available and will provide most of this information, as needed.
•Click the ![]() Icon to define a Relay Device Configuration
Icon to define a Relay Device Configuration
✓ID - System entry
✓Enabled - Check this box to enable this Relay Device Configuration
✓Service Instance Group -
✓Event - Purpose for this entry
✓Description - Friendly description for the purpose of this Relay Device Configuration
✓Host IP/URL - Network device IP address
✓Relay Index - Number
✓Check every - Check device using this time frequency (in seconds)
✓Wait for - Reset this device using this time frequency (in seconds)
✓Turn off after - Turn Off device after activation using this time frequency in seconds (0 = ignore)
✓Username - for WEBRELAY devices that require a User Name
✓Password - for WEBRELAY devices that require a Password
✓Port Number - 80 by default for WEBRELAY and null for ETH-DIO-48 devices
✓Device Type - Use the Drop-Down Selection List provided to Choose the type of Device being configured
✓Click the ![]() Icon to record this Relay Device Configuration entry.
Icon to record this Relay Device Configuration entry.
✓Repeat this process, as needed, to define each required Relay Device Configuration.
![]() List Icon - The Navigation Menu also has a List option which provides a tabular view of these Relay Device Configuration records.
List Icon - The Navigation Menu also has a List option which provides a tabular view of these Relay Device Configuration records.
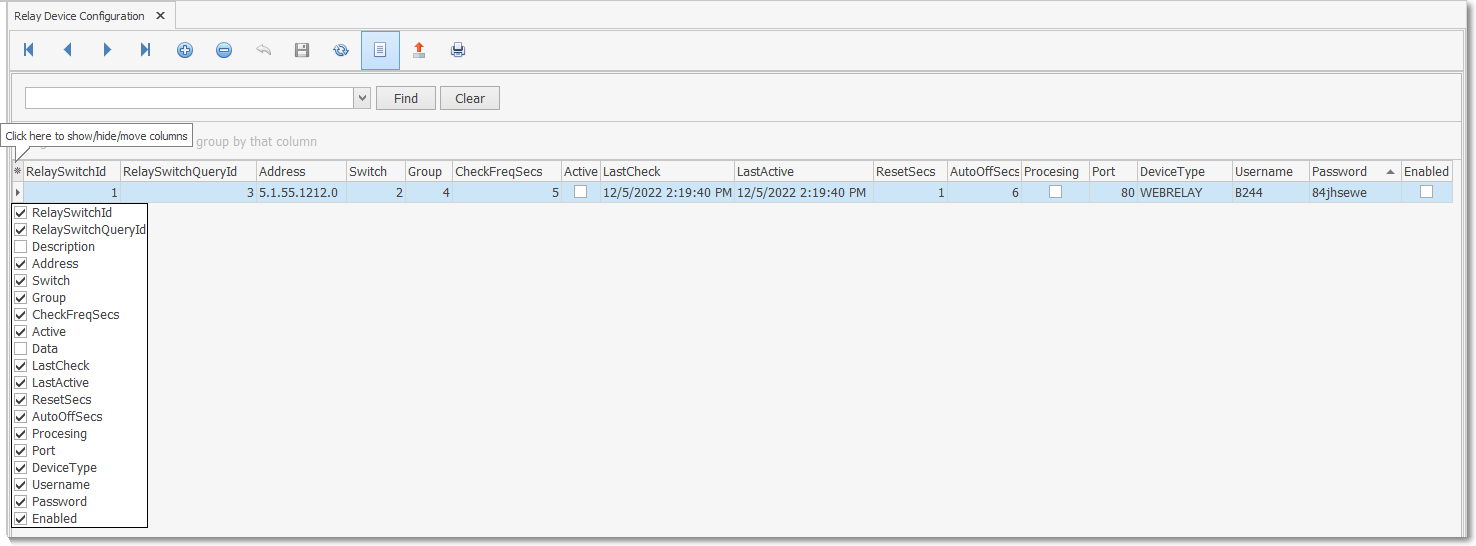
✓Click the List Icon to display the associated Grid Data.
✓The columns to be displayed in the Grid Data List may be selected, rearranged, filtered, sorted, and exported as a PDF file and/or an Excel formatted file.

✓Find - Enter text to search for a specific record, then Click the Find option.
✓Clear - To remove the text to search for entry, Click the Clear option

Navigation Menu shown with the List Options for Export & Print
✓Click the List Icon again to Close the List View and return to the Record Editing View.
❖See the Grid & Lists - Print Preview - Export Data chapter for complete information on using the List View, including its Export & Print options.