❖This chapter is being reviewed/revised
❑Installing and Testing the PBX Server
1.Copy the ctiX.DLL file into the C:\Windows\System32 folder.
2.Confirm that you are an Administrator
3.Right-Click the Windows® Icon and Choose Run.
4.Open a command line (DOS Box) by entering cmd.
5.Change to the C:\Windows\System32 folder by entering cd\windows\system32.
6.Enter the following command: regsvr32 ctix.dll
7.Close the DOS Box.
8.Create a PBX folder in the C:\Program Files (x86)\MKS folder
9.Copy PBXServer.exe application to that C:\Program Files (x86)\MKS\PBX folder.
10.Right-Click the Windows® Icon and Choose Run.
11.Open a command line (DOS Box) by entering cmd.
12.Enter the following command: PBXServer /install
13.A dialog box should appear on screen saying that the installation was a success
PBX Company Settings
❑Company Settings - Click the Company Settings button on the Company tab of the User Options Form to (re-)set the PBX related options:
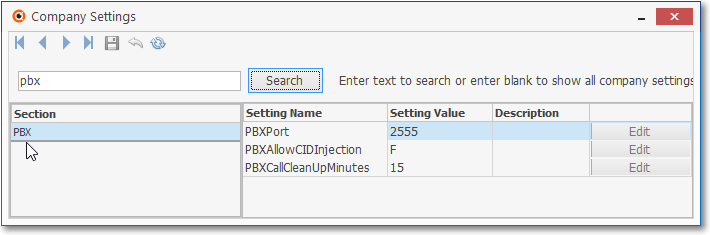
User Options - Company Settings - PBX Options

User Options - Company Settings - Telephony Options
• Update the following PBX options with the appropriate information:
1.PBX Service On - By default, the PBXServiceOn option is set to False ("F").
▪Setting the PBXServiceOn option to True ("T") tells the system to activate its PBX capabilities.
2.PBX Host - Enter the hostname of PBX system's computer
3.PBX ISDN1 - 255
4.PBX ISDN2 - 255
5.PBX Call Clean Up Minutes -
6.PBX IP Host1 -
7.PBX Port1 -
8.PBX Allow CID Injection -
9.PBX HOST2 -
10.PBX port2 -
11.PBX IP Host -
12.PBX Port - Enter the TCP/IP port of PBX system computer's CSTA interface (Typically 2555)
Config / Launch Server
❑Follow these steps to configure and start the PBX Server:
a)Open the Windows Services settings dialog
b)Search the list of services for MKS PBX Interface
i.You may have to press F5 to refresh the list if you don't see it
ii.If you still don't see it then reboot the computer and try again
c)Click on the MKS PBX CallerID Service (PBXServer) service listing
d)Select Properties
e)Insure that Startup Type is set to Automatic
f)Start the PBX CallerID service, if necessary
g)Check C:\Windows\Temp\PBXService_xxx.log, where xxx = the day of the week
h)Look for errors in the PBXService_DOW.log
Testing
❑Follow these steps to test the PBX Server:
a)Enter phone extension numbers into the PBXExt table. ComputerName is actually the hostname of the workstation computer next to the phone.
b)Call one of the extensions, either from another phone on the PBX or use your cell phone and call the DID number for the PBX that rings the extension you wish to test.
c)Check the log for an incoming call originating from your cell or the PBX extension.
➢Note: MKMS and MKMSCS will update the PBXExt table automatically upon logging in, so you only have to make the manual PBXExt table update if it is empty.