❑Often, while Processing Alarms or just answering the telephone, an Operator (or any User) may get a request to provide service for the Subscriber's Alarm System.
•MKMSCS Monitoring Application Users may Press Shift+F10 or Click the Work Order Icon on the Shortcuts tab to access the Quick Work Order Form.

•There are three possible scenarios leading up to selecting the Work Order (Shift+F10) option:
1.While Processing an Alarm Signal for a Subscriber, the Operator may Click the Work Order Icon on this Shortcuts Tab to open the Quick Work Order Form.
▪When an Operator opens the Quick Work Order Form while actually processing an Alarm Signal, the Quick Work Order Form will be populated with the information associated with the Subscriber for whom the Alarm Signal is being processed.
2.While viewing a Subscriber's information within the Sub Info (F2) Form, the Operator may Click the Work Order Icon on this Shortcuts Tab to open the Quick Work Order Form.
▪When an Operator opens the Quick Work Order Form while looking at the Sub Info (F2) Form, the Quick Work Order Form will be populated with that Subscriber's information.
3.In any other case (doing nothing specific, just logged into MKMSCS), the Operator may Click the Work Orders Icon on the Shortcuts Tab to open the Quick Work Order Form.
▪In this case, the Operator must first Search for the specific Subscriber who is requesting the service.
▪Once that Subscriber record is located, the Quick Work Order Form will be populated with that Subscriber's information.
•MKMS users may also Click the Quick Work Order Icon on the Service Tab of the MKMS Desktop
![]()
✓In this case the User must first Search for the specific Subscriber who is requesting the service.
✓Once that Subscriber is chosen, the Quick Work Order Form will be pre-populated with that Subscriber's information.
❑Entering a Service Request using the Quick Work Order Form when no Subscriber record is displayed (scenario #3, versus #1 or #2 as outlined above):

•Click the Search Icon and locate the appropriate Subscriber.

✓The Subscriber + Address + Phone information will be inserted the the Quick Work Order Form.
•Some decisions that might have to be made, and how to make them:
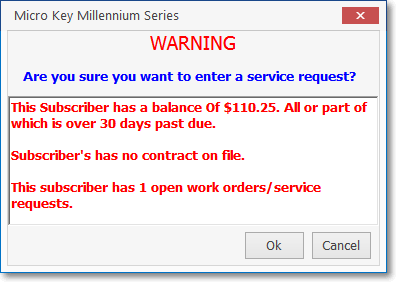
✓If the Subscriber has any of these conditions a Warning message will be displayed:

Are you sure you want to enter a service request?
▪Has an Outstanding Balance which some or all of it is Past Due
oSee the "What to do if the "Subscriber has a Past Due Balance" section in the Quick Work Order chapter.
▪Has no Warranty or Extended Service Agreement
oConsider offering them an Extended Warranty Agreement now
▪Has one or more Open Service Request(s)
oSee the "Subscriber already has an Open Work Order" section in the Quick Work Order chapter.
•The Quick Work Order Form

Quick Work Order Form
❖See the Quick Work Order chapter for detailed information on how to enter this Service Request.