
|
Web Dealer Access - Panels Tab - Medical InfoThis Help File Page was last Modified on 11/07/2017 |


|
|
Web Dealer Access - Panels Tab - Medical InfoThis Help File Page was last Modified on 11/07/2017 |
 Scroll to Top of Page
 Print Topic
 Email Feedback
 Show/Hide Expanders
❑The Subscriber Information page has three (3) tabs one of which is the Panels tab
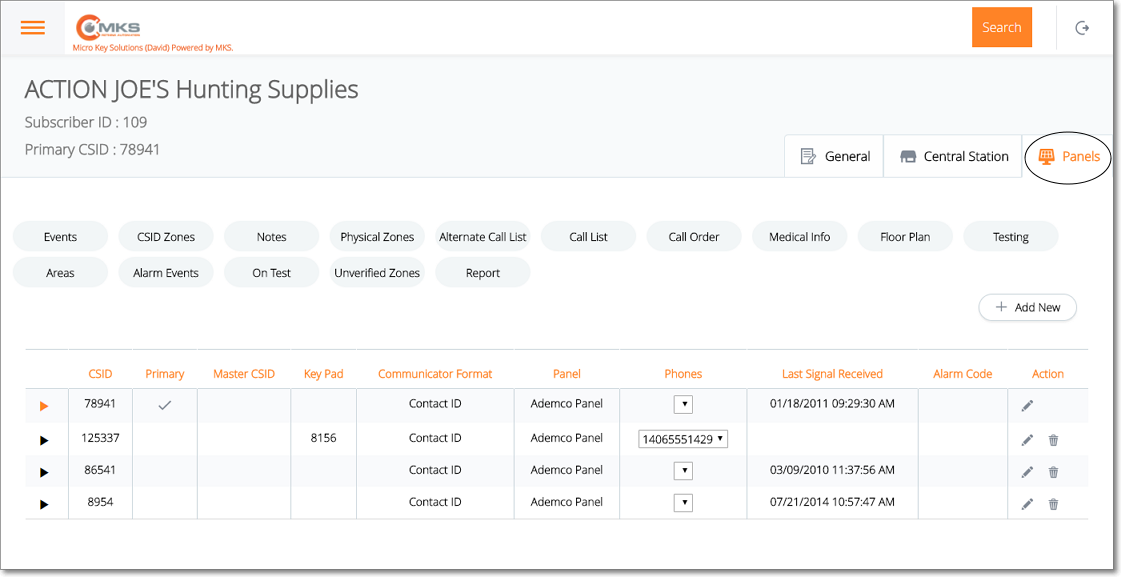
Web Dealer Access - Subscriber Information - Panels tab
•The Panels tab contains the list of the CSIDs which are being monitored for this Subscriber; and (among other options) has a Medical Info option.
✓On the Panels tab Tap or Click on the Medical Info option.
✓The Medical Info option is not CSID specific because it identifies a resident (Client/Patient) at the premises.

Web Dealer Access - Subscriber Information - Panels tab - Medical Info option
✓Once you have finished using the Medical Information page, Tap or Click on the Panels tab to return to it.
❑Understanding and Using the Medical Information page:
•This Medical Information page provides three features:
A.List - The list of the Client Names who have Medical Information entered
B.Actions - Ability to Edit and/or Delete a previously defined Medical Information record.
C.Add New - Ability to Add a new Medical Information record
A.List - List of Medical Information has several columns
a.Serial Number - The ID for this Client
b.Patient Name - The Client's Name who has Medical Information entered
c.Action - Special purpose Icons (see B. below).
B.Action - Offers an Edit (select to update existing Medical Information), and a Delete (select to remove this Medical Information entry) option
1.Edit - Tap or Click  to open the Medical Information page
2.Trash - Tap or Click  to remove this Medical Information entry.
C.+ Add New - Tap or Click this button to open the Medical Information entry page.

Web Dealer Access - Subscriber Information - Panels tab - new Medical Information entry
❑Entering a new Medical Information record for a Client:
•There are four (4) tabs within the Add Medical Information page with the Details tab selected by default.
1.Details - Basic Patient information is entered
2.Doctor Info - Contact information is entered for their Physician
3.Hospital Info - Location and Contact information for Hospital in which Physician has privileges
4.Medications - Medicine, Allergy and related information
✓Tap or Click + Add New to start a new Medical Information entry.
•Details tab - See the illustration above.
✓Patient Name - Enter the name of the individual (Client) for whom this emergency medical response service information is being entered.
✓Date of Birth - Click the Calendar button to open the Drop-Down Calendar/Date Entry field to enter their Date of Birth.
✓Lock Box? - Check this box if there is an external Lock Box installed containing the keys to the premises.
✓8 - Pin Jack? - Check this box if there is an 8 - Pin Jack for an EKG connection available on the premises.
✓Lives Alone? - Check this box if the Client lives by themselves.
✓Paid By - Click the appropriate button
▪Self - The Client identified here.
▪Friend - A friend of the Client identified here.
▪Relative - A Relative of the Client identified here.
▪Agency - An Agency indicates an Insurance Company, Medicare or Medicaid.
▪Other - Some other person or entity who is responsible for the Client identified here.
✓Gender - Click the appropriate button.
✓Key Location - Identify where the Client normally keeps the Keys to their Premises (or the location of the Lock Box, if installed).
✓Save - Tap or Click the Save option to record any changes or updates to this information.
▪A confirmation message will be displayed when the changes have successfully been posted to the database.
▪Tap or Click the OK button to continue.
▪You will be returned to the Medical Information page and this Patient will be inserted in the list.
✓To define information for the other tabs:
▪Tap or Click the Edit Icon next to that Patient
▪Choose the appropriate tab
•Doctor Info tab - Unless they have a specific medical condition that dictates a Specialist should be listed, enter their Primary Care Physician's name, address and contact information.

Web Dealer Access - Subscriber Information - Panels tab - Medical Information - Doctor Info entry
✓Name - Enter the full name of the Physician
✓Address - Enter the office address of the Physician
✓City - Enter the city in which the office address of the Physician is located
✓State - Enter the State Code in which the office address of the Physician is located
✓Zip - Enter the Zip Code of the office address of the Physician is located
✓Phone - Enter the appropriate Telephone Number that is best used to contact this Physician.
✓Fax - Enter the appropriate Telephone Number that is best used to send a Fax to this Physician.
✓Update - Tap or Click the Update option to record any changes or updates to this information.
▪A confirmation message will be displayed when the changes have successfully been posted to the database.
▪Tap or Click the OK button to continue.
▪You will be returned to the Medical Information page.
✓To define information for the other tabs:
▪Tap or Click the Edit Icon next to that Patient
▪Choose the appropriate tab
•Hospital Info tab - If possible (and they have an Emergency Room) enter the Hospital's name, address and contact information for the Hospital that is closest to the Client's premises.

Web Dealer Access - Subscriber Information - Panels tab - Medical Information - Hospital Info entry
✓Name - Enter the full name of the Hospital
✓Address - Enter the office address of the Hospital
✓City - Enter the city in which the office address of the Hospital is located
✓State - Enter the State Code in which the office address of the Hospital is located
✓Zip - Enter the Zip Code of the office address of the Hospital is located
✓Phone - Enter the appropriate Telephone Number that is best used to contact this Hospital.
✓Fax - Enter the appropriate Telephone Number that is best used to send a Fax to this Hospital.
✓Update - Tap or Click the Update option to record any changes or updates to this information.
▪A confirmation message will be displayed when the changes have successfully been posted to the database.
▪Tap or Click the OK button to continue.
▪You will be returned to the Medical Information page.
✓To define information for the other tabs:
▪Tap or Click the Edit Icon next to that Patient
▪Choose the appropriate tab
•Medications tab - Identify the Medicine, Allergy and related information, as appropriate.

Web Dealer Access - Subscriber Information - Panels tab - Medical Information - Medications entry
✓Medications - List as many medications, vitamins, over-the-counter drugs and herbal supplements that this Client takes on a regular basis. Basic text enhancement formatting is available.
✓Allergies - Enter all known allergies for this Client, or indicate that there are none known. Basic text enhancement formatting is available.
✓Diagnosis - If this Client has one or more specific medical conditions that should be known to an Emergency Responder, enter them here.
✓Language - Enter the preferred Language for the Client, and a secondary language, if available.
✓Meds Location - Enter where the Client normally keeps their medications (up to 50 characters).
✓Update - Tap or Click the Update option to record any changes or updates to this information.
▪A confirmation message will be displayed when the changes have successfully been posted to the database.
▪Tap or Click the OK button to continue.
▪You will be returned to the Medical Information page.
✓To define information for the other tabs:
▪Tap or Click the Edit Icon next to that Patient
▪Choose the appropriate tab