❑Using the Schedule Button to assign a Technician to a Work Order and then to Schedule it
•First things first: Who should be Scheduled to perform the tasks required to complete this Service Request?
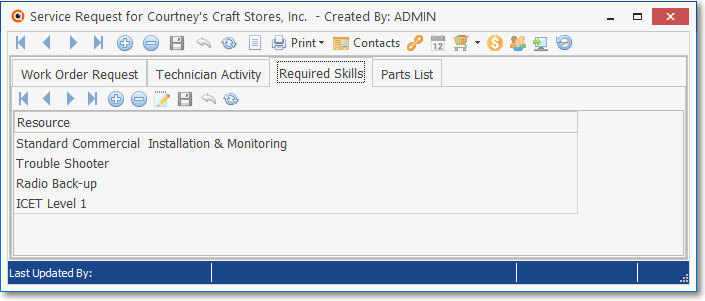
Required Skills tab on the Work Order Form
1.Before using the Schedule Icon or working within the Scheduling Drop-Down Information Box, if this Work Order requires any specialized Technician Skills, identify those required Skills within the Technician Skills tab (as illustrated above).
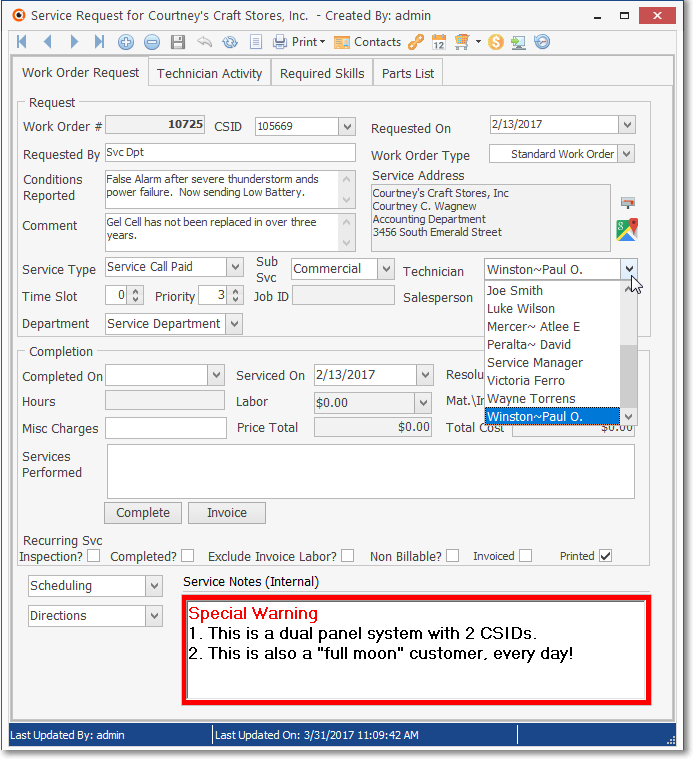
Work Order Request tab - Technician (Tech) field
2.Tech - When ready to assign this Work Order to a Lead Technician, use the Drop-Down Selection List in the Tech field on the Work Order Form and Choose the appropriate Technician (as illustrated above).

Scheduling Drop-Down Info Box - Work Order Not Scheduled
•If no Scheduling Information is shown (as illustrated above), one of two cases exist:
3.It has not been scheduled (be sure to do so!).
4.You are not yet using the Technician Scheduling feature (why not?).
➢Note: For information about the adjacent Labor and Inventory\Materials options, see Completing a Work Order.
•Schedule - Before accessing the Schedule button, be sure to assign a Technician to this Service Request.
✓Once the Technician is selected, Click the Schedule button to set an Appointment for the Currently Selected Work Order.
![]()
Work Order Form - Schedule Icon
✓Search Tech - Select the appropriate Technician using the Search Tech dialog
![]()
✓The Technician Scheduling Form will now be displayed for the Selected Technician and will show that Technician's schedule for Today.
❑Enter the appropriate Scheduling Information
➢Note: A review of the Technician Scheduling Form's chapter is recommended at this time.
•When the Technician Scheduling Form is opened:
✓The assigned Lead Technician's Schedule for Today will be displayed.
▪This selection of Today may be changed to a different Date by accessing the Drop-Down Calendar/Date Entry field in the Calendar field to the right.
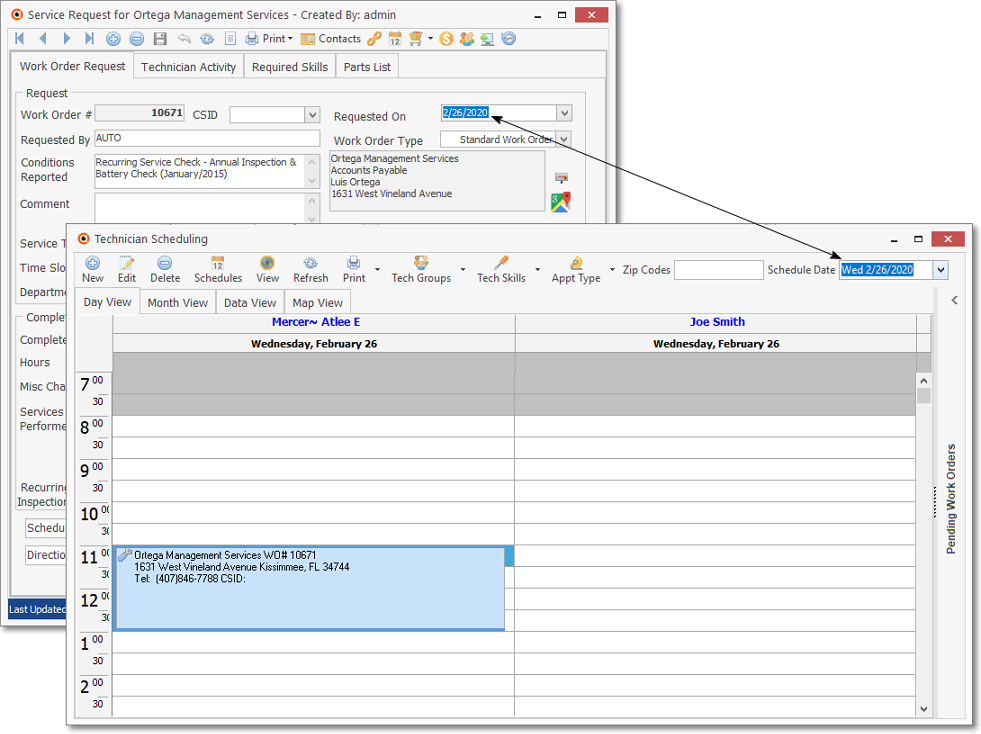
Tech Scheduling Form accessed from Work Order Form's Schedule button
•Once the desired schedule Date is selected:
✓Click on the available Time Slot that is closest to the one requested by the Subscriber.
✓Click the New button (or Double-Click the Time Slot) on the Technician Scheduling Form.
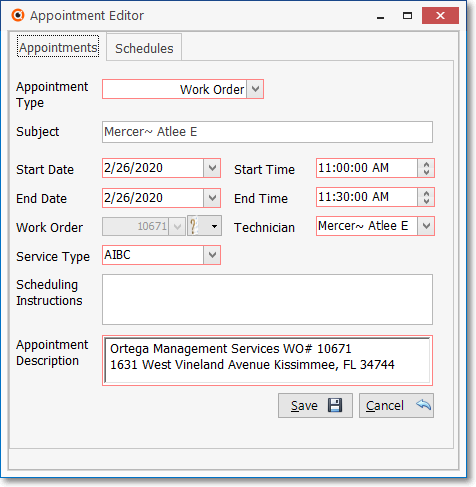
Appointment Editor Form
✓The Appointment Editor Form will be opened with the current Work Order information inserted including:
▪Appointment Type - The Type of Work Order being scheduled.
oThe four possible Appointment Types are listed below:

▪Subject - The Subject (in this case it will be the name of the Technician)
▪Start Date/End Date Start Time/End Time - Starting and Ending Dates and Times
▪Work Order - The Work Order Number
▪Technician - The Employee (BB) code of the Technician
▪Service Type - The Service Type (in this case SERV representing the Service to an existing system is required) that was assigned to the Work Order,
▪Scheduling Instructions - A place to enter any special Scheduling Instructions
oThe instructions should be no longer than 200 characters or they will not be fully shown on the Technician's printed Work Order
▪Appointment Description - The Appointment Description which usually includes the Name and Address of the Subscriber and other related information as defined using the Macro Substitution that is available within the Appointment Description dialog in the Service Options tab of the User Options Form.
➢Note: A review of the Appointment Editor Form chapter is recommended at this time.
✓Click the Save Icon to record the Appointment and Close the Appointment Editor Form.
▪The Technician Scheduling Form will now contain the Service Appointment you've just entered.
▪Click the Close ![]() box to Close the Technician Scheduling Form and the Service Request Form will be re-displayed.
box to Close the Technician Scheduling Form and the Service Request Form will be re-displayed.
•Scheduling Work Order Form on the Work Order Form - The Service Appointment Information that was entered using the Appointment Editor Form will be inserted in the Work Order Form's Scheduling Drop-Down Info Box (see pointer in illustration below) including the Tech name, the scheduled Start and End times, and any special Scheduling Instructions that were provided.
•Click the Scheduling Drop-Down Info Box on the Work Order Form to view the Scheduling Instructions for, and the Technician(s) who have already been scheduled for this Work Order.
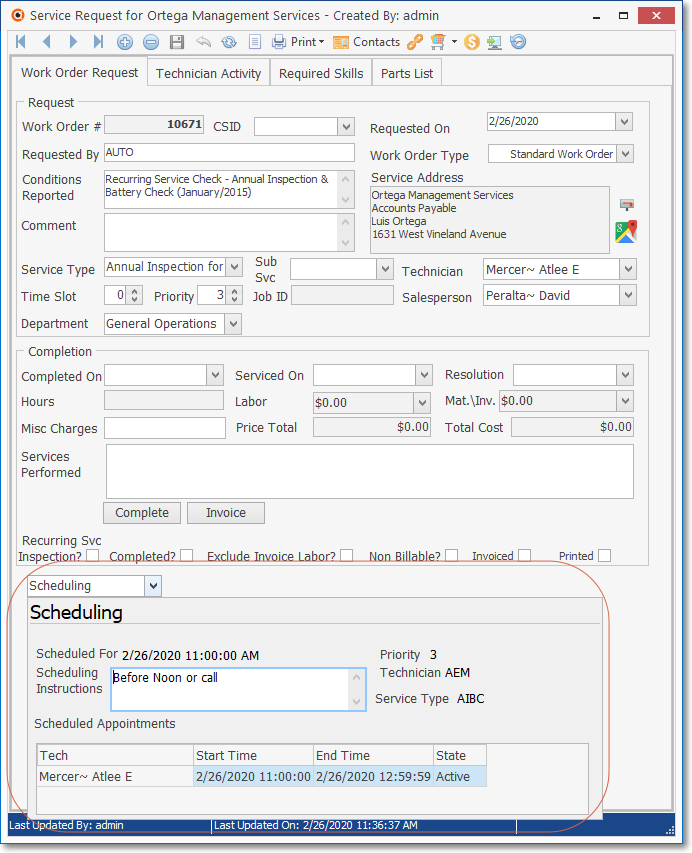
Work Order Form - Scheduling Information
✓Scheduled For - The Date and Time (and Priority Level) of the Appointment.
✓Scheduling Instructions - This information is entered in the Appointment Form on the Technicians Scheduling Form and show here.
▪The Scheduling Instructions may be longer than what will display in this box
▪A vertical scroll bar is available so the User may easy access and view all of those Instructions
▪These instructions should be no longer than 200 characters or they will not be fully shown on the Technician's printed Work Order
✓Scheduled Appointments - More than one Technician may be scheduled to work on this Service Request.
▪All Technicians scheduled for the Work Order will be listed.
▪See the "Scheduling Multiple Technicians" discussion immediate below.
❑Scheduling Multiple Technicians for the same Work Order using the Appointment Editor:
•It is not uncommon to have more than just a Lead Technician assigned to a Work Order
✓This is usually because the Work Order is for a complete system installation, a complex repair, or a major system upgrade.
✓To accommodate this Multiple Technicians requirement, any number of Technicians may be Scheduled for each Work Order.
•To add an additional Technician to an existing (already) scheduled Work Order, open the Technicians Scheduling Form.
✓Make sure that the you make the Schedule visible for the desired new Technician and that person's schedule is being displayed.
✓Using the Calendar Drop-Down Date/Calendar Box, Select the Schedule Date of the Work Order.
✓Select the Time Slot that matches the previously set appointment for the Work Order that needs another Technician assigned, or select a different Time Slot (and even a different Day, if appropriate), based on when that Technician is actually required to be working on-site.
•There are two ways to add an additional Technician to a Service Request that has previously been Scheduled but has not been Completed: but both methods require that you Open the Visible Schedules dialog and add the desired Technician to the Day View tab then Click on that Technician's schedule column.
5.Click the ![]() Icon on the Technicians Scheduling Form to create an Appointment for another Technician for the Work Order Number that has already been assigned its Lead Technician.
Icon on the Technicians Scheduling Form to create an Appointment for another Technician for the Work Order Number that has already been assigned its Lead Technician.
▪Click the Drop-Down Selection List to the right of the Work Order Number field's Question Mark ?

Appointment Editor - New Appointment - Work Order options
▪Set the Work Order Number field for for Open Work Orders
oBy doing so, any Work Order which has not been Completed will be available in the Work Order Number field's Drop-Down Selection List - whether or not it was previously Scheduled.
▪Work Order - Select the Work Order Number that was previously scheduled and to which you want an additional Technician assigned.

▪Complete the Appointment entry as needed.
▪Save the Appointment.
▪The Technicians Scheduling Form will show both Technicians that were assigned to the same Work Order Number.

Tech Scheduling Form - multiple Technicians Scheduled for the same Work Order
▪You may Click the Close ![]() box to Close the Technicians Scheduling Form.
box to Close the Technicians Scheduling Form.
6.On the Technicians Scheduling Form: Drag and Drop a Work Order Number to the appropriate Time Slot of the second Technician.
▪Complete the Appointment entry as needed.
▪Save the Appointment.
•Return to the Work Order Form and Click the Scheduling Drop-Down Info Box to Confirm that this additional Technician was Scheduled.

✓If the Work Order Form was still open, Click the Refresh Icon to get the latest information displayed on the Scheduling Drop-Down Info Box.
![]()
Work Order Form - Refresh Icon
➢Note: For complete information about the adjacent Labor and the Inventory\Materials Drop-Down Info Boxes, read those chapters, and also the Completing a Work Order chapter.