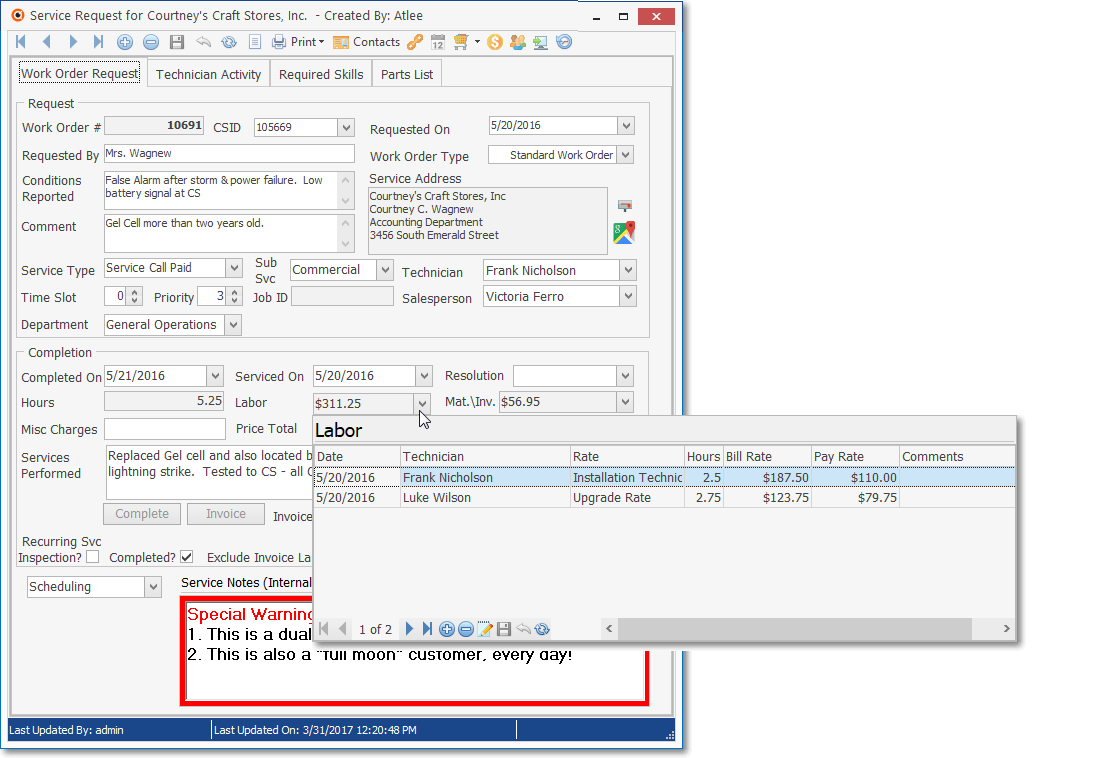
❑Labor Drop-Down Info Box - Click the Down-Arrow on the Labor field at the bottom of the Work Order Form to display the Labor Drop-Down Info Box

Labor Drop-Down Info Box on the Work Order Form
•When the Technician(s) complete the repair, installation, and/or inspection required on the Work Order, the Labor used to accomplish this service work should be recorded.
✓The Labor Drop-Down Info Box is used to
a)Identify the Date the Labor was required,
b)Choose the Technician who performed that Labor,
c)Select the appropriate Rate to be charged,
d)Enter the number of Hours used,
e)Calculate associated Labor Charges for this Work Order based on the information entered above.
✓Labor charges must be recorded here to have them appear on the Invoice when using the Invoice button in the Completion section of the Work Order (for more information see see the "Using the Complete and Invoice buttons" discussion in the Completing a Work Order chapter).
✓The Hours worked that were recorded in this Labor Drop-Down Info Box are automatically added to the Time Sheet Form for that Technician.
➢Reminder: Once this Work Order is Invoiced, you can no longer modify these entries.
❑Recording the Labor required on a Work Order:
• Click the ![]() Icon on the Labor Drop-Down Info Box Ribbon Menu
Icon on the Labor Drop-Down Info Box Ribbon Menu
•Date - By default, this will be Today.
✓If required, (re-)set the Date of Service using the Drop-Down Calendar/Date Entry field.
•Tech - By default, this will be the Lead Technician assigned to the Work Order.
✓Verify that the correct Technician name has been inserted.
✓Use the Drop-Down Selection List to Choose a different Technician, if appropriate.
▪If No Pay Rate was defined for the selected Technician, an Information message is displayed. Click OK!

▪If the Technician has not had their Hourly Pay Rates defined you will be unable to record a Labor entry for this Technician until at least one Technician Rate has been added to their Employee record.
▪To take care of this immediately;
oLeave the Work Order Form on screen,
oOpen the Employee Form (Right-Click on the MKMS Desktop and Choose Maintenance, then Select Employee), locate that Technician
oSelect the Rates tab and enter the required Pay Rate information.
oClose the Employee Form.
▪Return to the (already open) Work Order and enter the Labor information, as needed.
•Rate - Use the Drop-Down Selection List to Choose the appropriate Pay Rate for the service work that was performed.
✓Consider defining a "Warranty" Pay Rate for the Technician which would have the appropriate Internal Pay Rate but a Bill Rate of $0.00
✓In this manner, when Completing a Service Request, the "Cost" and "Hours" of Labor that was required may be properly tracked without adding a charge to the Invoice
✓This No Charge Invoice could be sent to the Subscriber indicating what was done, but that there would be no charges to them for that work.
•Hours - Enter the hours that were required (example: 1.75) for this Work Order.
✓If the current User has Display Rates? box Checked in the Employee Form's Security tab these two fields will be populated:
1.Pay Rate - Calculated by multiplying the Hours by the internal Pay Rate, and displayed by the system.
2.Bill Rate - Calculated by multiplying the Hours by the Billing Rate, and displayed by the system.
•Comments - Click the Drop-Down Arrow in the Comments field to open an edit box where you may enter any note or comment you deem appropriate.

✓Click the OK button when you are finished entering the comment.
•Be sure to also Click the Save ![]() Icon on the Labor Drop-Down Info Box Ribbon Menu
Icon on the Labor Drop-Down Info Box Ribbon Menu
✓The Hours worked that were recorded in this Labor Drop-Down Info Box are automatically added to the Time Sheet Form for that Technician.