❑Special Panel Zone Entries - Certain specialized Panel Zones must exist for each Communicator Format to identify special circumstances.
•Third Edition UL® 1981 Standard 11.1.9 - The automation system shall be able to automatically identify an alarm system as a runaway system (also see 5.47 - Runaway System) when the number of signals from that system exceeds the pre-programmed number wit the pre-programmed time frame; the following shall occur (see Mandatory Condition Codes & Panel Zones, On Runaway Alarm in SPA Setup - System tab):
a)It shall immediately and automatically display a message on the operator terminal; and
b)The message shall indicate"runaway" system and identify the details of the alarm system such as type of signal, account number, location, contact person, and similar information.
•Because each Communicator Format has its own (somewhat) unique set of Panel Zones representing almost all of the Alarm Signals and Events that will be transmitted by that type of Communicator Format, each of these Communicator Formats must also have all of the specialized Panel Zones that are listed below:
✓Panel Zones - The Panel Zones required for each Communicator Format are as follows:
▪Signal ID = A105 Alarm Code = Runaway Alarm OCTAR = Alarm Description = This account has sent too many signals in a short period of time and is classified as a Runaway alarm by UL.
▪Signal ID = A107 Alarm Code = System Messages OCTAR = Alarm Description = No CSID or SI on Alarm Signal
▪Signal ID = A108 Alarm Code = System Messages OCTAR = Alarm Description = Invalid Caller ID (Phone number not in CSID caller list)
oThree Signal ID = A108 records must be entered with the following Physical Zones and Descriptions:
Physical Zone |
Descriptions (add this text to above "Invalid Caller ID" message |
0 |
There is no phone in the subscriber panel |
1 |
There is at least one phone number in the panel |
2 |
There is no account with that CSID Or the account is offline Or the subscriber is a deleted account (Old Subscriber = ‘T’) |
▪Signal ID = A121 Alarm Code = System Messages OCTAR = Alarm Description = Manual Customer Note
▪Signal ID = A127 Alarm Code = System Messages OCTAR = Alarm Description = Invalid SIA package or Unable to process SIA package
▪Signal ID = A128 Alarm Code = System Messages OCTAR = Alarm Description = Temp Note Added/Modified/Deleted
▪Signal ID = A130 Alarm Code = System Messages OCTAR = Alarm Description = Account canceled via Dealer Client or Millennium
▪Signal ID = A131 Alarm Code = System Messages OCTAR = Alarm Description = Account set to offline
▪Signal ID = A132 Alarm Code = System Messages OCTAR = Alarm Description = Account set to online
❑Using the Copy To button feature to duplicate this predefined set of Special Panel Zones for the new Communicator Format:
1.Enter the Name of, and any Comments about it and Save this new Communicator Format.
2.Using the List Icon feature described immediately above, Locate and Double-Click on the Communicator Format from which the Panel Zones are to be copied to this new Communicator Format.
3.This will display the source Communicator Format record
![]()
4.To create the duplicate set of the Selected Communicator Format's Panel Zones for newly created Communicator Format record, Click the Copy To button

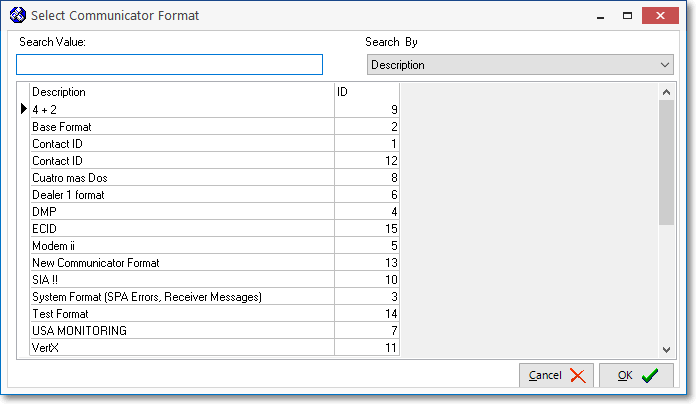
Select Communicator Format dialog
5.Using the Select Communicator Format dialog which will be displayed automatically (see illustration immediately above), Select the Communicator Format to which the Panel Zones of the currently selected Communicator Format are to be copied.
6.Click the OK übutton on the Select Communicator Format dialog and the copying process will be completed automatically.