
|
Reminder ItemsThis Help File Page was last Modified on 01/06/2018 |


|
|
Reminder ItemsThis Help File Page was last Modified on 01/06/2018 |
 Scroll to Top of Page
 Print Topic
 Email Feedback
 Show/Hide Expanders
❑Reminder Items - From the Reminders Form, a User may add a New Reminder Item, Edit an existing Reminder Item, and Complete them when appropriate.
•The available Action buttons on the Reminders Form are:

Reminders Form - Action buttons
❑The Reminder Items Form, is displayed when one of the first three options are selected on the Reminders Form:
•New - Click the New button to open the Reminder Item dialog (shown below) to create a new Reminder Item.
➢Note: Based on where this Reminder Item Form was accessed, that determine the defaults and which fields may, or may not be modified.

Reminder Item documenting a Service follow up
✓User - By default, this will be the currently logged in User name.
▪Use the Drop-Down Selection List to Choose a different User name, if appropriate.
✓and - By default, will be the type of Form (Subscribers or Prospect) currently displayed.
▪If no Form (Subscribers or Prospect) is currently displayed, use the Drop-Down Selection List to Choose either Subscriber or Prospect.
✓= By default, will be the Name of the currently displayed Subscribers or Prospect.
▪If no Form (Subscribers or Prospect) is currently displayed, Click the Search Icon to open the Subscriber (Prospect) Search dialog.
▪Choose the appropriate Subscribers or Prospect record.
✓Date - By default, today's date.
▪Alternately, use the Drop-Down Calendar/Date Entry field provided to Choose a different Date.
a)Click on the Date field and type the desired Date using a MM/DD/YYYY format; or
b)Use the Drop-Down Calendar/Date Entry field provided to Choose the desired Date
✓Priority - By default, the number 5, but using the Drop-Down Selection List, a number from 1 - 9 may be selected.
✓Type - Use the Drop-Down Selection List to Select the Type of Reminder Item this will be.
▪Note - Read the Description (and/or the Subscribers or Prospect Comments area) for instructions.
▪Call - Telephone this Account.
▪Meeting - Attend a meeting - Read the Description (and/or the Subscribers or Prospect Comments area) for instructions.
▪To Do - You have to do this now - Read the Description (and/or the Subscribers or Prospect Comments area) for instructions.
▪Mediate - Read the Description (and/or the Subscribers or Prospect Comments area) for instructions.
✓Description - Enter a brief description of why this Reminder Item was created.
✓Resolution - Displayed but Not available when entering a New Reminder Item.
✓Close Date - Displayed but Not available when entering a New Reminder Item.
✓Post - Click the Post button to save the entry or Cancel to abort the entry.
•Edit - Click on a specific Reminders line item, then Click Edit to update the information on the Reminder Item Form. as described above.
✓Post - Click the Post button to save the entry or Cancel to abort the entry.
•Complete - Click on a specific Reminders line item then Click Complete (see above) by selecting a Resolution and Close Date on the Reminder Item Form.
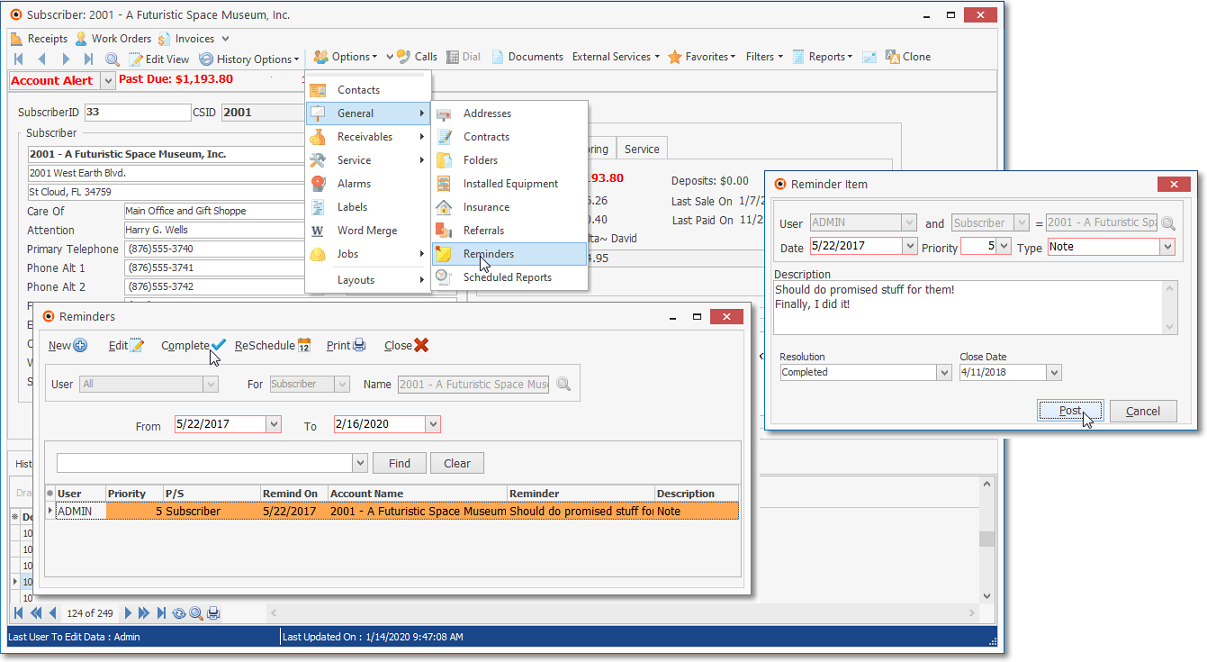
Completed Reminder Item
✓Resolution - Using the Drop-Down Selection List provided, Select a Resolution from the list (explained below) of the Reminder Resolutions.
a.Completed - No more action is required by this User.
b.Rescheduled - Another Reminder Item has been created for further follow up.
c.Note - See this Note for why no more action is required by this User.
d.Sold - Prospect/Subscriber has been sold and requires no more follow up by the Salesperson.
e.Collected - Accounts Receivable Department has received Payment.
f.Sent to Collection - Accounts Receivable Department has determined this Past Due Account is not collectable using in-house procedures.
g.Left Message - See the Subscriber's Comments for reason no more action is required by this User.
✓Close Date - Use the Drop-Down Calendar/Date Entry field to enter the Close Date which identifies when this Reminder was resolved.
a)Click on the Date field and type the desired Date using a MM/DD/YYYY format; or
b)Use the Drop-Down Calendar/Date Entry field provided to Choose the desired Date
✓Post - Click the Post button to save the entry or Cancel to abort the entry.